SlavagodM
15150 0 2
SlavagodM October 14, 2016Specialization: master of interior and exterior finishing (plaster, putty, tiles, drywall, lining, laminate, etc.). In addition, plumbing, heating, electrical, conventional cladding and balcony extensions. That is, the renovation of an apartment or house was done on a turnkey basis with all the necessary types of work.
Restraints are important for the safety of our children
Let me start with the fact that a window opening limiter can imply not only different mechanisms, but also different functions - it all depends on what you are going to limit and why.
For example, you can block the function of fully opening the sash from children so that the child does not accidentally fall out of the window. Or you can install shut-off valves that provide micro-ventilation mode.
Let's look at this in more detail and learn about the types of child locks and devices for air exchange from the street.
Peculiarities
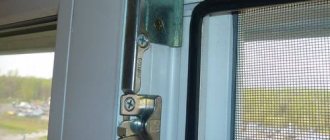
A window stop is a design that allows you to open a window slightly, leaving a small gap and fixing the window sash in a given position. The device received the name “comb” for its external resemblance to a comb. It has several grooves. A rod can be placed in any of them, which allows you to hold the slightly open window in one position, and prevent household members and pets from getting too close to the window opening.
The comb is installed on turning windows, that is, on those where the sash opens exclusively in the horizontal direction. In essence, the limiter allows, if necessary, to open the sash like a window. However, nothing prevents you from installing a comb on windows with a tilt-and-turn mechanism. Its use will reduce the gap formed when the sash opens in the vertical direction.
The design consists of a strip with slots and a window sash position lock (rod). The strip is mounted to the frame, the clamp is installed in the window sash. By installing the latch in one or another groove, it is possible to open the window within 1-10 cm. The opening angle depends on the length of the strip with grooves and the number of them.
The more grooves the strip has, the more precise adjustment of the sash position can be achieved. The standard plank is 10-12 cm in size with 4 grooves.
Manufacturers of limiters usually indicate 2 main functions of the comb:
- ventilation of the room (especially important for windows that do not have supply valves, sashes that open exclusively horizontally);
- protection of the glass unit from damage due to sudden slamming of the sash due to a draft or strong wind.
Ensuring the safety of children and pets is another advantage of the limiter.
By adjusting the position of the comb, the user has the opportunity to open the sash wider or narrower. Thanks to this, it is possible to achieve an optimal microclimate in the room, prevent the formation of condensation on the plastic double-glazed window, without overcooling the room.
You can leave the window in this position even for the whole day (which is especially important in the warm season). By opening the window literally 5-15 cm and using a limiter, you will ensure optimal air circulation in the room. However, it is important to understand that the comb only fixes the window, but in no case is a locking device. Residents of the first floors should not leave their windows open and secured with limiters when leaving the house.
In addition to the obvious advantages, the design also has disadvantages, which are best learned about before purchasing and installing the comb. Installation of the device requires the presence of additional perforations in the profile, which slightly reduces the thermal insulation properties of the glass unit. The sound insulation coefficient is also reduced by 2-3 dB. Finally, the presence of holes leads to a decrease in the strength of the profile and possible violations of the geometry.
If we compare supply valves with limiters, then the latter, of course, are inferior to them in terms of safety and functionality. The operation of double-glazed windows with valves is more convenient, but such products are more expensive.
The limiting elements may differ in the number of grooves. Standard models have 4 slots, but there are also options with 5 slots. In addition, there are several types of combs.
Outdoor
Designed for folding window sashes (for example, vents). It has 3-4 grooves, fixes the sash while ventilating the room.
Built-in
Invisible to the eye analogue of the external comb. In terms of its functioning and number of grooves, this option is identical to the one described above. The difference is the greater aesthetics of the window, since the built-in limiter is invisible.
Constant brake
Perhaps such a name will seem unknown to many, although, perhaps, everyone has come across such mechanisms for sashes. A permanent brake is usually installed on the doors of shops and offices. All a person needs to do is pull the door towards him and open it. No need to close. Thanks to the built-in mechanism, the door will slam shut automatically.
A similar system is mounted on a window, preventing the sash from spontaneously closing or swinging open excessively. Such a mechanism should not be pulled by force when trying to cover the window, as it may break.
Cable limiter
Structurally, it consists of 2 elements, one of which is fixed on the frame, and the second on the profile. They are connected to each other by a metal-based cable (sometimes in a plastic braid). There are models where the cable is replaced with a thin chain. The micro-ventilation function is realized thanks to the short (up to 20 cm) length of the cable.
Unlike a standard comb, it does not allow you to fix the sash, but only holds it , preventing further swinging of the window. At the same time, the cable stop is stronger than the comb and can withstand a breaking force of up to 550 kg (depending on the model).
For protection against children and unauthorized entry from the outside, a cable stopper is more suitable than a comb. For ventilation it is better to choose the latter.
When installed on swing sashes, the limiter can be mounted anywhere in the profile and frame; when mounted on tilt-and-turn structures, only in the upper part.
Handle-lock
This is the most effective limiter that provides protection against children opening the window. It is a metal handle with shut-off valves. There is a lock on its outer part. Opening is done with a key.
Related article: How to lift a plastic window sash
Using the key, you can securely close the sash or give it a folding position. In appearance, such designs are indistinguishable from ordinary handles. The inconvenience is the need to keep the key safe. To do this, find a place inaccessible to children. The use of a key also includes overhead and mortise locks installed on a double-glazed window, as well as a stopper and blockers for sliding windows.
Depending on the material used, there are also several types of combs.
Plastic
This is the most accessible type. It can have several color finishes and goes well with PVC structures. The base is ABS (impact-resistant) plastic. The standard number of grooves is 3-4.
The disadvantages include the lowest strength indicator and, accordingly, a shorter service life. It is not recommended to install such products on windows facing the windy side, since under heavy loads they can become deformed and burst.
Possible difficulties and errors
In general, users believe that the work of installing slopes on such windows is not difficult today, especially with the use of special panels.
However, in practice, novice performers experience difficulties in this work and make many mistakes, after which they need to redo the work again. Otherwise, the slope will have an unattractive appearance and will not be able to protect the surfaces of the walls and windows from atmospheric influences.
The main mistakes made by contractors when installing slopes:
The surface is not prepared for the work: the walls are uneven, dirty, with cracks and concrete sagging.- Mounting strips around the perimeter of the window opening are not installed.
- Heat and noise protection of the slope has not been completed.
- The horizontal and vertical levels of the slope surfaces are not maintained.
- Corner joints are not aligned.
- Incorrectly selected material for slopes, glue, hardware and sealants.
Installing an opening limiter on windows
Plastic windows are particularly airtight, but at the same time they allow you to ventilate the room without any problems. The main advantage is the adjustable level of ventilation, i.e. You can open the window wide open or slightly open the top. This can also save you from accidents, for example, if there are children/animals in the family, they may fall out of a fully open window.
But despite this, some prefer to install a special regulator for guaranteed safety. How to install a limiter on plastic windows and what might it be needed for?
Why do you need to put:
- Good accident insurance. If there are children/animals in the room, then with full ventilation they may fall out of the window.
- Maintains the integrity of the sash. When opened “to the fullest”, a strong wind can move the sash, which can cause it to hit neighboring objects, which can cause unwanted defects or complete breakage of the sash.
- Minimizes harm to plants on the windowsill. Ventilation is not always beneficial for many flowers, because... Due to sudden gusts of cold/hot air, their condition may worsen. In this case, a limited amount of air from the external environment enters the plant, which manages to change the temperature to the average temperature in the room.
- It is more difficult for birds to accidentally fly into an apartment. In the case of a mosquito net, birds can break through it at high speed and end up indoors.
- It is possible to adjust the opening width with a larger differential than without a limiter.
The limiter can be in the form of a comb (most often), as well as a chain or cable.
Installation - step by step process and instructions
To install the comb on a plastic window, you will need to purchase the following items:
- Limiter (comb). There are several variations. Models with the ability to open the window by 2-6 cm are more often found on sale.
- Drill with a 2-5 mm drill (in no case more).
- Screwdriver. Any one will do, but it’s better to rely on the characteristics of the bolts installed on the handle mount. You can find out by moving the plastic valve (you need to pry it with something thin and turn it).
- Pencil or pen.
- Several self-tapping screws.
- You may need a camera (you can use any available camera).
Initially, you need to remove the handle itself, under which a special bracket will be installed. Then it will need to be put in place, so you need to remember the location of all the elements in the required sequence (for convenience, use a camera). Removal process:
- The plastic valve rotates 180 degrees. To do this, you need to pry it off with your fingernail. After a click it turns freely. Installs in its original place without any problems.
- Use a screwdriver to unscrew the bolts.
- The structure is removed.
Then comes the installation of the bracket. Installation is simple - you need to “try on” the bracket, and then install the handle on top of it. Installing the handle is similar to the removal process, but only in reverse order.
Now you can install a comb, which will be the limiter. Be sure to “try it on,” otherwise you will have to install it again, and traces of fasteners may remain in the old place. Mark the area with a pencil or pen (it can be easily erased after installation). Also mark the places where the screws will be inserted.
The comb can then be set aside and shallow holes can be drilled using a drill. Don't be afraid of damaging the plastic, because... With proper marking, defects will not be noticeable. The limiter is put back in place and fixed. Next it is screwed on with screws or self-tapping screws.
You can also do without a drill by screwing in the screw by hand. However, you need to act carefully and try to secure them as best as possible. Otherwise, the comb may fall off, leaving traces in its place, and it will not be possible to reinstall it.
Step-by-step instructions describing the stages
In order for the slopes to be installed as accurately as possible, you will need to carefully prepare the opening site for installation: clean it of dirt and concrete deposits, level and plaster the surface.
Step-by-step instructions for installing slopes:
Perform markings.- Fix a wooden strip to the base with dowels on the near side, away from the glass. This is necessary to make the slope structure more durable.
- For wide slopes, install another rail near the window.
- The starting strip is pressed against the window frame and nailed to the beam with a stapler.
- In the areas where vertical and horizontal planes connect, corner parts with a relief are installed, which allows you to fix PVC elements in them.
- An F-shaped profile is fixed to the rail, which will hold the cladding.
- The corner joints are aligned by trimming the profile using a miter box.
- Using a carpenter's knife, the necessary parts are cut out of PVC elements and inserted into the grooves.
- To install a heat-protective layer, create additional volume using a J-profile, which is placed around the perimeter of all planes. One of its faces must be perpendicular to the base.
- Heat-protective material is placed between them.
- The protective layer is covered with PVC products on top and snapped into place.
Installation of plastic slopes on PVC windows - in the video:
Comb for plastic windows - features and installation of limiters
Plastic windows have long proven their practicality and functionality. One of their main advantages is ensuring tightness. However, this can also be considered a certain disadvantage, because the air in the room must be periodically renewed. So you have to open the windows for ventilation. In winter this is not very convenient, and at other times of the year too. To facilitate this task, the opening limiter of plastic windows is intended, which allows you to open the hinged sash only to a certain angle. This will achieve a normal level of ventilation in the room.
Related article: Grilles for windows that open from the inside
Purpose of the limiter
You can define the device in question. A plastic window stop is a fitting element that allows you to install and fix the window sash in a certain open position. Structurally, this mechanism is a bar with slots, as well as a sash position lock. It allows you to change the position of the open window sash, usually within 1-10 cm. The strips that regulate the degree of opening of the sash are also called combs.
When such a device is installed on a window, the sash will not slam shut due to a draft and will not open completely due to a gust of wind.
What tools do you need to prepare?
The internal and external elements of the slopes must be very precisely cut and fitted to each other with minimal gaps. To do this, you need to choose precise cutting tools.
What to cut: hand and electric saws and jigsaws or a grinder with an appropriate attachment stand out; you can use an electric mini-circular saw with a laser for cutting wood and PVC, which has a 45-degree cut function.
In addition, to perform slopes the contractor will need:
- screwdriver;
- guns for glue and polyurethane foam;
- construction knife;
- measuring instruments: corner, ruler, tape measure, level and pencil;
- sponge roller and brush;
- spatula 5-10 cm wide;
- stapler;
- liquid Nails.
Types of combs for windows
The comb for PVC windows may vary depending on the material of manufacture:
- Plastic stops for windows. They are distinguished by reasonable cost, the ability to choose the desired shade;
Plastic window comb
- Metal regulators. They are more durable and have a higher cost;
- Products combining metal and plastic. For example, the retainer is made of metal, and the comb is made of plastic.
Window opening regulator with metal lockWindow stops also differ in the installation method: under the sash handle and in the overlap (end) of the sash.
Handle combs
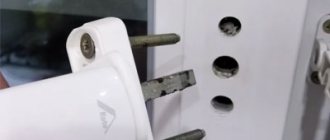
This limiter for opening a plastic window consists of a comb and a pin (clamp), which is secured under the window handle. The comb itself is mounted on a fixed frame. Depending on the design, the comb can be lowered or raised, taking up minimal space in the lowered position. This is the most convenient option. There are also combs that cannot be fully raised or lowered, pressed tightly to the frame. They are less convenient, as they constantly cling to the curtains and create obstacles near the window.
It is better to choose a metal lock for windows, since a plastic product can break very quickly. When choosing a clamp, you must ensure that its holes coincide with the holes for the screws in the handle.
Combs with fastening into the sash overlap
A sash lock of this type is not attached to the handle, but to the end of the sash. The comb itself is traditionally mounted on a fixed frame. The mounting location of such a limiter does not depend on the location of the handle. This makes it possible to place it anywhere. For example, sometimes there is some element of fittings just opposite the handle, so it is impossible to attach the latch under the handle.
The pin is fastened with a long self-tapping screw, which must pass through both internal jumpers of the sash overlap. Only in this case will the fastening be sufficiently reliable.
Important: This opening clamp for plastic windows cannot be installed on wooden sashes. The forces generated on the pin are such that they can damage the wood along its grain.
Setting the limiter
You can install a window stop at any time, including on plastic windows that have been in use for a long time. The design of the limiter provides for this. Especially such a simple mechanism as a comb.
The photo shows the components of the limiter
Tools required for work
To ensure that the protection against opening or closing plastic windows is installed correctly, before installing the comb, you must prepare the following tools and materials for work:
marking tool (pencil);
Tip: If you are installing a limiter in the overlap of a window sash, then additionally look for a self-tapping screw, the length of which would exceed the size of the latch by 3 cm. Having passed through the latch, the self-tapping screw will firmly fix it on the end of the sash.
Installation of a limiter with fastening under the handle
- The sash handle must be removed. To do this, rotate the decorative strip 90 degrees and then unscrew the screws holding the handle.
Installation of the comb
Installation of a limiter with fastening into the sash overlap
- The installation location of the limiter is pre-selected. Since the handle is not involved, the comb can be installed anywhere on the sash.
- A comb is screwed to the frame. For this, self-tapping screws up to 13 mm long are used.
- When the sash is in a closed position, mark with a pencil the position of the latch on the flap of the sash. The latch should be located exactly opposite the comb, but at the same time so as not to interfere with closing the window.
- A latch is screwed to the end of the sash (a hole is first drilled for it).
- The operation of the limiter is checked.
Sealing joints
Even with the most precise cutting of the finishing elements of the slope, gaps still form at the joints. They must be sealed to prevent moisture, cold air and noise from entering the room and the window structure.
In order for this work to be done professionally, you will need to choose the right sealant and strictly follow the seam sealing technology .
What to seal it with?
There are many types of sealants on the market for all types of work, which differ in their characteristics. The most popular types of work for this type of work are silicone, polyurethane and hybrid MS-polymer. Silicone sealants are considered the most universal of them, this is due to their special protective capabilities.
Within the class, they are divided into acidic and neutral varieties, each of which has its own characteristics. For PVC windows, a neutral silicone sealant is better suited, since an acidic one can corrode metal parts and concrete due to the presence of acetic acid in its composition.
The advantages of such sealants when sealing slope joints are:
Temperature range from -30 to +60 C. There are special heat-resistant modifications that can operate at temperatures up to 400 C.- The sealant creates a monolithic seam with excellent elasticity and wear resistance.
- Prevents moisture from penetrating into the window unit.
- It has high noise and soundproof characteristics.
- Biologically safe because it contains a fungicidal additive that counteracts the formation of fungi and mold.
- Large selection of sealant colors.
- Reasonable price.
- Long term use over 10 years.
The disadvantages of such protection include the impossibility of painting it, since paint destroys its structure; in addition, it is almost impossible to apply a new layer of sealant to an already applied layer of sealant, since they will crack and the protection will need to be carried out again from the very beginning.
Quite a lot of users choose polyurethane-based compounds for sealing. They come in one-component and two-component types, the latter being more difficult to use because they need to be mixed before application. One-component is available in the form of a paste-like substance of polyurethane fluoropolymer. Its hardening occurs due to the moisture contained in the air.
One-component polyurethane sealants are characterized by exceptional adhesion in practice to various building materials:
- brick,
- blocks,
- concrete,
- tree,
- glass,
- PVC and metal.
It can be applied to a previously laid layer of polyurethane sealant.
Sealants of this type have many advantages, including:
- High elasticity often reaching 100%.
- Highest adhesion.
- Long term use over 10 years.
- Resistance to mechanical stress; when stretched, it returns to its original state.
- High operating temperature range.
- Can be painted.
- Resistant to weathering and does not corrode treated surfaces.
- The disadvantages include its high cost.
Hybrid MS-polymer sealants are innovative materials in the field of elastomeric building materials; they incorporate the best characteristics of silicone and polyurethane, due to which they surpass all existing sealants in their properties.
The main advantages of MS-polymer materials when working with slopes of PVC windows:
High resistance to atmospheric influences, including UV rays.- There is no smell.
- Easy to apply to treated surfaces, fast hardening speed.
- Environmentally safe.
- The treated surface can be painted.
- Good adhesion to any materials.
- Able to withstand high temperature differences - 40 to 120 C.
- It is not susceptible to and does not create corrosive and oxidative processes.
The disadvantages include a very high price, which limits its use.
Sealant application technology
Once the type of sealant has been selected, prepare the surfaces of the slope for its application - they must be clean and dry.
Instructions for applying sealant to the seams of slopes for PVC windows step by step:
- It is necessary to glue protective masking tape to the window frame and that section of the slope that does not need to be sealed, so as not to cover the surfaces of the slope and the window with sealant and paint.
- Fill the cracks with the selected sealant so as not to leave voids.
- Using a narrow brush, smooth the sealant over the surface to be treated.
- Wait until the sealant hardens completely and remove the protective tapes.
For those sealants that can be painted and can be recoated, after the first coat has dried, apply additional sealant, wait until it dries and paint it the desired color. After the paint has dried, remove the protective tapes.
Disadvantages of combs compared to valves
The plastic window opening regulator, in addition to its undeniable advantages, is not without some disadvantages. They must be taken into account in the decision-making process for installing a limiter if there is a choice between them and inlet window valves:
- This device is not a barrier for small children. It can be easily opened, after which access to the open window will be unlocked;
- If the home is on the ground floor, intruders can take advantage of the opportunity to enter through a half-open window. The comb is easily removed from the clamp, and the window sash opens from the outside;
- If you forget about the slightly open window in the cold season, then there is a high probability of overcooling the room;
- When attaching the sash to the clamp, the noise-proof properties of the plastic window will not be ensured;
Related article: How to replace seals on plastic windows yourself
Compared to combs, window supply valves do not have these disadvantages. Fresh air enters in moderate quantities, and the window itself remains closed.
If you decide to install a sash opening limiter on your window, then follow the recommendations listed above and take into account all the installation nuances. In this case, the stopper will serve you well for a long time, and you will not be disappointed.
How to Install a Stopper on a Plastic Window Yourself
Plastic windows : How to install a Crocodile limiter on a window
PVC?
This note with illustrations tells how to install a crocodile stop on a plastic window yourself, without involving professional craftsmen.
PVC plastic windows are good for everyone, if, of course, they are made and installed correctly. Sound insulation is good, as is thermal insulation. Sometimes the question arises of how to disassemble a plastic window with your own hands. This action may be required when replacing old windows with new ones, or if you need to replace or. Unlike wooden windows, they do not dry out over time and do not require insulation for the winter. Retains a decent appearance for many years. Plastic windows are already everywhere, in government agencies, homes, schools, kindergartens, even in dachas and construction trailers they install plastic windows. Read more about the advantages of plastic windows, installation and selection here.
Plastic windows also have a noticeable drawback. How to properly install a plastic window on a balcony. Which, as often happens, was a consequence of their merits. The tightness of double-glazed windows (the same one that provides both heat and sound insulation) has a bad effect on the microclimate in the room. Measuring and installing a mosquito net on a plastic window with your own hands, photos and videos. Add here synthetic stretch ceilings made of PVC, heavy vinyl wallpaper and you will understand why the rooms can be stuffy and humid.
Window manufacturers offer solutions in the form of a special ventilation valve. But the apartment from the developer most likely will not have such a valve. Just as there will be no other devices that help open the doors not completely, but slightly, for ventilation.
And the developer will not install tilting windows, but hinged ones. In other words, to ventilate the room, you will have to open the window sash to its full width, enjoying the powerful flow of air from the street (often cold, dirty and noisy).
What to do? How to easily and quickly modernize a window on your own? – The answer is simple: “Crocodile” or, in other words, “Comb”. How to properly adjust a plastic window yourself. How to choose and install a child lock on a plastic window. This is a limiter that allows you to open the sash just a little.
Installation rules
The durability, reliability and stability of window blocks depends on the quality of installation of slopes. Slopes provide tightness, heat and sound insulation. If installed incorrectly, the window will not work for a long time and will not be functional, so the owner will soon have to replace it.
When choosing a slope design, it is very important to correctly determine the required modification, which will not only match the size and appearance of the window structure, but will also correspond to the operating temperature conditions. It is also very important to install the slopes technologically correctly.
Rules for installing slopes on PVC windows:
Before installing the slope, foam the gap between the wall opening and the frame.- Before installation, prepare the working surface of the wall; it must be clean and level, and excess foam must also be removed.
- When using material for slopes that do not have adequate heat and noise resistance, an additional layer of insulating material - mineral wool or basalt wool - is laid between the wall and the slope.
- It is important to set the correct angle of placement, which will ensure sufficient sunlight entering the rooms, usually from 110 to 120 C.
- Vertical and horizontal slopes must strictly correspond to the level; deviation in any direction will contribute to the accumulation of condensate.
- In order to achieve the same angle of rotation of the slopes on all windows, it is performed according to a stencil.
- For many types of ready-made slopes made of plastic and metal, a sheathing is prepared in the form of a wooden block, with a slope on one of the edges to firmly fix it near the frame.
- The bars are fastened with self-tapping screws or dowels.
- The starting profile is installed on a wooden block.
- PVC panels are secured with polyurethane foam.
- After connecting the slopes and corners, all seams are treated with sealant.
External slopes need to be done especially well, because if the internal ones can be hidden behind curtains, then the external ones will always be visible.
Requirements for slopes for PVC windows:
- Durability of the material and color coating from UV radiation.
- Resistant to detergents.
- Resistant to abrasion and scratches.
- Waterproof, 100%.
- Low thermal conductivity.
- Environmental safety for external and internal use.
- Biological safety, does not create conditions for the formation of fungus and mold.
- Heat, noise and moisture protection.
- Prevents the formation of condensation.
- Availability on the market and low cost.
- Must have a decorative appearance and match the material of the window frame.
- Should fit any shape of window opening.
- The service life is no less than that of window block frames.