Precisely selected gaps when installing interior doors are the key to durability and proper operation of the structure. The installation of doors is regulated by relevant requirements. One of them is the presence of gaps, thanks to which the leaf closes and opens freely, even if the material swells or the door is slightly skewed. Read the article on how to make gaps.
Rules for forming gaps
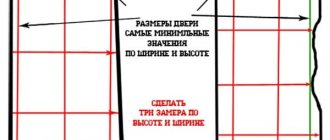
In order to avoid the problem of closing too large or developing small gaps, the door must initially be installed correctly. To do this, you should follow a few simple rules during installation:
- When installing the box, you need to leave 1-2 cm for the initial gaps, because during the hardening process the foam swells and puts pressure on the box. During this process, it is impossible to create the correct gaps.
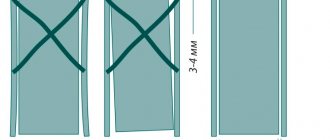
- When the foam has already dried and completely hardened, you can begin to form the gaps. To do this, you need to place a material of the required thickness on the sides and top between the canvas and the box. In the case of a standard box and canvas size, this is 3-4 mm. The best thing in this case is the packaging cardboard from under the door kit. It is just that thick.
- To prevent the box from moving in the opening, it should be wedged.
- Check door balancing. You can use a building level for this. Despite its weight, the canvas should “sit” firmly on the wedges. In this case, the supporting structure should not move when open.
As a result, after removing the wedges and spacers, the door structure should maintain an even geometry, and the gaps should remain in the dimensions that were planned when they were formed.
An option on how to remove a draft
Increasing the lumen
If the clearance is insufficient, the structural parts are damaged by friction.
To fix the problem, the door is removed from its hinges and the old paint is removed. Multi-layer paint coatings reduce gaps. We need to get rid of them. If the door is not painted, the wood is sanded with a chisel or plane to remove some wood in the desired area. Too large gaps between the door frame and the leaf are fraught with a lot of troubles, ranging from an unpleasant squeak when opening and closing, to constant drafts, damaged sound insulation, etc. You can avoid these problems if you correctly approach the installation of the structure, comply with GOSTs, SNiPs and other standards, rules. If you need to correct someone else’s installation mistakes, you can use the above recommendations by reducing or increasing the gap to the optimal size.
Option 1 doors first, then floor
Which laminate or doors first?
If you decide to install the doors first and then lay the floor, you should follow the following instructions.
First of all, all rough work is completed (leveling the floor, arranging slopes, choosing a coating, determining the thickness of the substrate). Next, doors are purchased, taking into account the fact that the floor level will be raised slightly after its installation (you need to measure how much in advance). The main thing is that there is enough distance left to lay the flooring. It is better to leave a small margin of a few millimeters so that the door does not touch the floor.
It is important to take into account that the laminate is laid without fastening to the base. In this regard, the box is placed directly on the subfloor
The laminate is subsequently laid not continuously between rooms, but with separation - up to the threshold and from it.
The trim on the door is installed after the laminate has been laid. There are situations when the doors are already installed and a laminate floor needs to be installed. In this case, much will depend on whether the subfloor will be replaced, or the laminate will be laid on the old floor covering. According to instructions from manufacturers, for a significant number of types of coatings, it is possible to lay the floor on various surfaces - tiles, boards, chipboard, fiberboard, linoleum, plywood. The main rule is that the surface must be flat.
To avoid unnecessary squeaks and noises, a substrate should be laid, which entails raising the floor level by 1 centimeter. In this case, you should determine in advance whether the door will touch the floor. If grazing cannot be avoided, there are two options left - either shorten the canvas or remove the old floor covering. The main thing is to ensure that the floor does not support the door frame. The gap should be such that the door can open freely. Extensions should also be filed down if they touch the floor (if any).
- Inability to damage the floor when installing doors;
- If the doors are not replaced and the old ones remain, this is the only possible option.
The disadvantage is the great complexity of adjusting the door and floor covering.
Features of installing a sliding structure
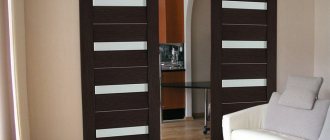
For double doors, the “compartment” option is often used. Sliding structures allow you to save space in the room and look beautiful. The doors move apart in different directions - they look more interesting than the usual swing doors.
The assembly and installation of sliding doors is completely different from the previous version. First of all, you need to buy canvases and an opening mechanism.
Installation steps:
- First, a false frame is installed on the doorway.
- It is necessary to secure the guide rails along which the blades will move.
- Rollers are attached to the upper ends of the doors, with the help of which movement will occur.
- Before hanging the canvases on the guide rails, you need to install the fittings on them. This could be a lock or handles for convenience.
- After installing the fittings, you can fix the rollers into the grooves located on the guide rails.
- The travel stops need to be secured. They are installed at the two ends that guide the rail and prevent the blade from falling out of the grooves. To prevent the doors from swaying when moving, you need to secure a flag roller to the floor.
It takes two people to install the sliding system. It will be difficult and inconvenient for one person to fix the blades on the guide rails.
When installing sashes and guides, it is necessary to leave 1.5 cm of free space between the doors and the floor.
Adjustment
After assembling the sliding doors, adjustments are required. The sliding mechanism has fixing bolts and brackets with screws for changing the position of the canvas. When you tighten the staples, you can raise it higher, and when you loosen it, you can lower it. This way you can adjust both sides of the door. If problems arise with closing the sashes, you need to check the guide elements. Perhaps the fasteners are preventing the rollers from moving freely.
You can order sliding doors with a false wall from door masters. Thus, when openings are opened, they will be hidden inside the wall, which looks even more interesting and completely saves space.
Installing interior swing doors is not as difficult as it might seem at first glance. To carry out the installation yourself, you need to properly prepare the passage, take measurements and follow the proposed procedure. Installation of the sliding structure occurs in the same sequence, only the mechanism is installed differently.
Types of bathroom doors without a threshold
Metal thickness of metal door
There are various types of doors, including those for the bathroom, let us recall some of them: doors made of MDF (undesirable since such doors quickly fail due to swelling from steam), wooden doors (most often manufacturers coat wooden doors with varnish, such a door is suitable for a bathroom because wood has the ability to “breathe”, metal-plastic (the choice of such a door is ideal, it is also not difficult to care for such a door) and glass doors (one of the main disadvantages of a glass door to a room is smudges and stains on the door , which are visible even after the water has dried.
Such a door requires daily care, which can pay off with the unusualness and originality of the door that pleases you). We also now offer a huge selection of types of door coverings that protect against water and moisture. Review of the doors in the video below.
We calculate the dimensions of the door.
As you can see from the photo, to select a door you need to measure:
- height,
- width,
- thickness,
- width of platbands.
The case without a threshold is considered.
So, with the corresponding standard dimensions of the doorway 2080 * 880 (+ - 10 mm and 2080 * 900 - for doors made of solid wood), the door size will be 2000 * 800 mm. To avoid errors during installation, it is recommended to measure the thickness of the walls in different places on both sides. This technique will allow you to choose the optimal and convenient door for your doorway to the bathroom and toilet.
Results
You should attach great importance to the size of the doorway, even if you are completely sure that it is the standard size of the doorway of an interior door. After all, the walls in the bathroom are usually tiled, and you will agree that reducing or enlarging such walls is a very labor-intensive task. Therefore, it is necessary to initially determine the exact dimensions of the doorway and boldly go to choose a door.
If your dimensions are not the standard type of doorway, then many manufacturers agree to make the door according to the ordered parameters. The photo below shows the dimensions of the door leaf and the standard dimensions of the doorway for interior doors.
Advantages and disadvantages of double-leaf models
Double-leaf doors
A practical solution for small rooms, or in the presence of wide interior openings, can be a double-leaf door model. Choosing a suitable option will not be difficult. It is recommended to familiarize yourself with the quality characteristics of the products in advance and carefully weigh the pros and cons of the design.
Advantages of double-leaf products:
- convenience and practicality;
- wide range of variations;
- original stylish look;
- provide a sufficient level of sound insulation;
- possibility of designing non-standard openings.
Double-leaf structures do not have any obvious disadvantages. It is important to take into account the layout features and the size of the room in order to avoid discomfort during operation. High-quality installation of a double-leaf swing door will protect against the appearance of defects, ensuring long-term operation of the product. The installation technology is not complicated, but is based on a certain sequence that requires knowledge and skills.
Door position control
Replacement of upholstery on the entrance door of an apartment
It is important that when installing an interior door, you must constantly ensure that the frame and door leaf are positioned strictly horizontally along the short side and strictly vertically along the long side. To do this, use tools such as a building level and a plumb line.
If this is not done, then your door will either swing open all the time or even “bury” the edge of the leaf into the floor. When installing a door, the level check must be done constantly; the more often, the better the result.
To do this, use tools such as a building level and a plumb line. If this is not done, then your door will either swing open all the time or even “bury” the edge of the leaf into the floor. When installing a door, the level check must be done constantly; the more often, the better the result.
Tools for work
Before installing a new door, you need to prepare consumables and tools:
- building level, tape measure;
- wood hacksaw;
- screwdriver, bits;
- drill, wood drills;
- polyurethane foam, screws, anchors;
- chisel, pry bar, hammer, screwdrivers;
- miter or hand circular saw;
- manual milling machine.
Before purchasing the sashes and frames, you must check the package contents. The door must be supplied with platbands. If they are not available, you need to purchase two sets (for two sides of the aisle). If the walls are thick, you need to buy additional strips.
installation tool, gaps when installing interior doors.
An interior door in a house is always visible and must be used constantly, so its quality and durability depend on its correct installation. Typically, a door is replaced once every decade or when a home is renovated.
The issue of installing a door can be solved in two ways - order a specialist or do the work yourself. Without minimal experience in this matter, it is better to trust the master.
But, if you are confident in your abilities, then you can start installing the door yourself. The procedure is quite complicated, it requires care, accuracy, and thoughtfulness, but if everything is done correctly, the result will be positive.
Self-installation of interior doors
For the most correct and high-quality installation of an interior door, you need to divide all the work into several stages. First, you should dismantle the old door frame and leaf, if necessary.
When the old door is removed, you need to clear the doorway of construction debris, remove insulation, fastening materials, and, if necessary, treat with mixtures or solutions.
Next, the door frame is assembled, consisting of a frame and beams. The assembly technology includes laying on the floor, sawing and arranging the elements.
Particular attention should be paid to the choice of awnings. Since doors are installed for a long period, you should not skimp on the quality of the hanging elements
After installing the hinges, the door is placed in the frame, and it is worth checking whether it fits well and whether there are any distortions.
Tool for installing interior doors
To install an interior door, you need to prepare some manual and electric tools, which are impossible to do without.
The marking of the door block is carried out using a tape measure, a knife, pencils, and a square. A chisel will help to make grooves for the hinges and lock. While working, you will also need hacksaws for metal and wood, a hammer, a nail puller, a drill, pliers, and screwdrivers.
The life of a modern person is greatly simplified by electric tools. To install the door you will need:
- Hammer;
- Cordless screwdriver;
- Electric drill;
- Miter saw.
When installing sliding doors, you cannot do without a manual electric router.
Gaps when installing interior doors
When installing interior doors yourself, you need to remember the gaps. Between the ends of the doorways at the top and sides and the door frame, the gap dimensions should not exceed 20 mm.
A gap of about 3 mm is required between the door and the perimeter of the frame. A gap of one centimeter is left between the floor and the door. These parameters should be taken into account when preliminary preparing the doorway, as well as when measuring and choosing a door.
You should pay attention to the gaps between the floor and the door. Depending on what coating will be applied, the gap can be increased or decreased
For example, if you plan to use thick carpet as a floor covering, then you can increase the number from 1 cm to 1.5.
When assembling the door frame, the following gaps should be taken into account: between the door and the top of the frame (about 3-5 mm), between the door and the sides of the frame (about 3 mm), between the door and the threshold (10-15 mm).
Installing a door with your own hands requires precision, accuracy, and caution. One wrong step can ruin the quality characteristics and service life of the entire structure
Also see:
Useful tips on how to install interior doors yourself
You should not save on materials, because this will certainly affect the further operation of the door. It is better to purchase good equipment that will serve for many years.
And also watch a video on how to assemble and install interior doors with your own hands:
Types of platbands and ways to cover boxes
Platbands can be:
Corner (L-shaped) and overhead casing
Corner ones are installed in the groove of a box block, overhead ones are nailed to the bars with finishing nails or glued (in rare cases).
Overlay platbands can be:
Depending on what kind of casing you have, it can be sawed and joined differently:
Also, depending on the platbands, the door frame bars in the corners are sawn and joined:
I washed down the box bars at 45 degrees and perpendicularly
This is done for symmetry, so that both the box and the casing are cut at 45 degrees; box at right angles and platband. Perpendicular is a little easier.
Now about the necessary tools.
How to take measurements of an opening
In many Soviet apartment buildings, doors to the bathroom and toilet have a standard width of 600 mm. However, you should not take this as an axiom. Before going to the store, you need to carefully measure the size of the opening in a particular residential building, because it can vary depending on the design project of the bathroom.
Measurements are made as follows:
- The height of the opening is measured from the floor (in this case, the finishing must be completed or a reserve must be laid on it) to the ceiling of the opening.
- The width of the opening is measured from wall to wall.
- The depth of the opening, that is, the thickness of the wall, is measured with the addition of a margin for the thickness of the tiles and mortar with which the bathroom walls will be lined (if, of course, the finishing has not yet been completed at the time of measurement). Often the thickness of the walls in the bathroom is less than the thickness of other walls in the apartment and is about 4-5 cm, so even this needs to be measured by yourself.
Doorway parameters
The table below presents data that will facilitate the selection of doors for the bathroom and toilet: the dimensions of the door leaf and the corresponding opening dimensions.
| Canvas, width/height, mm | Opening, width, mm | Opening, height, mm |
| 550x1900 | from 590 to 650 | from 1950 to 2000 |
| 600x1900 | from 640 to 700 | from 1950 to 2000 |
| 600x2000 | from 640 to 700 | from 2050 to 2100 |
Species diversity of designs
The design of a doorway can affect the design of the room as a whole, so it is very important to choose the optimally suitable product. Initially, you should familiarize yourself with the types of double-leaf door designs.
There are several general categories that are distinguished according to certain parameters:
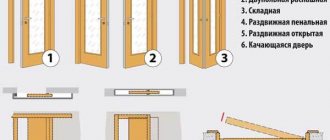
- The general principle of operation (swing, sliding, pendulum).
- Manufacturing materials (wood, MDF, plastic, aluminum, glass).
- Type of construction (panelled solid, or glazed, massive).
The door frame can be purchased or made by yourself. In the latter option, you will need to take into account the color scheme of the canvases, platbands and boxes, selecting materials strictly to match. The dimensions of the parts must correspond to the dimensions of the opening. The choice of fittings must take into account the direction of door opening, which will protect you from difficulties during installation in the future.
A gap has formed between the double interior doors. How to fix
As I understand from your explanation, when your doors are closed, there is a large gap in the middle between the two door leaves. Apparently, an error was initially made when assembling the door frame and door panels. The door installers played it safe and made a gap between the leaves in the center larger than required - 5 mm. Any tree is a living material and it, as they say, “breathes,” that is, increasing or decreasing its size, albeit minimally, depending on the humidity of the room where the doors are installed. In winter, when the heating is on, the wood dries out and increases the gaps between the sides of the frame and the door leaf. In the summer, when the heating is turned off, in the fall, when there is an excess of moisture in the atmosphere, the door leaves “swell”, absorbing moisture from the air and seem to increase in size and reduce the gaps and cracks between the door leaves. This is how approximately 2 - 3 mm of door leaves “walk” (that’s why a technological gap of 5 mm is needed when assembling the door frame and hanging the door leaves.
Ways to eliminate errors associated with unreasonably inflated gap sizes between door leaves:
- The most radical and rather labor-intensive method that requires certain professional skills is to dismantle the door frame with door leaves and reassemble the entire structure. To do this you need to: dismantle the door frame by unscrewing the fasteners that secured it to the doorway of the wall. Disassemble the door structure by removing it and unscrewing the door panels from the hinges. Disassemble one of the sides of the box, separate the top jumper and the bottom, if there is a threshold, from the side post installed at the height of the box. Reduce the upper and lower lintels to such a size that when installing the door leaves in place, still on the floor, during assembly, the gap in the center when the door leaves are closed is no more than 5 mm. After this, put it in place and reassemble the door frame in the reverse order. Attach the side post of the box in place. Hang the door panels and check the gap again. Place the box in the doorway.
2. Without removing the frame and door leaves, place a strip on the ends of the door leaves or on one door leaf that matches the thickness of the door leaf, matches the color, or, on the contrary, contrasts with the finish of the door, with the expectation that the gap in the center of closing the door leaves will also be 5 mm.
3. Stuff such a strip, having previously removed the door leaves from the hinges, under the same dimensional and decorative conditions, onto the side posts of the frame, evenly onto two or one post of the frame, but of a larger size, and then rehang the door leaves, making sure that they are in the center again should be 5 mm.
4. But choose a strip on one side of the double-sided door - a lining of a size that would completely cover the large gap you don’t like between the two door leaves in the center. The flashing strip is installed on the side of the door leaf where the door opens, that is, when opening the door it does not interfere, but when closed it closes the gap and, as it were, serves as a kind of limiter for the movement of the door in the opposite direction.
All these options are enough to avoid spending money on completely replacing your doors.
Good luck. Specialist with 30 years of experience, Vladimir Gor.
Preparatory stage: dismantling the old door
Removing the old door
Installation of double-leaf interior doors begins with preparing the opening and dismantling the old door. Before removing the box, remove the fabric from its hinges. For dismantling, you can use a crowbar, hammer and screwdriver. Next, the surfaces of the opening are cleaned from the unnecessary layer of cement and polyurethane foam.
If you need to expand the space, use a hammer drill or grinder. The edges should be carefully leveled using plaster. You can reduce the opening by using lumber and drywall. At the stage when the dimensions correspond to the required dimensions, construction waste is removed.
High-quality installation of double-leaf interior doors is possible provided that the opening surface is smooth and even. The walls should also be at the finishing stage. Otherwise, the box will fit under the unevenness and stand out from the plane.
We insulate the gap
There are many options for how to close the gap between the door and the frame. Before insulating the canvas, you need to decide how much to reduce the gap.
Through the cracks, which are mandatory, it often blows, they do not provide sound insulation. In addition, the seal eliminates door slamming. When choosing a sealing material, it is worth starting not so much from aesthetics and ease of installation, but from insulating qualities.
Materials for sealing cracks:
- Sealing (heat insulating) strip.
- Silicone mass.
- Other options.
Each method is used depending on where the door is installed and the size of the gap.
Sealing tapes (self-adhesive)
The bands can be rubber or plastic. Regardless of the material, they are inexpensive and easy to install. It is easiest to work with self-adhesive strips. On one side they have an adhesive layer, which, provided the surface for gluing is prepared, adheres tightly.
Double sealing “self-adhesive”
There are tapes of different thickness and width. They can cover gaps of different sizes. Their only drawback is that they need to be replaced over time, especially if the door is constantly closed. In this case, the tape is compressed and reduced in size - this impairs its functionality.
Installation:
- Clean the installation site from dust and degrease.
- Measure the required length of the tape, cut it with a small margin (up to 1 cm).
- Separate the protective film by 5–10 cm.
- Apply the tape to the door frame, it is best to start from the top from the corner.
- As you gluing, remove the protective paper.
- Press the tape tightly during installation.
In places where hinges are mounted, it is necessary to glue it to the front surface of the stopper or to the inner surface of the canvas. In the corners, the joints of the tape should be clearly trimmed.
Strips without self-adhesive
Their qualities are the same as the first type, the only thing they do not have is a self-adhesive layer. This makes them somewhat cheaper, and these options also have a different installation method.
Tape installation sequence:
- Clean the door frame from dust.
- Measure the required length of the tape.
- Close the door, in this position, place the tape on the jamb so that it fits tightly to it, even resting against the door.
- Nail to the jamb using short nails.
Thus, the door frame is completely upholstered. The distance between nails is no more than 10 cm.
Insulation without self-adhesive
Silicone paste
Or, more simply, construction silicone. It is sold in small tubes, transparent or white. To apply the composition you need a special gun, which can be found at a hardware store. The process of how to seal cracks with silicone:
- To prevent contamination of the door surface, you must first coat the areas where work will not be carried out with Vaseline.
- Insert the tube into the gun.
- Trim the tip so that the thickness of the silicone strip when extruded is slightly greater than needed to seal the gap.
- The gun should be held at a 45 degree angle to the jamb.
- Gently pressing the gun lever will begin to push the silicone out of the tube.
- The movement of the gun should be smooth so as not to squeeze out excess.
- After completing the treatment of all surfaces, close the door and wait until the silicone dries. The specific drying time is indicated on the tube with the material.
- After the time has passed, open the door and remove excess silicone.
Sealing joints in this way is convenient, because the silicone will take the shape it needs.
Other methods
Among them:
- Stuffing wooden glazing beads (thin slats) in places where there are cracks.
- Stuffing strips of felt or other dense fabric.
- The threshold can be insulated by stuffing a strip of soft rubber, special silicone curtains or “brushes” along the lower edge of the door leaf. The latter option will not only provide thermal insulation, but also maintain ventilation in the room.
Installing a double door
Now it's time to install a double door. It takes two people to work!
Having installed the box in the opening, we secure it with spacers made from the remains of the same door bars or wood. We fix the box in the opening approximately as in the picture (you won’t get it so beautifully, but it doesn’t matter, the main thing is to fix the box). This is quite a difficult job.
Fixing the door frame in the opening
Having placed the box as level as possible (from all sides and from the inside too!), we drill holes in the box right through and a small recess under the head of the screw (here you will need drills, one slightly thinner than the screw, the other as wide as the head), so that the head fits into the box.
Fastening the box with screws through and through
If the wall is concrete, then we mark the places where the screws will be screwed in. We remove the box and drill holes for the dowels. We install the dowels and the frame in place, tighten the screws, use self-tapping screws about 100 mm long, first fix the frame and hang the door leaf. It is important that the screws are tightened and do not stick out and damage the canvas.
We check whether the door leaf closes; if not (most likely not), we move the frame further into the level using wedges and tightening or unscrewing the screws. We ensure that the door closes well and tightly and that the necessary gaps are maintained.
When the door is open, you can relax a little and get to the fun part.
Gaps between the leaf and the frame of standard doors
What gap should be left if we are talking about a standard door leaf with a height of about 200 cm and a width of 60 to 90 cm? In such cases, it is generally accepted to leave mandatory gaps up to 5 mm wide. Moreover, 3 mm gaps are usually sufficient. Leaving 4 mm or more is advisable only for rooms with high humidity and for doors made from materials that are known to absorb moisture well.
A gap of at least 2 - 2.5 cm should be left between the interior door leaf and the floor to ensure natural ventilation. A gap of up to 4 cm is allowed for convenient and safe swinging of the door.
Where are double-leaf (double) doors used and where to install them?
You can install double doors wherever your heart desires. But, there are a couple of conditions: the doors must correspond to their intended purpose, that is, external doors must be installed outside, and interior doors must be installed indoors.
The second condition is the width of the opening where you install the door. If it is double, then there are no problems, but if it is single, then it is necessary to widen the opening. Here you need to be careful, since this is a redevelopment and expanding the opening from a single or one-and-a-half to a double, especially in a load-bearing wall, is necessary after agreeing on the redevelopment and the appropriate permission from the BTI.
Expansion of a doorway in a load-bearing wall requires permission and appropriate strengthening of the opening
Let's assume that you have a double doorway, or you have taken all the necessary actions and, with the permission of the BTI, expanded your opening or created a new one. If you have an old double door installed in your old double opening, it will need to be removed first, so let's start there.
Foaming
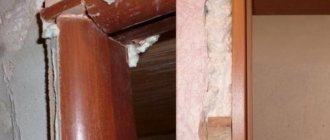
Before this step of installing interior double doors, you should carefully prepare the surface in order to avoid future problems associated with removing the foam. To do this, the doors should be carefully closed with cellophane, and the door frame should be covered with masking tape. When finished, the space between the box and the wall is foamed. After that, within 2-3 hours the mounting foam should dry completely.
It is important that the foam has a low expansion coefficient, otherwise the box may warp.
A few tips for novice carpenters
People say that “the first pancake is lumpy.” Therefore, those who have done the work of installing the box themselves for the first time should not be upset by the mistakes made, which in most cases can be easily corrected.
- An unsightly joint between the laminate and the door threshold can be hidden with a plinth or metal trim.
- If the doorway turns out to be smaller, it is easier to trim the posts and crossbars of the frame, but on the condition that you can adjust the size of the door leaf. Otherwise, you will have to widen the doorway.
- If the width of the casing is not enough for the gap between the frame and the wall, the latter is plastered and then finished with the same material that was used before the door was installed. Therefore, in new buildings, doors are installed first, and then the walls are finished.
- When installing a box made of wood or MDF into walls made of concrete or brick, first drill a hole in the rack with a drill or screwdriver, and then drill the wall with a hammer drill.
- Special mounting systems simplify the process of installing the box - there is no need to use wedges. Detailed instructions for their use are included in the packaging.
- In new houses, the door cannot be attached directly to the wall due to possible shrinkage. Here, first a wooden block is attached to the opening, and a door block is attached to it.
In conclusion, installing a door frame in an opening is not such a difficult job that can be done by yourself in just a few hours. But the effect of this is significant - the family budget will save approximately 3,000 rubles on each door (the average price for installing a door frame by professional builders is indicated).
Sources
- https://ODveryah.ru/montazh/ustanovka-korobki-mezhkomnatnoj-dveri
- https://www.rmnt.ru/story/doors/pravilnaja-ustanovka-mezhkomnatnyx-dverey.1636908/
- https://StroyGuru.com/dveri/ustanovka-dvernoj-korobki-dlya-mezhkomnatnoj-dveri-svoimi-rukami/
- https://materialyinfo.ru/ustanovka-mezhkomnatnyx-dverej-svoimi-rukami/
- https://o-dveryah.ru/mezhkomnatnye/ustanovka-korobki/
- https://dvernoiguru.ru/ustanovka/kak-sobrat-dvernuyu-korobku-svoimi-rukami/
[collapse]
Installing door hardware
A familiar type of door canopies for many is a flag-shaped design followed by a neat inset. There are loops that do not require such jewelry work. Many are the old-fashioned way, they just get cut in!
The canopies are located with standard spacing of 200 mm (the reference point is the edge of the canvas, below). When using the third loop, it is attached half a meter from the top edge.
In the middle.
The canopies are attached to the assembled box taking into account the gaps, with an indentation of 230 mm (the reference point is the upper hinge beam).
We make the cut with a chisel or use a milling cutter. It is important that the hinge flag is flush with both the box and the canvas.
We place the handle at a distance of about a meter from the floor (+200 mm if necessary).
Fitting in fittings
When the box is assembled, it needs to be laid on a flat floor with the flap facing up and the canvas placed inside. Having set the upper gap, you should place a folded hinge between the door and the frame and mark its position with a pencil. The hinges are installed 220–250 mm from the top and bottom of the canvas.
After this, the door is taken back out and the hinge plates are screwed onto a couple of screws using the marks made. This is done in order to carefully trace them along the contour with a sharp sectional blade, cutting off the lamination. After this, the loops are twisted, and a sample is made along the contour lines slightly less than the thickness of the metal plate. Professional installers use a hand router with a jig for this, while a home craftsman has to work with a chisel and hammer.
First you need to beat off the contour with a chisel, installing the tool with the cut of the blade inward so as not to flare the edges. When beating, the chisel should be buried slightly deeper than the thickness of the hinge plate. It is also recommended to make several notches, dividing the cut area into 6–8 fragments. To carefully remove the material, the chisel must be held at an angle where the blade is sharpened, cutting off thin shavings. There is no need to ideally clean the sample; you just need to try on the plate often enough to ensure its uniform depth. When the selections are made, the hinges are screwed with the screws from the kit along the pre-drilled holes.
Locks are cut in at such a height that their handles are flush with the switches. First, the lock body is placed on both sides of the door and holes for the handle drive and keyhole are marked. Their centers must be marked taking into account that the lock will move inside the door by the thickness of the end plate.
Next, the lock is attached to the end of the door with the body facing outward, a knife is drawn around the end plate and sampling is performed according to the same principle as when inserting hinges. Having measured the gaps between the edges of the end plate and the body, you need to mark the mortise pocket on the sample. The bulk of the material is removed with a feather drill. The pen must be centered so that the holes overlap each other by a third of the diameter; the drill must be held strictly perpendicular to the end. After this, you need to trim the remaining partitions with a wide chisel.
The cut-in pocket can be slightly larger, it is only important to leave enough body for attaching decorative handle trims. Having drilled holes for the lock rod and cylinder, insert the lock body into the pocket, secure the end plate and install handles with decorative overlays. To complete the installation, the strike plate is screwed under the latch; it must be placed in such a position that the closed door has no play.
The door catches the frame: how to fix the problem?
If, after installation, the door leaf rubs against the frame, the door closes with difficulty or does not close tightly, it is necessary to find out the reason.
Led the box
In such a situation, the first thing to check is the correct installation and reliability of the door hinges. If they are not the reason, it means that the box was deformed as a result of swelling of the construction foam due to significant temperature changes.
To eliminate the resulting defect, the door frame must be drilled through and connected to the concrete wall using long screws or anchors. The holes are then decorated with plugs.
Led wooden door leaf
In this situation, it is necessary to remove the locking mechanism and lightly sand the end part of the blade using sandpaper secured to a flat wooden block. During the grinding process, the contact of the blade with the box profile is periodically checked. After reaching the required gap, grinding stops, the treated area is tinted and varnished, and the door lock is installed in its place.
Installation
If the work is done without an assistant, it is more convenient to mount the frame without the door leaf and hang the door later. With this method, the frame needs 1-2 spacers, which can be cut from a block or other available material. To prevent the ends of the spacer from damaging the box lamination, wrap them in fabric.
Step-by-step installation of the box is performed as follows:
- Raise the frame and install it in the opening. If the door does not have a threshold, then you need to leave a technological gap between the end and the floor. Its size is 1.5-2 mm. You need to place wood chips of this thickness under the edges of the box.
- To fix the box, drive small wedges between it and the wall in the upper corners (side and top). Check the structure for verticality and horizontality, and for compliance of the edges with the plane of the wall.
- Install a spacer across the opening. Secure the box with wedges next to it.
- Drill holes at two points on the sides to secure the door to the wall. Use a hammer drill to make holes in the concrete and drive capsules of dowels or anchors into them. Screw in the fastening screws.
- Fill the gaps between the frame and the wall with polyurethane foam. Before this process, it is necessary to cover the frame with wide construction tape, since foam can get on its surface. Fill gaps to ½ of their depth: foam expands greatly. It will take 24 hours to cure. The spacer wedges must be cut or removed.
If the width of the box is 3 cm or more less than the opening, then additional installation will be required before installing it. These are bars of the required thickness, which are secured with dowels to the wall inside the opening. After this, install the frame of interior doors with your own hands according to the above instructions.
Eliminating cracks around the door perimeter
Even after high-quality insulation of the door leaf, cold air will continue to enter the home through large gaps between the door and the frame. The easiest way to solve this problem is to use a special seal: thanks to it, you can achieve complete tightness of the door block and significantly reduce the level of heat loss. This material is presented on the building materials market in several varieties, the installation of which is slightly different from each other.
Insulating the door around the perimeter
Self-adhesive tapes
The simplest and most inexpensive option for sealing the door leaf around the perimeter. To make such tapes, rubber or plastic can be used. To simplify its installation, an adhesive layer is applied to one side of the tape. The width and thickness of the tape may vary, which allows you to choose the most optimal option for a particular case. It should be taken into account that this seal has to be replaced periodically (this is especially true for frequently closed entrance doors, which causes compression of the gasket material).
The procedure for installing self-adhesive tape is as follows:
- Preparation of the area to be finished (end of the door leaf). It is cleaned of dirt and degreased.
- Taking dimensions and cutting off the seal. It is recommended to cut the strips with some margin (5-10 mm).
- Gluing strips. It is more convenient to start work from the upper corner of the canvas. The protective film is not removed from the entire segment: 5–10 cm is enough. After this, the tape is applied to the doors and carefully glued, gradually removing the protective paper. During the gluing process, the strip must be pressed tightly.
- The areas where the loops are located are glued along the outer plane of the stopper. Corners must be trimmed carefully.
A cheaper option for insulating tape are products without a self-adhesive base. They are mounted in a similar way; nails or special glue are used for fixation.
other methods
A more reliable option for eliminating cracks around the perimeter of entrance doors is the so-called. "floor planks". According to the type of construction, they are wedge-shaped and external; according to the material used for manufacturing - plastic, metal or foam. They can be replaced with strips of felt, wooden glazing beads, etc. The main thing is to use screws or nails rather than glue as fastening.
Installation of floor strips
Instructions for installation in the opening
Installing an interior door frame yourself does not create any big problems. Detailed instructions are available even for a beginner in the construction business. The step-by-step installation process is as follows.
Step 1. At a distance of 20 cm from the top and bottom of the supporting post, loops are placed and outlined with a pencil. Use a chisel and hammer to select a groove for them. Sometimes the same operation is carried out for the lining under the tongue of the door handle on the opposite pillar, for additional fastening of the frame.
Step 2. The door frame is installed in the opening and secured on the sides with several wedges. The main thing here is to prevent the vertical posts from touching the wall. Otherwise, it will be difficult and sometimes impossible to align the box vertically and horizontally. If the wall is uneven, then you need to navigate by the part that protrudes inside the doorway.
Attention: the threshold is installed only in the doors of the bathroom and toilet. In a box without a threshold, a spacer is placed at the bottom so that when foaming the gap between the wall and the studs, they do not go inside the door. Removes before hanging the door leaf.
Step 3. At this stage, it is important to position the box correctly so that the vertical posts have a perpendicular angle (90o) to the floor along the entire circumference. A plumb line, a level (both tools can successfully replace a laser level) and wedges will help here.
When driving wedges, you need to constantly monitor two things:
- so that the box does not change its position in space or move;
- so that the vertical posts do not bend inward due to high load.
If the box is deformed, the problem is solved with the help of spacers. If this operation does not help, the wedges are gradually knocked out in the opposite direction, removing the load from the beam of the racks.
Step 4. In the selected grooves for the hinges, holes with a diameter of 4 mm are drilled through the box. Wood screws are inserted into them and screwed into a block in the wall. There is no need to wrap them all the way yet.
If the wall is brick or concrete, then a hole for the dowel is drilled through the door frame, after which a self-tapping screw is also screwed in.
Attention: many apartment owners, when replacing a frame in an interior wall made of foam or aerated concrete, screw in self-tapping screws. The accumulated experience suggests that here, too, the best option is self-tapping dowels.
Step 5. Wooden blocks or wedges are inserted near the screwed-in hardware (needed in order, firstly, to give stability to the entire structure, and secondly, to prevent the stand from bending in the opposite direction when screwing the screws in completely) so that the structure stands level. After this, the position of the box in space is checked. If a shift occurs, it is corrected. After this, the screws are screwed in until they stop.
The position of the box is checked again. Here it is better to play it safe than to discover a distortion at the final stage - in this case, you will have to redo all the work.
Step 6. The door frame is attached to the wall with foam. First, the joint on the hinge side is foamed. Work is carried out from top to bottom. The foam is applied evenly. On the latch side, the joint is foamed with a small snake to prevent deformation of the rack.
Step 7. At the final stage, you need to secure the door leaf to the frame. It takes two people to hang it: one screws the hinges to the frame, the other holds the sash. There are a few little tricks here that will make the job easier:
- the hinges are first screwed onto the box;
- It is better to put a wedge under the door so as not to keep it hanging;
- The top loop is attached first;
- When attaching the lower hinge, the upper and then the lower screws are screwed in first. The rest of the fasteners are tightened after the operation of the door leaf is checked;
- along the entire perimeter the distance between the frame and the sash should be 3 mm. If it is necessary to achieve tightness, then glue the seal.
Step 8. The door is closed, after which its position is checked again. If everything is done correctly, the box is attached to the wall in the latch area. The self-tapping screw is screwed in under the bar, but not all the way. A wedge is driven in around it, after which the fastener is screwed in until it stops.
The structure is finally foaming. After the foam has dried, its excess is cut off with a construction knife, an extension is installed if the wall is wide, and platbands are attached.
Foamed gaps.
We looked at how to install a wooden door frame. A door made of MDF is attached in the same way.
There are some differences when installing a metal box made of metal profiles:
- the box is installed in the opening and fixed with wedges;
- its geometry is checked;
- Through the box in the wall on the side of the hinges, two holes about 15 cm long are drilled for anchor bolts. The drill is taken of the same diameter as the anchor;
- Using a hammer with a metal insert, the anchor bolts are driven into the hole. Hit the insert with a hammer until there is a characteristic click, indicating that the anchor is seated on the outer wall of the box;
- The bolt is tightened with a spanner wrench. At the same time, the verticality of the box is constantly checked. If necessary, the anchor is released;
- a similar procedure for installing an anchor, but only one, is carried out from the handle side;
- the door leaf is installed.
The process is very similar to installing a metal entrance door, which you can read about in the work “How to install a metal entrance door yourself?”
In addition, the box can be installed on metal hangers, which are used for lathing under plasterboard and special installation systems, the installation principle of which can be seen in the photo.
Special mounting system.
The procedure for installing the box on the hangers:
- from the outside of the box, three hangers are screwed to the risers using self-tapping screws (two per hanger);
Mounting on hangers.
- the box is installed in the opening and fixed with wedges;
- using a laser level (plumb and level) and wooden spacers, the vertical and horizontal of the box are displayed;
- the ends of the plumb lines are attached to the wall;
- the gap between the wall and the box is foamed about halfway. After the mounting foam has dried, the joint between the door block and the wall is completely filled with foam.
This type of fastening has many disadvantages, and therefore craftsmen who value their reputation do not use this type of fastening in their work.
Box assembly
Most often, the timber for the box is supplied in the form of separate parts that you will need to connect yourself. The door frame is assembled on the floor. To properly assemble the frame, you need to prepare the parts.
Measure the width and length of the canvas. For the door to move freely, you need to make allowances of 5-6 mm when marking the frame parts. This will make it possible to leave gaps between the box and the canvas.
To install the top strip of the box, the ends of the vertical elements need to be processed:
- measure the thickness of the top crossbar at the protrusion location;
- set aside this value from the end cut of the side;
- make a cross cut of the part of the sidewall protruding into the vestibule along this line;
- Using a chisel, cut off part of the material from the end to the cut, leveling the surface of the profile.
After such preparation, you need to try on the cross member to the cut of the vertical sidewall. If the thickness measurement was not made accurately, a gap will form between the edges of the parts. It needs to be eliminated.
Determine the hinge side of the box and mark the hinge locations at a distance of 20 cm from the top and bottom edges. If flat hinges are chosen for hanging the door, make a recess in the narthex. The dimensions and depth of the notch depend on the dimensions of the loop card. When marking the recess on the box, you need to make sure that the hinge pins are directed upward. The hinges can be fastened immediately or you can leave this part of the work for later. Place the door leaf in the frame and mark on it the locations of the hinge parts.
Connect the parts of the box into a U-shaped structure. Use self-tapping screws for connection. They must be screwed through the plane of the vertical parts into the end of the top bar. In order to avoid cracking of the box profile, first make holes at the screw installation sites with a 3-4 mm drill.
The uprights of the interior door frame have a length reserve (about 5 cm). After connecting the parts, you need to measure the opening again and cut off the excess length of the bars. If a wooden box is assembled with a threshold, then it is necessary to prepare the lower ends for installing the crossbar at the bottom, as indicated for the upper strip.
Tenon assembly
Assembling the frame on a tenon is rare - door manufacturers do not want to do unnecessary technological operations that increase the cost of the product. But, nevertheless, you can find them on sale. Assembling such a box is simple: on the floor, the crossbar is inserted with a tenon into a groove in the racks, after which the entire structure in each corner is fastened with a long wood screw, tightening and strengthening the box. It is better to drill a hole for the hardware, but of a smaller diameter.
At an angle of 90o
Assembling the frame at a right angle is the easiest and fastest way to install the load-bearing part of the door block. There are only three operations:
- the posts and crossbar are cut at an angle of 90o to the required size;
Attention: when measuring the racks and crossbar, it is necessary to take into account an important point: the crossbar will be attached to the racks or between the racks and will make allowance for the thickness of the box elements.
- using a chisel and saw, a part of the vestibule is selected (see photo);
- the box is assembled on the floor into one whole. The posts and crossbar are fastened together with self-tapping screws - 2 (in wide ones 3) at each end (see photo).
At an angle of 45o
The connection of the racks with the cross member at an angle of 45o, provided that the ends are cut correctly, looks very beautiful. The technology of work is simple:
- the elements of the box are laid out on the floor;
- the racks and crossbar are measured - no correction is made here for the thickness of the elements, as when assembling at right angles;
- the ends at the top of the box are cut at an angle of 45o. For work, be sure to use a miter box or a circular saw with a rotating mechanism;
- the structure is assembled into one whole;
- the ends are attached with self-tapping screws - two for each.
Gaps in entrance doors
In practice, it is not always possible to initially install entrance doors correctly. As a result, cold air and dirt from the street begin to penetrate into the room. The reasons for this phenomenon may also be subsidence of the structure during operation and insufficient insulation of the canvas itself. How to fix the problem directly depends on where exactly the door is located.
Installation of the second door
This is the most optimal option for increasing the protection of the door block from blowing from the street. After installing the second door, an intermediate vestibule appears: the resulting internal air cushion reduces heat loss by an order of magnitude. If the home is located on the first floor of a multi-storey building, it is necessary to achieve automatic operation of the door to the entrance. Installing a door closer also brings good results.
Installation of a second entrance door
Insulating the front door
The material used for making entrance doors in most cases is steel sheets, which tend to create the so-called. cold bridges. The situation is aggravated by the presence of microscopic gaps in welds and in places where fittings are installed. Due to the fact that almost all metal doors have a void inside, good opportunities for additional insulation open up. As a rule, mineral wool or slab foam is used for this.
- Dismantling protruding fittings (lock, handles, peephole).
- Disassembling the door leaf. If individual sheets were fixed by welding, they are cut off with a grinder.
- Laying insulation cut to size for internal cavities. When using polystyrene foam, the joint areas between the individual slabs and the metal frame must be filled with polyurethane foam.
- Reassembling the structure.
To insulate non-removable panels, internal heat-insulating linings (standard size 1x1 cm) are usually used. They are screwed onto screws around the entire perimeter of the removed door. After tensioning the upholstery, it is additionally fixed in the area of the linings with special nails.
Preparing the opening for installing a door frame
Before installing the door frame, be sure to check the verticality of the wall at the opening and inside it. This is done so that the platband is installed in the same plane with the wall and does not move away from it, and the frame fits into the opening without distortion, otherwise the fastening of the door frame will be defective. For measurements, use a building level with a plumb line.
If deviations of the concrete wall from the vertical are detected, the defect will need to be eliminated using finishing putty. Once the wall near the opening is completely vertical, dry it for 24 hours. Detected deviations of slopes from the vertical inside the opening are corrected in the same way.
Foaming the seams
The entire distance between the box and the opening must be foamed with foam. This is a simple and interesting task, the main thing is to foam the entire space and after drying, cut off the foam with a knife.
The following are the stages of installing extensions, door frames and → locks, but this will be discussed in other articles on the site.
Leave your tips and comments below. Subscribe to our newsletter. Good luck to you and good luck to your family!
Source
Seal the gap at the bottom of the door
As a rule, all entrance doors are equipped with a threshold. Blowing from the bottom is eliminated by increasing its height or decorating the area of contact with the canvas with a special seal. Given the constant contact with water and cold air, it is recommended to use reliable rubber as a seal. An excellent option are special threshold slats of a combined type, equipped with nylon brushes. The presence of a special groove protects the home from the penetration of external moisture.
Installation procedure for the combined threshold strip:
- Cutting the strip and brush to the size of the threshold. It is important to ensure that the overhanging edge penetrates into the opening. You can use a hacksaw as a tool.
- Brush installation. In the correct position, it should exert some pressure on the bar.
- Screwing the brush onto the lower edge of the canvas (away from the home). For this, a screwdriver and self-tapping screws are used.