Door frame assembly.
To accurately assemble the frame, we will assemble it directly along the door leaf. To do this, you need to assemble the elements of the box on the floor together with the door leaf.
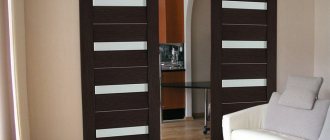
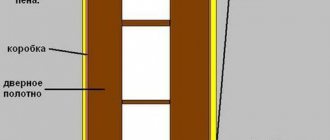
There will be 3 such elements in total. Two vertical strips and one horizontal top. Modern interior doors do not have a lower bar.
We assemble the box along with the canvas.
We lay the door leaf on the frame parts.
Before assembly, you need to decide on which side of the door the hinges will be installed, as well as which side will be the front and which the back. The design of some doors may contain glass inserts that are glossy on one side and matte on the other. Therefore, it is important to decide which side will be glossy and which side will be matte.
Between the box and the canvas you need to set gaps of 3mm and 4mm. MDF plates that come with the door leaf are suitable for this. These plates are 3mm thick and are mainly nailed with metal brackets on the top and bottom of the door leaf. The plates are installed at the manufacturer to protect the ends.
MDF plate 3mm thick.
On the side where the handle will be installed, it is better to set the gap a little larger, about 4mm. This increased gap is necessary to compensate for the expansion of the door when it swells due to increased humidity in the room. Achieving such a gap is quite easy. To do this, you need to stick masking tape onto the MDF plate; it will give the required thickness.
Assembly diagram.
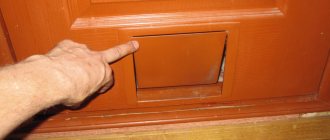
Now we mark on the top horizontal bar the places where we will make the cuts. Then we saw and use a utility knife to remove the excess parts.
We make markings on the top bar of the box.
We make a cut on the top strip of the door frame using a hacksaw. For an even cut, use a miter box.
Use a utility knife or chisel to cut off part of the material.
This way the vertical and horizontal parts of the door frame are joined.
We reassemble the box together with the canvas, setting all the necessary gaps.
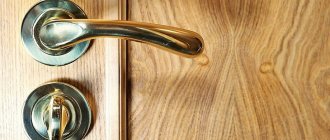
We install the hinges in place. They are installed at a distance of 20-25cm from the edge of the door leaf. It is convenient to use overhead loops in the form of a butterfly. Such hinges do not require special mounting cutouts.
Overhead loops.
Mark with a pencil on the door leaf and on the frame the location of the hinges.
Now you can determine the length of the vertical slats of the box. They should protrude from the bottom edge of the door leaf by 10-20mm. In an installed door, this will be the gap between the door and the floor. This gap will depend on what kind of floor covering will be in place of the threshold. If you plan to lay laminate in this place, then the gap can be chosen to be 20mm, but if there is linoleum, then it is better to make the gap smaller.
The gap between the door leaf and the floor.
We disassemble the structure and cut the vertical posts to the required size.
We mark on the canvas and the box where the screws for attaching the hinges will be installed. To do this, place a loop along the mark that was made earlier and use a pencil to outline the holes in the loop.
We mark the places where the screws are attached.
At this stage, you need to pay attention to which part of the loop is attached where. The loop consists of two parts. When folded, the outer and inner parts are clearly visible. The outer part is attached to the frame, and the inner part is attached to the door leaf.
In the previously marked places we drill holes for self-tapping screws. Holes should be drilled with a diameter of 1.5-2mm. If this is not done, then when tightening the screw, the part into which it is screwed may burst.
You can drill without preliminary marking directly along the loop.
After the holes for the hinges are drilled, you can begin assembling the door frame.
We connect the parts, drill holes with a diameter of 1.5-2 mm and tighten the screws.
Drill holes with a diameter of 1.5-2mm
We twist the parts with self-tapping screws.
Let's move on to the next stage.
Caring for swing door blocks
Swing doors are made from a variety of materials. The price of the door depends not only on this, but also on the built-in fittings and dimensions. In order for the doors to work for a long time and not have any problems, proper installation is initially required, that is, all door elements must be level.
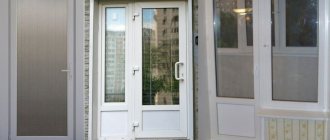
Existing design and construction options for swing interior doors
After installing wooden swing doors, the room should have a moderate temperature and low humidity. If the humidity is high, say, a shower room or bathhouse, then wooden doors should not be installed there. To care for doors, there are many polishing products that will cover the surface with a thin film, protecting the surface of the door block from environmental influences (temperature changes, high humidity). You should also lubricate the hinges and lock in a timely manner. WD-40 or machine oil may be suitable for this. If properly maintained, the interior swing door will last a long time, without deforming or causing problems.
Installing handles, latch or lock on the door.
The handle is most often installed exactly in the middle of the door. Since the height of the door is 2 m, the handle is placed at a height of 1 m. But for ease of use, especially for small children, the height of the handle can be reduced, for example to a height of 95 cm.
Accordingly, the lock is installed at the same height.
Installation of a mortise lock.
To install the lock accurately, you need to know a little trick.
We attach the lock as shown in the photo below. Be sure to drill holes before screwing in the screws.
We fasten the lock.
Using a utility knife, cut out the laminated covering around the lock. This action should be done carefully and slowly, pressing the knife blade well against the lock. As a result, we get a perfect cutout for the front lock bar.
Using a knife, cut along the contour of the lock.
We tear off the laminated coating.
We mark the place for installing the inside of the lock.
The photo shows the marked location for the interior of the castle.
We drill out a place for the lock.
Use a chisel to remove excess material.
Now you need to mark the place for the lock handle. To do this, we place the lock on the side of the door so that the front plate of the lock is flush with the end plane of the door. Mark with a pencil the location of the handle. Markings for the handle must be done on both sides of the door.
Mark the location for installing the handle shaft.
We drill holes according to the markings on both sides of the door. First on one side, then on the other. Under no circumstances should you drill through the door, as the drill may tear out a lot of material at the exit. Therefore, we install a plywood backing in the opening for the lock to prevent the hole from breaking where the drill exits.
Drill a hole for the handle shaft.
We put the lock in place and fasten it with the screws included in the kit.
Latch insert into the door.
The latch is a little easier to install than the lock. First of all, we drill a hole from the end of the door with a feather drill with a diameter of 24 mm. The latch is installed in such a hole quite tightly, and the front strip of the latch completely covers the hole.
Install the latch.
We install the latch in place and make an incision around its face plate with a stationery knife. Then we take out the latch and, using a chisel and a hammer, make a recess under the front strip of the latch.
Using a chisel, select a recess.
All that remains is to drill a hole for the handle shaft. To make such a hole, we will do the same as when inserting a lock. We place the latch on the side of the door so that its front panel is flush with the end of the door.
Mark the hole for the handle shaft.
Now use a pencil to mark the center of the hole. On the other side of the door we do the same and drill holes on both sides.
We install the latch in place and fasten it with self-tapping screws. Before screwing in the screws, do not forget to drill holes for them with a diameter of 1.5-2mm.
Final stages of installation
Instructions on how to properly install an interior door may indicate different procedures.
If the door has a built-in lock, then the fittings are installed first, and then the trim is installed. But another course of action is also possible.
The handle is located approximately in the middle of the door, i.e. with a canvas height of 2 meters, the fittings are mounted at a distance of 1 meter from the bottom edge. With this arrangement, it is easiest to open the door, since there are no distortions. If the door is a hollow structure, or has loose filling inside, then you need to find the place where the frame beam passes. You can detect it by tapping. In most cases, such a beam is located at a height of 90 cm.
Handles on interior doors can be:
- overhead ones, which simply cut in at a convenient height. Typically, such handles are connected by a pin, for which a hole is drilled in the canvas. In recent years, such pens have been used less and less. They are often installed on the doors of children or people with poor coordination of movements, since they do not require any effort to open.
- rotary, with a locking mechanism that prevents the door from opening spontaneously due to a draft.
Installation of fittings Source rusvrnty.beget.tech
Installing the door frame.
The interior door frame can be installed in two ways: using fastening metal plates or using self-tapping screws with a dowel. The figure below shows these 2 methods at once.
Fastening the door frame with mounting plates.
The use of fastening plates, which are used when installing drywall, is only possible if the walls have not yet been finished. It will be necessary to hollow out small recesses in the wall for the plates, which will then be covered with putty.
Fastening with mounting plates.
The plates are screwed onto the back side of the box using 3x13 self-tapping screws with a press washer.
As you can see in the picture above, the plates are attached in the places where the hinges are installed, opposite the hinges and one plate on top approximately in the middle of the box.
Fastening the door frame with self-tapping screws and dowels.
The fastening method using a self-tapping screw with a dowel involves through-drilling the sides of the box. But so that the heads of the screws are not visible, they are installed in certain places. Two self-tapping screws are installed under the hinges, and one self-tapping screw is installed in the place where the strike plate will be located under the latch tongue.
To hide the screws under the hinges, you need to drill holes with a diameter of 3 mm in advance at the place where the hinges are installed, and then drill them out a little to form a small recess for the head of the screw.
Drill holes for the mounting screw.
In the place where the latch tongue will be located, we simply drill a hole with a diameter of 3 mm. There is no need to make a recess under the screw head. At this point, securing the box with a self-tapping screw will be temporary. After fixing the box with foam, this screw will need to be unscrewed. Then the latch striker will cut in here. In this place, one polyurethane foam is enough to fix the frame, and on the side of the hinges, where the door frame will be loaded with the weight of the door, the fastening will be reinforced with self-tapping screws.
Door frame installation.
- We install the box in the opening.
- Make sure that the inside of the box (towards which the door will open) is flush with the wall.
Align the door frame with the wall.
- We wedge the top strip in the door opening and check its horizontalness with a building level. You can use any scraps of boards or door frame posts as wedges.
The top strip is wedged in the doorway.
- We fasten the vertical stand with self-tapping screws from the hinge side.
- We wedge the stand from the hinge side and check the level in two planes (we apply the level inside the box and on its side).
- We fasten the second rack with one self-tapping screw. We check it with a building level. We also make sure that the distance between the posts at the top is equal to the distance between the posts at the bottom.
- We wedge the second rack.
- We hang the door on the frame. The hinges must first be screwed onto the door. It is convenient to hang the door open and place some kind of lining under its edge.
We install a lining under the edge of the door and hang it on the door frame.
First screw on the top loop, then the bottom.
- We check the installation is correct. An open door in any position should not budge. This indicates that it is installed correctly.
- We close the door and install 3mm thick pads between the door leaf and the frame posts. We also install linings at the top of the door. At this stage, the box stand, which was fastened with one self-tapping screw, may be out of place. The gap between the blade and the stand may be too small or large. In this case, we move the stand to the desired position by unscrewing and tightening the screw and wedge the stand again.
- We fill the gaps between the box and the opening with polyurethane foam.
We use polyurethane foam.
Materials and tools
The installation of doors begins with the preparation of tools. For installation work you will need:
- To place the door level, you need a plumb line and a level. For measurements and markings, use a tape measure with a pencil.
- The process of assembling and installing interior doors includes final finishing with platbands and, if necessary, extensions. A hacksaw with fine teeth and a miter box are useful for cutting planks.
- The power tool you need is a drill with a set of drill bits for concrete and wood, as well as a screwdriver.
- It’s easier to make cuts for fittings with a milling cutter, but if you don’t have a tool, you can get by with a chisel and hammer.
The materials used are self-tapping screws, polyurethane foam, and also many wooden wedges of different thicknesses for spacers. You need to immediately decide how to install interior doors so that the fasteners are not visible.
If preference is given to hidden installation, additional hangers are purchased. You can fix the boat with anchors. Sink the caps into secret holes, putty them, and paint over them.
Insertion of the latch response into the door frame.
This work should be performed after installing the door frame, when the foam has hardened.
- Close the door and mark the edges of the latch tab on the frame post.
We draw marks.
- Now we determine at what distance the tongue is from the edge of the box. To do this, you can use a small sheet of cardboard. We insert the cardboard into the gap between the door leaf and the frame until it rests against the latch tongue. Then mark the edge of the box on the cardboard.
- Open the door, place the cardboard on the post of the box so that the mark on the cardboard coincides with the edge of the post. Mark with a pencil the place where the edge of the tongue will be located.
- We attach the mating part of the latch to the rack according to the previously applied marks. This part must be applied in reverse, as shown in the photo below.
We outline the mating part of the latch.
- We mark with a pencil the installation locations of the screws and outline the inside of the part.
- We drill several holes inside the marked outline and knock out excess material using a chisel and hammer.
We use a chisel.
- We drill holes with a diameter of 1.5 mm in the places where the screws will be installed.
- We mount the mating part of the latch.
- We check how the door closes.
Choosing a manufacturer
Belarusian doors
Considering the economic situation in the world, in order to maintain the purchasing power of the population, manufacturers are trying to combine quality and low cost of door leaves. In this segment of commercial products, producers from the following countries are characterized positively:
- Israel - the product is of high quality, sophistication, durability
- Finland - simplicity and lack of decoration distinguish the craftsmen of this country, who give preference to the natural light color of the product
- Belarus - gained popularity with inexpensive, reliable products with a wide variety of design implementations
- Russia - using its centuries-old experience and the latest foreign technologies, they have made their products the most popular in the region. The craftsmen have combined excellent quality, European design, and the lowest price to achieve such popularity.
You need to choose products with proven quality so that the doors can serve for a long time, withstanding mechanical loads.
Installation of door extensions.
Extensions are installed only if the wall thickness is much greater than the thickness of the door frame. If the wall thickness is 2-3 cm greater, then you can do without additional additions, but you will need telescopic platbands. They are made in the form of a corner and allow you to cover part of the wall. In addition, the box must be adapted for this type of platbands; it must have the necessary grooves.
So, let's set the extras:
- Let's start with the top panel. We measure the doorway from the side where the extension will be installed.
We take measurements.
- Cut the additional strip to the required size.
- We install the extension in place and note how much it needs to be trimmed so that it is flush with the wall.
We make markings on the board.
- Cut the extension to the required size.
We're sawing more.
- We install the extension into the doorway and wedge it.
The extension is installed in the opening and secured with wedges.
- We do the same with the side panels: measure, cut and install in the opening.
The side and top panels are installed.
- We apply foam between the doorway and the extensions. At the junction of the extension and the box, we apply a continuous layer of foam. Thus, when the foam expands, it will tightly press the extension to the box. In all other places, foam should be applied pointwise, in small quantities. This volume of foam will be enough to firmly glue the extensions. If you apply a lot of foam, the foam will squeeze the extensions into the inside of the opening.
We foam the space between the extension and the doorway.
Required opening measurements
Installation of double-leaf interior doors cannot take place without taking measurements. But in order to find out the dimensions of the doorway, you need to dismantle the old canvas and remove the moving elements of the decorative covering from the wall.
If the opening is empty, three values need to be determined:
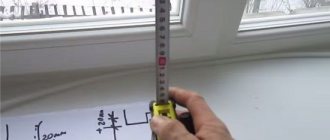
- Height - measured in two places. To do this, the tape measure is placed near the left and right slopes.
- Width - this parameter must be measured in three places: near the threshold, at a height of 80-100 cm and near the top lintel.
- Depth is not a required measurement parameter. However, knowing the width of the walls, it is more convenient to choose a box. Measured in three places, just like the width.
If there are differences when taking dimensions, additional preparation of the passage is required. Depending on the dimensions, a double-leaf design is selected.