Purchasing high-quality interior doors from reliable manufacturers and their correct installation can save the buyer for a long time from product breakdowns and the need for repairs. But despite taking these measures, violation of operating requirements often leads to a number of problems. In this case, it is possible that adjustment of the hinges of interior doors or their complete replacement may be required.
The need to adjust the hinges of interior doors
The service life of interior doors depends 70–75% on their quality.
The remaining share of influence is distributed among the following factors:
- quality of installation work;
- correctness of the adjustment of hidden hinges;
- compliance of operation with established standards (depending on the material from which the doors are made);
- degree of accuracy in using the structure;
- availability of necessary care;
- lifetime.
The hinge adjustment service ordered from a specialist is often expensive. If minor problems arise, for example, with opening and closing the sash, in many cases you can cope with the situation on your own. This does not require special skills.
This also applies to problems such as:
- subsidence of the door leaf;
- spontaneous opening and closing of the structure;
- touching the bottom of the floor covering, etc.
Advantages and disadvantages of products
Before purchasing accessories, you need to consider in detail its pros and cons. Advantages:
- Safety . The hinges that are hidden inside the door structure cannot be knocked out or cut down. Of course, this factor is more useful for input, but in other cases it is also an advantage.
- Stealth . An important feature for interior doors, since ordinary hinges do not always fit into the interior of the apartment.
- Range . The buyer is presented with various accessories for both light canopies and solid massive canvases.
- Large door opening angle . The vast majority of models allow you to open it so that it becomes parallel to the adjacent wall and does not interfere with the passage.
- Durability . They are made from steel or alloys that are highly wear-resistant. Recessing the mechanism inside the box and canvas also provides additional reliability.
Of course, the products have disadvantages:
- Difficult installation . To install, you need to cut grooves of the desired shape and size inside the box and canvas. Not every craftsman has a tool (mill).
- Price . High-quality components are expensive (from 1800 rubles per piece). You can find cheaper products on the market that cost several times less, but their quality will be appropriate. Cheap parts cannot be adjusted.
- Difficult to dismantle. If you need to remove a door, sometimes you have to completely disassemble and remove the hinges.
- Increased volume . In the canvas itself there is usually enough space for fittings, but in a thin box the depth is sometimes not enough.
Advice
Hidden hinges are suitable if you want to carry out high-quality repairs that will last for many years. It is better not to use them for temporary alterations.
Features of hexagon adjustment
For fastening accessories, incl. and door hinges, hex socket screws are often used.
To adjust the equipment using this tool, you need to perform the following steps:
- Select a hexagon that fits the size of the fastener.
- Insert the tool into the recess of the corresponding fitting element until it stops.
- Apply force and rotate the hexagon. Increase the load until torsion is achieved.
Using a hexagon is more convenient than using a regular screwdriver. In terms of technical characteristics, it is 10 times superior to other similar tools. The main feature of the hexagon is its high torsion rate.
How to adjust loops - instructions
Before you begin adjusting the hinges yourself, you must:
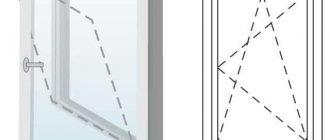
- Find out the cause of the problem. In case of incorrect opening/closing of the door leaf, you should check the vertical position of the elements using a plumb line. To determine the tightness of the fit, it is recommended to place a sheet of paper between the door leaf and the frame.
- Prepare problematic structural elements for upcoming work. It may be necessary to remove the door leaf to gain access to the hinges.
After completing the preparatory work, you can begin the repair. The algorithm of actions depends on the cause of the problems.
Required Tools
Before adjusting the interior door, you need to prepare everything you need. This is necessary for simple and convenient work. You will need the following:
- chisel;
- oily liquid for lubrication of canopies;
- screwdriver;
- plane;
- building level;
- hammer;
- plumb line;
- simple pencil.
If there is a loose fit
One of the most common breakdowns that occur during the operation of interior doors is sagging of the leaf and its loose fit.
This problem is most relevant for heavy and massive structures. Common causes of a door not fitting tightly:
- distortion that occurs at the joints of the loops;
- insufficient depth of hinges into the door frame.
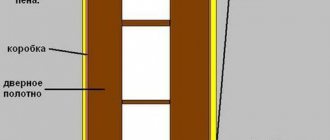
To eliminate the skew, you must perform the following steps:
- Remove the door leaf from the hinges.
- Remove any remaining foam and decorative elements.
- Identify places of distortion using measuring instruments.
- Secure the embedded beams that serve as supports for the door frame. If they are connected at a 45 degree angle, a horizontal screw should be used to hold them together.
- Strengthen the box by screwing in additional screws.
- Fill the resulting voids with polyurethane foam. It is important to take into account that when dried, its volume increases by 2 times. To avoid deformation of the beams, before using foam, it is recommended to carefully read the instructions for its consumption.
- Install doors and decorative trims.
In order not to damage the door leaf and frame, it is recommended to carry out work with great care.
If the problem arose due to insufficient depth of the hinges into the door frame, you will need to tighten the fixing screws as much as possible.
If this measure turns out to be ineffective, you will need to remove the hinges and deepen the niche.
Attention! If the hinges are unsuitable for further use, they must be replaced. In this case, it is recommended to choose fittings of a larger size than the previous one. If the door leaf has a large mass, it is advisable to install a third (additional) hinge. This will help take the load off the two main ones.
Installing different models of handles with your own hands
Installation of a stationary handle
It doesn't take much time to install a stationary handle. If the model is overhead, it is simply screwed to the door leaf with self-tapping screws; for this purpose there are holes in the base. The through model involves preparing a hole into which a threaded pin is inserted, and handles are screwed onto it on both sides. If a handle breaks, you simply need to replace it.
Installing the Latch Handle
To work, you will need a drill with a set of feather drills, a tape measure, a pencil, and a chisel.
Latch Handle Installation Tools
The sequence of work is as follows:
- We mark the place for attaching the handle at the selected height (from 80 to 120 cm from the floor). To do this, measure the distance from the square to the front plate and measure it from the edge of the door. At the end of the door at the same height, mark a point in the center.
- Using a drill and a feather drill of the required diameter, we prepare holes for the square and fasteners. You can make one large hole using a crown, but some models have additional screws that secure the structure to the door leaf, and in this case there will be nowhere to attach them.
- Using a chisel, we make a recess for the face plate. We first deepen the point at the end with an awl.
- Using a feather drill with a diameter of approximately 23 mm, we make a hole of the required length for the latch mechanism.
- We put the latch in place and fasten the face plate.
- We install the square pin and screw the handles onto it. Place the decorative base and tighten the locking screw.
Components of a lever handle with a latch
- On the box, we make a hole for the tongue with a chisel (to accurately determine the location, smear the tongue with oil or toothpaste and turn the closed door handle several times). After this, use a chisel to make a recess for the striker plate and fasten it with screws.
Installing a handle-lock
If a mortise lock with a handle is installed, installation is done a little differently:
- At the end of the door we mark the side contour of the lock. To do this, you can simply circle it.
Components of a mortise lock with a lever handle
- Using a drill and a feather drill of the required diameter, we make round holes close to each other. The depth should correspond to the width of the lock. We take out the outline with a chisel, the lock should fit completely into the hole.
- Using a chisel, we recess the face plate.
Recesses in the end of the door for the lock and face plate
- We make holes for handles and a keyhole.
- We install the square pin and screw the handles.
- If the base is a plank, it should be recessed a little.
- The strike plate is mounted in the same way as for the latch handle, only an additional hole is needed for the lock latch.
You can see the process of inserting the handle-lock in more detail in the video.
Installing a handle on a metal door
If you have already installed a lock on a metal door, installing the handle will not be difficult. The installation process will be the same as for a wooden door, you will only need special tools for drilling into metal. A metal drill will do an excellent job with holes up to 20mm; for larger holes you will need, for example, a cone drill.
Installing a handle on a metal door
Installing a double-sided handle on a plastic door
A plastic door is usually already equipped with technological holes for attaching a handle. We disassemble the handle: turn the decorative plug horizontally and unscrew one handle. First, a square with a handle attached to it is installed, and a second handle is attached to the other side. There are mounting bolts above and below the center that need to be tightened. The last step is to turn the plug masking the fastener into a vertical position. You can also install a lock for a plastic door yourself.
Handle for office, balcony and terrace plastic doors
When opening tightly
The reasons for a tight opening of an interior door may be:
- excessive deepening of loops
- swelling of the door leaf or frame.
In the first case, you will need to adjust the hinges, according to the algorithm of actions described in the previous paragraph, or reinstall the fastening elements.
Swelling of the canvas is a problem typical for wooden structures. To eliminate it, it is necessary to give the door its original geometric shape. The procedure consists of carefully removing part of the solid wood in problem areas using a plane. Then a layer of paint should be applied to the damaged surface.
When opening spontaneously
The reason for spontaneous opening/closing of the door may be improper installation of the frame, namely, tilted forward or backward.
To solve the problem, you will need to adjust its position. When opening or closing the door yourself, you should align the frame vertically. In this case, the beam on which the fittings are installed is subject to adjustment. You should also check the hinges for their alignment.
If the box is installed correctly and the fittings are located on the same axis, it is recommended to replace the hinges with new ones. The reason may lie in their wear and tear.
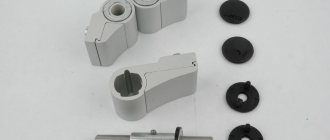
What it is?
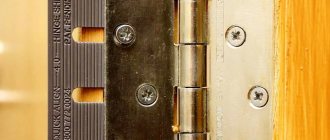
Hidden hinges (also called secret hinges) are installed in special holes that are made inside the door frame and leaf. They provide easy, smooth movement and are not visible when the sash is closed.
Attention
Before purchasing components, you need to know in which direction the sash will open. The fittings can be left or right, there is also a universal type that can be installed on either side of the box.
They are also unregulated and adjustable. Adjustment allows you to even out distortions in the door leaf, various gaps that form during long-term use or due to improper installation. You can install in:
- wooden;
- aluminum;
- or steel structures.
Butterflies
“Butterfly” is one of the varieties of overhead one-piece loops.
It is suitable for doors with low weight. This model got its name due to the similarity of its shape to the wings of a butterfly. Professionals call such a loop a card loop. The butterfly can be adjusted in different planes:
- Horizontally. The work is done using the adjusting screw. You should loosen it a little and level the door. It is recommended to alternately loosen and tighten the screw, checking the result each time.
- Back and forth. You need to slightly loosen the fixing screw on the overhead hinge. Then, by tightening and loosening it, you should align the door.
- Vertically. Adjustment is made using the upper and lower screws on the installation pad.
To perform the work efficiently and achieve the desired result, actions must be precise and accurate.
Hidden
Adjusting the hidden hinges of interior doors does not require dismantling the door leaf.
If you start working immediately after detecting a problem, the adjustable gap can be quickly restored to the required level. If you postpone repairs until a later time, the canvas may shift or begin to sag. In this case, it will be much more difficult to fix the problem.
Work is carried out simultaneously in several planes.
To troubleshoot, follow these steps:
- Adjust the canvas in height, setting a certain gap at the bottom and at the same time maintaining it at the top.
- Adjust the door leaf horizontally, aligning the door with the frame.
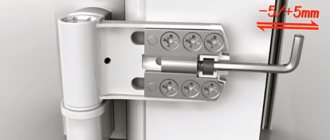
- Adjust the pressure by turning the adjusting eccentric. As a result of this action, the door leaf should be pressed against the frame along the entire perimeter.
The adjustment size ranges from 1 to 5 millimeters depending on the manufacturer.
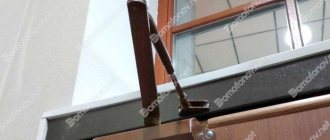
Hinges with closer
Adjustment of hinges with a closer is carried out in three directions:
- Vertically - by loosening the fastening elements located in the side parts of the hinge body and aligning them with subsequent fixation.
- Horizontally - using an eccentric located in the central part of the body.
- In depth - by rotating a special screw located in a groove on the body.
The serviceability of interior doors is influenced by multiple factors. They can lead to problems in the operation of the structure. If you start repairs in a timely manner, in most cases the breakdown can be fixed on your own without additional financial costs. This will require a minimum set of tools. But sometimes repairs may not lead to the desired result. In such cases, a complete replacement of the entire door unit is required. To prevent things from going to extreme measures, it is recommended to regularly carry out preventive maintenance of its operation.
Proper maintenance of fittings
The most important condition for the long service life of hinges is their regular lubrication. In this case, the hinges will not only serve for a long time, but will also stop making squeaks and various extraneous sounds.
Hinges can be lubricated with many types of oil and special lubricants:
- Machine oil is good for lubrication. The effect lasts quite a long time.
- Graphite - you can purchase it at a specialty store, or you can use the lead of a regular pencil. It must first be crushed. The effect is very long-term and reliable.
- Special lubricant WD-40 . Known to everyone for its universal properties for lubrication of both spare parts of equipment and doors. Ideally eliminates squeaks.
- Solid oil - a creamy structure will allow you to lubricate the hinges for a very long time. The disadvantage is that it sticks to your hands and some types have an unpleasant odor.
- Wax - does a good job of lubricating the door. You can also use paraffin from candles.
You cannot lubricate door hinges with vegetable oil - this will have the opposite effect. Dust and debris will adhere to the oil, causing further damage to the hinges.
Doors, like any piece of furniture, tend to lose their original properties over time. They can sag, creak, open on their own and in every possible way disturb the comfort of the home. To avoid this, it is necessary not only to choose hinges for doors wisely, but also to be able to regulate them and carry out preventive measures.