Blinds are an analogue of curtains; they are distinguished by an attractive appearance and certain functional qualities: they regulate the natural light in the room and decorate window openings in the premises. They do not interfere with frequent ventilation and do not take up much room space. Types of fabric textures make it possible to choose a harmonious option for the design of residential and non-residential premises.
Models by type of construction: fabric models are vertical, horizontal and rolled.
Designed for residential premises: houses, apartments, cottages. A person does not always buy a model of blinds in the market. Perhaps you are a creative person or a connoisseur of unique hand-made models, so we will tell you how to make them yourself at home.
Fabric blinds for a children's room
How to make fabric blinds with your own hands
Don’t be surprised, you don’t have to spend a lot of time and money to create fabric blinds by hand. If you want to make exclusive fabric roller blinds with your own hands, for this, prepare:
- a piece of fabric for the canvas; a ruler, scissors; an awl, liquid nails; assembly adhesive, rope (thick thread); a weight for the control thread.
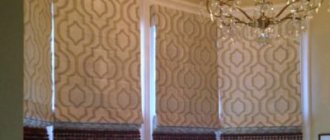
The most common type of blinds is the Roman blind.
Now we will tell you how to make Roman blinds at home. Roman blinds are a real asset to the room. To do this, choose a fabric that will organically complement the interior.
You will find many options for textures and colors. The production technology is reminiscent of the technology used to create sails by the ancient Roman seafarers. Outwardly they resemble a couple.
Is it straight or with folds. If you choose an ornament, the open pattern will manifest itself clearly. Taking this into account, choose a high-quality designer texture; it will please the eye for a long time.
- Select a texture and strong threads of the same color. Choose a fabric for the inside; Stock up on liquid nails; A cord for fastenings and a set of pins should be on hand; Stock up on plastic or wooden weighting for the curtain; Prepare screws, scissors, nails.
Fabric blinds for windows
Action steps:
Measure the area of the window.
Increase the width by a couple of centimeters from the total amount, and select the length at your discretion, based on the width of future folds. Please note that when assembled, the fabric will shrink. Cut two nylon threads. The length will be one centimeter longer than the length of the fabric. Use a pencil to mark the places for the seams. Sew them on a machine or by hand. To make the curtains heavier, sew in wooden strips. Using brackets and screws, attach the structure.
To visually consolidate the knowledge gained, watch the video on how to make fabric blinds at home:
How to decorate
If making homemade blinds is difficult the first time, start by decorating standard mass-produced models. Boring white plates can be “dressed” with film or wallpaper with any picture.
Action plan:
- Choose the color, pattern, texture of wallpaper or self-adhesive film that fits into the design project.
- Measure the plastic sheets and mark the material chosen for decoration.
- Cut the paper or self-adhesive so that the geometry of the pattern is maintained.
- Glue the blanks onto the main structure.
- Wipe off excess glue and trim any protruding corners.
Choose products with a moisture-resistant coating so that the glued elements do not peel off during wet cleaning.
Making roller blinds at home
Don't confuse roller blinds with Roman blinds. They are similar in appearance, but the mechanism of operation is different: the latter are assembled using cords in folds, while the former are wound around a special rod located at the top of the opening.
Made by hand, roller blinds are weighted at the bottom and held in the desired position with ribbons. Fabric roller blinds are a practical type of window decoration. Based on whether you want light to pass into the room or not, the type of fabric is selected.
They are divided into: light-absorbing and light-transmitting. Plain models, patterns on fabric texture, designer drawings - everything your imagination allows. To make roller blinds, proceed as follows:
- Divide the fabric into equal parts and fold. Turn the fabric inside out. Wrap the cut around the curtain rod. Secure the bottom of the fabric with plastic or wooden weighting. A thin slats will do. Using a stapler, secure the thread at the top. To make the fabric rise, wrap it around the slats. The roller shutter can be secured at any height.
Do not forget that the material should be twice as much as the window area.
DIY roller blinds
Life hack for making accordion blinds from wallpaper
Tips for making and choosing a base:
- glue plastic or cardboard weights to the first plate to increase the density of the accordion-shaped paper curtains;
- use textured wallpaper to liven up your interior;
- take light materials if you want to diffuse the light, and dark ones to maintain twilight;
- Be careful during assembly (paper is a fragile material).
Use light-colored wallpaper to make blinds.
Making silk blinds
Blinds made of silk threads are an original decoration for a window. It is permissible to collect single-color and multi-colored threads in one model.
Please note that silk slats do not cover the window one hundred percent. They let the sun flow through. They can only perform aesthetic window decoration.
They fit perfectly with various types of interior. Playing with colors, you will add bright colors to the design of the room. To make your own blinds from threads, you will need:
- Secure the upper and lower sections of the threads with mounting glue or tape so that they do not fall apart. There should be an equal number of threads in the lamellas. Install hook runners on the cornice, secure the upper part of the lamellas to the hooks. Install the adjustment cord. Attach a weight to the cord so that the curtain does not opened on its own.
Silk blinds
Thus, we conclude: if buying new blinds for some reason does not fit into the family budget, do it yourself. Now you know how to make original roller blinds and Roman blinds at home. As you understand, this will not require a lot of money to buy fabric and structural elements.
All this is sold in the hardware departments of markets. You will find any design detail from Russian and European manufacturers. Please note that European brands are more expensive, but this does not mean they are better.
Available materials, a creative idea and a little effort are the key to a successful result in creating blinds. They will protect you from bright sunlight in the summer for a long time.
Depending on the material and shape you choose, blinds will complement classic, oriental, Scandinavian and other types of decor. They will help create home comfort and warmth.
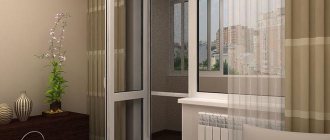
Vertical blinds for windows are becoming an increasingly popular alternative to conventional curtains. They decorate not only office windows, but also apartment windows.
Unlike horizontal ones, they have many textures, colors and can even be a real painting. And the use of lambrequins for vertical blinds has become a novelty in the field of window design and is confidently replacing curtains, which, like a sponge, absorb all the dust in the apartment. Due to its practicality and versatility, demand is constantly growing, which provides the main impetus for implementing a business idea at home.
What types of blinds are there?
According to the method of closing and opening, they can be:
- Vertical - the slats are arranged vertically. When closed, they are folded together or stretched along the window, forming a single canvas.
- Horizontal - consist of horizontal stripes forming a ladder. The rotation of the lamellas occurs as a result of the action of a special drum.
- Pleated is a sheet of paper or fabric assembled with an accordion. Its position is fixed using guide threads, at the ends of which there are clamps.
- Rolled - a fabric fabric that, under the influence of a special mechanism, is rolled into a roll.
Blinds can be made of wood, plastic, fabric, paper, threads. The material determines the use of the structure: in rooms with high humidity levels, you should not hang paper or fabric products. Therefore, it is better to install plastic or wooden blinds in the kitchen or bathroom.
You can make the design yourself from scrap materials that can be found in any home. Moreover, experience is not necessary. In any case, material and labor costs will be small, and the practical benefits will be significant. After all, the result will be a unique window decor that no one else has. Some products are quite easy to care for: plastic or wooden ones can be wiped with a damp sponge, and paper ones can be changed periodically (at least every day, if you stock up on the necessary material).
Production technology
A window with vertical blinds is nothing more than a cornice with curtains, only they are capable of transmitting street light in a certain amount, depending on the adjustment. All fabric slats have a special impregnation that has antistatic and dust-repellent properties.
That is, unlike conventional curtains, the fabric elements of the device do not collect dust, so they will require minimal care. To produce vertical blinds with your own hands, you do not need to rent a large room. A spacious room or, for example, a garage will be enough.
The production technology is a little simpler and less labor-intensive than the production of horizontal sun-protection structures for plastic windows. This makes the business more profitable and does not require large capital investments.
Main components of the design:
- Decorative cornice for vertical blinds.Slats. Brackets.Latches.Chains, laces for adjusting the closing angle.RunnersInventory for fastening.
To produce a device at home, you will need certain equipment.
Colonial Improved
Now let's see how to make simple, cheap and reliable colonial-type horizontal blinds with fixed slats for mid-latitudes with your own hands. First, their grille is assembled in a hinged and/or folding frame, like a window shutter. Then, 3-4 mm thick plywood, twice impregnated with a water-polymer emulsion and painted, will be used on the lamellas. The second impregnation is done after the first has completely dried. In extreme cases, say, for a summer cottage, the slats can be made from cardboard processed in the same way, but then the shutters and blinds also need blind sashes that can be closed for the winter.
The layout of the slats of “moderate colonial” blinds is shown in Fig. on right. Proportions and angles are given for the Central Zone of the Russian Federation; the dashed line shows additional slats of unshaded windows facing due south. In general, it is advisable to maintain the following ratios:
- South windows: h = W.
- South-east and south-west windows: h = 1.5W.
- East and west windows: h = H = 2W.
If you haven’t forgotten school trigonometry, then you can more accurately calculate both W, h, and the installation angle of the lamellas β. It is necessary that on the winter solstice on December 21, when the altitude of the Sun at noon is α = φ – 22 degrees, the shadow from the overlying lamella does not reach the inner edge of the underlying one, and on the summer solstice on June 22 it should reach half its width on the western/eastern windows, by 2/3 in the southwest and southeast, and by 3/4 in the south. Then in winter the blinds will practically not shade the room, in summer in the morning it will be illuminated by direct rays (which is very beneficial for health), and as the sun rises, the direct light will be replaced by diffused light. In the afternoon, the pattern of lighting changes will be reversed.
Note: 22 degrees with a certain, in this case completely insignificant, addition is the angle of inclination of the Earth’s rotation axis.
Equipment for the production of vertical blinds
The equipment can be manual or automated. The first option of equipment for making vertical blinds with your own hands is cheaper and therefore does not require large investments for a business idea. At the same time, manual equipment will be quite sufficient for full-fledged and high-quality production.
Equipment for the production of:
Persian scissors.
Fabric rewinding machine. Sewing machine. Additional equipment, materials and supplies.
Naturally, we showed a basic set of components and equipment for producing blinds at home, but for full work you will also need additional (household) tools.
For example, you need a construction tool (drill, screwdriver, grinder, etc.) to install finished products. You also cannot do this without sewing equipment. You will need absolutely everything that is at hand, from a pencil to a ruler.
Manufacturing stages
To manufacture any type of blinds, you will need to complete the following steps:
- Measurements of the window, window opening and additional corrections are made. Depending on the type of blinds, the allowances will be different: on the sides - 1-1.5 cm, on all sides - 2-3 cm.
- The material is laid out on a flat surface, the pattern is applied taking into account the allowances.
- The fabric is cut out, the outer edges of the curtain are folded or processed with an overlocker. If horizontal blinds are made, durable materials are used. They need to be drilled along the edges to extend the control cord.
- Rope for pulling between the elements of blinds is used of different types depending on the base material of the canvas - satin ribbon, strong thread, cord or rope, interlacing threads. The length should be twice the height of the window or with the addition of double the width of the opening.
- The assembly of the elements is carried out from the beginning of the preparation of the panel to its fastening with a cord to the top bar or cornice.
Product design assembly process
The production technology itself is quite simple and concise. Vertical blinds consist of slats that can be of various textures from fabric to wood.
The height of the lamellas depends on the size of the window or balcony block. In any case, before production begins, you need to visit the client and take all your relevant measurements. The width of the lamellas is standard and is 8.9 cm or 12.7 cm.
Lamels are cut from fabric (or other textures) using a manual machine. The machine performs several main functions at once: bending the bottom and top of the lamella, cutting and punching a hole for the holder (depending on the configuration of the machine). Next, you need to secure these folds using a sewing machine, that is, sew the slats.
It is also possible to secure the curved edges of the slats using hot glue. This glue does not leave marks on the fabric, it dries quickly, and glues materials together efficiently and for a long time. Next, we’ll look at how to assemble vertical blinds step by step.
For clarity, all assembly elements are shown in the figure.
And so the slats for vertical blinds are ready. Next they need to be put together. This can either be done on site, or half the process can be done in the workroom.
Assembling vertical blinds with your own hands has its own sequence of actions:
Selection of a cornice of a certain length. The cornice is complete with all the necessary components (rotating mechanism, sliders, holders, etc.).
Attaching the slats to the runners. Installation of weights in the lower bend of the lamellas. Fastening the decorative chain into weights.
To make the installation faster, points 4 and 5 of the above algorithm can be done at the workplace.
Horizontal blinds
A more complex option that requires certain skills is to make blinds from plastic, wood or bamboo plates. To create the design you will need:
- thin strips 0.5 cm thick;
- durable cord;
- drill and thin drill;
- block for fixing on the window;
- fastener
In the prepared plates, the width of which is equal to the width of the part of the window being closed, 3 holes are made: two in front along the edges, one on the other side in the middle. Sand all edges with sandpaper until they are smooth; the surface should be painted or varnished. The product is assembled as follows:
- Thread a piece of cord slightly longer than the height of the window into the front holes of one plate, tie a knot at the bottom and decorate with decorative beads.
- Thread a cord into the hole in the middle, which is 2 times longer than the height of the opening.
- At a height of 3.5 cm (taking into account that the width of the lamella is 4 cm), make knots on all cords or insert clips.
- Then thread the cords into the second plate, repeating all the steps.
- This is how the cords are threaded into all the slats.
- A loop is fixed on the block from the bottom in the middle.
- At the front of the block, screws are screwed in along the edges, onto which the ends of the side cords are attached.
- The central cord is threaded through the ring and left hanging freely. You can hang beads, a tassel, etc. at its end.
The blinds are closed by pulling the central cord, which is fixed on a hook installed on the window sill. To lower the slats, opening access to light, the cord is released.
At the same time, simple designs will help relieve apartment owners from scorching heat and bright sun rays. An accessory made independently allows you to create your own unique interior that no one else has.
Save
Save
Financial side of a business idea
This type of home business is quite profitable, but at the same time it does not require large investments. This fact makes this business fully pay for itself in the shortest possible time.
So, let’s look at the prices of equipment:
Press scissors.
There are several types of this manual machine. They can be designed for one type of texture, for example, only fabric or aluminum, or multi-textured. Press shears can also include one or more functions: either simply cut; cut and bend the edges; cut, bend the edges and make a hole in the upper part of the lamella for the holder. The productivity of this type of machine directly depends on your capabilities and ranges from 120-220 lamellas per hour.
You can buy press scissors, depending on functionality, from $500 to $800. A machine for rewinding fabric. Naturally, you can do without such a machine, but then you will have to carefully examine every millimeter of fabric when cutting the lamellas. The machine will also help you accurately determine the length of the roll, which will allow you to more accurately and economically calculate the resulting lamellas.
The machine costs between $1500-2000. Sewing machine. An ordinary household sewing machine will be sufficient to sew the folds of the bottom and top of the slats. The main thing is that the sewing machine can work with dense materials.
Prices for household machines start from $150. Accessories. Prices for components for vertical blinds and fittings are affordable. For example, one rotary mechanism costs approximately $2.
All necessary fittings and components can be easily purchased online. Fabric. Fabrics can be in rolls of two types - 12.7 cm and 8.9 cm wide. A wide range of colors allows the product to fit into any interior.
Paper
Blinds from paper wallpaper are the easiest and fastest to make. Wallpaper is used because wallpaper paper is strong enough, rigid, resistant and at the same time transmits a little light, i.e. When the blinds are fully lowered, the room will have soft, diffused lighting. By choosing the color of the blank, the blinds can be made quite aesthetic, and paper wallpaper is inexpensive. Step-by-step instructions for making “wallpaper” blinds are shown in the figure:
How to quickly make your own blinds from wallpaper
- A blank 1.25 times the height of the window and a width equal to its width or, if the window is wide, its whole share, is folded like an accordion. The width of the “lamellas” is in the range of 50-70 mm, so that a whole number of them fit along the length of the workpiece. The first and last strips should face outward. Folding an accordion is a very important operation: if you do it carelessly, the error accumulates and the panel comes out crooked. Therefore, before smoothing the next joint, it is best to check using a template made from a long rigid ruler, a flat strip left over from repairing an MDF board, etc., laid next to the workpiece;
- The accordion, while it is still in the form of a foot, is pierced exactly in the middle with a hole punch. The best punch is round, with a diameter of 8-10 mm, so a stationery hole punch will not work. A cord with a diameter of 6-8 mm is threaded into the hole. A thinner cord will soon cut the paper;
- The cord is looped around the top and adjacent “lamellas” and secured with a knot at its end;
- Remove 1 protective film from a strip of double-sided tape as long and wide as the “lamellas” and seal the top “lamella” with the cord with tape;
Adjusting wallpaper blinds with a latch - The ends of the lower “lamella” are brought together to form something like an unfolded fan (“peacock tail”) and glued together with PVA or the same tape. It is impossible to bring the gluing to the very inner bend; the accordion must move freely together and apart on the cord! At the end of the cord, first put a single (you can also double, but there will be an extra hole) cord clamp, then - an end cap, tie a knot at the end of the cord and put the end cap on it. Its role is not only decorative: if you fix the end of the cord with just a knot, it will soon get dirty;
- Remove the remaining protective film from the tape and glue the blinds to the window frame;
- The blinds are assembled/unfolded by moving the lock, see also fig. on the right, marked with an arrow.
The process, as we see, is simple, and if there are pieces of wallpaper left in the closet from the renovation, all the expenses will only be on tape and a couple of small pieces of fittings. In addition, you can watch a master class on making homemade paper curtains in the video below. Regular tape is enough to last the blinds all summer.
Video: DIY paper blinds
The first disadvantage of pleated blinds made from wallpaper is obvious: to assemble them, you need to stretch high up. The second may affect when the blinds are removed - the tape leaves marks on the paint. You can remove them with a cotton swab slightly moistened with vodka, cologne or 70% medical alcohol (alcohol “for injections” in a bottle with a blue stopper), but if the window frames are inexpensive, the sticky layer of tape can eat into the paint so that it can no longer be used. you will bring it together.
The paper blinds of the design shown in the following are free from this drawback. rice.:
Original paper blinds
Making them more difficult: you need to accurately glue many pipes onto a mandrel. By the way, a pair of identical beer cans, placed at intervals so that the tapering parts stick out from the ends of the pipe, are suitable for it. Similar curtains are designed like Roman ones (see below), so you need to punch 3 holes under the cord: 2 10-15 cm from the edge and 1 exactly in the middle. A weighting agent (wooden strip) is placed into the lower pipe and secured with a couple of drops of glue. Its length is the same 10-15 cm less than the width of the canvas; the ends of the weighting material should fit between the outer cords. You can generally make a weighting material from 2 identical pieces laid between the cords. 3 holes are drilled in the top beam for the cords, and the beam is secured into the window opening, placing bosses under its edges so that the cords move freely. The timber is covered at intervals with a piece of the same wallpaper. The design turns out to be quite complex, but it will last for many years, especially if the wallpaper is non-woven.
The simplest paper blinds
Another “design” of paper blinds is shown in Fig. on right. New settlers of the first Khrushchev buildings remember these people well; back then they were made from newspapers. However, using the same method, without cutting the sheet all the way through, you can quickly make quite decent paper blinds for your dacha from wallpaper or paper with a pattern. They are to some extent automatic: a breeze blew, the stripes (30-70 mm) swayed. The shading remains, but this primitive curtain does not interfere with ventilation.
How to increase sales?
A few creative ideas can help you stand out from your competitors and significantly increase sales by attracting more customers.
For example, vertical blinds with a pattern look presentable and are in good demand. To implement this idea, you will need the graphic editor program “Pambrequins” 2.0Pro. The program can easily calculate the calculations for creating multi-textured patterns.
To significantly increase sales profits, you can think about developing “Smart Blinds”.
They will be controlled using a remote control, or, for example, fully automated. By installing software on the contact management platform for auxiliary devices (electric drives), the robotic sun shading system on windows will be able to close and open without human intervention. New technologies are more accessible today than ever before.
All you need to automate the device controls is:
- motors with gearboxes; wires; housings for hiding motors; building for the management center; platform with a microprocessor for managing microcircuits with contacts.
The platform can be flashed on your home computer with various software that can be downloaded from the Internet. And if you really want to, you can write the algorithm yourself. Moreover, both for platform portable systems and for mobile devices.
All this can be purchased at any amateur radio store. The costs are minimal, and the cost of the product can be increased significantly. This service is quite expensive, precisely because it is “new” and not many stores provide it.
Maintenance and repairs can be another additional income. Not many people are capable of doing simple repairs or caring for them themselves. Having the skills to manufacture structures, setting up their repair and maintenance will not be difficult.
Clients can be found on the Internet or among friends.
For example, you can create your own group on social networks, or create your own website where you can display all the photos of your work, where satisfied clients will leave their reviews, this in itself helps to attract new clients. Advertising in newspapers in your region will also help increase your customer base. Today nothing is sold without advertising.
- Date: 05/13/2015 Comments: Rating: 21
You can make curtains of any model for windows with your own hands, but blinds are ideal for the kitchen. This is a lifting curtain, which is a piece of rectangular fabric that is lifted upward by special slats. The cornice differs from the standard one; it may have an automatic lifting mechanism.
Fabric blinds are attached separately to each window sash and can be used as protection from the bright sun during the day. It’s easy to make such blinds with your own hands, you just need to have the skills to work with a sewing machine. The curtain fabric should be easy to fold during use.
The fabric of decorative blinds should be easy to gather when putting them together.
Features of blinds, materials and types
Blinds are a practical, universal barrier that blocks the sun's rays. The design does not require special care. Curtains are made from environmentally friendly raw materials and impregnated with a special composition (moisture-resistant, dust-repellent). The product does not retain odors and does not retain dirt.
High-quality models are so safe that they are used in sterile rooms. The design of the curtains is simple; installation does not require much time and effort. Curtains can be selected to suit any window shape (for example, for an arched window, peacock tail pleats are suitable).
Multifunctionality makes blinds stand out from their traditional counterparts with massive draperies.
Materials suitable for making curtains are as follows:
- aluminum (noisy material, resistant to changes in temperature conditions);
- wood (expensive, has a limited range of colors);
- plastic (durable, stable material);
- fabric (decorative element, requires special care);
- paper or photo wallpaper (easy-to-process material).
Vertical
The vertical design visually increases the height of the ceilings. The angle of rotation of the lamellas (plates, strips) is adjusted by a cord or an electric drive, which is also responsible for their movement along the cornice. Strict curtains will fit well into an office interior.
Vertical blinds increase the height of ceilings.
Horizontal
Stripes of Venetian curtains are positioned horizontally and visually expand the room. The structural parts can be attached to the window sash (inside the glass unit), as well as to any other flat surface. A rotating drum installed instead of a curtain will allow you to open and assemble the product, and adjust its height.
Horizontal blinds can be attached to the window sash.
Horizontal curtains will emphasize the spirit of open space in the house or on the terrace.
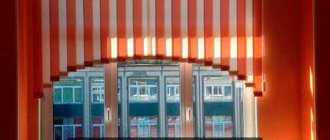
Pleated
Pleated curtains are easy to make, but due to their simplicity they lose functionality, because curtains with a “fan” have a static arrangement (there is no height adjustment mechanism in this model). The material is collected into an accordion and attached to the cornice. The product can be installed on windows of any shape due to the mobility of the base folded in steps.
Pleated blinds are assembled into an accordion.
The weight of pleated blinds is light, which allows them to be mounted directly on the glass (with adhesive fastenings).
The design is used when decorating an interior in a classic style, because... acts as a neutral element.
Rolled
Roller blinds, or roller structures, include fabric specially treated to prevent fading, fading, to increase moisture resistance, and a roller onto which the material is wound. This mechanism allows you to freely wind up and fix the curtains at the desired height. A product made of dense materials is used as a plug in industrial premises in enterprises.
Roller curtains can be fixed at the desired height.
Preparing materials for work
To sew blinds with your own hands, you must first decide what shape they will have and calculate the dimensions. The most commonly used is a Roman blind, which is a fabric lifted upward by a system of rings and slats with cords.
It is important to immediately choose the right fabric for sewing. In this case, dense natural is optimal. If you take a lightweight canvas, it will look less aesthetically pleasing.
Decorative blinds will fit well into the interior of the kitchen.
For sewing, only whole fabric is taken, although in some cases it is possible to use two cuts. One will be a knit stitch and the other will be a purl stitch. The width and height of the window opening are used as measurement data.
It is necessary to add 5 cm for the seams, but the height of the window opening must be multiplied by 2, then add another 1 cm. It is also worth considering that a small amount of fabric will be needed to form the folds. It doesn’t require much, but such data cannot be excluded when making calculations.
During calculations, it is necessary to take into account that rings and strips for folds will be required. The number of slats is equal to the number of folds, 2 more are added.
One will be for the bottom edge, and the second for the top. Rings are sewn at the level of each strip. You will need a strong cord, with its help the curtain will rise or fall.
Complete list of all necessary materials and tools:
Installation of decorative blinds.
- Fabric of the selected type, you can take 2 cuts if the back and face are different from each other. Nylon cord of the selected shade. It is best to take a skein from which the required amount will be cut. A wooden strip along the width of the window opening or a special cornice for Roman blinds. This is what fabric lifting blinds are called. Self-tapping screws and nails with decorative caps. Rings for fastening the cord. Strips for forming hems. Scissors, chalk or a piece of soap. Velcro tape, which is necessary for fastening the curtains and for creating an even appearance. Threads, metal meter and tailor's wooden meter, sewing machine.
Curtains may require decor. Beads or tassels, fringes act in this capacity - it all depends on the appearance of the blinds.
For sewing, plain fabrics are used, but patterned ones can also be used. Decorative elements should also be selected to match the tone. In the latter case, it is necessary to pay attention to ensuring that after raising the curtains the patterns look beautiful.
Otherwise, the appearance will not be the most attractive. Some people use thick fabrics; the bottom edge can be made curly and decorated with fringe. This option is great for a living room or bedroom.
Return to contents
To secure the blinds, you can use regular tapes.
After the preparatory work is completed, you can begin sewing the curtain itself. You will have to show patience and attentiveness here. The edges of the canvas are processed first; to do this, you need to carefully tuck them along the previously made mark.
On a sewing machine, the allowances are stitched and then ironed. Before cutting, the entire fabric must be laid out on a horizontal surface and ironed. This way it will not only be more convenient to work with the fabric, but there will also be no errors during sewing.
Next, you need to take a nylon cord with scissors, cut 2 large pieces from the cord, the length of which should be equal to the height of the entire curtain, multiplied by 2. 1 cm is added to the resulting value. Such cords will be used to lower and raise the fabric if necessary.
When the cords are ready, you can begin to hem the future curtain. This is done to make the curtain attractive and decorative.
Such places must be marked in advance. To fix the hems, you will have to use thin metal rods or wooden strips. Using a strip, you need to carefully bend the material to the required distance, make a mark with a piece of soap or a special chalk.
The number of folds of the blinds depends entirely on their length.
The number of folds depends on the height of the window opening and the length of the finished curtain when folded.
You should not make the folds too small or large, as this will negatively affect the appearance of the blinds. After folding, the pockets must be stitched, leaving room for the placket. It should fit snugly in your pocket.
The first strip will go on top of the canvas, the bottom one - on the end part. Everything else should be distributed evenly.
After this, rings are sewn on each hem. This should be done with a slight indent from the edge, the entire row should run smoothly. The number of rows for a small curtain is 2, if the width of the curtain is large - 3.
Return to contents
The final work will be no less responsible. It is necessary to thread the prepared cord through the sewn rings and the top hole on one and the other side of the future curtain. The ends of the lace must be carefully and securely secured with knots.
If the appearance of the curtain allows it, then you can attach heavy decorative beads made of glass or brushes to the lower part during fixation. As a result, the curtain will look beautiful and unusual. Heavy brushes will allow you to hold the fabric in the required position; it will no longer develop in the wind or draft.
It is recommended to sew a couple of Velcro strips to the bottom of the canvas, which will keep the curtain raised.
For this, a special Velcro tape is used; two small pieces of it in the corners are enough to hold the required shape. The second pair of Velcro is sewn at the top of the fabric near the first strip.
The arrangement must be made symmetrical, the upper and lower parts must be placed one above the other strictly parallel. It is these simple measures that allow you to avoid tissue shifting in different directions. From the outside, the Velcro is completely invisible, but they do their job perfectly.
After this, do-it-yourself fabric blinds must be secured to the cornice. Usually special curtain rods are sold for these types of curtains. At home, it is quite possible to use a regular wooden plank; it is pre-painted to match the color of the window opening.
The plank is carefully screwed into place with self-tapping screws; this can be done directly above the window frame. When fastening, we must not forget that the fabric should not interfere with opening and closing the window sashes, so the preliminary selection must be taken seriously. This should be done before sewing work begins.
The curtain can be attached to the cornice (or cornice strip) using various methods. If this is a special ready-made cornice, then the fastening system involves automatic lifting of the fabric. If a regular wooden plank is used as a base, then one of two methods can be used:
The fabric is fastened with small furniture nails with decorative caps. You can provide special loops through which the nails will be threaded so as not to spoil the fabric. It is recommended to use a special Velcro tape.
This is a special textile fastener that allows you to fasten fabrics to any surface. It can be fixed to the tree with staples, and the second part can be sewn to the top of the curtain. This option is the most attractive, since the curtain can be easily removed for washing and then reattached.
DIY blinds made from canvas and decorative elements are a type of lifting curtain.
They can be used for any room, but they are especially popular for kitchens. Making blinds is not that difficult, but it is important to correctly calculate the length of the fabric cut, taking into account the folds. If you make a mistake, the appearance of such a curtain will be unattractive.
Almost everyone can buy blinds, because stores always have models to suit every taste and budget. However, if you want to have an original thing in your house, then you should get creative and make your own blinds from fabric; you can see the step-by-step process in the photo. Taking into account all the tips, everyone will master the basic skills of making blinds from wood, paper and scrap materials.
Sewing fabric blinds with your own hands is not difficult
Roman blinds
Material fabric. Preferably dense. Wooden or metal rods are sewn into it at equal intervals across the width - say, 20 centimeters - from each other.
Plastic or metal rings are sewn into the middle and ends of each rod, and laces are passed through them and attached to the cornice. By pulling these laces, the curtain can be raised by divisions - from one rod to another.
The curtains, piece by piece, seem to fold into a large accordion. The most ancient and proven type of curtains. Known back to the times of Ancient Rome. Hence their name.
How to make roller blinds with your own hands from fabric step by step?
Roller blinds have a special mechanism with which they are rolled into a small roll.
This design is attached to the top of the window frame and can be used independently or as an addition to curtains. Fabric roller blinds are popular and the reason is not only that you can make them yourself. We invite you to familiarize yourself with the main advantages of roller blinds, namely:
- Easy to use. Huge application potential. Cheap. Possibility of obtaining a complete blackout effect. Installation of blinds on a wall, window, or frame.
Any fabric is suitable for making roller blinds.
However, experts recommend choosing special materials with impregnation and antistatic composition. There are fabrics with a water-repellent effect and with dirt-repellent properties. Caring for these blinds is quite simple.
Any fabric is suitable for making roller blinds
When starting to make fabric blinds, you first need to prepare the tools and consumables:
- a piece of fabric of the required size; wooden blocks for weighting the structure and making fasteners for the window; cord, rings, hooks; scissors, tape measure, thread.
Step-by-step instructions for sewing fabric blinds include the following aspects:
- A piece of fabric is cut out according to the size of the window, the edges of which are sewn from the inside out. Upper and lower fasteners are made for the wooden block in the form of pockets. Screws with a ring are screwed into the upper bar, as can be seen in the photo. Cords for rolling curtains-blinds into a roll are attached to the screws on top .The ends of the cords are connected to each other and brought out for convenient control of the structure.
The length of both cords should be 3 times the size of the canvas.
Sewing fabric blinds with your own hands is not difficult. The product is simple and durable. Such a curtain will decorate any room and help create coziness and comfortable conditions.
Selecting fabric by texture and color
Texture
To make blinds, you need to choose a material with a dense texture that can hold its shape well. Most often, fabrics are chosen for this work that are resistant to fading and subsequently do not acquire a yellow tint. Depending on the type and purpose of the room for the manufacture of blinds, you can choose translucent or, conversely, materials that reflect light or completely do not transmit it, as well as having additional antibacterial and dirt-repellent impregnation. The latter options will be more appropriate in rooms with increased sanitary requirements and requiring more frequent cleaning, such as the kitchen or bathroom.
A very interesting solution when choosing the main material for making roller blinds is “day-night” fabric. It is a canvas on which strips made of materials of different light permeability are alternately located. This option allows you to adjust the light level without the need to roll up the canvas. It visually makes the window opening wider.
Color
The choice of color in which fabric blinds will be presented depends entirely on the tastes and preferences of the manufacturer. In this case, it is necessary to select it in accordance with the interior of the room and the color scheme suitable for it. It is not necessary to use one shade to make a structure. Blinds that combine several colors and shades at once look very advantageous. A drawing or pattern on the fabric will also look very interesting. When choosing a material with a pattern, it is necessary to take into account that a printed pattern fades much faster than a woven one, which can subsequently affect the service life of the product.
Video on how to make blinds with your own hands from fabric step by step:
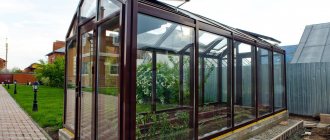
Owners of country houses and summer cottages prefer wooden blinds, which look original and are considered very functional.
Unique appearance, low cost, sophistication are the main advantages of the product. How to make window blinds with your own hands from wood? We offer step-by-step instructions:
Wooden blinds look original and are considered functional
Determine the size of the window opening and prepare the required number of wooden planks. A hole is made in each strip along the edge and center for a nylon thread. You can make one template, and then make holes in the planks according to it.
The cord is threaded through the prepared holes and fixed. The cornice and bottom strip are made separately. Screws with rings are screwed into the cornice. All parts are laid on a flat surface in the following sequence: cornice, wooden planks, bottom bar. A nylon cord is threaded into each part of the blinds and its edges are securely fixed to the bottom bar.
The middle cord should be 3 times longer than those used at the edges. We will use it as a lifting mechanism. We install the finished structure on a window frame or wall.
Details of all stages of making wooden blinds can be seen in the video.
Types of blinds
At the moment, manufacturers offer their customers three main types of this design - vertical, horizontal and roll. Each of these types has its own advantages, and they are suitable for certain rooms.
For example, blinds with a vertical or horizontal design are perfect for an office building. They open and close easily, and plastic products will last much longer. Wood products are suitable for saunas, baths, and kitchens.
Next, we will present you with some simple step-by-step instructions for making your own blinds.
How to make window blinds with your own hands from paper?
Making paper blinds is the easiest way, since there are no complicated parts in the design.
Wallpaper is most often used as consumables, as they have sufficient strength and you can choose the desired color. To save money, you can use wallpaper that was left after renovation. When making paper blinds, you should follow these instructions:
- A piece of wallpaper is made slightly longer than the window opening. Markings are made on the canvas with a pencil and, according to the drawing, folded like an accordion with a fold width of about 5 cm. All folds are brought together in the canvas with a hole punch or other device. Holes are made. A cord is threaded through the resulting holes. The strip on top is sealed with double-sided tape .The bottom edge is glued halfway.
The advantage of paper blinds is that you can experiment and create beautiful shapes
Now you can attach the resulting product to the window frame. The disadvantage of this design is its fragility, since it quickly breaks down with frequent use, but it can be used as a temporary and decorative means of protection from sunlight.
The advantage of paper blinds is that you can experiment and create beautiful shapes.
The cost of the finished product is small, but if you use your imagination, you can create comfort in your home and they will fit perfectly into the interior of the room. It is only important not to forget that you need to use them very carefully. If you decorate the blinds with a decorative cord, attach butterflies or flowers, then this simple design will look unusual and interesting.
Methods for attaching homemade blinds
Mounting system options:
- with drilling;
- without him;
- wall.
Blinds can be secured with double-sided tape.
For lightweight curtains, such as paper curtains, strong structures are not needed. They are fixed with 2-sided tape. To install products made of heavy fabric, you will need curtains and fastenings with screws.
How to repair?
First you need to determine the type of failure that is possible:
- On the bar.
- In the turning and lifting mechanism.
- Damage to the integrity of the cord.
- In the regulation of the rotating elements of the slats.
All repair work with horizontal blinds in case of damage is reduced to the following algorithm:
- The type of defect is determined.
- We are looking for replacement parts.
- For reliability, the assembled initial structure is photographed and then disassembled to remove damaged elements.
- The cord is removed to make it easier to work with each part.
- New parts are inserted into their original places.
- The final assembly of the entire structure is underway.
When installing and operating blinds, you may encounter a situation where the curtains need to be shortened or straightened. We told you how to do this in our materials.
Blinds are great for any interior design and can brighten up even modest rooms. If the design is done independently, then you can be sure of the originality of the curtains. Any available means can be used - from threads to varnished wooden planks. Additional decoration with glitter, paints, and other decorations realizes the most daring ideas.
How to install?
There are several ways to attach horizontal blinds:
- to the window (read about the rules for choosing and installing blinds on plastic windows here);
- to the ceiling;
- to Wall;
- in the window opening.
For installation work you will need:
- a screwdriver or screwdriver with a Phillips head, dowels or self-tapping screws with a thickness of up to 8 mm;
- electric drill with a drill for fasteners;
- level, construction ruler or tape measure, simple pencil;
- if you need to change the length of the product, you will need needles, threads, scissors or a hacksaw.
Instructions for attaching blinds:
- All elements are laid out on the working surface.
- After attaching the structure to the window, a point is marked on the wall or ceiling that will be drilled for the dowels.
- If special mounting brackets are used, they are fastened with self-tapping screws; dowels are inserted without brackets.
- A cornice or fastening strip is installed on which the rest of the structure is assembled or an already assembled one is fixed.
Attention
For wide curtains, you will need to organize intermediate fasteners, which will distribute the load more evenly and increase the reliability of fixation.