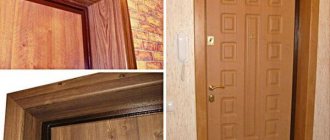
After installing the door, the walls adjacent to it - the slopes - have a deplorable appearance. Perhaps the fastest way to put them in order is to decorate them with laminated panels. It can be MDF or laminated chipboard (LDSP). There isn't much difference. The main task is to choose a pattern and shade to match the door or other decoration in the room, and making door slopes from MDF or laminated chipboard is not difficult. Moreover, there is a method that requires a minimum of time.
Laminate slopes are made quickly, and the appearance is at least good. No special skills are required, you just need to be able to use a saw or jigsaw to cut fragments of the required size. The rest of the work is simple and straightforward: glue, polyurethane foam, wooden planks, and self-tapping screws are used. You don’t even need plaster as when finishing drywall slopes.
Self-finishing of entrance door slopes with MDF panels: video
In order to install a door yourself, you need to have some experience and knowledge in this matter.
In this case, the MDF slopes of the entrance door are part of the space, and quite an important one at that. Installation of slopes, which are often made of MDF, occurs at the final stage of installing the door itself. The function of MDF slopes in this case is, firstly, to improve the appearance of the structure, and secondly, to insulate the room. The installation method may be different, but it is necessary to take into account the material from which the door leaf itself is made, since the protective properties of the door and other equally important characteristics depend on this. When installing a door, you need to consider the following rules:
- to ensure free opening of the door, installation of slopes must be done at the bottom of the frame (20 mm);
- slopes on the front door should be placed at different distances;
- To install the door correctly, it is necessary to take the correct measurements.
Installation of a slope using liquid nails and foam
If the width of the slope does not exceed 20-25 cm, the laminated panel can be installed using liquid nails and polyurethane foam. The method requires a minimum of time, and the result is good.
Preparing the slope elements
Laminate door slopes consist of three parts: two side parts and one top part. If the slopes are made at an angle, then one edge of the sidewalls will be beveled.
This is what the “pattern” for a slope made of MDF or laminated chipboard looks like:
Measure the distances from the door jamb to the corner in several places, cut the strip to the required width and height. The cut out sides should be a couple of centimeters higher than the required length - just in case they missed the dimensions. You can cut it off, but you can’t build it up.
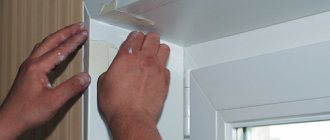
You try on the sides, insert the top. If the edge is flush with the main wall, and the gaps near the door frame are minimal, everything is done correctly. If there are mistakes, we correct them.
After cutting off the parts, try them on on the spot.
Then the outer edge of the chipboard or MDF is trimmed - a trim film is glued on: you do not nail the platbands to the very edge, so that some part will be visible. That's why it needs to be decorated. You can do without trimming if you trim the edge with a matching decorative corner. But it is made of plastic, and how good it will look is a question.
It is easy to apply the trim film. It is on an adhesive basis. Only the edge should be smooth and clean - free of dust and dirt. Glue the trim strip evenly onto it, then take a dry cotton fabric that does not fade, and iron the end through it with an iron (at medium power). Then it sticks tightly, but all the irregularities are visible, so saw off evenly.
If you can choose a plastic corner to match, it looks good, and there is less work: it is glued with liquid nails or silicone
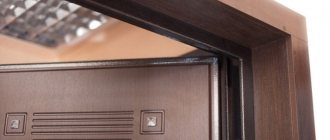
If a telescopic platband is used at the final stage of finishing the slope, a groove is made under it using a milling cutter in the laminated end. The width is exactly for the tenon of the platband, the depth is a little more than required so that it “fits” well. For a regular MDF platband you don’t need anything. It simply sticks onto liquid nails.
Installation of slopes
Having completed all the preparations, we begin to install slopes made of MDF (laminated chipboard). The end facing the door is coated with liquid nails. It is better to take a transparent composition - it will not be visible. The jamb to which the MDF is glued is degreased. Having pressed the sidewall, it is placed in the desired position, checking the verticality and maintaining the same indentation. Then peel it off and wait until the glue dries a little. After 5-7 minutes, the fragment is installed in place, checking the position relative to the walls.
The second side panel is installed in the same way, and then the upper part. The top expands additionally: spacer wedges are installed above the place where it joins the sidewalls. This will prevent the trim from bending and additionally “pinches” the sidewalls.
Having installed all parts of the MDF slope, place wedges at the top
Fixation
After the wedges are inserted, check whether everything is aligned correctly and evenly. If everything is fine, take the foam and place “patches” in the gap between the panel and the wall - apply a small amount of foam in islands. They should be full depth, but not wide. There is no need to fill the entire volume: a lot of foam will be required, and it may bend. Therefore, make islands.
After polymerization of the applied foam, the slope fragments are held rigidly. Now you can start filling the empty space. It is also more convenient to seal it with foam, but not to the full depth, but only in front.
The procedure for fixing slopes made of laminated fiberboard
After the foam has hardened, its excess is cut off with a knife. You can start finishing.
Installation of platbands
This part of the work is carried out in a standard way: first, one side panel is measured and cut, then the top one, then the second side panel. After trying on everything folded and checking the accuracy of the joining, the platbands are installed on foam or liquid nails, depending on the situation.
How to plaster slopes is described here.
How to choose a finishing method?
Facing can be carried out in various ways. The standard method includes attaching a ready-made slope directly to the box itself. In this case, there is a great saving of time, since it is not necessary to make the slopes for the entrance doors themselves.
There is a finishing option using plasterboard or plaster. This method is considered no less popular, however, not everyone can carry out such finishing, since this requires some knowledge in the construction field.
In order to decide on the method, you need to know the type of box installed. If door slopes are installed on an interior structure, insulation is not required in this case. Here, the best option would be cladding with decorative materials.
As for entrance doors, they require more careful and attentive work. Here, the best option would be MDF panels (fibreboard). Their popularity is quite high, since this material is not affected by temperature and dampness. The color of the panels in this case is selected in accordance with the color of the door itself. High-quality finishing includes the combined use of MDF with plaster.
Manufacturing instructions
This method requires special attention, so you must follow all instructions exactly. It would be useful to watch a video on the topic: “How to make slopes.” Once the door has been installed, cracks may appear along the edges. In this case, in order to seal such gaps between the wall and the frame, special foam (mounting foam) is used.
After using it, you need to wait for some time for it to harden, cut off the excess and level the surface.
Next comes surface treatment in those places where the joints will be located. The first step is to apply a primer, which will strengthen the material and improve its protective properties. The evenness of the surface can be ensured by plastering using a profile. As for the corners, they are attached to the corner using dowels.
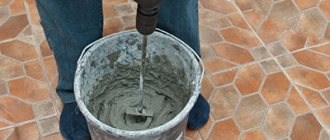
You can start plastering, but first you need to prepare the appropriate solution. It is easy to prepare, just mix sand, cement and lime solution. In some cases, it can be replaced with putty, which is used for cladding facades. It must be applied in an even, fairly thick layer, removing excess with a wooden lath.
The corners are strengthened using a perforated profile laid in a layer of plaster. The next layer should be applied after the previous one has dried. Once the puttying process has been completed, the MDF panels can be installed. Do-it-yourself finishing of entrance door slopes with MDF panels includes the following steps:
- Before starting work, it is necessary to prepare the base for the slopes for the front door. The corresponding solution is placed on the surface, after which it needs to dry. A primer layer is applied.
- MDF cutting. It is done to obtain three separate parts for the upper part of the structure and the sides.
- Glue is applied to the upper part of the opening and the MDF panel is pressed. It must be pressed and held until the mass dries. Other parts of the slope are made in the same way. For a tighter fixation, as recommended by the builders, you can use spacers.
- The space created during the work process is covered with small plastic.
- The next step is measuring the angles of the opening. To prevent cracks from appearing, before installation, you need to apply the material and see how tightly it fits. Then we attach the panel parts to the corners. It must be taken into account that the corners account for half the opening angle.
- The final stage is decoration. For this, the same material from which the door itself is made is used.
Preparatory work
- tape measure and pencil;
- laser level;
- square;
- hacksaw;
- chisel.
Installing an interior door made of MDF begins with checking the walls for verticality. First, the height and width of the doorway are measured. It should be borne in mind that the walls in the house may not be perfectly smooth, so measurements are taken at different points and at different heights. It must be remembered that between the MDF door frame and the wall there should be gaps of about 10-15 mm, both on the left and right sides, and at the top and bottom.
If the doorway is larger than the size of the MDF door, then if the difference in width is small, you need to fill a block of the required width along the entire height of the opening. If the door is much narrower than the opening, then it is partially filled with either brick or another suitable block, or a metal frame is made and covered with plasterboard. If the doorway is smaller in size, then it should be expanded.
Cross-section of door frames of different types.
Then the future box is prepared from MDF. Since the standard door height is 2000 mm, a gap of 2-3 mm is added to it between its upper part and the leaf. If the installation of the door requires the presence of a threshold, then 2 gaps are added to the height of the door, equal to 6 mm together. If you install an MDF door without a threshold, then in this case a gap of 3 mm and a distance from the floor of 10 mm are added. This is necessary so that when opening the door leaf does not cling to the floor covering. The result for an installation with a threshold is: 2000+3+3=2006 mm; without threshold: 2000+3+10=2013 mm. The blanks for the stands for the MDF box are ready.
Next, blanks for the threshold and upper lintel are made. To do this, measure the width of the door leaf. To this is added a gap of 3 mm and a thickness of 30 mm of the profile beam, which is installed on both sides. For example, with an MDF door width of 600 mm, the result is: 600+6+60=666 mm. After this, landing samples are made of the elements cut to size, i.e. On each side, those parts that protrude are cut off and because of this, when closing, they rest against the door. To do this, a segment equal to the thickness of the post is measured from the edge of the lintel, and a cut is made using a hacksaw with fine teeth. After this, the jumper is installed vertically and its unnecessary part is chopped off either with a knife or a chisel.
Do-it-yourself finishing of interior doorways
The absence of doors between rooms makes the home lighter, more spacious and stylish, however, with this method of interior design, special attention must be paid to the finishing of doorways. Through openings that merge with the rest of the walls do not look aesthetically pleasing, so they are decorated with MDF panels, decorative artificial stone or beautiful plastic. When choosing a method for decorating a doorway with your own hands, do not be lazy to view video and photographic materials appropriate to the occasion. Having seen exactly how certain construction work is carried out, and what the result of its implementation should be, you will be able to sensibly calculate your capabilities and, as a result of such an assessment, make the most correct decision.
Door installation
Once the box is ready, installation begins. If it is a swing door, then hinges are screwed to the door leaf. The insertion is carried out as carefully and accurately as possible, otherwise the operation of the installed door will be difficult.
Determining the position of the loops
It is advisable to make the insertion using a special tool. To do this, folded loops are applied to the canvas, departing approximately 25 cm from its ends, and traced along the contour. At this point, excess material is removed to a depth sufficient to ensure that the hinges are flush. When determining the location of the hinges, take into account the direction of opening of the sash and the type of fittings used. Loops are inserted into the prepared sockets and screwed with self-tapping screws.
The prepared box is inserted into the doorway, while necessarily monitoring its spatial position. Even a slight deviation in the vertical or horizontal plane is unacceptable. This will cause the sash to open or close spontaneously. Having decided on the position of the box, it is temporarily fixed using wooden wedges.
Fixation with polyurethane foam
Next, hang the canvas. Control the size of the vertical and horizontal gaps between the canvas and the box. If everything is done correctly, there should be no problems when opening or closing the sash. To prevent accidental displacement of structural elements relative to each other, cardboard of the same thickness is inserted between the canvas and the box. After this, the space between the box and the wall is foamed, and when the foam dries, it is secured with special hardware. After this, all that remains is to install the platbands.
Installation of MDF doors can be done in-house. It is enough to prepare the tool, familiarize yourself with the sequence of work, and then perform the installation according to all the rules. In this case, the installed structure will be beautiful and durable.
The key question in the process of arranging a doorway yourself is how to install a door frame with your own hands. With proper skill, this work is completed quite quickly. If you are doing this for the first time, first you need to become more familiar with the structure of this structure and its main types.
To install a door frame yourself, you need to know all the nuances of this process.
Preparing the doorway for finishing
Regardless of what kind of finishing material - PVC plastic, MDF or artificial stone, you decide to use to decorate the doorway, this opening should first be properly prepared.
If there was previously a door in the opening that you now decide to remove, first of all, remove the door frame from the wall and seal the holes left from its fastening with cement mortar. After this, plaster the opening, controlling the verticality and horizontality of its walls.
If the opening did not initially have a door, clean its walls from wallpaper, paint or whitewash and fill the cracks in the plaster with putty.
Hinge installation
- detachable or permanent hinges;
- chisel;
- carpenter's hammer;
- drill;
- self-tapping screws
Door frame assembly.
Before starting work, choose which direction the MDF door will open, i.e. towards or out of the room. Then door hinges are purchased, which have different types and, because of this, their own characteristics when inserting. To install interior doors you will need 2 hinges. And if this is an entrance structure, then to increase its strength, 3 loops are used. In this case, an additional element is mounted just above the middle of the door to distribute the load.
Next, 20 cm are measured from the lower and upper edges of the structure, and marks are made at these places. After this, the products are applied to the end of the MDF door, aligned with their beginning and traced along the contour. Then, using a sharp knife, cuts are made along the marked lines. The place for installing the hinge is cut out using a chisel and a carpenter's hammer. To do this, a recess is carefully made in the marked area with tools, the depth of which should be equal to the thickness of the loop, i.e. on average 3-5 mm. This is necessary to ensure that the loop is securely fastened and does not protrude beyond the structure.
The work of installing the loop is carried out in stages. First, small notches are made along the perimeter of the structure, of which there should be several pieces. Then excess material is removed from them. Cutting is not carried out in 1 approach. It is necessary to apply the loop to the structure each time to check, with this it is easier to achieve an ideal recess. After this, markings are applied to the places where the hinges will be secured using self-tapping screws. Then the second side of the hinges is secured to the door frame in a similar way. At the end, the MDF box is laid horizontally on the floor, and a door leaf with already embedded hinges is inserted into it. Next, using a 3 mm thick school ruler, the canvas is aligned inside the box so that there is an equal gap on all sides.
Decorating a doorway with artificial stone
Artificial decorative stone is a modern finishing material that is inferior to its noble natural counterparts - natural granites, limestones and basalts only in weight and price, which in itself is an argument in its favor. But lightness and accessibility are not the only advantages of this material. Artificial stone is beautiful, diverse, has a rich texture and is produced in a wide range of tones. Due to the fact that this material is made using a technology close to that of tile manufacturing, working with it does not require the skills of a mason - stone tiles are laid as simply as ceramic tiles.
In order for the homemade stone cladding of the opening to look like a stylish and professional finish, when working with artificial stone you must follow certain simple rules:
- the masonry on both sides of the opening must be symmetrical;
- the seams between individual stone dies must be neat, even, of the same thickness and width;
- the stone decoration of the lower part of the rectangular opening is supposed to be wider and more massive than the upper rows of decor;
- The edges of the stone frame should be made uneven - this design technique will create the effect of “ease and naturalness.”
Lining the opening with artificial stone: instructions
To work you will need:
- several packages of decorative stone;
- glue – a special water-soluble dry mixture based on cement and polymer additives or a two-component polyurethane composition of the “Keralastik” type;
- primer;
- construction mixer and bucket for mixing glue;
- marking pencil;
- trowel;
- level;
- spatula - simple and serrated;
- paint roller.
Work order
- Treat the prepared walls of the opening with a primer, and while it dries, remove the stone tiles from the boxes and lay them out on the floor covered with an old sheet.
- Lay out the edge of the opening from the dies, experiment with their location and, having achieved a beautiful combination of shapes and shades of individual tiles, leave them in this position.
- When the soil has dried, mark the outer contour of the finish and the placement lines of the tile rows on the wall.
- According to the instructions, prepare a portion of fairly thick glue. Start attaching the stone dies from the lower left corner of the opening.
- Apply a thin, half-centimeter layer of glue to a small area of the surface to be decorated and smooth it with a notched trowel. Using a flat putty knife, apply the same layer of adhesive to the back of the stone tile and press the tile against the wall in one smooth motion. Use a soft cloth to wipe off excess adhesive from the surface of the tile.
- Having covered the entire opening, mask small chips and scratches with matte paint (if any appeared on the stone during the work) and cover the entire masonry with a special colorless and transparent acrylic composition, which gives the artificial stone special water resistance and resistance to abrasion.
Advice. To make the seams between the tiles less noticeable, mix a little coloring pigment into the adhesive composition, the color of which matches the shade of the stone.
Decorating the opening with PVC panels
The advantages of plastic PVC panels include low cost, pleasant appearance, variety of colors, ease of installation and excellent water resistance. At the same time, such panels break even from slight pressure, fade in bright light and are easily scratched. Due to the increased fragility of plastic panels, they can only be used to decorate rectangular doorways.
Plastic panels are mounted directly on the walls of the opening (gluing them with “liquid nails”), or attached to a pre-constructed metal sheathing.
Now, knowing the basic methods of finishing doorways, you can choose the most suitable option and start decorating the passages yourself. If all the decoration methods described above do not seem attractive enough to you, contact builders and designers for help and they will make any of your fantasies and wishes come true.
Installation and installation technology
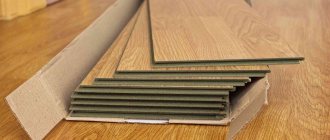
To cover the door, it is better to lay it in a horizontal position (for better fixation of the panels on the surface). The laminate must be cut into blanks for the entire width of the blade. It is better to start trimming from the inside of the door.
Glue or liquid nails must be applied to each part, and the remaining lines must be secured with a locking joint after drying the previous part with a construction hairdryer. After the entire side is pasted over, it needs to be allowed to dry (you can put a weight on the surface for better fixation).
After this, you can glue the decor to the ends. Veneer strips to match the finish are suitable. They can be pasted over the canvas or secured with liquid nails. Upon completion of the upholstery and decoration work, you can return the fittings to their place and return the door to its hinges.
Finishing requirements
Before you start finishing the front door opening with your own hands, you should study the requirements for the work.
They must be followed if you want to get decorative and durable slopes that will not lose their visual appeal for many years.
- Installing suitable door and opening fasteners is an important step in improving the safety, strength and aesthetic appeal of the structure.
- It is advisable to choose the same material from which the door is made. In any case, it should be in harmony with the decor and contribute to the creation of a unified image.
- It is important to determine the appropriate mounting method. Thus, decorative stone is attached by gluing to the wall, and sheathing with MDF panels can only be done after installing the sheathing.
- Pay attention to sound insulation and the ability to conserve heat.
- The finishing of the doorway ends with the installation of platbands.
- Sometimes different materials are used for interior and exterior decoration.
What materials are used?
The finishing of the doorway after installing the iron door is done with the following materials:
- cement-sand mortars;
- plasterboard, which acts as an independent option or the basis for subsequent finishing (for example, you can use wallpaper);
- plastic, wood panels, laminate, veneer;
- decorative stone, natural or artificial.
If you decide not to call a specialist, we select the material and get to work.
However, it is important to learn in advance about the nuances of finishing and correctly assess your strengths.
Plastering a doorway
Plaster is considered a classic option. This method is used in non-residential premises or where additional finishing is expected in the future. You should plaster with care and attention, and then handle the doorway with care, because it will become difficult to care for. But the method also has advantages: strength, durability, resistance to adverse environmental factors, the ability to easily carry out repairs in case of damage, cost-effectiveness (30 kg of plaster mixture costs 200-300 rubles).
The finishing process looks like this:
- The surface is cleaned and then primed.
- After drying, guide beacons are installed. The evenness of the position is determined by the building level, and fixation is carried out with a solution.
- A reinforced mesh is attached to the surface. The door frame and walls that are not to be covered are covered with masking tape.
- Holes and voids are filled with the solution, after which it is applied to the entire surface.
- The resulting cracks are eliminated with putty.
The door opening is ready for painting or installation of other facing materials.
Plastering slopes
[flat_ab > Slopes are most often plastered along with the entire apartment when the finishing is not completed.
- Putty knife.
- Level.
- Master OK.
- Rule.
- Painting mesh.
- Painting tape.
- Painting corners.
- Construction mixer.
- Plaster (dry mix).
- Finishing putty.
- The primer is liquid.
- Sandpaper.
- Water-based paint.
Do-it-yourself plastering sequence:
- Prime.
- Install and fix the beacons using a level.
- Close the junction of the wall and the slope using a painting corner.
- Cover the front door and frame with masking tape
- Attach the painting mesh.
- Make a solution.
- Fill potholes.
- Apply the solution to the entire surface, stretch along the beacons, then wait for it to dry and seal the cracks.
- Prime.
- Level with finishing putty.
- Wait until dry and sand with fine sandpaper.
- Paint with water emulsion.
If we are talking about a private house, it is advisable to treat the cleaned opening with an antifungal primer before work and add a little to the solution itself.
Plasterboard finishing
It can also become the basis for subsequent transformation or an independent option. Drywall is not as durable as plaster, but it looks attractive, strict and stylish, and is also easy to install. Another important advantage of plasterboard sheets is the cost, which is in the range of 200-400 rubles.
The finishing of the entrance door openings is carried out as follows:
- Measurements are being taken.
- Plasterboard sheets are cut into fragments. The resulting parts must completely cover the slopes and fit tightly to each other.
- Damage to the surface is repaired with polyurethane foam.
- Foam is also used to secure the finishing material. To do this, it is applied in a zigzag pattern to the wall, after which the drywall is pressed for several minutes. All you have to do is wait 10 minutes and press the material again. This ensures quick and durable adhesion.
- The cracks remaining after completion of the work are sealed, excess drywall and foam are cut off.
- The voids along the edges are closed with corners or putty.
Advantages of panels over other materials
Panels are considered a universal finishing material. Finishing slopes using this product is a simpler procedure than applying plaster or using gypsum boards. Plastic varieties stand out especially. They are characterized by good durability, low cost and ease of installation.
Covering window slopes with panels has many advantages, namely:
- The work is completed in a short time. The process usually takes no more than one day, which is significantly less than putting putty and subsequent painting.
- If properly sealed, such slopes will become an excellent barrier to the penetration of cold.
- Modern materials have good properties. They are durable and indestructible from exposure to ultraviolet radiation.
- There is no need to carry out additional finishing measures. The fact is that the panels have different colors and textures, which makes them suitable for use in various interiors.
- The result is an attractive decorative surface. It is also necessary to take into account that there are additional elements (profiles, corners, moldings) that make the coating even more sophisticated.
Finishing with MDF panels
MDF is used for interior cladding of entrance doors in residential buildings and office buildings. The material is characterized by durability, hygiene and aesthetics, provides good sound and heat insulation, and withstands moisture well. The panels cost 150-250 rubles. per square meter. The tree will cost more: 300-700 rubles. Serious disadvantages of the material include its easy flammability and the fact that cladding is possible only after installing the frame.
Expensive purchases also include the purchase of veneer, a wood material characterized by high strength and aesthetic appeal. True, direct sunlight is harmful to it. Price per square meter – up to 5,000 rubles.
To decorate a doorway with wood, veneer or MDF panels, you need:
- Using self-tapping screws and dowels, install guides from wooden slats. Before starting work, the frame slats are treated with an antiseptic.
- Adjust the panels to the required size.
- Attach the first part with self-tapping screws or nails to the guides, continue cladding, completely covering the width of the slope.
- Mount corners and side panels to the guides.
- Mask the fasteners with adhesive and install a decorative strip.
- Secure trim around the perimeter of the door.
Assembling a box from MDF
Installation of door panels.
- roulette;
- hacksaw or circular saw;
- miter box;
- hammer and nails;
- electric drill;
- self-tapping screws
To obtain a high-quality result, the assembly of an MDF door frame must be carried out on a flat horizontal plane. There are several ways to make a door frame. Firstly, it can be assembled using a tenon joint. To do this, spikes are mounted in adjacent beams, equal in height to the thickness of the beams. Moreover, both horizontal and vertical beams must have spikes with which they are connected to each other.
Read also: Cambridge cottage community photo
Secondly, the assembly can be carried out at an angle of 45 0. In this case, the vertical beam is cut at an angle of 45 0 on only one side (where it is connected to the horizontal element). In the case of a horizontal beam, the same cut is made on both sides. When determining the length of the vertical bars, which should be the same, the height of the doorway, the size of the gaps, and the thickness of the bars used must be taken into account. The length of the horizontal beam is the sum of the width of the door leaf, the size of the gaps and the thickness of each of the vertical elements. To secure the structure, you need to use nails or screws. They must be screwed in at an angle of 45 0.
Thirdly, the structure can be assembled at an angle of 90 0. To do this, the horizontal beam is simply applied to the vertical element and connected using self-tapping screws. In this case, the narthex is sawed off on parts that are located vertically. To prevent the MDF from cracking, holes are pre-drilled, the diameter of which should be 2-3 mm less than the diameter of the screw. To obtain a rigid and reliable structure, each connection point is secured with 2 self-tapping screws.
Plastic finish
A popular material, environmentally friendly, budget-friendly and easy to maintain. Manufacturers offer a wide color palette, which makes it easy to match the plastic to the texture of the door leaf. A square meter costs no more than 200 rubles. But the material is not particularly durable and does not fit every door.
The entrance door opening is lined with plastic according to the same principle as MDF: first the surface is prepared, then a sheathing of slats is attached, and then plastic panels are attached to it.
Advantages of sealing MDF slopes
Installation of MDF slopes is affordable for most buyers, and the color scheme allows you to choose a design that matches the door leaf and style in the hallway, so most of those who have installed new doors prefer finishing the opening with this material. Additional MDF panels have the following advantages:
- the material insulates the opening from noise and cold;
- withstands moderate impacts and is resistant to damage;
- the decorative layer contains a pattern imitating natural wood, which looks very rich and adds coziness to the hallway;
- Easy to install, no hammer drill or drill skills required.
Laminate cladding
Such finishing usually does not raise questions even among inexperienced builders. This is due to the special flexibility of the laminate, its ability to take different shapes. The material looks good and does not harm the environment, but it does not tolerate high humidity, so you should not use it on the outside of the opening. The price of sheets is 300-3000 rubles.
Finishing a doorway with laminate differs little from lining it with MDF panels. But it is not necessary to mount the frame: another finishing method, suitable for smooth walls without flaws, involves gluing the material with foam directly to the surface.
Source: misterdver.ru
Advantages of laminate products
Laminate slopes are equally good when finishing the entrance to an apartment or country house, office or any other non-residential premises. This material goes well with various floor coverings.
Laminate has many positive qualities, which makes it popular specifically for arranging slopes:
- Low price and availability. The material is easy to find in the nearest construction supermarket; it is quite inexpensive.
- External attractiveness. Due to the variety of shades and textures, it can be matched to any door. It goes well with designs in which the canvas imitates wood.
- Easy to install. Laminate slopes are very easy to install on your own. It won't take much time and doesn't require any special construction skills. The material cuts well, it is light, bends moderately, so it does not crack.
- Durability and moisture resistance. Laminate can withstand bends well and is shock resistant. Some of its varieties have not only upper, but also lower protective layers that protect the material from moisture penetration.
In addition to these advantages, laminate slopes for interior doors have a significant service life. With proper installation and good quality products, they will last about 15 years, no less than the door itself.