The process of installing doors is a responsible and important stage of all construction and finishing work. High-quality fabric not only helps to create a tightness of the room space, maintaining its sound and heat insulation, but also gives a feeling of safety and security. But this is not the whole range of work on equipping a doorway.
Proper finishing of the doorway plays an important role in this matter. Such work will give the new door a finished and aesthetic appearance, and the correctly selected material for this will provide additional protection from noise and cold to the area around it. And to create a beautiful interior and design, you can make door slopes from plastic, although this is not the only option.
Having decided to finish the door openings on your own, you need to know some technological subtleties, then you can do without the expensive services of repair teams.
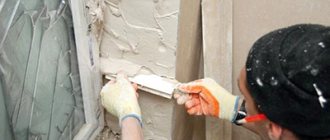
Plaster slopes
Considering that in most residential premises the walls are plastered, it is quite logical that finishing the door slopes with your own hands will be done in the same way. No special knowledge is required here, you only need some tools, without which an even angle will not work.
Tools and materials
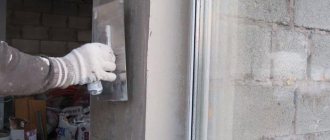
To mix the solution, in addition to the container, you will need a drill with a “mixer” attachment. To ensure straight lines for the slope, you need: a two-meter building level and a rule. You also need two spatulas: one with a width slightly exceeding the width of the slope, the second smaller. To prime surfaces, it is convenient to use a flat brush.
So:
- If you do not plan to use plastic corners during subsequent finishing, you can protect the outer corners of the slope in another way. For this purpose, a perforated metal corner is also used, which, before finishing the door slopes, is attached to the base surface of the slope with “liquid nails” glue or polyurethane foam.
- To strengthen the plane of the slope, or an opening without a door, a plaster mesh made of fiberglass is used. And there is a version of a corner combined with a grid into a single element - it is very convenient to use.
- To prepare the solution, you will need to purchase dry gypsum plaster, diluted with water to the desired consistency. To save solution, you may need polystyrene foam.
- If there are deep potholes in the slope, or its thickness exceeds two centimeters, pieces of foam plastic are placed in the deepest places, and a layer of plaster is applied on top.
- In order not to spoil the door frame, its surface is first covered with masking tape. Only after this can you begin priming and plastering the slope.
The last stage of rough finishing of the slope will be treating the plastered surface with fine sandpaper to achieve smoothness, and another layer of primer. To see how door slopes are plastered, videos, of which there are many on the Internet, will help you a lot.
Plastic slopes
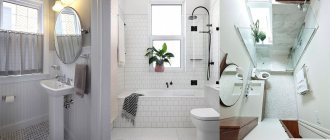
The easiest way to finish the slope is plastic. The price of this material is the lowest compared to others. The only “but” is that plastic slopes will not look harmonious everywhere. It is most advisable to finish the slopes of windows and doors with plastic, if the window, door, or wall cladding of the room is made from it. The ideal option for such finishing is usually kitchens, loggias, and bathrooms. So:
- The most important thing when working with plastic is to achieve the most even and accurate cut possible.
To do this, it is better to use an electric jigsaw rather than a knife. Naturally, the measurements must be taken accurately, then it is much easier to adjust the parts to each other.
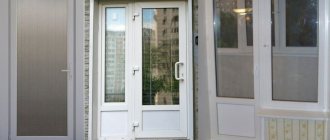
Plastic walls and slopes
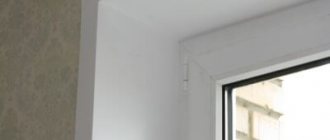
- For window slopes, white sandwich panels are most often used, and any PVC panel is suitable for finishing the doorway. If this is a balcony door, the trim of the slopes of which is made of colored plastic, then the slopes of the window next to it are decorated in the same way. The picture above is a clear example of such a finish.
- If the doorway was severely damaged when dismantling the old door, then before finishing the door slopes with plastic, it is better to first remove the plaster slope with a margin of 1 cm. There will be no need to sand it under the plastic, and the solution can be used not gypsum, but cement.
- If there is no significant damage to the opening, the potholes can simply be filled with foam. The same is done when MDF panels are used for finishing.
- To install the PVC panel, a plastic starting profile is fixed to the door frame with self-tapping screws.
The side parts are installed first, and then the horizontal part. Any universal adhesive designed for working with this material is applied to the plastic. - The panel is inserted into the groove of the profile and pressed tightly to the surface. Then the glued part must be further fixed until the glue dries completely. You can do this with masking tape, or just prop it up with something.
When the panels are mounted, the seams between them must be filled with sealant and then closed with decorative corners. This completes the finishing of the slopes on the balcony door.
Wooden slopes
Considering that interior doors are made of wood, it is quite logical that the slopes can be made of the same material. This doorway design will look harmonious in any interior.
So:
- To finish the slope, you can, of course, use solid wood panels, but most often veneered or laminated MDF is used. Regular laminate used for flooring is also suitable. The main thing is that its color is perfectly matched to the color of the door.
- The technology for installing wooden panels is similar to plastic, only instead of a guide profile, there will be strips that are attached to the base surface with dowels. Next, the panels are screwed to the slats with self-tapping screws, not forgetting to apply glue to the back side. The joints between the panels are also sealed and covered with a corner.
- There is another option: when buying doors, you can immediately buy additional strips in color. Sometimes they come included. They are made of chipboard covered with PVC film that imitates the texture of wood.
- Extensions can also be used if the width of the doorway is larger than the width of the frame. Since these strips are attached directly to the frame, the extensions are installed in the groove located on the back side even before the door is installed.
Sometimes door slopes are trimmed with decorative stone
. This option is more suitable for entrance doors. Indoors, such finishing is rare - mainly in design projects and in the interiors of mansions. The floor or fireplace can be laid from the same stone, and appropriate accessories can be used to decorate the room. In this case, slopes made of decorative stone look original and appropriate.
- Methods for making slopes
- Preparatory work
- Plastering the slope
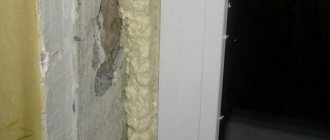
The apartment has already installed entrance doors. Reliability, safety, high-quality protection that protects against heat loss and all kinds of external sounds and noises is ensured. Now all that remains is to clean up the mess. On the outside, entrance doors are most often decorated with platbands or sealed with mortar by professional installers or independently during installation. On the inside, everything is much worse. Bare concrete, bricks, and door fastenings are visible. It is necessary to organize slopes to hide all this disgrace. The finishing of the entrance door slopes can be done by installers, however, not every company undertakes this. In this case, you will have to do this work yourself. The process itself is not particularly complicated with any method of forming slopes. Below are detailed instructions on how to make slopes with your own hands.
Methods for making slopes
The main purpose of the slope is to give a normal appearance to the doorway and reliably cover the fastenings of the door frame, thereby increasing the burglary resistance of the entire structure. There are several ways to form slopes:
- sealing with mortar and plastering;
- gluing the finishing material with a solution;
- frame cladding with finishing material.
The division is made precisely according to the method of forming the slope, because you can choose a wide variety of materials for cladding: laminate, MDF, plasterboard, plastic panels, wooden slats, cellulose panels and much more. The main thing is to decide how to fasten the slopes of the front door with your own hands.
Sealing the entire slope with mortar is the most acceptable option in terms of protection and sound insulation. Moreover, the result is a slope that does not bend and has no voids. However, this option is somewhat cramped in terms of design. As an option, you can decorate the slope using textured plaster and painting.
If, in addition to filling with mortar, you also install various finishing materials, you can achieve absolutely any appearance. So this option, when fully executed, combines the advantages of the first method and has no actual disadvantages.
Without good slopes, even the most luxurious door loses all its appeal.
The third way to make a front door slope involves mounting a finishing material, such as MDF, plasterboard or plastic, on a pre-constructed frame made of wooden blocks or a metal profile. This option is ideal when forming slopes using another method requires an prohibitively large amount of solution to completely fill it. As a result, money is saved and it is possible to make the slope more aesthetically pleasing. Moreover, with a frame structure it is easier to achieve evenness and maintain all levels, which is not unimportant for visual perception.
This option for slopes is great for installing lighting and switches directly into or above the doorway. This way it will be possible to illuminate the hallway directly at the entrance to the apartment. In addition, with a frame construction of the slopes, it will be easier to subsequently carry out such communications as wired Internet or cable television.
Preparatory work
For any method of forming a slope, the preparatory stage is the same. Before any work, the door leaf and door frame should be covered with film and masking tape to avoid damage. First of all, all particularly protruding parts are combed off, which may interfere with the installation of the frame of the future slope or will protrude above the plastering level. Then the entire surface is swept and primed. It is better to use a deep penetration primer. Only if the wall is made of foam concrete or similar loose material, a surface primer is used.
At the preparation stage, you can also lay a power cable to connect a switch that will light the lamps in the hallway. If you plan to use the option with a frame fastening of the slope, then it is better to postpone laying the wire until the frame has already been installed.
Tip: For clarity, display the outline of the future slope on the floor. Subsequently, it will be easier to navigate using these marks.
Plastering the slope
Beacon profiles are installed on the prepared and primed surface. With their help, it is easier to create a smooth surface for the applied solution. Beacons can be secured using mortar. It is better to use gypsum mortar, it sets quickly and you can proceed to the next stage sooner.
Place small piles of mortar in two or three places along the length of each end and install beacons. Using a bubble level, adjust the position of the beacons in one plane.
When the solution under the beacons has hardened, you can begin to fill the slope with cement-sand mortar. Cement and sand are mixed in a ratio of 1:4 and thoroughly mixed with a mixer attachment inserted into a drill at low speed. The solution should be similar in thickness to curd mass. You can add a little gypsum.
Using a trowel and spatula, apply the solution to the doorway slope and level it along the beacons. As soon as the solution has dried, which is at least a day, you can begin applying the starting and finishing putty. The dried finishing putty is finally compared using an abrasive mesh. After this, you can open the slope with paint.
Formation of a slope using finishing material for mortar
In this case, materials such as drywall, MDF, plastic slopes, etc., are strengthened using cement-sand mortar or adhesive. The surface has already been prepared: leveled and primed.
It is best to indicate the level of the future slope and provide normal support for the sheathing material. To do this, screw the screws into the wall so that their heads form one plane. In this case, the thickness of the sheathing material is taken into account, because it will rest on the heads of the screws. After this, you can fill the entire space of the slope around the perimeter with a solution.
For reliability and for the sake of economy, the first layer is a cement-sand mortar, which forms a layer slightly smaller than the height of the supporting screws. Next, select an adhesive composition suitable for your sheathing material. The adhesive solution is applied in an even layer over the surface of the slope and onto the strips of material on the reverse side.
Carefully placing the sheets of material on the slope, they must be pressed down until they rest on the caps of the screws. The correct installation is checked using a level; if necessary, you can correct the position while the solution has not yet set.
If there is a gap between the sheathing sheets and the wall, it must be sealed with mortar. After this, you can attach the platbands, if any.
Video: nuances of primary finishing of slopes
Mounting slopes on a frame
Even though the solution will not be used, the entire surface of the wall under the slope should still be primed. This will prevent it from crumbling over time. Next, parts are prepared for mounting the frame.
As a material for the frame, you can use wooden bars and slats, or a metal profile, which is used for the construction of plasterboard walls and ceilings. Given the thickness of any of these materials, care should be taken to level the wall on which the frame will be mounted so that the frame elements fit snugly against the wall.
The frame elements should be secured using plastic dowels and impact screws of the required length. Along the entire perimeter of the doorway, two slats or profiles are attached in parallel, placing them on both edges of the future slope. To strengthen the structure, jumpers are fixed between the main load-bearing elements. This is especially important at the corners between the sides of the doorway and the top.
Before sheathing the frame, you can just start laying the cable to the installation site of the switch.
Fastening the sheathing is slightly different for each type of material:
Drywall
It is enough to secure it with self-tapping screws around the perimeter of the slope. The gap between the sheet of drywall and the wall is filled either with mortar, or sufficiently wide platbands are installed. The edges of plasterboard slopes are reinforced with special perforated corners. The joints between the pieces of drywall are sealed with construction tape. The entire surface is puttied and leveled with a float using the finest abrasive. After this, you can paint the slopes or wallpaper them.
This material undoubtedly has the best aesthetic qualities, and also greater strength and wear resistance than other materials. The elements are secured using small nails, clamps or self-tapping screws. The main thing is that each type of fastening does not interfere with the installation of the following slope elements. Corners and fastening points are covered with platbands or corners, which are glued throughout the entire structure using liquid nails.
MDF is the most popular material for slopes, and the maximum number of ready-made solutions is produced from it. Therefore, installation of such slopes is usually the simplest.
Laminate strips can be laid both across and along the ends of the doorway. When laying transversely, it is enough to fasten the first lamella to the frame from below along the edges. Subsequent elements are installed with a snap lock. The last lamella must be secured. All intermediate ones can be secured, for example, through one or even two elements. Along the upper horizontal slope, all laminate strips must be secured at the edges. The longitudinal strips of the laminate are attached in at least three places: along the edges and in the center.
Plastic slopes
Installation of slopes made of plastic, as well as plastic lining, is carried out in almost the same way as laminate. Since this material is less durable than laminate, it needs to be fixed more often. The fact that near the front door the material will be subject to heavy loads and frequent impacts is taken into account. Therefore, the fastenings of the strip of plastic cladding of the slopes are located every 10-15 cm.
Plastic slopes are well suited for interiors in a modern style. But the interior decoration of the door must, of course, match.
After the slopes are mounted, switches and lighting fixtures are connected. The film and masking tape are removed from the door leaf and door frame. This completes the work. The whole process of forming the slopes of the front door is quite simple, choose the option that suits you and start implementing your plan.
After installing the door, a space remains in the opening between its frame and the wall, which is filled with polyurethane foam or other filler. To give the doorway a finished look, slope finishing is used. They perform not only a design function. The slopes also serve as additional heat and sound insulation. It is very important that the finishing of the openings remains in good condition for as long as possible. The materials needed for this, and how to do it yourself, so that they fit harmoniously into the interior of the home, and their production does not become burdensome for the family budget, will be discussed below.
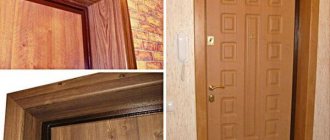
How to finish slopes after installing an iron door
After completing the installation of the door, it is extremely important to properly caulk or sew up the jamb to hide the concrete, brick, and other finishing materials. It is possible to arrange the entrance to the house in several ways, using all kinds of building materials.
Drywall
A common, labor-intensive way to design door slopes. First, the gypsum board needs to be built in, then puttyed, carefully painted with a water-based paint composition or covered with wallpaper. As a result, the surface of the jamb will be smooth and attractive.
Artificial or natural stone
A luxurious option that plays a decorative role. It is considered expensive (if it is a natural material). The latter is extremely durable, environmentally friendly, and resistant to external influences. Artificially created stones are made from gypsum, are relatively cheap, and have multiple disadvantages.
Tile
Tile slopes are durable, easy to maintain, resistant to moisture, and do not scratch. However, it is unusual to look at them: such material is more often found in the kitchen and bathroom. In addition, laying mosaics takes a lot of time. Today it is not in trend, therefore it is not popular.
Extras
More suitable for a corridor in which there are many doors (entrance iron, interior wooden). Then the door leaves and slopes can be decorated with the same material. Extensions are easy to install, but they are more expensive than MDF and laminate.
Plastering slopes: advantages and disadvantages
For many years, the slope was finished using almost the same material - a mortar based on cement and sand. This method cannot be called an outdated technology, because many developers who know how to handle plastering tools resort to it. The gaps between the openings of interior doors and the walls are closed with a strong and durable material, which can subsequently be easily applied with most finishing coatings. However, cement slopes have disadvantages:
- In order for them to turn out to be of high quality, you need experience in plastering work.
- Dismantling slopes requires the use of either a hammer drill or a crowbar, and this is dusty and labor-intensive work.
The use of modern materials when finishing door openings with your own hands allows you to save effort and time. To be fair, it should be said that plastered surfaces often act as a rough base for laying slope cladding, but I would like to note that plastering the cracks before doing the cladding is still easier than achieving a perfectly smooth surface using mortar.
In addition to the sand-cement mixture, the following are used for finishing interior door openings:
- drywall;
- plastic;
- wood based materials.
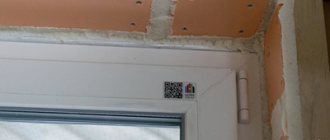
Notes from professionals
Figure 4. To prevent the profiles from diverging during installation, it is recommended to temporarily seal the joints with tape.
- Sandwich panels can have a matte or glossy surface and can imitate the colors of various types of wood. Inside there is a porous structure made of polystyrene foam that retains heat. They are not afraid of exposure to moisture. The thickness of the panels is 1 cm. They can be fastened with self-tapping screws, the caps of which are closed with plastic corners. From this material you can construct slopes up to 150 cm wide.
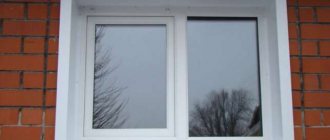
- You can make slopes from plastic immediately after installing the windows. Window sills are also installed at the same time.
- Plastic wall hollow panels are the cheapest material of this kind. It can have many colors. Inside there are air chambers formed by stiffening ribs. The thickness of the material is 0.8 and 1 cm. It is produced in sheets of length 270 and 300 cm. Width – 25, 37.5 and 39 cm. These panels are recommended for finishing slopes up to 25 cm wide.
It is quite possible to make plastic slopes after installing new windows with your own hands. The work requires a minimum of tools and materials.
A job done correctly will delight you for at least 20 years.
If you make gross mistakes, this can lead to a loss of thermal energy in your home up to 40%. All work is completed in a few hours and does not leave behind a large amount of dirt and debris. Now it should be clear to you how to make slopes.
The use of plasterboard in finishing
Drywall is becoming an increasingly popular material. True, it does not apply to finishing coatings, but serves as a leveling base for further finishing. It is easy to cut and install. The main difficulty of working with drywall is associated only with the accuracy of marking the parts.
GK sheets can be attached to a cement base if it is sufficiently flat, however, before laying drywall, the surface of the slope must be cleaned of dust, dirt and grease and treated with a primer. Gluing should begin only after the impregnation has completely dried. The panels are fixed to the wall with dowels or specialized glue. The joints between adjacent sections of the building block and between them and the wall are sealed with putty. To prevent cracks from forming in their place, reinforcing sickle is applied to the seams. In addition, the outer corners of the slopes are sealed with perforated corners.
It can also be made from HA using a profile, in which case plastering may not be required at all. This option is suitable when the box is made of hard material that will not allow it to “play” during operation, and the issues of sound insulation and heat protection of the room are not in the first place.
To work with drywall, you need the following tools:
- construction knife or hacksaw for cutting HA;
- marking devices (tape measure, ruler, square, level);
- profile cutting machine;
- spatula for applying putty and glue;
- priming brush;
- screwdriver;
- drill.
Whether the slopes on the interior doors will be covered with plasterboard or the plasterboard will be fixed to profiles, the finishing work must begin with the installation of vertical panels. Only after they are fixed is the sheet of civil code attached above the door. Glue can be applied to the base under drywall in a continuous layer or every 10-15 cm. The fastener heads should be recessed in the sheets, and the holes should be treated with putty.
Materials and tools for work
Figure 2. Layout of the sandwich panel.
How to make slopes from plastic panels, what tools and materials to use? To work you need to prepare:
- plastic;
- starting profile;
- F-shaped profile;
- insulation;
- liquid Nails;
- self-tapping screws 3.5x25 mm;
- screwdriver;
- sharp knife;
- gun for a bottle of liquid nails;
- polyurethane foam;
- pencil;
- PVC corners 30-50 mm wide;
- scotch;
- cement mortar.
You can't skimp on plastic. Properly executed slopes are designed to last for a long time. It is better to purchase hard plastic, since through holes may appear in soft plastic due to careless handling.
The F-shaped profile is easy to cut with scissors, a knife and other cutting tools. Most often sold in lengths of 3 and 6 m. This also applies to the starting profile.
Mineral wool is used as insulation in slabs measuring 0.5 x 1 m. Instead of mineral wool, polyurethane foam is often used, which at the same time serves as an adhesive composition.
Liquid nails may be needed to glue profiles to the wall adjacent to the slope.
Self-tapping screws 3.5x25 mm are popularly called “bugs”. They are designed for connecting metal guides when working with drywall. This fastener is excellent for attaching the starter profile to the surface of the window sill and to the frame.
Wood-like slopes
The wood finish gives the doorway a sophisticated look. The role of wood when decorating door openings with your own hands is played by laminate or MDF. The first is used in cases where a minimum finishing thickness is needed, and MDF boards can close wider gaps.
Please note that the slope planes may not be located at an angle to the door leaf.
Their surfaces can be perpendicular to it. In many cases, this will help simplify the installation of the cladding if the end of the opening is fairly even.
The procedure for installing “wooden” slopes is as follows:
- The gaps between the frame and the wall are sealed with foam or other fillers.
- Excess filler is removed
- The wall surface is cleaned and primed.
- The base layer for the slopes (plywood, MDF) is attached to it with glue or dowels.
- The cladding is glued or screwed onto the base with self-tapping screws.
- The seams between the planks are coated with sealants.
It is important that all planks have the same thickness and are correctly selected in color. Finishing with laminate or MDF is the most preferable option for those who used them to renovate their home. After it, there will definitely be a sufficient amount of this material left, which will be enough to construct several slopes.
Types of doorways
Before arranging a doorway, it is important to choose the appropriate option. The latter must fit into the style of a particular room.
Among the doorways often used in practice, the following should be noted:
1. Rectangular. Most often used in public places and residential buildings. Their width can be changed (depending on the products being installed).
2. Arches. Unlike rectangular ones, their upper part is arched (regular, arbitrary). Doors are usually not installed in such openings.
3. Columns, half-columns. They are used only in specially designed buildings (estates, palaces).
Additionally, non-traditional doorway designs are used. They are distinguished by special shapes, contain additional elements, and are mostly formed in plasterboard partitions.
Plastic cladding
Quite often, interior openings are lined with plastic, but it needs to be chosen correctly so that there is no feeling of disharmony when you see a plastic entrance to a room decorated, for example, with wood. Otherwise, installing plastic is not difficult.
- Along the perimeter of the opening, wooden slats or a profile are attached to the wall. Their installation must be carried out using a level, but it is better to stretch 2 cords from top to bottom at the 2 vertical ends of the opening. The distance from the threads to the wall depends on the thickness of the profile. The sags are set level and attached to self-tapping screws, which are screwed into the upper and lower parts of the opening. Along these planes, base profiles are nailed to the ends of the wall with dowels. The plane above the box is built using horizontal threads.
- The starting bar is nailed close to the box.
- Plastic panels are cut according to the vertical and horizontal dimensions of the opening.
- Vertical sheets are installed and fastened with self-tapping screws to the slats.
- The top panels are placed and also secured.
- The finishing profile is installed.
- Corner joints are sealed with sealant.
To work with plastic you need:
- sander;
- jigsaw;
- impact drill or hammer drill;
- screwdriver;
- hammer;
- carpenter's knife;
- level.
The direction of the plastic panels can be parallel to the wall, but it is better if their joints with each other are located horizontally (from the door to the room).
You can choose the most suitable method for constructing slopes based on the availability of a particular material, economic or design reasons.
After installing the new entrance door, all that remains is to update them with brand new slopes. They can be integrated into the interior design in different ways; plasterboard, laminate, MDF, PVC sandwich panels, as well as non-standard materials (for example, imitation natural stone) are suitable for design. In order not to spend money on the services of a specialist, you can install the slopes yourself, following the instructions.
Main types of materials
The finishing of doors, windows, loggias and balconies is carried out using different panel-type materials. The main types include:
- MDF panels.
- Plastic wall panels.
- Sandwich panels.
MDF is not often used for windows; as a rule, it is used to cover a door and is used as cladding. MDF panels have their own characteristics:
- Slopes require meticulous work. Moisture can get in through cracks and crevices, which means everything needs to be carefully sealed.
- The size of the panels is factory-made, due to which it will not be possible to use MDF everywhere. If the width of the slope is large, then MDF will do.
- Small selection of colors and textures.
- Plastic windows will not always be combined with MDF.
It is better to use the material by carefully considering the interior of the house. Goes well with wood or wood-look materials.
Advantages of PVC slopes
Plastic panels for slopes are the most popular choice of people. They have many advantages:
- The material is cheap compared to other types.
- Installation is simple, even without experience.
- The choice of colors is huge, so you can match any design inside or to match the facade of the house outside.
There are also difficulties during work:
- If the slope is more than 25 centimeters, then additional clamps are installed, otherwise the cladding will “walk”.
- It is recommended to use insulation, because insulation will not allow cold to pass into the house.
- Plastic panels are easy to damage.
Despite the disadvantages, plastic panels for slopes are an excellent option for window design. Cutting, installation and insulation are very simple, the appearance is decent. Slopes made of sandwich panels are a type of plastic material, but the characteristics of such raw materials are better, of course, this differs in the price of the product.
PVC sandwich panels for slopes
Sandwich panels for window slopes have their own characteristics:
- The product is made from two pieces of plastic, and there is already insulation between them. Due to this, there is no need to insulate the slopes.
- Installation work does not require large financial costs, the main thing is to calculate everything correctly and install the slopes carefully.
There is also a disadvantage of sandwich panels for slopes - if the window sealing is poor, moisture will begin to penetrate, the material will deteriorate and collapse, in other words, it will peel. You can also find other panel elements on sale:
- Natural wood is highly expensive and difficult to install.
- Composite panels based on gypsum, lined with PVC.
- Metal panels are used more often outside and require certain knowledge when installing slopes.
Although the materials are different, their installation instructions are almost always the same.
Slopes made of PVC panels and PVC corners (video)
Plastering slopes
Slopes are most often plastered together with the entire apartment when the finishing is not completed.
Required tools:
- Putty knife.
- Level.
- Master OK.
- Rule.
- Painting mesh.
- Painting tape.
- Painting corners.
- Construction mixer.
Materials:
- Plaster (dry mix).
- Finishing putty.
- The primer is liquid.
- Sandpaper.
- Water-based paint.
Do-it-yourself plastering sequence:
- Clean the surface.
- Prime.
- Install and fix the beacons using a level.
- Close the junction of the wall and the slope using a painting corner.
- Cover the front door and frame with masking tape
- Attach the painting mesh.
- Make a solution.
- Fill potholes.
- Apply the solution to the entire surface, stretch along the beacons, then wait for it to dry and seal the cracks.
- Prime.
- Level with finishing putty.
- Wait until dry and sand with fine sandpaper.
- Paint with water emulsion.
The finishing is complete.
If we are talking about a private house, it is advisable to treat the cleaned opening with an antifungal primer before work and add a little to the solution itself.
Drywall slopes
Drywall is a popular material for finishing the slopes of the front door with your own hands. It is inexpensive, reliable and easy to install.
Necessary materials:
- Drywall.
- Dowels.
- Self-tapping screws.
- Profile guides.
- Glue.
Required tools:
- Drill.
- Roulette.
- A simple pencil.
- Rag.
- Level.
- Putty knife.
- Construction mixer.
- Hammer.
The procedure for installing slopes with your own hands using drywall:
- Clean the opening from dust and foam residues.
- Drill slots for dowels around the perimeter at a distance of 20 cm - this is necessary to improve the adhesion of the material to the surface.
- Using a tape measure, measure the width and height of the door opening and cut out guides: two side and one top.
- Stepping back about 1.5 cm from the door opening, attach the guide to the self-tapping screws so that its narrow edge is in the inner part of the slope.
- Measure the size of the strips for the slopes and cut them from plasterboard. When cutting, try to ensure that the edge of the drywall does not crumble and is smooth.
- Dilute the glue to a homogeneous, thick sour cream.
- Apply the adhesive mixture in heaps onto the cut-out parts of the drywall.
- Coat the dowels with glue.
- A sheet of drywall is inserted into the guide and pressed.
- Check the position of the slope with a level, then fix it for 6 hours.
- Remove any protruding glue with a rag.
- Periodically tap the surface with a hammer through the scrap.
The next day after installation, the slopes can be further processed: putty, paint.
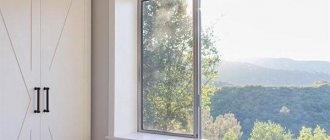
PVC panels are the best choice
This option is optimal, because this finish combines an affordable price, ease of installation and an attractive appearance. Manufacturers offer a variety of panel options to imitate natural materials; wood is especially popular. This material has a number of significant advantages:
- Environmentally friendly. The surface of the panels has no pores, which prevents the fixation and development of fungi and mold on it. When it comes to the slope of the front door, this is important.
- Fire resistance. If we compare it with other popular materials - fiberboard and chipboard, then PVC products have a ignition temperature that is 100 degrees higher. Even if a fire occurs, the panel emits less smoke than the specified materials, which means it will not create an obstacle to exiting the room. Plus, PVC is a self-extinguishing material.
- Durability. The panels can withstand intensive use, temperature changes, and repeated washing.
- Ease of installation - attaching them to the wall will not be difficult even for a novice builder.
- The doorway takes on a finished look.
Slopes finished with white panels
Advice! If the opening is wide, many people wonder what is better: installing a second door or finishing this space? The decision depends on the location of the opening itself. For the entrance group, two doors are still preferable.
Laminate slopes
Laminate is a floor covering, often used for entrance door slopes; it does not require additional processing, it resists mechanical stress. Do-it-yourself finishing has a lot of nuances.
There are two ways to install laminate slopes:
- Frame installation. With this technology, you can insulate the opening: fill it with mineral wool or polyurethane foam. The disadvantage of the design is that the slats are placed only in a horizontal position.
- Glue installation. It requires a flat surface of the opening, or it must correspond to the dimensions of the laminate. The laminate is glued to the foam (at low pressure).
The first method is preferable for apartments, the second is universal.
Finish: technology
There are 2 common methods of finishing slopes with panels or wood. This is frame installation and adhesive.
First way. The main advantage of frame technology is that the space between the finishing material and the wall can be sealed with mineral wool, polystyrene foam or polystyrene foam, which guarantees high-quality insulation. The essence of the technology is that first a frame is created from slats or a metal profile, onto which panels of any material are screwed with self-tapping screws.
Second way. Adhesive installation requires careful leveling of the base. Low-pressure polyurethane foam can be used as an adhesive. The glue method is easier for DIY projects.
Slopes made of MDF panels
The most common finish: affordable, looks good, easy to install.
Necessary materials:
- MDF panels.
- Wooden bars, width 3 cm.
- Dowels.
- Self-tapping screws.
- Liquid nails.
- Platbands.
- Decorative corner.
- Guide strips.
Tools:
- Hammer.
- Drill.
- Scissors, knife.
Installation of MDF door slopes - do-it-yourself installation algorithm:
- Clear the opening.
- Drill holes around the perimeter for the dowels.
- Afterwards, attach the slats and guides.
- Measure dimensions and make templates for parts for slopes.
- Cut out the details.
- Install the top part onto the screws. Check that there are no gaps.
- Install into the side guides: inside on nails, outside on screws.
- Cover the outer corners with a flexible decorative corner to hide screws and irregularities.
- Cover the inside corners with decorative strips and the finishing is ready.
After finishing the work, you need to install the platbands. If there is still wallpapering to be done, they will be installed after the renovation is completed.
Advantages: the finish looks presentable, easy installation.
Progress of work on equipment with plastic panels
Properly equipped slopes using PVC or MDF panels provide reliable and beautiful coverage.
The first step will be to take all measurements and prepare the panels and cut them to the required sizes. The process of cutting panels is best done using power tools: an angle grinder or a jigsaw - this will help achieve perfectly even cuts, helping to avoid bevels, roughness or burrs.
Before finishing the panels, you can carry out a preliminary one to check the quality of the resulting coating and, if necessary, adjust the dimensions of the parts.
The process should be carried out from the side openings; for this, the initial panel is attached to the box panel using metal screws.
Then a flat and smooth wooden strip is attached along the edge of the wall using dowels. After this, the remaining plastic panels or sheets are installed and secured with staples.
Sandwich panel slopes
A PVC sandwich panel is two thin sheets of plastic with a layer of insulation (sheet thickness 1 cm).
Materials, tools for installing slopes of PVC sandwich panels on the front door:
- PVC sandwich panel.
- Profile (starting, cover).
- Plastic is liquid.
- Roulette.
- Self-tapping screws.
- Screwdriver.
- Drill.
- Screwdriver.
Installing slopes from sandwich panels, or how to do it yourself:
- Clean the opening from dust and foam residues.
- Take measurements of the parts of the sandwich panels (length width): one top, two sides. For convenience, you can cut out a cardboard template so that there are no gaps between the parts of the PVC sandwich panels after installation.
- Cut the starting profile and attach it with self-tapping screws (10 cm margins) along the edge. You don’t have to use a profile: make an opening in the foam 1 cm deep, insert the edge of the sandwich panels there.
- Install the PVC top panel.
- Afterwards, cut the starting profile to the width of the slope, install it under the ceiling and at the base of the floor. This does not have to be done if there is liquid plastic - the cracks can be sealed with it. But do not use sealant - it will darken.
- Installation of strips of sandwich panels.
- Cover the sections of the sandwich panels with a “lid” profile. Cut and install. An overlap forms in the corners of the structure.
- Where there is an overlap, cut the profile at an angle of 45 degrees.
If desired, the space between the PVC sandwich panel and the wall is filled with polyurethane foam. This is done after installing the sandwich panels.
For more information about installing slopes with your own hands after installing the front door, watch the video
DIY door slopes: instructions for beginners
Immediately after installation, the door looks unattractive - the door frame with polyurethane foam and other details that should not be conspicuous are visible. As a finishing touch to installing doors, install slopes on the front door. To carry out this procedure, it is not necessary to resort to the help of construction companies - you can make and install slopes yourself and at home. This will require building materials, tools, patience and free time.
- Why are slopes needed?
- What are they?
- Getting ready to do the work We begin to make slopes
- From plasterboard
- Made of plastic
Non-standard solutions
In addition to the above standard methods using popular materials, you can use more original options that will highlight the interior, decorate the front door and surprise your friends:
- Artificial stone is a non-standard finishing of slopes. The main advantage is resistance to mechanical stress (if it is not a plaster model, it is fragile). Not a cheap option, requires the participation of a specialist.
- Tile. A type such as clinker (imitation brick or stone) is suitable.
- Plastic panels are an affordable but unreliable finish.
- Decorative plaster – in terms of aesthetics and durability, it has no equal. But you will need to work hard to find a good specialist in this field, because this work requires a creative approach and professionalism.
Materials can be combined if their properties are similar (sandwich panel parts + stone, laminate + tile and others).
Finishing the slopes of the entrance door from the inside with siding
The use of siding in interior decoration is widespread. This is partly due to the wide variety of colors and sizes of this material. But siding has many other advantages:
- the material is durable;
- does not absorb dirt and is easy to clean;
- easy to install;
- resistant to fire and moisture, temperature changes;
- practical.
it is better not to use abrasives to clean this material - they will damage the surface. The best remedy is plain water.
Siding is attached in the same way as plastic panels. The wooden sheathing on which the starting strip is attached is prepared in advance. Siding can be attached vertically or horizontally. In order to save material, it is best to fasten it along the slope.
- siding;
- wooden blocks;
- self-tapping screws;
- starting strips;
- construction stapler;
- corners for fastening slopes.
The siding is strengthened on a wooden sheathing. It is better to use a construction stapler - this way you can choose the staples to match. An original solution would be to use several different siding tones. Thanks to this, the decoration of the front door from the inside will be bright and unusual.