Installation of plastic windows assumes that the installation opening will be subject to a certain impact. This will lead to numerous defects appearing: cracks and holes from fallen plaster, exposure of the base of the walls, bulging excess foam. The best option to correct this situation is considered to be the manufacture of slopes made of plastic. This material is ideal for such work. But the most important thing is that all the work can be done independently, which significantly saves the family budget.
Plaster finishing
This option is now considered quite outdated because it has more disadvantages than advantages. But you can still consider this possibility.
There are two main advantages of this type of finishing:
- Low installation cost.
- If the windows were installed close to the walls, then this is the only possible option.
Unfortunately, there are many more disadvantages to this method, so you should consider the negative consequences of its use.
Among the disadvantages are the following:
- Plaster is not the final finishing option; you will still need to putty and paint the slopes.
- After work, a lot of waste remains.
- You cannot install additional insulation from mineral wool or plasterboard.
- Installation experience required.
- Unsightly appearance; expensive paint will be needed to solve this problem.
- Short service life. After some time, the plaster will begin to crumble.
If, after weighing all the pros and cons, you come to the conclusion that you can’t do without plaster, feel free to get down to business.
Plastering and painting slopes
This method of processing slopes is the most economical and simple. The finished dry mixture, which is based on gypsum or cement, is mixed with water in the proportion specified by the manufacturer, after which the material is ready for use.
Note!
Before applying plaster, the surface around the window is cleaned of dust, dirt, concrete deposits or foam.
The seams of corners and slopes are widened so that the plaster adheres better to the base - the brick wall. The wall is plastered first, and only then the slopes are started.
Installation of slopes
Using drywall
This material has been very popular lately. A lot of structures are made from it, including slopes for walls. When installing it, you may encounter difficulties, but they are much less than when finishing with plaster.
The undeniable advantages of using this material are:
- Relatively low cost of material.
- Small amount of waste after installation.
- You can do the installation yourself.
- The damaged part of the drywall can be painted over or sealed with putty.
- Long service life.
But, like any other material, drywall also has its disadvantages:
- During installation, a large number of tools and materials are used.
- It is very sensitive to high humidity, so it is better not to use it in an aggressive environment.
- Insulation is required.
Now you can proceed directly to installing the slopes. Tools and materials required for installation:
- Construction or stationery knife.
- Hacksaw.
- Scissors.
- Drill or hammer drill.
- Tape measure, hammer, pencil.
- Screwdriver.
- Rollers and brushes.
- Sandpaper.
Now that the necessary tools are nearby, you can get to work. First, we attach wooden blocks around the entire perimeter of the window, flush with the wall. The bars are fastened with dowels. Then, using a utility knife, a sheet of foam and drywall is cut. The insulation is laid between the bars and pressed using the finished slope segment. Drywall is screwed into wooden blocks in increments of approximately 20 cm around the perimeter.
After all the slopes are fixed, we proceed to puttying. The putty mixture is applied to the sheet in a thin layer and covers the unevenness and screw heads.
The next stage is painting. You can paint it in the usual way, the task is not to stain the windows. Once the paint has dried, you can begin decorating the corners. To do this, plastic corners are cut to the required length and attached to the surface with glue.
What are the advantages of plastic finishing
Undoubtedly, plastic is not the only material used to finish window slopes. You can use regular plaster followed by putty and painting with various compounds, or drywall, which also requires further work on applying putty and painting. Regarding plaster slopes, we can say that not everyone can make them on their own. This also requires professional skill and skill.
But the plastic used is good because it combines a perfectly flat surface, like drywall, and the absence of painting or pasting work. In addition, slopes finished with plastic once do not require further repairs or periodic painting. All care involves wiping with a damp cloth. Therefore, recently finishing window slopes with plastic has gained wide popularity.
In just one day you can cover all the slopes in the house, which is much faster if you plaster them or finish them with plasterboard. In addition, the use of plastic panels makes it possible to insulate slopes if a layer of heat-insulating material is laid under them. A wide selection of panels in color and texture will help to harmoniously fit them into the existing interior of the room. And the cost of plastic products is affordable to almost all segments of the population. With careful use, their lifespan can be more than tens of years.
Plastic materials
Plastic slopes have huge advantages compared to plaster:
- Long service life.
- Aesthetic appearance.
- Covers all joint defects.
- Does not require additional finishing or painting.
- Excellent thermal insulation.
- Average cost of installation work.
- Installation can be completed in 2-3 hours.
- Easy to use - the surface is easy to clean.
- High moisture resistance.
- Wide choice of color palette.
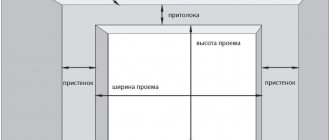
When replacing old windows, the window opening can be severely damaged, so it is important to fill the resulting voids. In some cases, the cracks are not visible , but it still comes through the window. This indicates that the seams were depressurized after installation work.
Thermal insulation methods
If you install slopes according to all the rules, then they need to be properly insulated. Thermal insulation is achieved simply: you need to install insulation under a layer of plastic.
Insulation can be done in 2 ways:
- Insulate the space with polystyrene foam or mineral wool on the inside of the window.
- Fill the cracks at the junction of the window opening and the PVC frame with foam.
It is advisable to insulate a gap within 50 mm on a smooth surface with Isover, sheet foam or expanded polystyrene. If the wall is uneven, it is better to use mineral wool. From the outside, the gaps can be filled with foam.
Well-insulated multilayer walls themselves perfectly protect the window opening from external factors, so it is not necessary to insulate the slopes; it is enough to apply polyurethane foam along all the gaps from the outside.
Installation of plastic slopes
Now let's look at how to make slopes on windows out of plastic. Required tools:
- Sheet plastic 8 mm, enough for 6 meters.
- The starting strip is U-shaped and F-shaped.
- Hammer or drill.
- Building level.
- Metal scissors.
- Square.
- Pencil.
- Sealant and screws.
As in the case of drywall, you need to install plastic slopes with your own hands from blocks and foam plastic. Then we attach the starting profile to the window frame using glue; you can fix the profile to the block with construction staples for greater reliability.
The next step is to attach the F-profile to the block that runs along the wall.
Now comes the most difficult stage - installing the panels. Since the profiles that were previously fixed are made of plastic, they bend easily, this will help to bring them into the F-profile. But before that, you need to insert one edge of the slope into the starting element and push it until it stops.
Then you need to carefully press the inner edges of the F- profile and bring the panel inward. If the work is done correctly, the profile should return to its original position and securely fix the panel.
Photo report 1: installation of slopes from sandwich panels without starting profiles
This method is suitable when the window is installed so that the distance from the window frame to the opening wall is too small. In this case, installation with a starting profile (see below) is either very difficult or - usually from the hinge side - completely impossible.
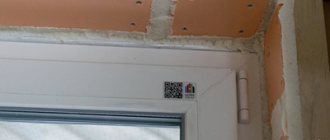
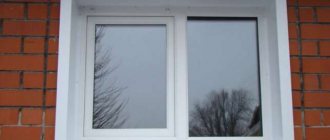
After installing the plastic window, the following picture was observed.
Picture after installing PVC windows
The installation of slopes for plastic windows begins with preparing the opening: we cut off the remaining foam with a stationery knife. It is easy to cut, just don’t overdo it, cut it flush and don’t cut it out - the foam both holds and insulates the frame. Pieces of plaster that interfere and protrude are also removed. If they hold up well and do not protrude beyond the plane of the future slope, you can leave them - the foam will slide less.
Then, around the perimeter of the window we nail (we place it on dowels if the wall is concrete) a thin strip - 10 * 40 mm - with the wide side facing the slope.
Nailed around the perimeter of the rail
Usually they don’t level it, they nail it as is, but if you want, you can make it level by placing pieces of plywood, thin boards, etc. in the right places.
Groove for plastic sandwich panel
Next, we cut the foam around the perimeter of the frame so that the sandwich panel fits there. It should go in about 1 cm. We cut off the foam carefully so that there are no residues on the frame, but without damaging the plastic.
Now you need to cut the plastic panels correctly. You can do it in a standard way: using measurements, you can make a stencil. It seems easier with a stencil. Take a sheet of paper larger than your window (I had old wallpaper). Apply to the slope, crimp, bending the excess. Cut along the curved lines, try on, adjust as necessary.
It is more convenient to start from the upper part of the opening. Having made a paper stencil, we outline it on the plastic. Considering that about 1 cm will go into the foam groove, add this centimeter along the edge that will be inserted there. We cut it out with a small margin - it’s easier to cut it off than to cover it up later.
We cut it with a hacksaw and a metal blade, try it on, adjust it so that the plastic stands up straight, without bending. We level it so that the panel is flush with the plaster. The edge turns out to be almost even; where necessary, we trim it with a file.
Inserted plastic slope top
Having removed the tried-on and adjusted strip, along the outer edge that will be nailed to the plank, we drill holes according to the thickness of the nails, retreating about 0.5 cm from the edge. This will make it easier to attach and will not damage the plastic.
We put it in place again, take a balloon with mounting foam and short “sprays” to fill the gap with foam. We try to get as deep as possible, but don’t pour too much: when it swells, it can distort the plastic.
Fill it out like this
There are several points to consider when working with polyurethane foam. If the plastic is smooth, the foam does not have a very good grip on it. To improve it, either treat the surface that faces the wall with sandpaper, and/or prime it with something to improve adhesion. The second nuance: for normal polymerization of the foam, moisture is needed. Therefore, before installing the plastic, the slope is sprayed with water from a spray bottle. Naturally, there should be no dust on the wall - it should be swept away with a brush or removed with a vacuum cleaner. If the plaster or mortar is loose, the opening is pre-treated with a penetrating primer, which will bind the concrete particles together.
Then we lift the panel, pressing down the foam, insert the nails into the holes and fasten the outer edge to the bar. The inner one rests against the window frame.
Fixed top plastic panel on the window slope
Using the same technology - cut out a paper template, try it on, transfer it to plastic - cut out a plastic side. Here you need to be especially precise so that the gap between the slope panel and the window sill (upper slope) is minimal. To do this, the edge will have to be sanded. To make the edge smooth it is easier, it is more convenient to process it with sandpaper attached to a smooth block, a file or a sharpening stone (half a circle, as in the photo).
Processing the edge of a plastic panel
We adjust it until it matches perfectly (as best as possible) at the top and bottom, and install it in place, driving one edge into the groove near the window. When the result is satisfactory, we level the outer vertical edge to the same level as the wall plaster. You can do this with a stationery knife on the spot, or you can draw a line on the panel (with a pencil, a thin marker, scratch it with something sharp) and then modify it with whatever is convenient.
Having removed it, we also drill holes for nails along the outer edge. We install the panel in place, take foam, and fill the gap from bottom to top. Too much foam is not good here either, as it can bend the plastic. Therefore, we fill it in short portions, trying to fill it as deeply as possible.
On the vertical parts of the slopes, you can do it differently: apply foam to the panel ready for installation along the far edge, which goes under the frame, before installation. The strip is made continuous or applied as a small snake. Only you need to do this not from the very edge, but stepping back a little. Then the plastic part is inserted into the cut-out groove, positioned as needed, and the rest of the gap is filled with foam (do not forget to wet the wall before installation). Once filled, press, level, and secure with nails into the bar.
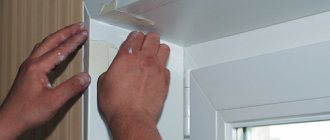
The upper and lower joints are fixed with masking tape until the foam polymerizes.
To prevent the foam from moving the edges of the slope during the polymerization process, tape the joint at the top and bottom with masking tape. No matter how hard you try to adjust the plastic evenly, gaps, albeit small ones, remain. They can be covered with acrylic. It is sold in foam-type tubes and placed in the same mounting gun.
Squeeze the strip into the gap, rub it, level it, remove the excess with a damp soft cloth or sponge. This operation needs to be done in small areas and wiped carefully - completely clean. As long as the acrylic has not hardened, it cleans up well. Then - with great difficulty. It is more convenient to start sealing cracks from the top - immediately - the horizontal panel of the slope, then the joints, then move down first along one side, then along the other. The last to be sealed are the joints with the window sill.
After drying - 12-24 hours, depending on the sealant (written on the tube), acrylic can be pulled into the seam - this is if the cracks are large. Go through all these places a second time using the same method. After the second layer has dried, if there are any roughness or unevenness, they can be smoothed out with fine-grain sandpaper, folded in half. In general, it is better to carefully level it while it is still wet, otherwise you may scratch the plastic.
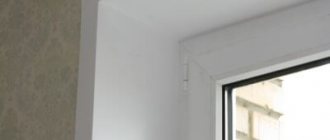
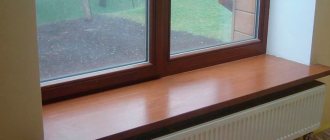
Installed plastic slopes
That's it, the plastic slopes are installed. After the final polymerization of the foam, the bevels must be puttied, leveling with the surface of the walls. After this, you can remove the protective blue film. As a result, the window will look something like this.
Window with plastic slopes (sandwich panels)
When installing these plastic slopes, sandwich panels were used. These are two layers of plastic, between which there is a layer of foamed propylene foam. Using the same technology, you can make a window frame from inexpensive plastic window sills or white PVC wall panels. The most unreliable material is panels: even wall panels are pressed through quite easily, and if the front layer of plastic is thin (cheap), then the jumpers are visible in the light. This is not the case with sandwich panels and plastic window sills. And it takes a lot of effort to push through, and there are no jumpers even for clearance.
Installation of plastic windows is described here.
Installation of external slopes
There are several options for installing and preparing external slopes. The most common methods for installing slopes:
- Made from plasterboard covered with plastic.
- Made from sandwich panels.
- Made from foam plastic.
Sandwich panels or plastic panels are cut using a power saw or metal scissors. Then the starting profile is mounted with dowels into the window opening during window installation. Next, the slopes are attached to this base. For installation work, galvanized brackets and mounting tape are used. The brackets are attached using self-tapping screws, and on their base, the slopes are firmly pressed to the window sill. The corners are lubricated with sealant.
Plasterboard slopes lined with PVC sheets are mounted with “liquid nails”. It is necessary to ensure that no traces of deformation remain on the surface of the plastic.
One option is to use foamed PVC. By cutting, it can be bent to the required shape. Otherwise, PVC has a common installation technology with sandwich panels.
Price for installation specialists
If you are not sure that you can cope with the task, then you should trust the professionals. If you need to install a plastic window sill, it will cost 300-600 rubles per linear meter. The price of slopes will be 280-300 rubles per piece. But how to install modern shutters on a window, and what the cost is, you can find out from the article.
And although plastic windows look attractive and stylish, the installation process can no longer be called so simple. It is necessary to take into account a number of points that are harmful when installing a window sill and slopes, so that the window structure can take on its final form. If you approach the work responsibly, you will be able to complete it yourself
Features of sealing window openings
After installing plastic windows, the slopes are sealed inside and outside the room. The influence of environmental factors negatively affects the foam layer: it becomes deformed and loses its protective abilities. External work is carried out simultaneously with internal work.
Regardless of the material used, all surfaces around the window unit are additionally treated with special antifungal compounds.
It is imperative to use a material with the maximum percentage of waterproofing. It is recommended to lay sealing tape or a plastic equivalent 4 cm thick along the outer zones of the installation seam.
Plastering slopes - the final stage
A little solution is placed in the groove of the slope, leveled, wait until it dries and move on to the next layer. In one go, you can apply 5-7 mm of the solution, then you need to wait for the material to dry completely. Level the layers from bottom to top.
Before applying the plaster, the upper part of the slope is fixed with a horizontal plank of wood - its edge must be perfectly smooth. Fix the lath to the plaster or with nails, aligning the guide level.
Slopes on the windows
Surface preparation
Before sealing the surface, it must be prepared for work. The process consists of several stages:
- All protruding or collapsing areas are knocked down. To do this, a hammer and chisel are used; they can do the work precisely without damaging adjacent areas.
Cleaning window slopes from unnecessary areasOn a note! Considering that the work involves the collapse of some pieces of cement or brick, it is advisable to prevent damage to the window and sill. To do this, they are covered with corrugated cardboard.
- A construction knife is used to cut off excess foam used to seal the windows. The main thing is to wait until it has completely gained volume and dries. This is done quite simply: use a blade to pierce the protruding part of the foam from above (parallel to the window) and, pressing slightly, make a single downward movement. If necessary, cut through the part that is glued to the wall.
Removing excess polyurethane foamAdvice! There is a film sticker on the plastic frame; it is removed only after all work has been completed.
- The surface is thoroughly cleaned from dust and dirt. It often happens that an old brick wall has loose bricks. They need to be placed on the solution and allowed to adhere.
If you plan to plaster the slopes, the area is first coated with a layer of primer. In other cases, it is advisable to use antiseptics.
Applying primer to window slopes
A little about slopes
Slopes are divided into external and internal and represent a part of the wall that is directly adjacent to the window block at a certain angle. It is necessary to approach the finishing of those areas that are located indoors most carefully.
Why is it necessary to install slopes of plastic windows? There are a number of functions that they directly perform:
- Creating external attractiveness and aesthetic completeness. Indeed, it is difficult to imagine how new windows will look if the adjacent surface is poorly finished.
- An additional source of heat and sound insulation. This means that the slopes allow you to protect the room from the penetration of cold and noise pollution.
- Protection of assembly seams from external influences, as well as preventing windows from fogging up.
Finishing slopes is a procedure that is not only decorative in nature, but also has a protective function. Thus, sealing window openings is carried out not only to restore damaged areas, but also to create a whole complex of additional protection.
Sealing cracks
When making slopes, additionally check the tightness of the joints of the wall and window. The detected cracks are sealed with polyurethane foam, or you can use tow or felt. Fabric materials are treated with a gypsum solution and fixed around the perimeter of the frame.
There should be 2-3 cm left to the side parts of the window opening - this gap will be filled with plaster. When the material has dried, work can continue. It may not be very quick to do window slopes with your own hands, but you can be sure of the quality of each stage of the work.
Functional purpose of external slopes
Polyurethane foam can quickly expand, filling the smallest cavities and firmly adhering to any surface. In a frozen state, it helps the fasteners fix the window block in the opening, serves as a good heat and sound insulator, and a barrier against dust and moisture from the street. Construction foam is not afraid of temperature changes and exposure to precipitation, but is destroyed by ultraviolet radiation.
If filled joints are left exposed to sunlight, the polyurethane foam will deteriorate in a matter of months. Polyurethane foam under the influence of ultraviolet radiation becomes brittle and crumbles, moisture penetrates into the material and accelerates the destruction process. As a result, over time, the seams lose their tightness.
Window with slope
This results in freezing and wetness of the walls around the window, large heat losses, fogging of glass, and the growth of mold in damp walls. The window unit may warp, and its mechanisms will fail faster due to increased loads.
Finishing the slopes, performed immediately after installing the translucent structure or after a short time, protects the seams filled with polyurethane foam from external influences. When arranging it, the external slopes can be additionally insulated. High-quality finishing gives the windows a complete look and improves the appearance of the facade.
How to insulate slopes
How to install slopes on plastic windows so that they not only play a protective and aesthetic function, but also allow for lower heat loss in the winter? The right solution is insulation.
First of all, each gap must be filled with foam. However, this material is only suitable if the gaps are large. If we are talking about small cracks, then they cannot be ignored. They are not blown out with foam; another good sealant is used for this purpose - acrylic. It is durable, lasts a long time, and is not afraid of moisture.
Also, the installation of sandwich slopes on plastic windows may be accompanied by the attachment of foam or mineral wool. Sometimes you can buy simple foam rubber. In any case, regardless of what type of material you rely on, you need to use a durable film that will create insulation. You need to secure the edges of the film with construction tape so that there are no gaps left. Of course, the lower part of the slopes must first be thoroughly cleaned - this is the basic rule for installation in general.
The installation of external slopes on plastic windows is not accompanied by insulation - this is only relevant inside, since moisture will quickly affect the structure of the insulation, so it will collapse and a gap will form inside.
Also, when insulating, it is important to pay attention to the sealing of all seams. The structural elements must fit snugly against each other and be fixed to each other.
When choosing insulation, do not forget that its characteristics must correspond to the size of the window opening. In some cases, the thickness of the coating cannot be large, so they are limited to thin plates found on sale.
If the use of polystyrene foam is relevant during the insulation process, then the joints of the opening must be pre-treated with cement mortar. All cracks in these places are filled with this material. Next, polystyrene foam is laid out and covered with film.
If the installation of slopes from the outside on plastic windows requires mandatory insulation, then for this it is permissible to use only extruded polystyrene foam. An important condition is tight fixation to the surface so that water does not seep inside.
Attention! Proper insulation is carried out along the entire perimeter of the structure. It is not practical to choose only one side.
What material to choose for sealing slopes
Craftsmen recommend using sandwich panels as slopes. They can be found at any building materials store. Their advantages are appreciated by many window owners:
- They are respectable, similar to classic plastic windows.
- Thanks to the internal insulating ball, the material provides good sound and heat insulation.
In second place in popularity is a simple plaster mixture. This material is distinguished by its optimal heat retention properties, contributes to additional aesthetics, is durable and reliable in use.
Internal slope
When all the work outside is completed, the craftsmen move into the room and carry out similar work inside. Internal slopes perform the same function as external ones, but carry a higher decorative load, because without them the wall will look untidy. Therefore, all work is carried out carefully. If the choice of cladding for external finishing should be based on indicators of resistance to moisture, then this rule does not work when finishing internal slopes. Here materials that are contraindicated for the street can be used - for example, drywall.
External slope
To work you will need:
- foam layers (5 and 10 cm wide);
- reinforcing mesh;
- PVC corners with reinforcing elements;
- putty;
- dowels, umbrellas;
- waterproof paint;
- drill, screwdriver;
- garden knife.
First, the master must remove the old slopes, if any, freeing the surface around the glass unit by at least 10 cm in width.
Before installing the polystyrene foam, excess polyurethane foam that has protruded outwards is removed. Foam serves as protection for seams from freezing and blowing by strong gusts of wind, but it itself can be deformed under the influence of UV rays, frost, and rain. Therefore, for slopes, those materials are selected that hide the foamed areas from the influence of environmental factors.
- Strips 10 cm wide are cut out of foam plastic.
- The panels are fastened with dowels and an adhesive-based mixture at the level of the brickwork around the window frame.
- The area near the windows without special finishing looks unattractive, so it is necessary to install slopes.
- They can be painted on top with water-based paint after the plaster layer has dried.