Window mounting seam: according to GOST or not
Today, when glazing houses, most construction companies require the installation of windows in accordance with GOST. When installing windows, private consumers do not always think about the importance of a high-quality installation seam and are not ready to overpay for it. Why is a high-quality and protected installation seam in a window so important and what materials can it be used to make it?
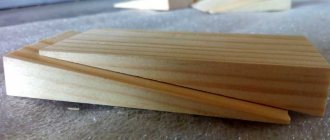
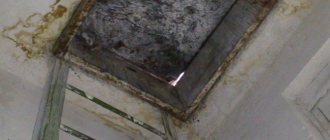
Photo: 3 protective layers of window assembly seam according to GOST
A regular window installation seam differs from a GOST installation seam in the number of protective layers. In a regular seam there is only 1 thermal insulating layer of polyurethane foam.
According to GOST, the installation seam must have 3 protective layers:
- external vapor-permeable and waterproofing to remove excess moisture to the outside and protect the seam from the sun, rain and wind, which is done using mounting tapes or sealants;
- medium – thermal insulation using polyurethane foam;
- internal - vapor barrier (vapour-tight), protects the seam from the penetration of steam from the room into the seam, using tapes or sealants.
What is a sealant?
A sealant is a type of adhesive composition, a plastic paste-like mass based on polymers, which dries after a certain period of time after application and prevents leakage or penetration of moisture and air. In other words, this mounting compound is used to seal joints, since it is capable of forming a moisture-resistant and airtight seam.
Sealant for plastic windows is an irreplaceable thing. It gives the structure a more aesthetic appearance (available in white or transparent), protects against temperature changes and negative atmospheric influences.
The sealant is applied around the entire perimeter of the window to provide additional insulation to the glass unit. Some compounds turn yellow over time and are therefore not suitable for window installation - a high-quality sealant should serve without changing its shape, color, thickness and structure.
The cost of an error due to poor-quality window installation seam
What happens if, in order to save money, the polyurethane foam is not isolated from contact with the external environment?
- After installation, excess foam is cut off, revealing its porous structure; the material begins to absorb moisture, like a sponge. Wet foam cannot perform its main function - thermal insulation. This means that the window will be ventilated.
- Freezing in winter, moisture in the pores of the foam begins to destroy it. Blowing through the installation seam leads to the appearance of ice on the windows, and the slopes become covered with mold.
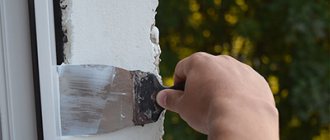
Photo: mold on slopes is the result of improper execution of the installation seam
- Under the influence of ultraviolet radiation (sun), the foam quickly deteriorates on the outside and ceases to perform its protective functions.
Photo: sun, rain, steam destroy the assembly seam
Therefore, according to GOST 30971-2012, when installing windows, it is necessary to use special materials to protect the external and internal seams of the window. Insulating tapes and sealants are the most common materials permitted by GOST. Let's consider the advantages and disadvantages of each type of material for sealing the installation seam (window joint).
Tips and tricks
Protecting polyurethane foam from external influences requires a correct understanding of the possible effects on the material. From the outside it is necessary to use some methods, from the inside - others.
It is important to understand that the external finishing of the joints is intended primarily to cut off sunlight, while the internal protection cuts off the foam from air moisture.
At the same time, it cannot be assumed that the impact on the foam from the inside is minimal and can be ignored. The steam in the internal air is under pressure and is actively absorbed into all enclosing structures. Therefore, it is recommended to apply a layer of sealant, regardless of the chosen finishing method.
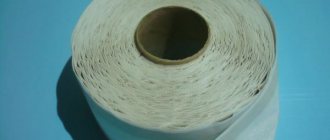
Insulating tapes for sealing the installation seam of windows according to GOST
Three types of tapes are used for installation:
- PSUL tapes – waterproofing external tape made of polyurethane foam, glued to the outside of the opening;
- Vapor barrier foil tape with an adhesive layer for the inside of the seam;
- Membrane diffuser tapes for the inside of the construction seam.
Advantages of installation using tapes:
- The speed of installation of tapes on the opening is twice as high as compared to applying sealant. Tapes can be glued until the foam is completely polymerized, without waiting for it to harden. Installation can be done in one day.
- The window and opening do not get dirty;
Disadvantages of installation using tapes:
- Risk of damage to the tapes during or after installation, which entails the need for their complete replacement;
- Careful preparation of the opening is required (about 5 days) if it is not leveled: filling potholes and voids, organizing a quarter in a quarterless opening and allowing the putty to dry. All this increases the cost and time of installation;
- It is necessary to keep tapes of different widths in stock and use them depending on the width of the seam, which also increases the cost and can lead to installation failure when there is no tape of the required width.
- At negative temperatures, the expansion time of the PSUL increases greatly, the foam can come out - the seam will have to be redone.
Protection of the structure from the outside
The foam used should be protected from destruction so that it retains its properties. Otherwise, you will often have to spend money on new repairs. Before sealing the base with sealant or putty, you should try to cope with the situation using universal sealing tape. This product is actively used by professionals to hide various irregularities in the window opening, which are difficult to avoid when installing new structures. For working with old products, tape with waterproofing parameters is more suitable.
The coating can be safely done with other materials:
- Polyurethane sealant.
- Putty/plaster. The craftsman needs to make sure that the material resists the negative effects of low temperatures well.
- Acrylic based paint.
- High-quality mortar made from durable cement and river sand.
- Special putty for sealing defects.
Before you start puttingtying the foam, you need to prepare a small bucket for mixing the components, a sharp knife, gloves and a trowel.
You can learn proven recommendations from experts from the video:
Acrylic sealants for sealing the installation seam of windows according to GOST
Let's consider the advantages of sealants for insulating a heat-insulating layer.
Advantages of sealants relative to mounting tapes:
- A more hermetically sealed application means you don’t have to level the opening in advance and don’t have to wait for it to dry. Due to their liquid consistency, sealants fill cracks, irregularities and voids in the opening during the application of the external seam.
- Higher water resistance - in order for water to begin to penetrate through the sealant layer, a pressure drop of more than 600 Pa is required (this happens, for example, with a wind of more than 30 m/s). Through the joint of the tape with a wall or window, water begins to leak at 150 Pa, i.e. already with a wind of 17 m/s.
- Higher seam protection against blowing. A 2mm layer of sealant can withstand hurricane winds at a speed of 45m/s for at least 3 hours without blowing. No ribbon can withstand such wind.
Photo: the tape does not have a tight connection with the opening and the product; additional sealing is required
- Sealant can be used to cover an installation gap of any width, and the range of external sealing tapes is limited to several sizes (10, 12, 15, 20mm, less often 50mm)
- High maintainability – a damaged area of sealant can be easily restored; you don’t even have to remove the old one. The damaged tape will have to be replaced completely, which may entail a complete reinstallation of the window and slopes.
- More affordable price relative to high-quality tapes.
Disadvantages of sealants compared to tapes:
- In winter, installation will take two days: to apply the sealant, you need to wait until the foam hardens. In winter, this happens for several hours, so processing the seam will have to be postponed until the next day.
- Applying sealant takes longer than applying tape - approximately 15-20 minutes, including protecting the window with masking tape.
- It cannot be used when repairing an assembly seam when the window is already installed and requires repair.
According to industry experts in the field of installation, sealants today occupy about 60% of the market, due to the optimal price-quality ratio.
Protection principle
If the master decides to use putty to cover the foam material, then he needs to adhere to a certain algorithm of actions. You can begin any manipulations only after the foam has completely dried. This process most often takes 10 to 12 hours. If there are areas that protrude above the level of the glass unit, then they need to be carefully cut off using a sharp knife.
During this procedure, it is worth going a little deeper into the base. The surface must be cleaned of debris and covered with a layer of primer. When the applied product has dried, you can apply the putty solution, but not in a thick layer. After complete hardening, the prepared construction mixture is applied again.
Gain
The surface must be sanded, primed and painted. If the master does not plan to use putty, then the excess protrusions are cut off flush with the PVC window. Sandpaper removes all irregularities. At the final stage, all that remains is to paint the surfaces. For these purposes, it is advisable to use an acrylic-based composition.
The product is applied only in an upward direction, gradually approaching the corners of the frame. If putty or paint is applied to the surface, then the final service life of the formed seam will definitely not be inferior to the operation of the building itself.
Important! To putty the foam, it is better to choose a frost-resistant material, which is freely sold in modern construction departments. Many of them are powders, to which a certain amount of clean water must be added to obtain a solution of the desired consistency.
The putty is applied to the surface to be treated and carefully leveled. If the layer turns out to be too thin, then over time it may become covered with numerous cracks. The thickness of the finishing material must be at least 3 mm. To give the seams an aesthetically attractive appearance, it is better to use a construction mesh.
Classic mesh for improved adhesion
Step-by-step instructions for sealing
Features of the technological process of sealing are determined by a number of factors: the type of wall material, the design features of the window, the amount of work, and the materials consumed in the process. The instructions below show the procedure that is relevant in the vast majority of cases:
- Having firmly secured the frame, you can begin to apply the foam composition.
- The PSUL is carefully installed between the frame and the quarter.
- Next, a diffusion tape is attached (between the ebb and frame).
- Duplicate vapor barrier tape must be installed along the internal slopes, insulating them at the same time.
- The next stage is sealing the cracks.
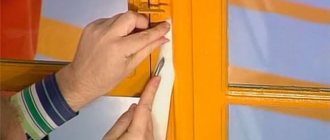
- Prepare a syringe with sealant, pour water into the prepared container.
- Unused parts are protected with tape to avoid contamination.
- The work area is thoroughly cleaned of dirt and dust, and unnecessary obstructive objects are removed.
- The sealing mixture is applied with a syringe, the needle is placed at a right angle, after which the composition is evenly squeezed out.
- The seam areas that have begun to protrude are smoothed with a finger moistened with water (cleaning it later will not be difficult, you don’t need to worry about it). The sealant is spread evenly. Extra swims are not allowed.
- All excess is collected with a sponge previously soaked in a container of water. Before subsequent wipes, the sponge is washed.
Why does this problem arise?
Many owners carry out bathroom renovations on their own. This allows you to significantly save money on the family budget. However, without sufficient experience in carrying out such work, novice craftsmen can make a number of mistakes. Because of this, the bathtub does not fit tightly to the wall surface.
Even when repair work is carried out by professionals, the gap between the plumbing fixtures and the ceramic coating will be small, but sufficient for water to penetrate. To be on the safe side, installers most often seal the joint in various ways.
A wide gap is created if the tiles were laid before installing the bathtub. Also, uneven walls and improperly sized plumbing fixtures can lead to the formation of a wide gap. But even with high-quality installation of the bathtub, the joint should be sealed using one of the methods listed below.
Sealing joints indoors
To implement this construction task, it is necessary to use the same technologies. To achieve optimal results, you can use aesthetically pleasing drywall. This material will hide foam seams from prying eyes, and small slabs can be protected with emulsion or covered with wallpaper.
There is only one drawback - drywall is susceptible to high humidity, which is why it is not intended for the street side of the building. The material can be easily attached to the surface using standard size dowels and self-tapping screws. A craftsman can create a truly ideal surface with his own hands at an affordable price. Once the panels are in place, they should be coated with a quality primer for optimal adhesion to the upcoming finish.
Important! Drywall sold today can be processed in any way, but at the first stage you need to fill the cracks, holes, and screw caps.
To install drywall, you need to build a durable profile made of natural wood. If the walls are smooth, then you can get by with classic lathing. In this situation, the panels are simply placed on a special glue, which greatly simplifies and speeds up installation. Thanks to this, during many years of use, users will not encounter various unpleasant moments.
Otherwise, leaks, drafts, the growth of ice crusts, as well as uncontrolled growth of mold on those surfaces adjacent to the frame and wall opening cannot be ruled out. The standard service life of a foam joint is 17 years if all construction procedures were carried out correctly. But the final figure depends on the factory, operating conditions, as well as the degree of compliance of the completed construction work with established standards.
Using putty inside the house
Modern methods
Modern bathroom renovations are carried out using more advanced materials. They extend the life of plumbing fixtures and finishes. Cement mortar is now used very rarely.
To get the job done quickly and efficiently, you can use waterproof sealant, polyurethane foam or grout. These materials are simply applied to the work surface. They are easy to adjust if necessary until the material dries.
There is also a wide selection of different strips and skirting boards on sale. They securely close the joints. To improve the result, some masters use a combined approach. In this case, you can be sure that water will not seep under the bathtub or accumulate in the seams between the bathtub and the wall.
Prices for services of masters
The cost of work is influenced by many parameters: the width of the joints, the number of linear meters, the number of storeys of the window, etc. For clarity, the average Russian prices for various services are described below.
- Performing complex sealing after installation of window systems costs about 2000-2500 rubles. per set.
- Sealing internal connections - 300-400 rubles. per p.m.
- Sealing external seams - about 600-700 rubles. per p.m. There is an additional payment for the number of floors of work.
- Adjustment and complete preparation of surfaces for application of sealing compounds - 300 rubles. per p.m.
- Filling technological gaps (the price does not depend on their specific position) - 100-200 rubles. per p.m.
Protective agent application technology
Foam treatment must be carried out at all stages of double-glazed window installation. From the street, the material is protected from snow and rain, as well as from condensation and steam. If the budget is limited, then you can use sealing tape, which is glued to the frame before installation in the prepared opening. If we are talking about old houses, then it is better to use a diffusion tape, which works like a membrane. The product perfectly protects from condensation inside the room and from moisture outside.
To significantly extend the durability of the foam, you need to choose the right putty. The mixture is prepared in strict accordance with the manufacturer's instructions. All proportions are indicated on the packaging of the purchased mixture. The prepared solution should have a thick, uniform consistency. Distribute the solution perpendicular to the seam, since only in this case can optimal filling of all cracks and cracks be achieved.
The prepared putty solution is evenly applied not at the same level as the joint, but with a reserve. Before applying the paint and varnish, the surface is sanded. Work should begin only after the surface has hardened in order to ultimately obtain a smooth base. If there is any doubt that the sun's rays will not reach the exposed areas of the stump, then the sealant involved must be puttied and painted. Experienced builders recommend following several effective recommendations:
- To mix the solution evenly, you must use a construction mixer.
- The mixture is applied to the foam with a good margin, since the final layer must be at least 6 mm.
- After the manipulations, you should clean the instrument involved, since removing the petrified solution is very problematic.
Creating a durable external structure
Application of grout
When deciding how to seal the joint between the bathtub and the tile, first of all you should pay attention to the grout. This is a durable, waterproof material. Its advantage is the large number of shades. This allows you to perfectly match the color of the seam to the existing interior elements.
The most popular, despite everything, remains white grout. The bathtub most often has this color. Grout is used when the gap that needs to be filled is small. This substance does not require special skills from the master. Everything happens simply and quickly. The seam will be moisture resistant and will retain its original shade for a long time.
The grout is applied with a spatula. Then the layer is treated with a special agent to prevent the accumulation of dirt on the material. However, if the gap is quite large, this method will not work.
Application of skirting boards
Sometimes it is impossible to close the seam between the bathtub and the tiles using only sealant or foam. This is due to the large distance from the bathtub to the tiled surface. In this case, you should resort to the help of special skirting boards. They are often supplied complete with tiles.
If the gap is more than 4 cm, you can use ceramic, plastic, polyurethane borders, as well as self-adhesive tapes. Before starting work, work surfaces are prepared accordingly.
After taking measurements, the required length of the plinth is cut. An adhesive is applied to the inner surface of the product. You can use “liquid nails”. After this you need to wait a few minutes. Then the plinth is installed in the place allocated for it and pressed firmly. Particular attention is paid to the corners.
After fixing the plinth, its upper and lower edges are treated with sanitary silicone sealant.
Tools
Caulking the seams is preceded by careful preparation of the instruments. The list below can be expanded, as it depends on the size of the slots and the technology chosen for processing. So, it is assumed that the window installation work was completed in compliance with all the rules. In this case, you will need to acquire the following devices, tools and consumables in advance. The list is considerable:
- spatula set (not forgetting the corner one);
- soft brushes (wide and narrow);
- mounting gun;
- mortar container;
- fabric for removing dirt;
- a bucket of water;
- napkins and sponge;
- building level, plumb line;
- PSUL;
- Master OK;
- drill equipped with a mixer attachment;
- grater (sandpaper);
- foam;
- primer;
- special tape for vapor barrier;
- fiberglass-based reinforcing mesh;
- construction tape.
The oldest way
When studying how to close the joint between the bathtub and the tiles, you should consider several ways to solve this issue. The oldest use is considered to be cement mortar. To make it moisture resistant, the surface of the seam was coated with a special agent.
Before the procedure, the surface of the bathtub and walls must be thoroughly cleaned of various contaminants and degreased. To prevent cement from getting behind the bathtub, close the gap from below using any convenient means at hand.
Working surfaces are moistened with water. This way the solution will set better. The joint is filled with mortar. The cement must be viscous enough to spread evenly onto the surface. After complete drying, the cement joint can be painted or glued with special tape.