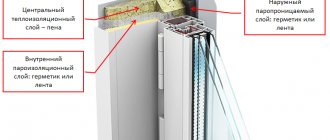
When installing a window block in an opening of an external wall, it is important to maintain the required size of the installation gap, which must be filled with heat-insulating and waterproofing materials.
If the installation seams of windows are installed incorrectly, the energy efficiency of the room will decrease, the structure will begin to let in atmospheric moisture and wind, which affects comfortable living.
What is a window unit installation unit?
The installation seam of a window structure is the standardized distance between the outer part of the frame profile and the end of the opening in the outer wall . The installation of an installation gap of standardized dimensions is a mandatory requirement when installing a window unit.
The design of this structural element is regulated by the requirements of the current GOST 30971-2012 “Mounting seams of joints connecting window blocks to wall structures.”
Important. All elements of the seam filling must meet the requirements for ensuring reliability, safety, and also serve no less than the service life of the translucent structure itself declared by the manufacturer.
Why do cracks form? Reasons for appearance.
In the vast majority of cases, gaps arise due to a violation of window installation technology:
- choosing the wrong material for spacer pads;
- missing number of frame attachment points;
- poor sealing of tides;
- incorrect execution of the window sill-window opening-frame conjugation unit.
If any of the listed mistakes are made, then, most likely, over time the frame will sag and the foam sealing the joints will become deformed. With all this, the formation of through cracks is virtually inevitable.
Another likely reason why the tightness of connections may be compromised is subsidence of building structures. Fortunately, it occurs very rarely and in this case you need to think not about sealing cracks, but about completely repairing load-bearing structures.
Why is a mounting seam needed?
The installation seam is necessary to achieve the following goals during operation of the window unit :
Ensuring the required energy efficiency of the space being used.- Sealing the joint between the frame profile and the opening material, which minimizes the risk of blowing through the enclosing structure and eliminates drafts.
- The seam material prevents the penetration of precipitation into the room, freezing of slopes and window sill boards.
- Compensation for errors during the construction of external walls and the construction of the opening - mounting foam laid in the seam allows deviations from the geometry of up to 3 mm along any side of the structural element.
- The seam also serves to install vapor and waterproofing membranes with a self-adhesive surface, which prevent the formation of condensation on the inner plane of the glass.
- Compensation for the movement of the lintel from the permissible deflection, the possibility of minor movements of the window unit due to wind pulsation. This requirement is especially relevant when installing translucent elements at a height above 30 m.
If there is no gap of the minimum allowable width, the window unit will not provide the required resistance to television transmission, and it can also become deformed and collapse when the outer wall moves over time.
Is it possible to do without it?
Many property owners are interested in whether it is possible to do without an installation gap. This structural element may not be installed for the following types of objects :
- Frame houses made of wooden blocks - when sealing, it is enough to use clamping strips to frame the slopes.
- Cold contour of terraces, verandas, porches and other attached premises to private houses.
- Glazing of loggias and balconies on the top floors, provided there is no upper floor slab, which can cause deflection and deformation of the glazing.
- Stained glass structures that have their own compensation gaps between the profile elements. In such situations, fastening to the elements of floors and walls is carried out using hinged joints.
Important. In the absence of an installation gap, building structures are subject to more stringent requirements to ensure a perfectly flat plane and installation area of the translucent element.
The nuances of repairing wooden windows
No available repair materials can compare with special sealants and sealants. They cope well with frame deformations, filling voids. They are made on the basis of rubber, silicone, and polymers. The price is usually affordable for everyone. With minimal effort and expense, it is possible to restore insulation and protect structures from adverse external influences.
The basis for the operation of technical fillers is the syringe principle. A sealant is squeezed out through the nozzle, which fills the cracks well. There is no need to compact it. It will fill the voids on its own, and the excess on top can then be removed.
The use of the described means requires compliance with simple rules:
- Apply only to dry surfaces, free of dust and debris;
- carrying out work at room temperature.
Regulatory requirements for junction points
the following requirements apply to installation joints between the profiles of window blocks and the ends of openings in external walls :
The minimum permissible width of the installation seam should not be less than 15 mm.- The optimal gap size is from 20 to 30 mm.
- The seam must be constant along the entire perimeter of the window frame.
- When filling the space with foam, the thermal properties of the enclosing structure specified in the energy passport of the facility must be ensured.
- Each seam must contain sealing self-adhesive tapes, which increase the vapor barrier and waterproofing of the enclosing structure.
- If a window is installed in a quarter, the seam on the front side is filled with porous PSUL tape.
- A correctly installed seam eliminates the risk of slopes freezing and atmospheric moisture entering the premises.
- When using a high-quality membrane, the seam should not contribute to the formation of condensation, which causes the growth of bacteria and the occurrence of fungus.
- The design of the seam must be used no less than the window unit itself.
Before putting a capital construction project into operation, supervisory authorities check the quality of installation of window units for compliance with the regulatory requirements listed above. If the owner of the premises contacts the installation organization, in case of violation of GOST, he has the right to make an official claim.
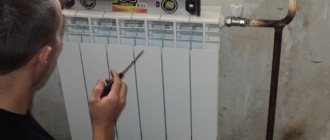
How to coat cracks in plastic windows?
After installing a new plastic window in a room, gaps may usually remain at the joints and junctions of slopes made of PVC panels. Self-respecting construction companies will definitely seal these cracks at the final stage of window installation so that the consumer receives a finished product that can please the eye. But it also happens that you are unlucky with the company - either it’s normal to leave gaps 1-3 mm wide, or the workers’ hands are so crooked that you can’t expect an accurate result from them.
We can correct the situation ourselves, especially since there is nothing complicated about it. One window with careful work will take 1-1.5 hours.
| ATTENTION! All materials presented on the site belong to the site mastertim.ru and are written for people. Full or partial copying of text and (or) images, posting on other sites, use for personal gain is PROHIBITED! |
Traditionally, masking tape is glued along the edges of the gap between the slopes so that a narrow strip 2-4 mm wide remains (depending on the width of the gap that we are sealing). Next, fill the seam with some excess sealant (it also depends on the width of the gap). Then use a sponge or cloth (or a wet finger) to run along the seam, pressing the sealant into the crack. We remove the remaining sealant and remove the tape.
The main thing here is to choose the “right” tape that will not leave behind glue residue on the slopes and frame of the PVC window. And of course, some skill is needed.
If you don't have masking tape on hand, you can do without it.
To work, we will need white acrylic sealant (match the color of the panels), a sealant gun, 2 small spatulas (more convenient than rubber ones), a piece of sponge and a container of water. We will first clean the joints from dirt and remnants of packaging film. To do this, you can use a small sharp spatula.
If the cracks are narrow, squeeze out the sealant in small portions onto a spatula and then apply it between the joints with a second spatula.
Having sealed a small part of the joint, you need to begin removing the remaining sealant. This can be done with a damp sponge, which must be soaked in a container of water each time.
Long sections thus need to be divided into short ones: putty - leveling and removal (washing) of residues. Otherwise, the sealant will dry quickly and will be more difficult to remove.
The next day you need to inspect the work done, and to achieve the best result, in places where the sealant has dried out and retracted, you can repeat the operation again.
Calculation of the size of the gap between the window and the frame
To calculate the installation gap before installing a window structure, you need to use simple arithmetic formulas .
The lower dimension of the gap is determined by the size of the support profile. As a rule, the dimensions of these elements vary from 15 to 25 mm. The final thickness of the profile depends on the design features of the window sill board and framing frame.
If there is no support profile, the installation gap is set with a temporary plastic block or wedges.
The side dimensions of the assembly seams are calculated using the formula:
a1 = a2 = (b – l) / 2
Where:
- a1 and a2 – installation seams between the pier and the vertical window profile;
- b – window opening width;
- l – width of the window block.
For example, if the window opening has a dimension of 1600 mm, and the maximum size of the window frame is 1550 mm, then a1 = a2 = (1600 – 1550) / 2 = 25 mm.
The height of the installation gap at the top of the window is also determined by the formula:
c = H – h – d
Where:
- H – window opening height;
- h – second dimension of the translucent element;
- d – height of the support profile.
If the window opening in a building has a height of 1800 mm, the window is 1750 mm, the stand profile is 25 mm, then c = 1800 – 1750 – 25 = 25 mm. This is exactly the value that should be obtained after installing the window block in the opening on the stand profile.
The achieved installation gaps must be fixed with spacer wedges and checked using a caliper.
When installing a window block in an opening with a quarter, the cross section of the installation seam will have an L-shaped configuration. The gap between the inner edge of the protruding brick and the plane of the frame profile should be from 10 to 20 mm, which is quite enough for the installation of a PSUL.
An alternative is the installation of external slopes
Now the slopes on the outside are made immediately after installing the frames. They help to increase service life and make the appearance more attractive and complete. They are decorated with plastic and wood.
Timely installation helps to reliably protect foam seams, thereby improving thermal insulation. If the installation rules are followed, condensation and mold will not appear.
Slopes
How to close it correctly?
To arrange the required installation gaps when installing windows, you must follow all the steps in the step-by-step instructions :
The window opening is measured to calculate the width of the seams according to the algorithm given above.- The required height of the stand profile is selected.
- The window frame is installed in the opening.
- The design is adjusted within the dimensions of the building structure until a uniform gap is formed.
- Along the entire perimeter, the frame is wedged in the opening, the sizes of the seams are verified with a caliper.
- The window is fixed on mounting plates.
- The entire profile line is carefully foamed with liquid insulation.
- Wait time for the material to polymerize.
- Excess foam is carefully cut to the plane of the main frame profile.
- The mounting wedges are removed.
- In places where spacer elements are installed, foam is re-installed, the excess of which is also cut off after hardening.
- Steam and waterproofing membranes are glued to the interior side of the window.
- On the outside of the window structure, silicone or acrylic sealant or PSUL tape is applied.
- At the final stage, the quality of the seam filling is inspected, after which it is allowed to proceed with the installation of double-glazed windows and sashes.
Important. After filling the seams with foam and hardening, all the wedges are removed, and the holes in their place are finished with the same liquid insulation.
Why does water accumulate on the windowsill of plastic windows?
Often, after the blowing has been eliminated, users are faced with the fact that complete tightness leads to water accumulating on the windows and sills of plastic windows. This is condensation that forms for various reasons, in particular:
- due to lack of ventilation,
- due to the significant width of the window sill. It protrudes beyond the heating radiator and the warm air does not have time to warm up the glass and prevent the appearance of moisture;
- high indoor humidity. The appearance of condensation is typical for the kitchen or for rooms in which renovation work is being carried out;
- low temperature in the rooms;
- defects in window installation and slope insulation.
What materials can be used to cover it?
Sealing of seams is carried out with the following polymeric materials and elastic chemical compositions :
- Polyurethane foam:
- standard;
- fire-resistant - if there are special requirements for the window unit;
- resistant to temperature changes - for winter installation.
- Liquid or viscous sealants:
- silicone;
- polyurethane;
- acrylic;
- butyl;
- thiokol.
- Sealing tapes:
- PSUL - on the front side of the window structure;
- sealing tape - to improve the adhesion of PSUL to building structures;
- vapor barrier tape for sticking under low tide on the outside;
- vapor-permeable waterproofing membrane - for installation on the interior side of the window;
- diffusion tape - to protect the foam from the inside of the opening.
Note. When choosing sealing materials, special attention should be paid to their operating conditions and durability.
The best solution would be to purchase formulations from well-known manufacturers that have been on the market for a long time, whose products have many online reviews from satisfied consumers.
Stages of cleaning activities
In order for the cleaning of the window opening in the winter to take place in an organized, coordinated and high-quality manner, the following basic points should be observed when carrying out the work:
Cleaning the surface with a vacuum cleaner with a special attachment attached to the pipe. It will help to thoroughly remove dirt from glass, frames, and any holes between the sashes.
It is important to monitor the integrity of the glass; the tools used should not damage or scratch the surface. The protective film is removed from new windows. When the temperature outside the window drops below 5 degrees, it is advisable to use a steam generator
It allows you to most safely and quickly remove such coating and clean frames without causing defects. Subsequent washing of windows is based on processing the frames, their grooves, and sealing rubber bands on the outside and inside. Next, the glass is cleaned and then polished. Finally, a special product is applied to the cleaned surface and the window sill is wiped.
This is interesting: Why plastic windows sweat: causes and elimination of condensation on windows
Step-by-step instruction
When sealing the installation gap, you should sequentially follow the steps of the following technological map :
Before installing the window unit in the opening, pre-compressed sealing tape is glued along its perimeter.
It is necessary to ensure that the sealing material is installed strictly near the outer edge of the window profile.- After installation, wedging and foaming of the structure, a viscous sealant is applied to the inside of the window block.
- Vapor barrier and waterproofing are glued on top of the polymerized substance. All materials are supplied in rolls with a self-adhesive surface.
- To protect the waterproofing, a diffusion tape is installed, the structure of which resembles durable fiberglass.
- On the outside of the seam, if there is a quarter, a PSUL is laid, after which a vapor barrier membrane with increased frost resistance is installed.
Important. The window block has a decorative frame of slopes, a window sill board and ebb. Before masking the installation seam, you need to make sure that it is completely impenetrable and that there are no cold bridges or drafts, after which you can stick on decorative elements or close the gaps with a plaster mixture.
Sealing the external assembly seam:
Possible mistakes
When creating installation seams and their design, beginners can make a number of mistakes that will lead to negative consequences. To prevent this from happening, professional installers and experts often share their experience on forums on the Internet, pointing out a number of important nuances :
- If the seam is too small - 10 mm or less - the foam layer will not be able to provide adequate resistance to heat transfer - the opening will need to be widened.
- If the gap is too large - more than 30 mm - the sealing materials begin to fall out, lose reliability during operation, and the entire structure does not have the proper strength. In such cases, it is recommended to plaster the opening on 3 sides, or install a high stand profile.
- Incorrect selection of polyurethane foam - the material must meet the operating conditions, as well as the device, depending on climatic conditions.
- Choosing PSUL tape with small dimensions - freezing and blowing of the window are possible. This material should be in a moderately compressed state in the gap.
- The use of low-quality sealing tapes - over time, the material may be destroyed under the influence of an aggressive environment.
- The use of diffusion protective tape with insufficient width means that the material will not be able to adhere along the entire contact plane, which will cause it to delaminate during operation and disrupt the thermal properties of the assembly seam.
Note. If you carefully follow the above recommendations and exclude the indicated errors, the window unit will be used for at least the period stated by the manufacturer, without the need for repair, restoration or replacement of structural elements.
Liquid plastic
At this point I would like to talk about two products called “Cosmofen”.
- COSMOFEN PLUS – for sealing joints no more than 2 mm wide.
- COSMOFEN 345 – for sealing joints with a width of no more than 7 mm.
These are compositions unique in their characteristics, designed for gluing structures using “diffusion welding”. After application, the composition penetrates into the surface structure, and when hardened, it forms a single monolithic composition with them.
Source krepeg-tula.ru
For those who decide to give preference to Cosmofen, I would like to recommend that you read the instructions for use more carefully and will once again emphasize a number of features that distinguish it from other analogues. They are as follows:
- Cosmofen does not need to be smoothed or rubbed in after application. By doing this, you simply disrupt the aforementioned penetration process, which begins due to the rapid evaporation of air particles. Remember, by smoothing it you make the final layer thinner and destroy the film that forms on it.
- There is no need to wet the surface before applying Cosmofen. The reason is similar to that described earlier: upon contact with a wet surface, the top layer is destroyed. This reduces the quality of the applied coating, quickly loses its appearance and begins the process of destruction (cracking).
Source vseinstrumenti.ru