When installing or reconstructing a heating system, replacement or installation of batteries is often required. Installation of heating radiators can be done on your own, without resorting to the help of specialists, but only by strictly observing the requirements of SNiP. When performing work, both theoretical knowledge and practical experience will be required, because even the slightest mistake can lead to problems during operation of the heating system.
Radiator battery installation
a brief description of
Today, buyers have a huge selection of batteries on the heating systems market. They differ in design options, as well as in materials of manufacture. It should be noted that radiators are:
- Floor-standing. They are installed directly on the floor, as they are equipped with small legs, which are made taking into account the standards for the gap between the floor, window sill and radiator.
- Mounted. Their sections are attached using special metal hangers to the internal walls of the house near the window openings.
Connection
Stages of work
If you decide to do the battery installation work yourself, you need to know what steps the process involves.
The instructions for carrying out such work divide it into:
- Preparation of materials and equipment.
- Location calculation.
- Installation of brackets.
- Production of the actual installation.
- Soldering or sealing the joint.
- System check.
Preparatory stage
This stage applies to all types of construction work. First of all, pay attention to what type of system your heating system is. They come in single-pipe and double-pipe. If you are the owner of a one-pipe heating system, you will need to additionally purchase a bypass, which will allow you, if the need arises, to turn off any part of the system without resorting to completely shutting it off.
These operations are not recommended to be performed in winter, especially in severe frosts - this is unsafe. Even if you decide to do all the work yourself, you will still have to call a plumber from the housing office to disconnect your apartment from the common riser. In preparation for installing the system, you will need to purchase or find the following tools and additional materials, such as:
If you still choose, for example, cast iron batteries, you will probably have to purchase Mayevsky taps and install them yourself. In bimetallic and aluminum sections they are already built-in. This device allows you to bleed excess air from the system and maintain its functionality, preventing airing.
Types of radiators
Modern heating systems are made from a variety of materials, so the choice is quite large. There are the following types of sections:
Cast iron
Due to their physical properties, cast iron products heat up well and retain heat for a long time, since they have improved heat transfer. Today, cast iron sectional batteries have a more presentable appearance than those produced in Soviet times.
Today's cast iron radiators are flat panels with even, smooth corners.
Installation diagrams
The service life of such sections is 25–50 years. The disadvantages of this type are significant weight, so it cannot be installed on walls made of gypsum plasterboard and wood.
Made of aluminum
The appearance of the presented heating batteries is practically no different from cast iron ones, but one of the advantages is the light weight of the section (only 1 kg). Due to their low weight, aluminum radiators can be installed on any smooth surface. As for the disadvantages, this is sensitivity to the mineral composition of running water, as well as to possible pressure surges directly in the pipeline.
In the living room
Bimetallic
This type of battery is a good option for a room heating system. This is due to the fact that such material is not affected by the composition of the water, and it is also resistant to pressure drops in the system. Bimetallic batteries heat up quickly enough and, when installed correctly, perfectly heat the air in the apartment.
Construction portal No. 1
Heating installation is a serious stage in preparing a house for operation. Attaching heating radiators to the wall is not the only, but quite big difficulty in this process. To do everything correctly and get a good result of your work, you need to understand what mounting options exist, types of batteries, and the intricacies of work.
The first question is still worth considering the types of batteries that can be used by you both in a country house and in an apartment.
Rules for installing heating radiators according to SNiP
SNiP 3.05.01-85 is a document according to which sections for heating any room are installed. It contains the following provisions:
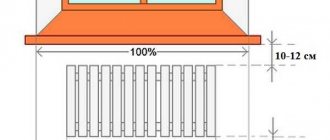
- The radiators must be placed so that the center of the window and the heating radiator completely coincide. The permissible error is no more than 20 mm.
- According to the rules, the width of the heating battery itself should not exceed 50% of the width of the window opening where the window sill is located in residential premises. Batteries in schools, homes for the elderly and disabled, hospitals and kindergartens should occupy 75% of the light opening. This provision is regulated by clause 3.48 of SNiP 2.04.05-91 and clause 6.5.5 of SNiP 41-01-2003.
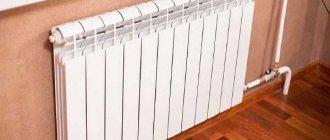
- When carrying out installation, it is necessary to take into account that the distance from the floor surface to the bottom point of the section should not be more than 12 cm. The gap between the upper edge of the battery and the existing window sill according to the standards is at least 5 cm.
- As for the distance that is provided from the wall to the radiator, it should be within 10–12 cm. Although it is possible to change these parameters, then it will be necessary to attach a special heat-protective material (mirror insulation or shielding sheet made of aluminum foil) between the wall and the radiator ).
Radiator installation diagram according to SNiP standards
The set of rules (SP 31.13330.2012) and standards states that in U-shaped heating systems it is impossible to install more sections than were used before. If a method of forced circulation of water directly in the heating system is provided, then if there are 24 or more sections, it is necessary to use a versatile connection method.
How to attach a floor battery
You have to mount the battery on the floor if it is very heavy and hanging it on the wall is simply dangerous. There are special floor brackets for this purpose. They are more expensive than wall-mounted ones, but they have no equal in terms of reliability of fastening. Most often, long heating radiators made of cast iron are mounted on the floor, but sometimes the designs of aluminum and steel radiators also provide for floor mounting.
Advice. It is most convenient to attach brackets intended for mounting floor radiators before pouring the screed to cover the fastening point.
Steps to take when installing a radiator on the floor:
- select two brackets that are suitable for a given battery weight;
- racks are installed on the base allocated for the battery using anchor bolts, maintaining a distance to the wall of at least 6 cm;
- perform concrete work, covering the base of the brackets and bolt heads with a screed;
- hooks are placed on the racks, set at the required height, and they are secured with bolts (metal gaskets are also installed for protection, if provided for in the package);
- The radiator is hung on the hooks, carefully aligning it horizontally.
The floor mounting system has great advantages, since all the weight from the battery falls on the floor. The remaining distance from the floor to the battery allows air flow to circulate.
How do the gaps between the heating radiator and the wall affect
The designated set of rules according to SNiP 2.04.05-91 are not just approved parameters for installing a heating battery. Fixed figures allow you to reduce unexpected heating costs, for example in an apartment building.
The justification for compliance with the standards is that the external walls of residential buildings are in constant contact with the environment.
Depending on the outside air temperature, the building can cool significantly. For example, most high-rise buildings are built of concrete, which due to its physical characteristics does not allow heat to be retained indoors.
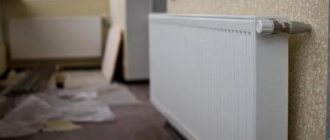
Fastening and installation
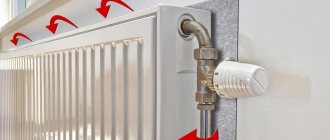
It follows from this that if the heating battery is attached directly to the inner wall of the supporting structure, then most of the heat will be directed precisely to it, and not to heating the air. By making a small distance from the wall to the heating radiator, a kind of air insulation is created, thereby reducing unnecessary costs. According to this principle, it is necessary to install all devices indoors.
What distance from the wall to the battery or radiator is provided if the window sill protrudes significantly in relation to the wall is indicated in the standards. The distance between the radiator and the window opening should not exceed 3/4, since the heating of the air in the apartment will be significantly reduced.
Indoor air movement pattern
What to consider when installing other than distance
Taking into account the indicated norms and rules for installing a heating system, it is necessary to concentrate on such recommendations. In order to avoid unreasonable costs, as well as to ensure that heat is retained in a private house or apartment, you should select heating devices based on the following criteria:
- place of residence, namely the climatic conditions of the region;
- existing heating system wiring;
- method of fastening heating sections;
- temperature indicators in the heating system itself;
- you need to take into account what material the incoming pipes and the pipeline connected to the apartment are made of;
- location of living quarters in the building itself;
- choice of regulatory elements.
Under the window
After analyzing all the options, you can proceed directly to the selection of batteries that will be installed, for example, in a private house, apartment buildings and other premises.
#4 Do not install a jumper
Unscrupulous plumbers take advantage of clients’ ignorance and make their work easier, for example, by not installing a bypass jumper on the heating device. It is necessary to be able to shut off the battery without turning off the neighbors’ heat. In addition, if one of the other residents wants to reduce the temperature in the apartment, this will not affect those who have a jumper. However, if there is no tap on the device, then a bypass is not needed.
Connection diagrams according to SNiP
Before starting installation, regardless of where the installation is being carried out: in the kitchen, in living rooms, connecting batteries on the site between floors, or insulating the hallway - you should select the necessary connection diagram. Several options are presented for consideration.
Rules and regulations
Side connection
In most cases, a lateral connection is made, which helps achieve maximum heat transfer from heating batteries. This requires minimal expenditure on heating the room. The installation principle of the presented option is that the inlet pipe is connected to the upper branch pipe of the section, and the outlet pipe, respectively, to the lower branch pipe. When connected in this way, the pipes will be on one side of the heating radiator.
Diagonal connection
The indicated connection method is intended for attaching batteries that are long. In this case, the inlet pipe is connected to the upper pipe, and the outlet pipe is connected to the lower pipe, which is located on the opposite side of the radiator. As a result, maximum heating of the radiator is achieved along its entire length.
Distance from floor
Bottom connection
This connection method is used for heating systems located under the floor. The only drawback of the presented option is a decrease in efficiency by approximately 5–15% when compared with the side connection of radiators.
To summarize, it should be said that each manufacturer includes instructions with its products, thanks to which step-by-step installation of the purchased heating device and brackets is carried out.
In the bedroom
All standards are recorded in SNiP. It is necessary to adhere to the indicated rules and recommendations, maintaining the required distance between the radiator and the wall. When installing batteries, even without the involvement of specialists, no problems should arise, but it is still better to entrust such work to professionals.
Distance from the floor for the office and kitchen
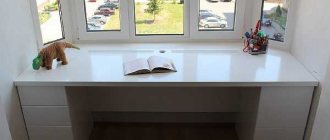
A wider window sill will allow the surface to be used for utilitarian purposes
In such rooms, the placement of the window sill largely depends on the arrangement of the furniture. In offices, the main natural lighting of the workspace is important, so the dimensions should be selected to ensure this condition.
Some people specifically make wide window sills and use them as a desk. On average, the distance from the floor should be about 60-65 cm. These are the optimal dimensions; they will illuminate most of the office.
In the kitchen, the window sill is often combined with furniture, increasing the usable area
In the kitchen, the window sill is often located at a distance of 90 cm from the floor. Most of the kitchen furniture has the same height. With such dimensions, if you place the dining table in the center, it will be fully illuminated.
If you plan to install a bar counter, the height will need to be increased. Under such circumstances, it should be about 120 cm from the floor.
The choice of placement in the corridor is not so critical, because no one stays there for a long time. A landing at 80 cm is considered optimal.
Premises requirements
Gone are the days when tiny Khrushchev-era kitchens quietly placed four-burner gas stoves by the window, next to hanging curtains. Now the situation has changed . A new regulatory document has been approved and put into effect - SP 402.1325800.2018 “Residential buildings. Rules for the design of gas consumption systems."
It includes a number of requirements for premises in which gas stoves are allowed to be installed:
- purpose of the premises - kitchens, kitchen-dining rooms, corridors;
- ceiling height - at least 2.2 m;
- the presence of natural ventilation, an exhaust ventilation duct and a window with an opening sash or window;
- the door from the room opens outward;
- there is a gap of at least 0.02 m² between the floor and the door leaf (for air flow);
- minimum room volume: for two-burner stoves - at least 8 m³, for three-burner stoves - at least 12 m³, for four-burner stoves - at least 15 m³;
- window glazing area - at the rate of at least 0.03 m² per 1 m³ of room volume (glass acts as an easily removable enclosing structure in the event of an explosion).
These requirements apply to both free-standing and built-in devices.
Installation standards
The rules for installing gas stoves or built-in gas panels are described in detail in the instructions from the manufacturer. The technical characteristics of each type of burner are also given there.
Important! Installation of any gas-using equipment, including stoves, is carried out by a specialized organization that has a license for this type of work. If the device is connected by unqualified personnel, there is a risk of gas leakage and explosion. Independent installation and connection of gas-using equipment, which includes stoves, is considered a violation. The consumer is only allowed to perform actions that are performed without a tool.
The work is carried out according to the manufacturer's instructions, taking into account the existing technical connection conditions and the requirements of the local gas service in the following order:
- Make sure that the stove complies with GOST 33998-2016 and is equipped with a “gas control” system that stops the gas supply to the burner when the flame goes out.
- Before installation and connection, check that the type and pressure of gas in the local gas network are compatible with the settings of the device. If necessary, adjust to a different type of gas by replacing the nozzles.
- The device is placed in a strictly horizontal position using set screws and legs.
- Connect the equipment to gas using certified flexible hoses, which should not touch the heated back wall of the appliance and the top of the oven.
- A dielectric insert is placed between the gas tap and the hose, meeting the standards for interrupting the current and passing the full gas flow.
- Seals are used only once.
- After installation, check the tightness of the connections made with a soapy sponge. Apply soap foam to the connection points and see if air escapes.
- Light all burners, checking the stability of the flame at low and high temperatures.