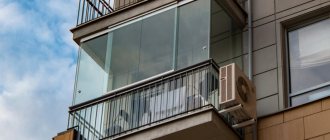
In many apartments, a balcony or loggia serves as a dumping ground for all kinds of garbage, jars of pickles, and sports equipment. This happens because it is simply impossible to stay there in winter. If you save on insulating your balcony, then in the cold season the temperature on it can drop below 0 degrees.
Making a loggia into a full-fledged living space does not cost a lot of money or effort. To do this, it is not necessary to carry out a full renovation. But if possible, you need to think about heating a balcony or loggia already at the construction stage.
What to consider when choosing a heater for a balcony
Balcony heating. Which heater to choose?
A heating device is selected not only based on the characteristics of the device itself, but also taking into account the specific use of the room. Options for using a balcony:
- Pantry or utility room. Maintaining a temperature of about 3-5 degrees is enough. You can do without heating devices, just by insulating it well.
- Work office, place to relax. Heating will do as needed.
- A living space, a place to sleep, or an area combined with a living room or kitchen. In this case, it is necessary to constantly maintain a temperature of about 20-25 degrees.
That is, if you have a glazed balcony and it is used, for example, for drying clothes or simply for storing things, then it is not necessary to heat it. But if you will regularly use it as a living space, then at a minimum you will need a wall or ceiling heater. But it’s even better to install infrared heated floors. You can read about their benefits in this article.
A heater for a loggia or balcony must meet four basic requirements:
- Be safe. Must have fire/overheat protection (automatic shutdown of the device when overheated or tipped over).
- Be economical. Have a thermostat that allows you to automatically maintain the desired temperature.
- Have the power necessary to warm up your balcony (based on the size and degree of insulation of the balcony).
- Occupy a minimum of usable space.
In accordance with these conditions, the following types of heaters are suitable for heating a balcony or loggia:
- electric radiators;
- floor and wall fan heaters;
- ceiling or wall IR (infrared) heaters;
- electric heated floors.
From our experience, oil and gas heaters are definitely not suitable for heating balconies due to their fire hazard.
Gas heater
Oil heater
Let's take a closer look at the main options.
We adhere to the letter of the Law
When removing the battery onto the balcony without completing the appropriate documentation, you need to understand that after this event you risk “running into trouble,” the most minimal of which will be the imposition of a fine on you.
But, in this case, the matter will not be limited to paying a fine. You will have to either dismantle the battery installed outside the apartment, or, having received written confirmation from all owners of the living space, prove in court that such a modification is safe for the heating system and does not affect the quality of life in the house of other residents.
Based on your application, the court will make an appropriate decision. He can authorize the changes you have made, after which they will be included in the Technical Plan of the apartment or recognize them as illegal. Then you will have to dismantle the installed equipment within the specified time frame.
If you doubt the need to move the radiator, we recommend that you familiarize yourself with an alternative heating option. Read how to make a warm floor on a balcony with your own hands on our website. The article discusses the features of all variants of this system.
It is also possible to use ceiling infrared heating on the balcony. It has a number of advantages and is much easier to install.
But no matter what option you choose, in any case, heating will only make sense if the room is well insulated. We told you how to do this correctly here.
Electric radiators for heating a balcony or loggia
They can be classified as the safest and easiest to install devices for heating a balcony. Almost all electric radiators have thermostats that allow you to set a comfortable temperature. In some cases, thermostats have to be purchased separately, but, as a rule, the seller warns about this in advance. The power of one radiator usually varies from 500 W to 2 kW.
Electric radiator
The advantages of the radiator are:
- safety;
- low price;
- almost always a built-in thermostat;
- easy installation;
- Possibility of installation after complete finishing.
Modern models do not dry out the air, are suitable for heating small balconies and can be used both on an ongoing basis and as needed.
The disadvantages of a radiator for heating your balcony or loggia are:
- heat spreads unevenly;
Electric radiator - 2 - poor floor heating;
- occupies a power socket.
Another significant disadvantage of using electrical appliances for heating is the significant consumption of electricity.
Note:
pay attention to the installation location. Place the radiator on a solid wall. When installing on an insulated wall, it is necessary to take into account where the hidden sheathing is located, since it must be mounted to it. When installing an electric convector yourself, you should also pay attention to the length of the wire and the distance from the outlet.
Problems during transfer
When wondering whether it is possible to move the battery to the loggia, on the one hand it seems that there is nothing special or complicated in moving the heating radiator from the adjacent room to this part of the apartment. After all, the balcony itself will be thoroughly insulated before this procedure is carried out, so you won’t have to worry about possible heat losses associated with increasing the usable area of the room. However, in practice, it is very difficult to implement this idea, if only because such a move is not approved by Housing Legislation without obtaining the appropriate permission.
According to paragraph 1 of Article 25 of the Housing Code of the Russian Federation, the transfer of utility networks is part of the reconstruction of residential premises. But balconies, loggias and some other types of premises do not belong to this category. Therefore, moving radiators there is strictly prohibited. The following arguments can be cited as weighty and adequate arguments in favor of this ban:
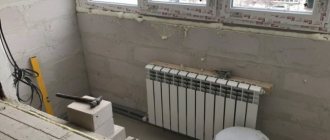
Option for placing a radiator on the balcony
Floor and wall fan heaters for heating balconies
An interesting option for quickly heating the air on the balcony is a floor or wall fan heater. It is suitable if you want to spend an evening there with friends. The fan heater will warm up the balcony very quickly.
Floor fan heater
Advantages of heating a balcony with a fan heater:
- rapid heating of indoor air;
- fairly simple installation of wall-mounted models;
- Floor-standing models do not require installation. The heater can be removed at any time;
- uniform heating of the premises (except for the place where the fan heater is directly installed);
- the presence of a thermostat and stepwise power adjustment. This greatly expands the functionality of the heater.
The disadvantages of fan heaters include:
- low efficiency.
Electricity consumption is higher than when using other devices; Wall fan heater - wall-mounted options must be mounted above head level and require a socket at a height;
- When the fan is running, there is sometimes a slight odor;
- increased noise relative to other heating sources;
- poor floor heating;
- It is not comfortable to be near a wall-mounted fan heater (closer than 1 meter) due to the high air temperature. This can be a problem for rooms with a small area.
Summarize
: a fan heater is a good option, but not for constant heating, but specifically for quick
periodic
heating of a balcony or loggia. Mount it, just like an electric convector, preferably on a solid wall. If the wall is with insulation, then in the mortgages (sheathing).
Maxim Tsebro measuring engineer
Option O, Lucky
If you still decide to seek permission to move the central heating battery to the balcony, then you need to:
- carry out engineering calculations of the thermal conductivity of balcony insulation;
- obtain an opinion from a licensed specialist that it is impossible for the battery to freeze on the balcony;
- perform insulation and glazing of the balcony;
- obtain permission to transfer;
- select and approve a scheme for how to make heating;
- installation of batteries and connection to the heating system.
Tip: If you plan to heat the balcony yourself, then before removing the radiators, it is recommended to cover the wall under the heater with a foil screen, this will eliminate heat loss due to heating the wall.
Calculation of sections
According to SNiP standards, in order to avoid freezing of the heating system, mainly in the corners, the length of the battery must be at least half the length of the window. In addition, each type of battery has its own heat transfer characteristics of 1 section:
- aluminum for 2m2 heated area;
- bimetallic for 1.5 m 2.
Step-by-step instructions on how to install batteries:
- We make markings for radiators. The distance from the window sill to the top is less than 100 mm, from the bottom to the floor - at least 120 mm, from 20 mm or more from the wall.
- Brackets are installed; the main weight must be supported by the upper mounts. Up to 12 sections - 2 on top, 1 on bottom to prevent mobility of the lower part. If the battery is larger, additional top mounts are required.
- We hang the batteries and check the horizontal and vertical levels.
Connection
To prevent the formation of an air lock, make sure that there are no kinks in the lower pipe in the direction from the radiator upwards, and in the lower pipe in the opposite direction.
How to install batteries:
Installing a battery on a balcony
- Lateral.
- Diagonal.
- Lower.
- With bypass for regulating the coolant supply.
If the battery consists of 12 sections and a diagonal heating connection is more appropriate.
Connection diagram of the battery to the central heating system
Connection diagram to the central heating system:
- Two-pipe side connection.
- Two-pipe bottom connection.
- Single-pipe side.
- Monotube bottom.
Video on how to install the battery
But if you decide to connect the heating of a balcony or loggia with your own hands, then first of all turn off the heater supply.
Important: If there is no shut-off valve, then the batteries should be installed outside the heating season
- Cut off the old battery.
- Install the inlet valve.
- Screw the connecting pipe into the battery and into the tap through the fittings.
Tip: To seal and seal connections, use fum tape or tow.
Connecting the battery to the central heating system is the most critical stage in the work; it is better to contact certified specialists, then in case of leaks they will be responsible.
The article was written based on materials from the sites: schoolremont.ru, klivent.biz, balkonsami.ru, oknanagoda.com, house-lab.ru.
Infrared ceiling or wall heaters
This type of heater is placed on the walls and ceiling. Their operating principle is based on infrared waves. They heat nearby objects, which, in turn, heat the air.
Infrared wall heater
Advantages of using infrared heaters on the balcony:
- — uniform heating of the room;
- - efficiency;
- - high efficiency.
Infrared ceiling heater
Features of using infrared ceiling and wall heaters for balconies:
- strong dependence of surface heating on the distance to the heater;
- not suitable for balconies with a small area, rather suitable for terraces;
- it is better to choose extended low-power options;
- Models with power control have an advantage (for example, with a 0.5 and 1 kW switch);
- the heater housing often becomes very hot;
- sockets or connected wire to the installation site are required;
- it is often non-rotating, i.e. it will not be possible to direct it to another part of the balcony;
- heating feels like solar heat;
- there is no need to heat the entire balcony; you can almost instantly begin to warm up any area, for example, a workplace.
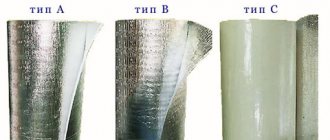
Insulating materials
The following types of insulation are available on the market:
- expanded clay;
- mineral wool;
- expanded polystyrene;
- polyurethane foam;
- penofol.
Choosing the optimal material is easier than it seems.
Expanded clay
This is the cheapest material. Does not hold its shape, readily absorbs moisture. Durable, resistant to fire, mold, mildew. It is used to insulate the floor on the balcony when they want to save money.
Insulating the floor on the loggia with expanded clay
Mineral wool
Medium price material. Its slabs are very wide, so they are not suitable for small spaces. The ingress of moisture impairs the insulating properties. Mineral wool is environmentally friendly, fire-resistant, and creates additional sound insulation.
Balcony insulation with mineral wool
Expanded polystyrene
Expensive insulation, devoid of any shortcomings. The plates are easily attached to any surface using self-tapping screws. The best option for any room.
Polyurethane foam
Liquid insulation. Easily fills any cracks and cavities. Special equipment is required for installation. Dismantling presents some difficulties.
Penofol
Auxiliary thin heat and water insulator. It is used together with expanded polystyrene and mineral wool to create an additional air layer.
After you have chosen a thermal insulator, proceed with installation. First, all walls, floor, and ceiling must be covered with a layer of waterproofing made of polyethylene or foam foam, and the joints between the sheets must be glued with tape.
Balcony insulation with penofol
Then a metal or wooden frame is built (for more details, see the article “balcony sheathing”), into which the insulation will then be laid. The distance between it and the surfaces must be sealed with polyurethane foam. Next, the insulating boards are tightly laid. There should be no gap between them and the frame, otherwise all the work will go down the drain.
A rough covering of chipboard and plywood is built on top of this structure. You can install a heated floor on the loggia. Then finishing work is carried out.
Ceramic heaters
You can also use ceramic heating panels to heat your balcony.
Ceramic heater
They consist of the following components:
- magnesite plate;
- metal body coated with polymer materials;
- a heating element;
- ceramics.
75% of the heat is given off by the ceramic surface in the form of infrared radiation. 25% of the heat is the warm flow rising from the device. The panel and metal case can heat up to 90 degrees.
Ceramic heaters use the principle of propagation of infrared rays in combination with convection.
Advantages:
- relatively small size;
Ceramic heating panel
- efficiency up to 99%;
- simple installation;
- reduction in energy costs by 25-30% when using temperature controllers;
- compliance with environmental and fire safety requirements;
- does not dry out the air.
Disadvantages of ceramic heaters:
- High price;
- Strong heating of some models;
- Weight of some models;
- Insufficient heating in the area of the feet.
How the device works and principle of operation
In terms of operation, infrared heaters are similar to the sun. During operation, thermal radiation is created, which is absorbed by all surfaces on which it hits, and then the objects release energy into the environment.
The infrared heating system is thermal radiation that is in the infrared spectrum. Most of the bodies on the planet that have their own heat also have their own radiation. Therefore, after converting electricity into thermal energy, it is directed from the plates, which, when reaching a temperature of approximately 250 degrees, begin to release heat using infrared rays.
The main feature of this method is the extremely rapid heating of the room due to surface or deep heating of furniture, fittings and floors. Due to the fact that the rays do not heat the air, there is no decrease in the amount of oxygen or decrease in humidity. In addition, such mechanisms are extremely economical.
Quartz heaters
There are monolithic and infrared. The difference lies in their structure:
- for monolithic ones, the heating panel is made from quartz;
- In infrared heaters, quartz is the material for heating pipes.
Heating is carried out by a nichrome thread built into the panels or quartz tubes. Heated quartz emits infrared heat, heating nearby objects.
Quartz heater
Advantages of monolithic quartz heaters:
- affordable price;
- design in which there is nothing superfluous;
- no noise during operation;
- health safety;
- heating the room does not take much time.
Disadvantages of monolithic quartz heaters:
- ceramics weigh a lot;
- it is necessary to additionally purchase a thermostat;
- a protective screen is required to avoid getting burned on the panel;
- ceramics is a fragile material.
Quartz infrared heater
Advantages of quartz infrared heaters:
- Safe - all heating elements are located behind a durable grille, and the device also turns off automatically when tipped over;
- Silent – can be installed directly in recreation areas;
- Compact and mobile - does not require installation, and can be removed if necessary;
- Durable – if used carefully, the heater will serve you for a very long time;
- Economical - there is a timer and temperature regulator. Disadvantages of quartz infrared heaters:
- Uneven temperature distribution - such a unit does not heat the air, but only the objects it is directed at; accordingly, if the heater is directed at you at the level of your feet, then at the level of your head you will be cold;
- Some elements get very hot, and if you are careless, you can get burned;
- The fragility of the vacuum quartz flask - if damaged, it is almost impossible to repair it;
- The room cools down quickly.
Electric heated floors for a balcony or loggia
Perhaps this option is the best for heating balconies and loggias. Electric underfloor heating is ideal for maintaining a comfortable room temperature.
Its obvious advantages: careful consumption of energy, uniform heating of the entire area, ease of installation, protection against mold, and electric heated floors do not take up any space.
Good to know: the power of underfloor heating is calculated based on the power per square meter. This means that 1 square meter of heated floors from different models and manufacturers can heat in completely different ways.
Main types of electric heated floors:
- Heating cable mounted in a screed.
- Heating mat for floor tiles.
- Infrared film flooring for laminate or linoleum.
Heating cable in screed
Heating cable in screed
An undoubted advantage of laying a heating cable is economical energy consumption. It is placed in a screed, thanks to which the floor retains heat longer. You can also regulate the required heat supply power by laying one or another (suitable for you) amount of cable per square meter.
The disadvantages include the fact that it heats the floor for quite a long time, so it is not suitable for short-term use.
A special electric cable is used as a heating element. It is necessary to first prepare the base, make thermal and waterproofing.
Heating cable laying diagram
Stages of work:
- Preparing the floor for laying tiles (screed, DSP sheets on joists, etc.) is often dusty and long (more than 2 days) work.
- Electrical cable connection.
- After this, at the time of laying the floor tiles, the mats are laid.
The main advantages of using a heating cable for underfloor heating in a screed:
- the air in the room warms up evenly;
- you can walk barefoot without fear of catching a cold;
- The heating is based on the principle of the Russian stove;
- A properly laid heating cable has a long service life.
It is also worth noting some disadvantages of laying the heating cable in a screed:
- the room takes a long time to heat up;
- installation takes a long time due to the long drying time of the screed;
- the screed increases the height of the floor;
- Not all balconies can be screeded;
- The topcoat can only be tiles (not linoleum or laminate).
Despite the long heating time, such a floor remains warm for a long time even when turned off. Electric cable tie is ideal for use in large spaces.
Heating mat under tiles
A heating mat for a balcony is actually the same heating cable, only attached to a mesh, which eliminates the need for additional calculations of power per m2. It is the heating mats that do not have to be laid in the screed before laying the tiles. They are laid directly during the work of tiling the floor with ceramic tiles.
Heating mat under tiles
Sequence of work:
- Preparing the base for laying tiles (pouring screed, CBPB sheets, etc.).
- Electrical cable connection.
- Laying mats under floor tiles.
Advantages of a heating mat under tiles:
- heats the floor faster than a heating cable;
- easier to install;
- a well-laid floor does not require maintenance and can last for decades;
- less afraid of the “locking effect” (laying under furniture) than an infrared floor.
Disadvantages of mats for tiles:
- not suitable as the only way to heat a balcony at temperatures below -10 degrees. An additional heat source may be required to maintain the desired temperature. But in any case, even in the absence of one, a warm floor will not allow the room temperature to drop below -5-10 degrees;
- The efficiency of underfloor heating on a balcony depends very much on the type of glazing and insulation of the balcony. However, there are many examples where a heated floor with an area of 3 sq. m. enough to warm up the entire balcony in the most severe (by St. Petersburg standards) frosts;
- repair or replacement without dismantling the tiles is impossible;
- at particularly low temperatures, it is necessary to install hidden wiring and a wall thermostat.
Heating mat under tiles – 2
Despite the complexity of installation on a balcony, we still consider warm floors a necessary condition for comfort. Lower energy efficiency (in the short term) means that you won’t be able to turn on the floor and heat the balcony in a few hours. But when the tile warms up, the heating effect will feel similar to the heat coming from a Russian stove.
Infrared heated floor on the balcony
Infrared heated floor on the balcony
The main advantage of using infrared flooring is the possibility of its compatibility with laminate or linoleum. These floor coverings are the most budget-friendly and are used most often. Therefore, infrared heated floors can be considered the most popular method of heating insulated balconies and loggias. Also, such a floor ionizes the air, which eliminates allergens and unpleasant odors (paint, tobacco, etc.).
Infrared rays heat nearby objects, which transfer heat to the entire room.
8 reasons to install film infrared heated floors on the balcony:
- Easy installation.
- No expensive surface preparation required.
- Does not put a load on the balcony, as is the case with pouring screed.
- Infrared film flooring is safe for health.
- During heating, air ionization occurs. This eliminates unpleasant and foreign odors in the room.
- For repairs, you only need to remove the laminate or linoleum.
- If you need to add furniture to a balcony or loggia, high-quality floors make it easy to remove or add the required number of mats by connecting them to existing ones. To do this, you only need to remove the finishing floor covering.
- It doesn't take long to heat up.
Laying infrared heated floors on the balcony
When purchasing a heated floor, pay attention to the power of the mats. For glazed balconies and loggias, infrared mats with a power of more than 200 W per 1 sq. m. are best suited.
Insulation of the loggia during the construction phase
The tips in this section are suitable for “bare” balconies and loggias. The main difference between these two rooms is that the balcony protrudes from the facade of the house, and the loggia is separated from the main room by a wall. Read more in the article “What is the difference between a loggia and a balcony?”
The first thing you should decide is whether you are ready to start insulating the outside. This may require special equipment if you live above the 1st floor. Double-sided insulation is necessary for large rooms.
Seal all cracks with sealant (small) or foam (large). Heat escapes through them the fastest. Level all walls with putty and cement mortar. This increases the efficiency of thermal insulation.
Pay special attention to moisture insulation. Dampness attracts cold. Treat the internal and external walls with a moisture-repellent solution before installing heat-insulating panels.
conclusions
When choosing a method for heating a balcony, it is necessary to take into account many factors (purpose of the room, area, cost of the device, etc.). There are no bad or good options, since everything depends on specific conditions. Nevertheless, the most affordable and effective methods include infrared flooring.
If you are thinking about how to heat an insulated balcony and have questions, please contact us. We will offer you the option that best suits your requirements.
We are always in touch and ready to help. Call daily +7 (812) 407-35-00
With respect to you and your colleagues in the workshop.
Team "Your Home"