Concrete is a common building material, the high strength and other positive characteristics of which determine its use in the construction of a wide variety of civil and industrial facilities. However, concrete products do not have thermal insulation properties and, in addition, conduct structural and impact noise well. Therefore, buildings made of concrete structures require additional finishing with heat and sound insulating materials - external or internal, frame or frameless.
Today's range of high-quality insulating materials is wide, and at the same time, new thermal insulation means are appearing, the degree of effectiveness of which is often well known only to the manufacturer. Therefore, in an effort to achieve maximum results, you should not buy a widely advertised, expensive, but still little-known insulation - the high cost is often just a marketing ploy, a way to declare the high quality of a product, which after a week is often half the price.
When looking for a budget solution for thermal and sound insulation of housing, one should not underestimate the use of such a proven product as polystyrene foam and its improved varieties.
This insulator, depending on the type, is suitable for installation on any type of enclosing base - floor, walls, ceiling. Based on the fact that it is easier to equip the floor and walls with insulation, we will consider how and with what to glue foam plastic to the concrete on the ceiling - the most inconvenient surface for finishing.
Advantages and disadvantages of penoplex
Porous synthetic penoplex does not absorb moisture and insulates the room from sounds.
Choosing to lay penoplex on the floor under a screed has a number of significant advantages that have not gone unnoticed by professionals and private developers.
- Low thermal conductivity. This figure is several times higher than that of analogues, which makes it possible to lay slabs of minimal thickness on the floor and install a warm water or electric floor on them.
- Long service life. Various manufacturers provide a warranty of 40-60 years.
- Reasonable price. Petrochemical industry by-products are used as raw materials.
- Sufficient strength. The coating can withstand strong mechanical loads. You can lay laminate or parquet boards directly on it.
- Waterproof. The slabs do not absorb or allow moisture to pass through, creating a high-quality water barrier.
- Resistance to fungus and mold. Insects and rodents are not interested in the polymer.
- Environmental Safety. The insulation does not contain formaldehyde or other substances harmful to health.
- Excellent sound insulation properties. A layer of material of only 5 cm completely cuts off all noise produced at the lower level of the building.
- Low specific gravity. There is no additional pressure on the foundation, and installation of penoplex on the floor can be done without much effort alone.
Significant disadvantages of insulation
This type of insulation has several significant disadvantages:
- Price . Here it is difficult for it to compete with mineral or stone wool, ordinary polystyrene foam.
- Flammability . The material may ignite at temperatures above 410 °C. And its mechanical and physical properties change at temperatures above 75 °C.
- It is vapor-tight . It does not allow steam and air to pass through, which can lead to the formation of fungus.
Of course, you can buy penoplex with fire-resistant additives. However, in this case you will have to choose even more expensive material.
What is the best way to cut penoplex?
During various procedures, the insulating product must be divided into certain parts that have certain dimensions. If the material simply breaks, you will get uneven edges, and it is not possible to achieve the exact size.
Based on the above, we can conclude that the best solution is cutting. You can use various tools:
Using a utility knife. The advantages of using this tool: accessibility, no noise, speed of the process. The sharper the tool, the higher the cutting quality.
Stationery knife
Using an electric jigsaw. The downside is getting edges that are uneven. But the speed of performing this work is the maximum possible. An electric jigsaw can handle slabs of varying thicknesses.
Electric jigsaw
- A kitchen knife can be used. Be sure to sharpen the kitchen knife thoroughly before starting the cutting procedure. Next, the selected tool should be heated. A hot knife does a much better job of cutting. Pros of using a kitchen knife: no debris and smooth edges.
- Nichrome wire. It is used for figure cutting. It is necessary to connect the wires to a 24V transformer. When electric current is applied, the tool heats up.
One of the distinctive features of thermal insulation products is ease of installation. To do this, you do not need to have any specific knowledge or extensive experience as an installer.
How to install insulation on the ceiling
To insulate the ceiling with foam plastic, you will need some tools:
- wooden slats or aluminum profile;
- polystyrene foam (or penoplex);
- dowels;
- knife and hacksaw;
- polyurethane foam;
- glassine (or similar waterproofing material);
- metal screws;
- hammer;
- drywall;
- glue.
Ceiling insulation is carried out in two ways:
- frame ceiling insulation with foam plastic;
- adhesive ceiling insulation with polystyrene foam.
Frame insulation involves creating a frame from slats or a profile. A frame made of aluminum profiles is preferable because it gives the ceiling additional rigidity. This allows you to lay the power supply system inside the frame and place lighting fixtures without difficulty.
Installation is carried out exclusively on a prepared surface. All irregularities must be leveled, puttied, and the surface of the ceiling covering must be treated with a primer. The frame is created by the transverse and longitudinal arrangement of profiles, which are attached to each other and to the ceiling with screws or nails.
Foam plastic is placed in the resulting cells. It must be cut strictly according to the cell size; it does not shrink and does not deform over time. This property allows you to insulate any ceiling surfaces. Penoplex is either glued with specialized glue or attached with screws. Then, which is the most important condition for obtaining the best effect of sound insulation and insulation, all the gaps between the frame and layers of material are tightly filled with polyurethane foam.
The final stage of ceiling insulation is covering the frame with plasterboard. Afterwards all that remains is to complete the finishing work on the ceiling.
Foam ceiling insulation technology
If you are somewhat strapped for funds or simply do not want to bother with creating a frame, then use the method of insulating the ceiling with foam plastic by simply gluing the material. The proprietary adhesive mixture is quite expensive, but it can be successfully replaced with ordinary putty or tile adhesive.
Before proceeding with gluing, it is necessary to prepare the surface, as in the case of frame insulation. At the same time, if the ceiling canvas is covered with whitewash, which is almost impossible to completely remove, you can simply coat it with an adhesive mixture and wait until it dries. In this case, the foam will stick perfectly.
Pasting is carried out in the following order:
- the ceiling canvas is being prepared;
- An adhesive mixture is applied to the insulation sheets;
- the foam is pressed against the ceiling;
- hold for several minutes for best adhesion;
- The gaps between the sheets are properly coated with the adhesive mixture.
There is also a little trick: for better adhesion, you can use dowels with a large head, with which the penoplex is screwed to the surface.
After the surface has dried, it is worth reinforcing it with a special solution in which a fiberglass mesh is embedded. The second layer of solution is applied only to the completely dried first one.
Insulating the ceiling with foam plastic will not only help keep the room warm, but will also significantly reduce the level of incoming noise. In addition, it will be possible to perform various finishing works that were impossible on a whitewashed ceiling surface.
https://youtube.com/watch?v=_fga-mBSyUo
A person wants to live comfortably both in the city and in the countryside. A material with unique properties – penoplex – will help him with this.
It is perfect for insulating the ceilings of city balconies and loggias, and in private houses - verandas and living rooms.
Penoplex is made from extruded polystyrene foam. This material has remarkable chemical and physical properties that allow it to outperform other construction insulation materials in terms of quality, reliability and efficiency.
How to properly attach penoplex to a concrete wall
The modern construction industry is annually enriched with a mass of new materials with unique properties that make it possible to build stronger, more durable and cheaper structures.
One such material is penoplex or EPS, used mainly as thermal insulation.
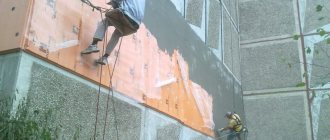
At the same time, to ensure high reliability and long service life, it is important to correctly perform the installation procedure
In the photo - gluing EPS to a concrete foundation
Installation methods and materials used
Installation of polystyrene foam slabs can be done without the use of any additional fasteners, however, the concrete surface should be carefully prepared:
Advice: if the protrusions interfere with your preparation, use cutting reinforced concrete with diamond wheels to dismantle them.
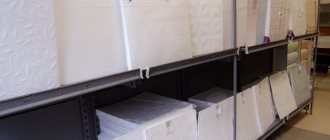
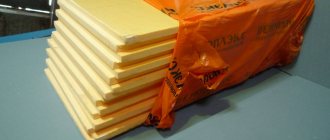
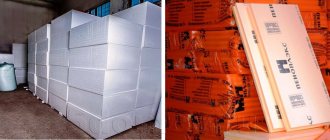
In the photo - foam boards
Before gluing penoplex to concrete, you need to prepare the following materials:
- cement mortar;
- primers;
- adhesives for polystyrene foam;
- drills for mixing glue components;
- containers in which the components will be mixed;
- serrated spatulas.
If installation is planned to be carried out using additional fasteners, the set of materials will be even smaller:
- insulation;
- glue;
- seam sealant;
- dowels
- The method of attaching insulation using liquid nails is widely popular. Its advantage is that this substance does not need to be applied to the entire surface of the sheet - it is enough to apply it pointwise.
Application of liquid nails
Advice: keep in mind that its use is not possible with every type of insulation, moreover, it contains toxic substances.
To carry out work using this method, in addition to polystyrene foam and liquid nails, you will also need protective gloves.
- Another option that answers the question of how to glue penoplex to concrete is the use of special foam. However, it is advisable to resort to this method only when working with floors, since the foam has rather low adhesive properties. There are several types of foam: for fastening foam block structures;
- for foam sheets;
- for polystyrene foam boards.
Below we will talk in detail about how to glue penoplex to concrete and the characteristics of these materials.
Properties of various types of glue and options for its use
Its key advantages include:
- pronounced waterproofing properties;
- resistance to low temperatures.
It does not require any special preliminary preparation, however, if work is carried out at an air temperature below + 5 ˚С, it is recommended to warm the glue to + 18-20 ˚С.
Extruded polystyrene foam (EPS) or penoplex
The market for building materials produced on the basis of polymer compositions and used for thermal insulation of residential premises is replete with various options. The assortment presented in stores can confuse not only inexperienced builders, but also professionals in their field. Experienced builders recommend opting for penoplex rather than other types of insulation such as “XPS TECHNOPLEX”. The reason for this is the presence of special properties in this material related to its composition and structure. Thanks to them, extruded polystyrene foam is a material with a universal scope of application. Most often, this material is used specifically for thermal insulation in private homes, commercial and industrial buildings. It is mounted both in the area of the foundation and walls, and is used to insulate the roof space.
The use of extruded polystyrene foam allows you to take advantage of a number of its unique properties that other types of materials cannot boast of when insulating a ceiling with a cold roof. These include:
- Environmental safety of insulation.
- The presence of microscopic pores in the structure of penoplex causes a low level of moisture absorption without compromising acceptable vapor permeability values.
- Penoplex is not susceptible to fungal infections and mold, and is not destroyed by environmental factors. It is completely protected from rotting.
- The material is characterized by increased strength, thanks to which its slabs are able to withstand significant mechanical loads. This quality makes it possible to use penoplex for thermal insulation not only of ceilings, but also of walls and floors.
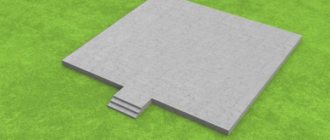
- The edge of the insulation looks like a protrusion in the shape of the letter “L”. This feature greatly facilitates the process of joining the slabs, and also guarantees that all the cracks will be filled with material.
- The surface of the penoplex is rough, which ensures good adhesion characteristics with finishing materials - putty, plaster.
It is difficult to disagree with the fact that not every finishing material made on a polymer basis has a set of such important qualities. In addition, penoplex slabs weigh little, which means they do not create additional load on the structural elements of the building. Since the pores of the material are very small, it can serve as an excellent means of thermal and sound insulation, while its thickness is small. Those who happened to use this material to insulate the ceiling space of the loggia noticed a number of other useful properties.
They are as follows:
- ease of installation;
- the ability to independently carry out work without difficulty;
- work on installing penoplex slabs can be done without regard to weather conditions, since it is not afraid of either frost or moisture.
Mounting methods
Specialists use different methods to attach polystyrene foam.
- Glue method.
This is a quick and convenient way to attach. It is enough to choose the right adhesive composition and then apply it to the insulation. Based on their initial state, adhesive compositions are divided into types:
dry mixes are bulk materials packaged in bags. They contain cement with binding additives. To prepare the glue, just dilute the solution according to the instructions;
- liquid formulations are always ready for use. These include the adhesive composition “liquid nails” and cheap PVA glue. If PVA glues foam plastic well to metal surfaces, then “liquid nails” glue different materials, however, the glue is very expensive, so it is used on small surfaces;
- foam - this type includes special adhesive compositions developed for foam plastic. First of all, these include:
- Polyurethane adhesive that has good adhesion to foam. It is packaged in cans, so it is used with a special pistol.
- Adhesive - foam provides reliable adhesion to various materials. A special gun makes it easier to use glue.
- Fastening method.
Dowels with a wide head are intended to strengthen the fastening of slabs. They are used for external wall insulation, as well as when there is an increased load on the heat insulator.
There are several types of dowels, but they all necessarily have a sleeve, a core and a wide head. If the dowel is hollow, then a nail or screw is used in the spacer zone. The plate is fastened in the corners and in the center. Compared to gluing insulation, this method is more labor-intensive.
- Combined method.
The simultaneous use of two methods of fastening the insulation allows you to achieve high quality installation. The adhesive composition isolates the surface from external influences, and the dowels increase the reliability of fastening.
Video instruction:
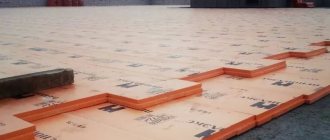
Laying foam insulation on a concrete floor
Insulation of reinforced concrete floors often causes difficulties; the process of laying slabs is simple and is not much different from finishing walls or subfloors. The problem arises with how to secure the foam to the ceiling. Insulation material can be installed in many ways, but in practice only two are used:
- Apply insulation sticker to the prepared surface;
- Attaching foam plastic to the ceiling mechanically.
The use of a specific method depends on the condition of the concrete and the degree of surface moisture. For residential premises with normally dry ceilings, it is possible and necessary to glue insulation material. For buildings in which rooms are heated with a large gap in time, or there are cracks in the ceiling, the best way is to lay the slabs using fungal dowels.
Rules and recommendations for installing penoplex
Effective thermal insulation with penoplex is only possible if the technology for its installation is followed. The sheets are installed on a flat surface. The first to be fixed is the starting bar, made of wooden beams or perforated metal. The width of the strip must correspond to the width of the insulation. Ready-made kits are available for sale, consisting of strips, external and internal corners for installation at joints.
Installation of the starting strip is carried out in the following order:
- A horizontal guide is marked along the perimeter of the building using a level or chokeline.
- First, the required level is set, then the beacons are installed with a thread.
- The plank is mounted on the dowels along the intended guide.
The starting strip will ensure the correct fastening of the penoplex in compliance with the installation geometry.
A staggered arrangement of sheets from the starting strip upward is the best way to install insulation. The adhesive composition is applied to the inside of the insulation, and to fill the resulting voids, polyurethane foam is used, which does not contain hazardous components.
After the installation of penoplex is completed, decorative finishing of the surface is performed.
Finishing of ceilings when performing work with penoplex
This thermal insulation material opens up wide possibilities for choosing finishes. This can be a variety of decorative plasters, as well as classic plasterboard ceilings or suspended ceilings. In the case of the latter, you must first take care of installing the profile suspension system and only then proceed with the installation of insulation. For high-quality fastening of decorative finishing, before using it, you should install a specialized plaster mesh.
The entire above set of works can be effectively done with your own hands. To do this, it is enough to fully study the technology of work, prepare high-quality tools and have minimal construction skills to perform work with the materials used.
Gluing instructions
First of all, an adhesive solution is selected. It is determined depending on what the penoplex is glued to; the work is carried out outside or inside the room. The gluing process is as follows:
- The working surface on which the stove will be attached is cleaned of dirt.
- Surfaces are treated with a primer.
- Prepare the adhesive solution and use it according to the instructions. It may be necessary to apply glue to the insulated surface and the penoplex itself.
- The slabs are applied to the surface from bottom to top on the walls or from left to right on the ceiling/floor. The plate must be held until it no longer lags behind the surface.
When the slab is well glued, then you can begin installing the next one.
How to mount
Installing such slabs on the ceiling will not cause any difficulties for anyone. Even if you have never done this kind of work, you can still do it. The operating procedure will be as follows:
- First, the surface of the ceiling is cleaned from dirt, dust and other similar things. Old peeling coatings also need to be removed.
- All necessary work is carried out on laying the wiring and sealing the grooves in which it is laid.
- Next, the surface is primed. It is needed to improve the adhesion properties of the surface and to prevent the formation of mold or mildew under the insulation layer. Most primers contain special components for this.
- The next stage is gluing the plates. They are cut to the required dimensions as necessary and glued, if possible, in a checkerboard pattern so that the joints of the plates do not form one line.
The final work is to “foam” the joints between the parts with polyurethane foam, the excess of which is cut off after drying.
Video description
Features of fastening foam boards indoors can be seen in the video
Depending on the nature of the work, the glue is applied in three ways:
- continuous layer - over the entire area, evenly, with a distance of 3 cm from the edge;
- stripes - “L”-shaped four stripes in the corners and two long ones in the center;
- point – dense drops are made at a distance of 30 cm from each other.
Having figured out how to glue penoplex to concrete or other surfaces, you need to remember several important nuances of the work. It is better to do all work with an assistant. Be sure to read the glue consumption level and the manufacturer's instructions. Spray adhesives are easiest to work with, but they are not suitable for all surfaces.
Be sure to treat all surfaces with a primer to improve the quality of bonding and protect against fungus. The adhesive solution is applied evenly, in a layer of several millimeters. Immediately after touching, it is imperative to level each slab. Do not forget about safety measures and manufacturers' recommendations.
Each adhesive option is applied differently, this is important to consider during installation of slabs Source obustroeno.com
How to glue foam sheets together
The modern building materials market is replete with different models of penoplex.
Sheets vary in thickness, rigidity and density. When penoplex is attached to penoplex, these characteristics are taken into account. In this case, the appropriate adhesive composition is selected. Attaching penoplex to penoplex is carried out using any type of glue. An important nuance when choosing glue is the absence of acetone and gasoline.
Attaching penoplex to penoplex can be done using a special solution. It is prepared using a gravity mixer or a drill with a variable rotation speed. In this case, use a whisk attachment.
The prepared solution must be used within 2 hours after preparation.
Attaching penoplex to penoplex requires a distance between the sheets of no more than 2 mm. If gaps appear, they are filled with strips of insulation or foam for installation.
The best manufacturers
How to glue penoplex to concrete and other surfaces, which manufacturer of the composition to choose? Many experts prefer well-established and well-known companies. Among such manufacturers are Teploskrep, Kleiberit, Penoplex, Technonikol and some other companies. The products of these manufacturers were developed specifically for foam boards. It can be liquid, foamed or dry. The market offers products from domestic and foreign manufacturers in different price categories.
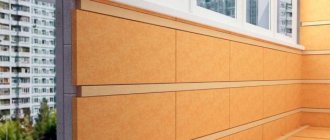
Ceiling insulation with penoplex - mounting options
High-quality thermal insulation of living space can significantly improve the energy efficiency of an apartment, house or office.
One of the most popular technologies for performing these tasks is ceiling insulation with penoplex. This material has proven itself well and is an excellent alternative to analogues existing on the market. 20-25% of heated air can escape through an uninsulated ceiling. In financial terms, this can significantly hit the family budget, significantly increasing heating bills. The use of penoplex can pay for itself already in the first season of use; moreover, this material can significantly increase sound insulation, protecting against street noise.
Video description
Step-by-step technology for facade insulation with penoplex in the video:
The compositions are designed for external and internal use. Adhesives are resistant to temperature changes, high humidity, and sunlight. When developing the formulations, high-quality materials are used; they are as safe as possible for people and the environment. However, in any case, before starting work, you must carefully study the recommendations and requirements of manufacturers and consult with specialists. Choose an adhesive that will be best suited for a particular surface. Manufacturers also offer special universal adhesives. Some compositions are additional insulation for the basement, roof or foundation.
Compositions for penoplex are developed specifically for slabs and withstand the negative influence of the environment; universal options can be used with different materials. Source stroymat77.ru
Briefly about the main thing
There is no clear answer to the question of how to glue penoplex to each other or to different surfaces. Manufacturers offer specialized adhesive compositions that have the following characteristics:
- high quality adhesives are not afraid of moisture, temperature changes, sun rays and wind;
- the compositions are developed for different surfaces and are applied using several techniques;
- glue is applied in several ways depending on its type and characteristics;
- There are several types of adhesive solutions;
- some compositions are strictly prohibited for use for interior work;
Which one to choose depends on the task at hand and the operating conditions of the insulated object.
Distinctive features and composition
When considering options for insulating an apartment or house, the financial side is first taken into account, which is often put above issues of health and environmental safety. To a large extent this depends on the composition of the insulation used. In this capacity, materials such as expanded clay, sawdust, mineral wool, as well as insulation obtained after processing polystyrene can be used. These are polystyrene foam and penoplex - insulation materials that have much in common, but differ significantly. First of all, the production method differs. If polystyrene foam, which is widely used, is made by foaming granules in dry steam, then foam plastic can be obtained by extrusion. This implies that the granules of the semi-finished product melt, which makes it possible to obtain a single surface with strong intermolecular bonds.
Insulation methods
Solving the issue of insulating a wooden house is possible without inviting specialists; basic skills in working with building materials are sufficient.
It is important that thermal insulation using penoplex is possible both inside and outside the building
But practice shows that external, or external, insulation of a house is preferable for a number of reasons:
- Insulation on external walls will last longer, as it will be better ventilated.
- The external structure will not only serve as insulation, but also protect the walls from negative natural factors.
- External insulation will not reduce the internal living space.
- Work can be carried out in an occupied house without disturbing the internal structure.
Installation using plastic mushroom dowels
This method has been harshly criticized by many experts. In their opinion, technological holes for dowels in foam plastic can be additional sources of warm air passage. Holes are drilled on the surface and in the foam itself. Fungi are then inserted into them to maintain the insulation at the required level under the ceiling.
Features of penoplex
Penoplex has certain distinctive features:
- environmentally friendly and durable;
- resistant to evaporation and moisture;
- minimum chemical activity;
- easy to install and handle;
- good resistance to deformation;
- favorable price, low thermal conductivity.
Special glue is used to attach the plates
When choosing it, it is very important to consider several important factors. The quality of the glue directly affects the service life of the insulation
The composition of the glue can have a negative effect on human health. When purchasing glue, choose solutions that have high adhesion and are safe for the environment and human health.
The material has good characteristics, thermal insulation properties, is not afraid of moisture, a favorable price, can be glued to different surfaces, ceilings, floors and walls. Source pro-uteplenie.ru
How to insulate a wooden floor with penoplex - step-by-step instructions
Penoplex is the latest generation material. This is a foamed polymer produced by extrusion. It has low thermal conductivity due to its durable structure with a large number of cells.
Penoplex is produced in slabs, the thickness of the slab is from two to 10 centimeters. Outwardly, it strongly resembles polystyrene foam. Does not increase the weight of the structure.
Does not absorb moisture. Foamed polystyrene is not affected by fungi and rotting processes.
It should be noted that the thermal conductivity of penoplex is 25 times lower than the thermal conductivity of expanded clay concrete. This factor significantly increases the insulating characteristics.
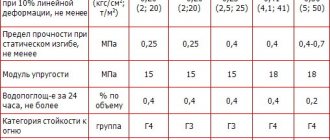
Penoplex density is 22 t/m
Therefore, the material is mechanically strong and does not require a frame to work with it.
If necessary, this thermal insulation material can be used to install “warm floors” (electric and water type). Penoplex is fire resistant.
The cost of penoplex is slightly higher than the cost of other insulation materials, but it easily pays for itself in the cold season.
Let's figure out how to act correctly when carrying out insulation work.
The most convenient way to place expanded polystyrene foam is to alternate with logs and lay the floor covering on top of them.
Penoplex: wall mounting technology
It is not so important where the insulation is carried out - on the outside of the house, or in the interior. In any case, the insulated surface must be flat
Its quality is checked by level and plumb line; if necessary, the surface is plastered.
When finishing a newly constructed building from the outside, it is necessary to prime the walls with a primer containing quartz sand. This treatment will significantly improve the ability of the glue to connect the insulation to the base.
For the same purpose, old walls should be thoroughly cleaned of dirt and traces of the old coating. Before installation, it is necessary to treat the surfaces with antifungal agents.
What to glue
How to glue penoplex to a concrete wall? In this case, it is better to choose cement-based or mineral adhesive solutions. With their help, you can achieve the maximum effect of bonding two surfaces. Such compositions have an affordable price and high adhesion rates when using penoplex for outdoor use. The composition is excellent for installing slabs to concrete, aerated concrete and sandstone. Such compositions are sold in the form of bulk mixtures and packaged in paper packaging. Before use, the mixture is mixed with water; instructions are on the package.
Mineral and cement adhesives are sold in the form of a dry mixture, which is diluted with water in accordance with the manufacturer's instructions. Source blog-potolok.ru
If you are choosing how to glue penoplex to a brick, then you need to look towards polyurethane glue. This is an ideal option for attaching penoplex to wood and brick. Such a solution can be used to insulate concrete surfaces, but in this case the cost of the result increases significantly. Polyurethane compositions are sold ready-to-use, they are sticky, and are sold in 750 ml aerosol cans.
It is very important to remember that this type of glue has one characteristic feature - it dries very quickly. Therefore, immediately after applying the adhesive, the slab must be immediately attached to the surface.
Polymer adhesives are universal and can be used on different surfaces. Provides quick fixation. Can be used to attach slabs to the ceiling. Bituminous waterproofing compounds are designed specifically for rooms with high and constant humidity.
Polymer compounds are a universal type of glue; they can be used for different surfaces and quickly glue slabs to different surfacesSource ad-cd.net
All types of adhesive compositions have their own characteristics, pros and cons. When removing glue, it is necessary to take into account working conditions, external or internal work, room humidity, and so on.
How to attach to concrete
What should I use to glue penoplex to concrete? There are several ways to attach slabs to concrete surfaces - using special adhesives, foam and liquid nails. It is necessary to select a suitable material taking into account the characteristics of the work. Experts prefer dry mineral and cement mortars developed specifically for these purposes. They have high adhesion and give a high result of bonding two surfaces. Liquid nails can only be used if penoplex will be installed on the floor. Foam is best used only to fill joints.
Special dry adhesive mixtures are designed for installing foam boards to concrete surfacesSource www.cemtorg.com
How to attach to metal
How to glue penoplex to metal? When working with metal surfaces, you can use regular polyurethane foam. The composition is applied to the sheet at five points and then pressed tightly against the metal. Many experts use PVA glue. This is a cost-effective option, but you will need to purchase additional burlap.
The gluing process occurs in two stages. First, glue is applied to the burlap and it is glued to the metal. At the second stage, a foam board is glued to the burlap, but only after the previous layer on the metal has dried well. Cladding is allowed only after the glue has completely dried. For cladding, any materials that are light in weight can be used.
To glue penoplex to metal, you can use mounting foams or PVA glue. Source imhodom.ru
Gluing the boards together
Sometimes the question arises: how to glue penoplex together? In this case, it is strictly forbidden to use any solutions that contain kerosene, alcohol or acetone. This is due to the fact that organic solvents can completely destroy the structure of the insulation. To fasten foam boards together, it is allowed to use only adhesive compositions designed for working with polymer materials.
Any dry mortars based on cement are used in this case. The best option is polymer adhesives. After application, it forms a homogeneous mass that reliably holds the sheets together. Polyurethane compounds that provide quick bonding also give quite good results.
Plates can only be glued together to increase thermal insulation properties and noise protection using polymer adhesives; it is strictly forbidden to use compositions with organic solvents Source i1.photo.2gis.com
Mounting on polyurethane foam
To work with this composition, it is advisable to use a special gun and do not forget to use a rinse after use. Each container must be shaken well before inserting into the gun. The foam is applied in a thick strip along the entire perimeter of the slab, as well as diagonally. After this, press the slab towards the ceiling and wait until it sets. In order to fix it evenly to the concrete ceiling, use a level, with which you can save yourself the hassle of finishing the surface.
Penoplex installation
You will have to choose from two options: install from the attic side, or make thermal insulation from the inside of the room.
Installation from the attic is carried out as follows:
The attic floor is thoroughly and carefully cleaned of dirt and debris and, if necessary, leveled. Dry glue is applied to the foam boards, after which they are laid on the attic floor in dense rows to each other. After the glue has dried and the slabs are attached to the attic floor, the gaps between the laid material are sealed with polyurethane foam
It takes a day for the resulting structure to dry thoroughly. Excess foam is carefully cut off. A floor made of boards is laid on top of the foam boards.
Installation from the side of the room (loggia, balcony) is done as follows:
The ceiling, cleared of dirt and debris (leveled, with cracks and potholes sealed), is treated with a primer. Dry glue is applied to the foam boards, then they are attached to the ceiling. Use a hammer drill (very carefully!) to drill holes for the fungi. Fungi are driven into the holes made by the puncher. They are necessary to ensure that the structure rests securely on the ceiling. At the joints and in the gaps, foam boards are filled with polyurethane foam
When it dries, the excess is carefully trimmed off. Now the reinforcing mesh is attached. For this, a rough adhesive mixture is used. The surface of the ceiling is cleaned and treated with a primer. A fine finish is applied. The final touch is a decorative coating or paint.
Ceiling insulation is complete.
Take note: if you have an attic, it is better to insulate it from its side. The second method of thermal insulation with penoplex - from the side of the room - is suitable if neighbors live above and there is no access to the attic.
Advantages of thermal insulation from the attic:
- the usable area of the room is preserved;
- ceilings will not become lower after installing penoplex;
- additional work in the attic is carried out, as when laying a floor.
Use of foam plastic in work
How to apply liquid wallpaper with your own hands in the interior? 93 photos, tips and application ideas
Insulating the ceiling in a private house from the inside with polystyrene foam is used quite often. But it has disadvantages:
- Formaldehydes are released into the air;
- Rodents may appear;
- The upper part of the room will not breathe;
- Lights up when a fire occurs.
Installation stages
- There are two installation methods: glue and frame.
- Measurements are taken of the width and length of the ceiling.
- Thermal insulation material is purchased.
- The old covering is removed from the ceiling.
- The surface must be treated with an antiseptic.
- Afterwards it is primed.
- Now either the slabs are glued to the ceiling, or a frame is made and the blocks are placed in the cells.
- With the adhesive method, the slabs are additionally secured with dowels.
- All cracks are filled with polyurethane foam.
- Reinforcement of the surface is done.
- The entire upper surface of the room is sewn up.
Advantages and disadvantages of using penoplex
This material has optimal properties for use as insulation:
- extremely low thermal conductivity of 0.03 W*m*C, wet material also perfectly insulates;
- absolute moisture resistance is due to the foamed structure of polystyrene. Closed foam microcells do not allow water to pass through, which makes it possible to use penoplex for insulation on the roof and foundation, in conditions of increased dampness;
- compressive strength 0.2–0.5 MPa, flexibility, does not change its shape and properties under mechanical loads;
- does not rot, does not contribute to the growth of mold and mildew;
- wide operating temperature range is from -50 to +70Сº;
- the effective service life declared by the manufacturers is at least 50 years;
- does not contain phenols and other toxic substances;
- does not burn, self-extinguishes, some models contain fire retardants;
- low weight makes storage and transportation, installation easier, does not load the walls;
- low price will allow you to inexpensively insulate a house and save on utility costs, produced by Russian companies.
Disadvantages of the material:
- when exposed to fire, it melts and emits caustic toxic smoke;
- vapor permeability is low, the walls do not breathe;
- requires finishing on top, with constant ultraviolet irradiation it is destroyed over time;
- weak adhesion to adhesives, fixed to the wall using fasteners.
Foam plastic, its varieties and characteristics
Polystyrene foam is a large group of cellular materials made from plastics by foaming them. Almost all known polymer masses served as the basis for the production of modern types of foam plastic, and, depending on the source material, the final product differs in size and cell structure, density, strength, specific gravity, etc.
Foams are polyurethane, polyvinyl chloride, phenol-formaldehyde, urea-formaldehyde foams and polystyrene, differing in characteristics and, accordingly, areas of application.
According to the degree of rigidity, foam plastics are divided into:
- hard;
- semi-elastic;
- elastic.
The same type of foam can have varieties with varying degrees of rigidity and elasticity.
For heat and sound insulation, it is recommended to use rigid, thermosetting types of foam, which, after curing during manufacturing (polymerization), are not subject to softening due to increased temperature, for example, phenol-formaldehyde and polyurethane, extruded polystyrene foam (penoplex).
Thermoplastic types of foam (polystyrene, polyvinyl chloride) soften with each heating and then harden again when cooled, but this imposes additional restrictions on application.
Porous varieties (foam rubber of various types) are subject to shrinkage, are hygroscopic and therefore lose their insulating qualities over time.
It makes no sense to list the properties of all types of foam plastic, since they have many common characteristics that differ in numerical values, but knowing the properties that determine the use of these materials as insulators is necessary for their effective and safe use.
General advantages of rigid foam plastics used for heat and sound insulation:
- extremely low specific gravity (ease of transportation);
- high degree of heat and sound insulating properties, subject to operation in the temperature range acceptable for a particular type of material;
- ease of processing with mechanical tools;
- lack of toxicity when used without heating to the temperature of destruction (destruction);
- neutral to the effects of bacteria and does not contribute to their proliferation.
Disadvantages of rigid foams:
- low threshold for maximum application temperature;
- lack of resistance to a number of chemical compounds (solvents, nitro paints);
- porous surface, making cleaning difficult and favorable for the attachment of microorganisms;
- toxicity of most species when burned.
Important! In food enterprises, the use of polystyrene foam as insulation is prohibited due to the fact that rodents can grow in it.
How to attach the insulation
To understand how to glue penoplex to the wall, check out all the possible options for the products. There are several ways to attach insulation. For example, using:
- polyurethane foam;
- cement mixture;
- disc dowels;
- polymer-bitumen mastic;
- "liquid nails"
Let's look at each method of installing penoplex in more detail and find out how to glue penoplex to a concrete wall, wooden surface or other materials.
Mastic
Bitumen-polymer mastic is recognized as one of the most practical and cheapest materials. Most often it is used to insulate the basements of buildings with constant high humidity.
Also, bitumen-polymer mastic is suitable for rooms with reagents that corrode other mixtures. Penoplex will be securely attached even when exposed to adverse factors.
The adhesive mixture is supplied in the form of tubes and is inserted into a special sealant gun. You can buy one at a building materials store. After installing the tube, you must apply the composition to the center and along the perimeter of the penoplex, as well as into the grooves. It remains to press the insulation sheet for a short time. Complete drying occurs in one hour.
Dry mixes
Reliable and simple option. The use of a dry mixture allows you to quickly and without hassle fix the insulation on a wall made of brick or concrete. To prepare the solution for use, dilute the powder in water according to the instructions. Now mix the mixture using a mixer attachment for a regular construction drill. Set the minimum speed.
Apply the solution using a notched trowel. Don't forget to fill the grooves; you can also do this with a spatula. Press the penoplex lubricated with the mixture onto the surface for one minute.
Adhesive foam
The ideal solution specifically for smooth stone surfaces. Since the adhesive mixture has high adhesion, even smooth insulation will be perfectly fixed to concrete surfaces and will not move over time. The foam is applied strictly along the perimeter of the slab; to enhance adhesion, it can also be applied to the center. It is enough to press Penoplex tightly for thirty seconds, with an average setting time of about twenty minutes.
You will be able to carry out further work with the insulation (for example, grouting) in two hours.
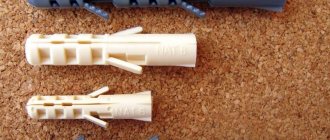
Disc dowels
The use of dowels is relevant for rooms with an uneven facade or large areas. To secure the insulation to the dowels, you will need a drill, a hammer drill and a hammer. So, how to properly attach penoplex using dowels?
Using a hammer drill, you must drill holes; each ready-made one has a recess in the base of about fifty millimeters.
Fill these holes with regular mounting foam, then place and hammer a disc dowel into them. Fungi should not protrude above the stove. One slab of penoplex will require about five pieces. One dowel can be used to fasten adjacent sheets of insulation.
Liquid Nails
The most expensive fasteners for penoplex. If the wall is already well primed and leveled, you can try attaching the insulation to so-called “liquid nails”. The glue is applied using sealant (or a glue gun) in the center and along the perimeter of the foam sheet. Now press the insulation against the wall for a few seconds.
But such an adhesive composition has a fairly high cost. Therefore, the method is suitable only for small insulation areas.
Polyurethane foam
An equally popular option for attaching foam sheets. Apply the foam using a gun, then hold the sheet until it fully adheres to the surface. But do not forget that the composition expands and breaks down over time, so this method is not recommended when installing insulation outside the house.
How to insulate a balcony with your own hands (Photo)
Look at step-by-step photos of each stage of balcony insulation. This is what the finished sheathing looks like. Notice that at a height of 1.2 meters from the floor, there are two bars. The bottom one is for attaching the first sheet of drywall, the next one is for the second sheet of plasterboard. Try to fit the foam sheets tightly to the cells of the sheathing, avoiding large gaps. If there are still gaps, you should foam them with polyurethane foam, and cut off the excess with a paper cutter. Don’t forget about the places under the window sill. All cracks must be filled to avoid cold bridges. We lay penofol and fasten it to the sheathing with a stapler. We glue the joints of two sheets of penofol with tape
Important! Penofol is attached with the foil side to you! The final stage is the installation of drywall sheets
As you can see, the technology for insulating a balcony from the inside is quite simple, the implementation of which you can easily cope with. Following all the recommendations in this article will allow you to properly insulate your balcony and make it more comfortable and functional.