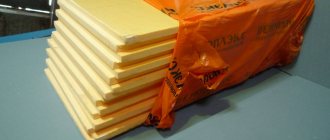
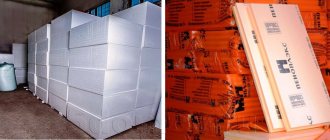
Insulating boards from the Penoplex brand are known to almost every resident of our country; the product is really high quality, but it still needs to be installed correctly. And then we will try to figure out which adhesive for penoplex insulation is better and how to attach the panels with your own hands, plus I will answer 7 questions regarding this type of insulation.
Penoplex adhesive for exterior and interior use may differ in composition
Types of adhesives
In order for the choice of adhesive to be made correctly, you need to know exactly what material the foam sheets are glued to. The wrong choice and poor quality of the adhesive cause the destruction of the entire insulating structure.
Polyurethane
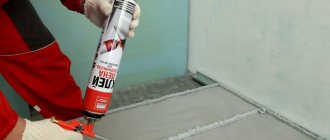
Polyurethane adhesive for attaching insulation is convenient even for beginners, since it is available in aerosol form. The product is economical, does not require stirring, and is ready for use immediately after purchase.
- Insta stick. Release form: 0.75 l cylinders. 1 b is spent. for 12-15 m². Coupling time – 20 min. Tensile strength – up to 400 thousand PA. It may freeze. Cannot be used at sub-zero temperatures.
- Titan Stiro-753. Consumption – 1 b. for 14 m². Tensile strength – 600 thousand Pa. Coupling time – 15 min.
- Foamed Fix&Go Montage. This is a frost-resistant composition and can be used at temperatures from -65 to +130 °C.
Polyurethane adhesives can be used to fix penoplex to wood, brick walls, concrete, and to glue slabs together.
Polymer adhesives
Glue for polymer-type penoplex is sold in small cans. The use is justified when slabs need to be glued to metal. The funds are absorbed instantly. It will not be possible to correct the incorrect position of the elements of the insulating structure, so beginners rarely use polymer mixtures.
- Moment. A moisture-resistant, heat-resistant composition, which is sold in containers ranging from 250 ml to 1 liter. A small package is enough to cover 4-5 square meters. surfaces.
- Emfikol 225. Has the same characteristics as “Moment”. It is better to use it outside, since after interior work you need to ventilate the room for 2-3 days.
Mineral
The mineral mixtures are based on cement, ordinary and fine-grained gypsum. Sold in bulk form, need to be kneaded before use. Due to the rapid hardening, the glue must be made in small portions, which are used immediately.
Cement-based mixtures are suitable for external thermal insulation, and gypsum composition is ideal for internal work.
The mixture sets in 1.5-4 hours, which gives a lot of time to change the position of the sheets and eliminate any defects.
Mineral mixtures can only be glued to a pre-primed base. Without primer treatment, the connection will be weak. For high-quality preparation of a single-textured mixture, a construction mixer is used.
- Ceresit CT 83. You can glue the material to any base. Pull strength – 500 kPa, frost-resistant.
- Atlas Stopter K-20. Tensile strength – 600 thousand Pa. Pot life time: 4 hours. Consumption: 4.4 kg per m². The composition is supplemented with reinforcing fiber.
Packed in bags of 5-25 kg.
- If the package is marked F50, it means the product is for indoor use.
- Frost resistance class F100 requires the use of adhesive for exterior use.
Waterproofing compounds
The group includes bitumen, acrylic and rubber compounds. Sold in the form of mastics.
Liquid glue cannot be used, as it will corrode the penoplex, like other petroleum-based waterproofing mixtures.
The best bitumen composition is “Bitumast XPS”. There are no solvents in it, the setting time is 48 hours, the tensile strength is 500 thousand Pa.
Resistant to low temperatures, has improved waterproofing characteristics. Acrylic waterproofing compounds are used to glue slabs to metal, wood, concrete, and brick bases. You can connect two sheets of insulation together and glue it with penofol. The mixtures have low consumption and are suitable for internal and external insulation.
Bitumen mastic
Can work at low temperatures. The insulation is glued onto the bitumen mastic entirely or the joints between individual sheets are filled with it. In the second case, it works as a hydrophobic filler.
To apply mastic, use a spatula or spatula. The product does not require shrinkage. Penoplex can be glued well to a metal or mineral base.
Liquid Nails
Liquid nails can be used to attach penoplex to almost any substrate. If insulation is done inside the house, then standard mixtures are used; heat-resistant liquid nails are selected for external treatment.
The composition is sold in tubes. It should be applied to the sheets in a snake pattern over the entire area for maximum adhesion to the base. Dries in 10-20 seconds. It differs from other products in its rather high price.
The most popular are liquid nails Moment Montazh.
What is not suitable for gluing
The modern building materials market offers a number of compounds that cannot be used in combination with expanded polystyrene. This is due to the fact that some elements of binders negatively affect the structure of the material, reducing its technical characteristics, or partially destroying it.
For this reason, before gluing the penoplex together, you need to make sure that the adhesive composition does not contain some components.
For example this:
- Solvents that contain acetone or with the addition of this substance.
- Industrial components that consist of oil, gas.
- Alcohol-containing substances in varying degrees of concentration.
If you bought a solution with an unknown component, then you can determine its compatibility with the sheets using a simple method.
To do this, you need to apply the mixture to a small area of insulation and observe what happens within half an hour.
For example, if you see minor damage on the surface - soldered, welded cells, significant dents, dark spots, etc. - it is not recommended to use a means for gluing polystyrene foam.
The product should not contain flammable substances, otherwise the cells will gradually collapse. If you cannot remember the list of undesirable substances in the composition of the products, then you need to remember one rule - do not purchase glue that contains flammable substances.
How to choose for different surfaces
- For exterior work, it is better to use loose mixtures that have good adhesion to stone, brickwork and plaster. It is important that the purchased packaging is intact. If it is not airtight, the quality of the dry mixture is impaired.
- To waterproof the surface or seams, bitumen or polymer compounds are used.
- For wooden and reinforced concrete bases, choose polyurethane adhesives.
- Penoplex can be glued to a metal base using liquid nails, polyurethane foam or silicone sealants. Gluing on regular PVA will be inexpensive. It is first applied to burlap, which is attached to the metal, and then penoplex is attached.
- Insulating material can be attached to plastic, corrugated sheeting or chipboard using liquid nails.
- If both the ceiling and walls are insulated, it is better to use polymer compounds.
- It is better to use polyurethane mixtures for thermal insulation of the floor and when carrying out interior work, and mineral ones for exterior finishing.
- A universal product for all surfaces and rooms is foam adhesive.
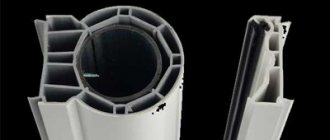
Fastening drywall
GVL (gypsum fiber sheet) is a well-known drywall that is widely used in repairs.
GVL is attached to penoplex in two ways. It can be glued and also strengthened by installing a frame made of metal or wood. The wooden frame should be a few centimeters behind the wall. The space between the slats is filled with foam sheets. The gaps between the plates of thermal insulation material are closed with installation foam. Then drywall is attached to the wooden blocks.
Insulation using penoplex and plasterboard is a fairly common method used on loggias, balconies, basements and garages. Penoplex sheets covered with plasterboard should not be used in high rooms (wall heights greater than 2.5 m). The frame should be stitched tightly.
Fastening drywall to penoplex using dowels is the best solution. For low wall heights, fastening with glue is a completely acceptable option.
Is it possible to glue on polyurethane foam?
If penoplex is placed on polyurethane foam, the connection will be quite strong. To use foam on the floor, you first need to make a self-leveling concrete screed. The main problem is the high price of construction foam.
Due to the long-term expansion of the foam during gluing work, it must be pressed all the time until installation is completed.
Wall mount
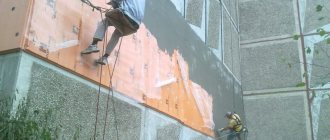
Attaching penoplex to a concrete wall creates difficulty due to the low adhesion of the thermal insulation material. The strength of installation work can be increased by using glue and dowels.
Attaching penoplex to the wall requires preliminary cleaning of the latter. Dust and dirt should be removed from the walls. Those areas that are affected by fungus should be treated with a special antiseptic. Irregularities and cracks are covered with putty.
Before starting work, the surface should be primed.
Stamps
Let's consider the most famous brands of adhesives for penoplex.
Tytan
Titanium is a universal adhesive produced in Poland by Selena.
To work with insulation, it is better to use the Professional Styro 753 series. The composition is resistant to the influence of precipitation and is heat-resistant, so thermal insulation can be carried out outside. The product ensures maximum adherence of the insulation to the base.
Ceresit
Using Ceresit products you can attach insulation to walls, ceilings and other surfaces.
- Ceresit ST 84. Foam for insulation. Can be used for outdoor work. Withstands temperature changes from -10 to +40 °C. Hardens quickly. In summer it hardens in 2-4 hours. Can be applied with a mounting gun.
- Ceresit ST 83. Available in bulk form. The complete drying time for the material is 3 days at positive air temperatures. Easy to apply with a notched trowel. Consumption – 6 kg per sq. m. Non-frost resistant.
- Ceresit ST 85. Composition for gluing and reinforcing penoplex. Operating temperature +5…+30 °C. Available in bulk form. After diluting with water, the composition should sit for 2 hours. When gluing in the usual way, the consumption is 6 kg per sq. m., when reinforced - 5 kg per sq. m.
Moment
Fixes penoplex to any base. The moment is also used to create a reinforcing mesh. The composition has good adhesive characteristics, is frost- and moisture-resistant, elastic, does not require shrinkage, and can withstand changes in temperature.
Master termol
- It has a cement-sand composition, which makes it easy to attach penoplex to concrete, cement and lime bases.
- Provides good adhesion to polystyrene foam.
- Very elastic composition.
- Immune to frost.
- Environmentally friendly composition.
Profline 3K-45
The adhesive contains components that increase the level of adhesion of penoplex to any base. Can be used on plastered, cement and concrete substrates.
The adhesive seam is not susceptible to moisture, cold, or mechanical damage.
Penoplex Fastfix
Penoplex Fastfix is an adhesive foam for penoplex, which is used during thermal insulation work. You can use foam to attach insulation boards to concrete ceilings, ceramic tiles, plasterboard, aerated concrete and brick. Penoplex Fastfix 750 ml is available in the form of an aerosol of the appropriate volume. Color – light blue.
The glue has good adhesive characteristics in relation to most building materials, including wood, plaster, expanded clay concrete blocks, cork, cellulose, and metal.
With foil material, the composition does not provide the necessary adhesion; it is also not suitable for gluing polyethylene, Teflon, and silicone surfaces.
The mixture adheres to the plane in 10-12 minutes, within half an hour it is still possible to cut the structure, and complete hardening occurs within a day. Can be used indoors and outdoors. Often used for thermal insulation of loggias and balconies.
Advantages and disadvantages
Advantages of polystyrene foam:
- Natural and environmentally friendly material. Expanded polystyrene does not emit toxic and harmful substances, therefore it is safe for the human body;
- Long service life. The structure is not susceptible to mold, fungi, moisture and various microorganisms.
- It resists fire well and can withstand high temperatures. The spontaneous combustion temperature is +491 degrees and this is 2 times higher compared to wood and 2.2 times higher than paper. It also does not support combustion well; if the source of ignition is removed in time, it goes out immediately.
- Little weight. Thanks to its light weight, it is easy to install and does not place additional load on the base.
- Inertia. Does not interact with other materials. Resists well against various chemicals. Therefore, it can be immersed in soapy water. It also does not interact with bleaches and acids, except nitric and acetic.
- Low cost. This material is very cheap and can be purchased at any hardware store.
Disadvantages of polystyrene foam:
- Easily damaged and broken. Therefore, it needs additional protection.
- It is quickly destroyed under the influence of nitro enamels and solvents. For this reason, it cannot be painted.
- Does not allow air to pass through. Therefore, rooms insulated with polystyrene foam must be frequently ventilated.
- Very often, foam plastic is damaged by rodents, gnaw holes in it and make their nests.
How to glue penoplex
It must be glued onto a carefully prepared base. The wall is cleaned of debris, dirt, washed and completely dried.
If the instructions for use suggest priming the base, it must be treated with a primer. Next, the insulation is cut. It is cut into pieces of the required size using a jigsaw or a construction knife.
Installation technology
Following the installation plan, you can begin attaching the insulation to the ceiling, walls or floor. Mineral wool is sometimes used as a backing for penoplex.
The composition can be applied to sheets pointwise (beacon method), continuous or strip method.
The spot application method is most often used.
If the glue is liquid, it is applied with a spatula 10-20 cm wide. A few minutes after application, the slab is pressed to the base and held for several seconds. When the glue is completely dry, the joints are sealed with foam. You can fill them with glue, but it will be more expensive.
Puttying penoplex
When the mounting adhesive has completely dried, the insulation can be secured with dowels for reliability. Afterwards, the surface is puttied with a finishing finish.
The putty must be applied slowly, layer by layer, ensuring its even distribution. After the first layer, you need to attach a metal or plastic reinforcing mesh. The first layer of putty is about 10 mm, the second and subsequent ones can be thinner. It is advisable to apply the third layer by spray, no more than 0.5 cm thick.
External protection
To protect the penoplex from the outside, adhesives with high adhesive characteristics are used. The most commonly purchased mixtures are Polymin, Master and Ceresit brands.
Some craftsmen advise gluing “Giprok” plasterboard on top of the penoplex insulation, which provides additional insulation.
Gluing stone and tiles to penoplex
When all installation work with insulation has already been completed, it is time to move on to finishing. Typically, ceramic tiles, porcelain tiles or artificial stone are laid on top of the penoplex. These materials adhere to tile adhesive. It is frost-resistant and can be easily applied to walls and floors. Before laying tiles on the walls, you need to apply a couple of layers of Ceresit ST 85 plaster with a reinforcing mesh between the layers.
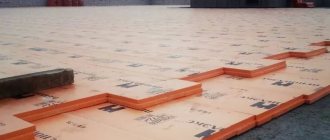
Laying tiles on the floor is done only after creating a cement screed on polystyrene foam.
Preparing tools
If you are concerned about the question of what kind of glue to glue foam to metal, then you can first start choosing the composition. Depending on which one you choose, you may need:
If you prefer a dry mixture, you will need a drill with a mixer attachment. To apply this glue, you can use a spatula in the form of a comb, but you will need a small spatula as a handy tool for work; with its help you can remove excess glue.
Tips for use
- Read the instructions on the packaging, take into account the consumption of the product when calculating the required material.
- Buy adhesive with reserve, especially when you need to insulate deformed surfaces with cracks, chips, and potholes.
- It is better for beginners not to use quick-drying compounds, since they will not be able to correct the position of the insulation boards if they are installed incorrectly. Glue in balloons is suitable.
- Before insulation, it is better to treat the surface with a primer; this will prevent the appearance of mold and increase the adhesive properties of the base.
- The glue must be applied evenly over the entire surface, with a layer thickness of no more than 3 mm.
- Insulation boards must be leveled immediately after application to the base.
During all thermal insulation work, safety precautions must be observed.
Preparatory work before installation
If you are thinking about how to glue polystyrene foam to metal with polyurethane foam, then it is important to know that this material can be fixed to almost any metal. Among other things, you can use almost any glue or putty. However, you cannot purchase a composition whose ingredients contain gasoline, acetone or any other solvent. The slabs will collapse.
Another mistake that craftsmen often make is not using enough adhesive. Such compounds must be applied to the back side of the slabs; this must be done in 5 places or more. First, the mixture is applied in the corners, and then in the center. Before gluing foam plastic to metal, you need to remember that saving is inappropriate here. To do this, some apply the composition only in three points; this is incorrect and violates the technology.
Before gluing metal and foam plastic, the surface should be prepared; it should be cleaned of dust, old paint and varnish coatings, dirt and rust. You can use an oscillating or belt sander for this. After such cleaning, the base is degreased with any convenient means. Gluing is not such a quick process; sometimes it is necessary to ensure that the material is fixed until the glue hardens. At first, the thermal insulation may slide under its own weight, so it must be supported from below with a board or plywood.
Conclusion
Now you know which Penoplex glue is best to use in your case. I recommend watching the video in this article, and if you have any questions, ask in the comments.
| The composition is excellent for attaching Penoplex to difficult surfaces . Plywood, corrugated sheets, plastic - you can attach insulation to all these bases with liquid nails. |
| Gluing is simple and quick . A small amount of liquid nails is applied in dots or lines to the base, then the sheet is pressed for 10-20 seconds. |
Decorating the coating
After grouting, plastering of penoplex is easy and relatively quick. To decorate the coating, you can use a sponge with large pores or a special grater.
There are ready-made decorative plaster compositions that create an unusual texture on the outer surface.
Bark beetle plaster, in addition to the usual basic components, contains white powder and small pebbles with a diameter of up to 2.5 mm. With certain skills, the master can make different designs from the same mixture by directing the movements of the spatula in a certain way. The work of a plasterer thus turns into the work of a decorator.
If the mixture contains larger stones, up to 4 mm in size, the relief will be completely different. Granules are crumbs made from natural raw materials: granite, marble. Pebble plaster gives the facade an unusual, beautiful look and provides shine in the rays of sunlight. White cement plaster mixtures with the addition of large granules of quartz, dolomite, and marble are available for sale. For some unknown reason, it was called the lamb. Perhaps the appearance of the facade reminded someone of the wool of sheep.
An interesting decorative option is created by mosaic plaster based on polymer acrylic interspersed with natural colored chips.
Penoplex is a high-quality insulation material, the initial installation of which requires an investment of money. The costs will quickly pay off thanks to savings on heating costs. They will be protected from bad weather at any time. Practical considerations about the advisability of using penoplex are complemented by aesthetic ones. Using decorative mixtures and painting surfaces, you can create a unique look for each home.
Peculiarities
Penoplex is foamed polystyrene with a uniform structure of small air cells. At the moment, only two types of penoplex with different densities are on sale: 35 and 45 kg/m³.
The difference between the two materials is significant, from properties and technological qualities to purpose:
- penoplex 35 kg/m³ is intended for thermal insulation in industrial and residential buildings;
- penoplex 45 kg/m³ is used in the construction of highways, gas and oil pipelines, and in railway construction.
In addition, the material is used to insulate facades, roofs, foundations and internal walls of buildings.
Technical characteristics of penoplex:
- strength;
- high resistance to moisture;
- low level of thermal conductivity;
- resistance to mechanical stress;
- ease of installation and processing;
- weak chemical activity;
- fire resistance;
- environmental friendliness;
- durability;
- affordable price.
Installation of this insulation is carried out using a special glue, the choice of which determines not only the duration of operation of the material, but also the health of the people living in the house.
Review of popular manufacturers
The best manufacturers of adhesive compositions on the Russian market include:
- Terraco - offers high-quality cement mixtures for interior and exterior use.
- Ceresit - the company produces a wide variety of building mixtures, including adhesives of almost any type. All products have quality certificates.
- Titan is a domestic manufacturer of polymer adhesives. They combine high quality and affordable prices.
Disc dowels: long lasting strength
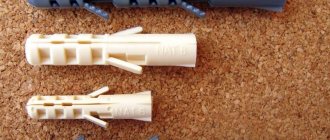
The use of disc-shaped dowels is justified in the case of a large insulation area or uneven façade surfaces. For fastening to dowels you need: a hammer drill (impact drill), a drill of the appropriate diameter and length, and a hammer. Holes are drilled with a recess of 50-60 mm into the base. The holes are filled with polyurethane foam. Then the dowel is driven in with a hammer so that the dowel fungi do not protrude above the surface of the slab. It is best to use dowels in combination with metal screws to increase the reliability of the connection. Installing 5 dowels per slab is sufficient. Adjacent sheets are fastened with one dowel. It must be installed in the seam between the slabs.
Mastic: the basics
Bitumen-polymer mastics are one of the most common materials due to their price and ease of use. This technology has found wide application in insulating the plinths of buildings operating in extremely unfavorable conditions of constant humidity, the presence of reagents, and mechanical stress. They provide quick and reliable installation of penoplex with stable resistance to harmful external factors. Mastics are sold in tubes, ready for use. The tube is installed in the sealant gun.
The composition is applied around the perimeter and pointwise to the center (when laying the second one and then next to it, it is also applied to the grooves). Then the installed insulation is pressed for a short time. The glued insulation can be repositioned within one hour.
The glued insulation can be repositioned within one hour.