To attach conventional sealing tape, glue or sealant is used
If you purchased a simple seal, then you need to take care of the method of attachment to the frame. You can use rubber adhesive or sealant. Otherwise, the installation does not differ from the method described above. It is worth noting that some ordinary people practice installing such insulation using a stapler. We do not recommend using this method, since the surface of the sash loses its appearance over time .
Swedish method of insulating windows
Another way to insulate a window structure, labor-intensive, but more reliable than the previous two, is the groove method (Swedish technology).
The groove method of window insulation is the most reliable
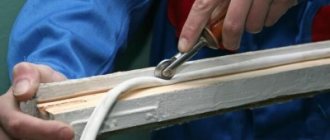
The sashes need to be removed from the frame; a chamfer is selected along their perimeter using a milling cutter at an angle of 45 degrees in the direction of the flashing.
The chamfer is selected with a milling cutter at an angle of 45 degrees
In place of the loops, an untouched gap is made three centimeters larger than the size of the loop.
The groove should be thoroughly cleaned of any remaining shavings and sawdust.
The rebated insulation is installed into the chamfer and pressed into place. To do this, you need to buy a special roller, which will greatly facilitate this process. Do not stretch the insulation tube by moving the roller in one direction; it must be moved back and forth.
When installing the tape, the roller cannot be moved in one direction.
The sashes are installed on the frame structure and the quality of the seal is checked by closing the window.
After installing the seal, you don’t have to worry about the cold in winter; in addition, the seal will perform soundproofing functions.
Replacing the seal on wooden windows is simple: the tape is removed from the structure, the places where it is located are cleaned and degreased, the frame is ready for installation of a new sealing tape.
How to properly glue self-adhesive insulation for windows
Statistics say that due to poor window insulation, up to 40% of the heat from the room is lost. Such waste in times of rising resource prices is unacceptable, because almost half of the money in this situation goes to useless heating of the street.
Several decades ago, the most popular window insulation was in the form of paper strips. The cracks were first sealed using pieces of cotton wool or scraps of fabric, and paper was glued over this area. However, technology has gone far ahead, so this technique is practically never found in practice. Today, window insulation has become more advanced, easier to apply and visually attractive, which could not be said about ugly paper tapes.
Conclusion
Sealing windows is an important process, the same as insulating a loggia. After all, these places are most often the sources of drafts in the apartment.
But now you know how to solve this problem without outside help and extra investments. In the video presented in this article you will find additional information on this topic.
With the onset of cold weather, owners of apartments and houses have a problem in the form of window frames that allow a lot of heat to pass through. And if 5-10 years ago it was necessary to use old methods - from newspapers, cotton wool to strips of fabric, now you can find simple and effective materials on the market. One of these is window insulation that is self-adhesive. What it is and how to work with it can be found out below.
Classification of materials
You can correctly use insulation for wooden windows yourself without outside help. Most materials are designed in such a way that their application requires little or no specialized tools.
There are a lot of options for insulating windows today.
On the shelves of specialized stores there are varieties of materials:
- foam insulation for windows;
- rubber insulation tape for windows;
- polyurethane;
- polyethylene foam;
- insulation for PVC windows (polyvinyl chloride).
Also, finished products are differentiated according to the method of application:
- self-adhesive insulation for windows;
- insulation for windows for the winter, fixed using glue.
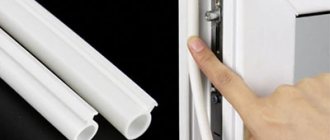
A tubular seal made of rubber is in demand. This material can be used repeatedly if necessary. An additional convenience is the ability to open windows during cold periods, since the material is glued to only one of the mating surfaces, unlike tape or paper.
Rubber tubular seal
And this is how it is fixed in the frame
Necessary conditions for insulation
To ensure the reliability of the work performed, a number of important conditions will need to be met. Before gluing window insulation, it is necessary to thoroughly wash the surface to be treated from dust and dirt. If necessary, replace cracked glass, because cold air can also be blown in through these cracks.
It is advisable to carry out all sealing work at positive temperatures in order to preserve the ductility of the materials used.
If the glass is not securely fixed, then it must be “seated” with silicone sealant. This will have an additional positive effect, since the glass will stop “siphoning”, which is already +5% in terms of heat retention in the house.
VIDEO: Insulation of window frames
Choosing the right material
Those wishing to use self-adhesive insulation for rubber windows must select a softer texture. This material, unlike hard material, will provide better penetration into all crevices, and it also has lower thermal conductivity. In addition, it is more problematic to work with hard materials.
The use of self-adhesive insulation for plastic and wooden windows helps to increase the speed of work. Simply remove the protective layer and apply the sticky side to the desired location.
When using materials without a sticky surface, it is recommended to use silicone insulation (sealant) for windows. It will withstand moisture from condensation and also has a plastic structure.
How to apply silicone sealant
For ease of application, purchase a sealant gun. Such a purchase costs about 200-300 rubles, but it will provide significant help.
Application of thermal insulating film
A practical material is insulating film for windows. It is applied both from the outside and from the inside. Despite the relative high cost of the material, it demonstrates excellent results in terms of energy saving.
As a type - energy-saving window film
Experts recommend installing energy-saving film on the inside of the window to achieve the best effect.
During application of the film, its uniform tension is ensured over the entire surface. A slight sagging of any area can lead to ruptures during a sharp gust of wind. You can get rid of the damage using tape.
More durable brands of films, also used in greenhouse farming, have a yellowish tint. They are able to withstand large temperature changes with virtually no change in their characteristics. They can also be used repeatedly, which will compensate for their increased cost relative to other brands of material.
To attach the film, use the following options:
- using a stapler directly to the frame;
- stuff wooden planks on top of the film with small nails;
- use nails with wide heads or place a strip of roofing felt or leatherette rolled up several times under them;
- fastening is carried out with paper clips.
Instead of film, you can use transparent polyvinyl chloride. The material is environmentally safe and does its job well.
Using a sealant
It is easy to find material for seals in hardware stores. Visually, they look like a tape with an adhesive layer on one side. The base consists of polymer or foam rubber. Polymers make it possible to tear off the sashes without any problems, as well as use water to clean the surface. When water regularly gets on foam rubber, the material quickly deteriorates and cannot withstand use for more than one season. It needs to be replaced by next winter.
Gluing the tapes is very simple. It is enough to cut the workpiece to the required length and then remove the paper protection from the adhesive side. It is glued both to the window frame and to the stationary part of it. This will provide reliable protection against cracks.
Fighting large cracks on an old frame
Since gluing self-adhesive window insulation in the presence of large cracks will be ineffective, in this situation an additional procedure is carried out to seal the cracks. The cavities are filled with the following materials:
The best way would, of course, be putty, which completely fills the space and does not leave cold bridges. Depending on the size of the crack, the density of the putty can be from liquid - for small cracks, to thick and viscous - for large cracks that need to be sealed.
The surface must first be cleaned of dirt in order to subsequently ensure good sealing. A retaining layer of tape or strips of paper is glued over the closed gap, which is attached to water-soluble glue, for example, PVA.
Working with plastic windows
Insulation for plastic windows is also in demand. In case of initial installation of high-quality materials, it can withstand up to 5 years of reliable protection. After this, the connections may be subject to depressurization.
During diagnosis, you can solve some problems yourself, however, you should clearly identify the cause of the problem:
- when the rubber on the sash has worn out, it needs to be replaced;
- a frame with a slope can also become depressurized, which can be solved by removing the slopes and sealing the resulting seams;
- If shrinkage of the building has occurred, then we carry out adjustment work with the fittings.
High-quality components are used so as not to carry out repairs every season.
VIDEO: Insulating doors and windows using sealant
(10th method) Insulation of the entire perimeter of the window frame
The whole process of insulating a wooden window consists of choosing the material for the work and the method of laying it, taking into account the characteristics of the wooden window. We mainly insulate the cracks, which are located at the junction of the frame and sashes.
If you are guided by Swedish technology, then you need a special tool - a cutter to make a groove inside the perimeter of the window and fill it with a tubular silicone seal that will cover all the smallest cracks and defects. The process is complex; if the window is old, it may not withstand removal and hanging; it is not cheap; the work must be performed by professionals.
An easier way is to place and glue the seal around the perimeter onto the transom of the window. When we close the frame, it will bend the seal and not slide over it; it will fit tightly, closing all the cracks. Such insulation can be laid in rows in several layers. Its use must be combined with the installation of glass on a layer of sealant. The seal installed in this way will last for many years and there will be no need to remove it in the spring and install it in the fall.
Some people continue to insulate their windows with toilet paper or newspapers. But today there are a sufficient number of specialized tools designed to make our everyday life easier. It’s worth mentioning right away: pasting windows is a regular process and it will be repeated every winter. Therefore, it is worth choosing the least labor-intensive method of insulation. In this article we will look at the types of insulation for self-adhesive windows. We will also compare the cost of different types of materials and provide step-by-step installation instructions using one example.
Any self-adhesive insulation always consists of two main elements:
- Warming base;
- Adhesive layer.
The first is designed, in fact, to protect from the cold, the second eliminates the need to dilute and use a special adhesive. This tape-based approach has three significant advantages over traditional methods:
- Reduces insulation installation time;
- Simplifies pasting;
- Eliminates wet processes.
And as a bonus, any adhesive will leave marks on the frame when the owner wants to get rid of the insulating tape. Using special adhesive tape for insulation will not cause diffusion between the frame paint and the adhesive composition of the insulation.
Let's now look at the 4 materials from which self-adhesive window seals are made, and discuss the advantages and disadvantages of each.
What is a sealant for wooden windows
This material allows for a tight fit of window or door elements to each other. It is made from silicone, rubber, PVC, and other elastic raw materials. The use of seals in wooden windows significantly increases the thermal insulation and sound insulation of the building.
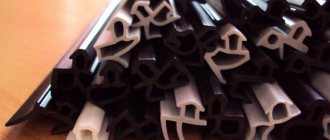
As a rule, the seal is a rubber strip of various shapes, which can be on a pliers basis or without it. Currently, the following types of seals are available on the building materials market.
- Self-adhesive. A rubber tape made in the form of the Latin letters D, C, E, V with an adhesive applied on one side. For installation, it is enough to remove the sewn tape from it and glue it to the place required for sealing. The disadvantage of this type is the poor quality of the adhesive base, which after some time loses its properties.
- Without adhesive backing. It is also a rubber tape of the same shape as self-adhesive, but without an adhesive base. This seal is fastened using frost-resistant and moisture-resistant glue. When choosing glue, it is important to purchase a certified and branded product. Otherwise the seal will come off.
- Seal with fastening in the groove . It is made of rubber in the form of a tape and also has various shapes; its distinctive feature is the fastening element, which is inserted into a pre-prepared groove along with the seal. The advantage of this type is that no adhesive is required, but at the same time you need to cut grooves for installation.
- Silicone. Refers to liquid seals, preferably used on windows that will not be opened during the sealing period. This type has high tightness and thermal insulation. Also, using this liquid base, you can install glass in wooden frames for better sealing.
Each type has its own advantages and disadvantages depending on the design of the window and how it is used.
Tips for choosing
As a rule, a tape is selected based on three indicators.
By material
- Foam rubber ― has been used for insulation since ancient times. Currently it is included in the tape.
- low cost;
- high elasticity, allowing you to close gaps of different sizes.
There are also disadvantages:
- Due to the porous structure, moisture is quickly absorbed. The drying process takes a very long time;
- low durability. With prolonged use, the material turns yellow and crumbles.
- Polyvinyl chloride (PVC) ― material with high strength and adhesiveness. It is not afraid of humidity and temperature fluctuations. The tapes are fixed on any surface and stretch well.
Unfortunately, such tapes are rarely used for window insulation, as they increase the cost of window construction by up to 15%.
- Rubber - used to make two types of tapes: self-adhesive and sealing.
Tubular seals with a groove
Self-adhesive tapes are made on the basis of synthetic rubber and have all its positive qualities: elasticity and resistance to temperature fluctuations.
Rubber seals are not afraid of aggressive environments, so they last a very long time.
- Polyurethane foam (PPE) is a porous material made of foamed polyethylene.
Due to their high elasticity, the tapes are very effective for small gaps. Good insulating qualities. Due to the presence of air in the structure, a thermal insulating environment is created.
Its use is limited by its ability to transform into a toxic liquid state at high temperatures.
By manufacturer
In construction stores you can find tapes from different manufacturers.
However, only materials from the following brands are in demand:
- Russia - Profitrast, Economy, Zubr.
- Germany - KIMTEC, Deventer.
- Poland - Sanok.
Domestic manufacturers, as a rule, work using European technologies and produce high-quality material no worse than foreign samples. At the same time, German and Polish ribbons, although more expensive, last longer.
By cost
Insulating tapes are sold retail and in coils from 6 to 10 meters.
Since a standard window requires about 5 meters of self-adhesive insulation, purchases are most often made at retail.
How to choose a seal
Before insulating a window, you need to choose a product based on how it will be used at the time of sealing. When choosing a sealing material, you should pay attention to the following aspects.
- It is necessary that it have a high degree of frost resistance and moisture resistance.
- Resistance of raw materials to compression during active opening and closing of the window.
- The size of the seal should be optimal, that is, not exceed the sealing area and not be smaller than it.
- The adhesive on the material (self-adhesive) must have water-repellent properties.
As a rule, two types of seals are used for wooden windows such as:
- Silicone seal. The elastic type of raw material is widely used in medicine and the food industry. Also, this type is non-toxic and has high moisture resistance. There are two types of silicone sealant.
- Liquid silicone. It is produced in plastic containers and applied to the surface using a special gun. This type of seal can be used when installing glass or sealing wooden windows that are not planned to be opened. You can also glue a rubber seal with liquid silicone, as it has adhesive properties.
- Rubber silicone. Produced in the form of flat strips of various shapes. Used to seal doors and windows of various types and types. It has high water resistance and tightness.
- Self-adhesive seal. Rubber or silicone tape of various shapes, having a layer of adhesive for fixation to any surface. The disadvantage of this type is the poor quality of the glue, which after a certain time loses its adhesive properties and may lag behind the surface.
The types of sealing materials described above can be used for wooden and plastic windows and doors.
Window problems
If you need to insulate plastic windows or wooden frames, you need to understand where the cold air is blowing from (see also the article How to insulate plastic windows for the winter - a matter of warmth and comfort).
There may be several problem areas:
- The first thing you should pay attention to is the slopes. They must be insulated first, since without proper sealing, heat loss will increase by 15-20%. To do this, you can use various insulation materials: liquid or solid.
- Lintels over windows are also sources of drafts. This point can be eliminated in two ways. The first is the installation of polystyrene foam on the street side, followed by finishing. The second is the installation of a plasterboard wall in combination with any thermal insulation materials.
Interesting! There is a third method - when plaster is used over the insulation followed by painting. It can be applied directly to foam plastic or any other insulation.
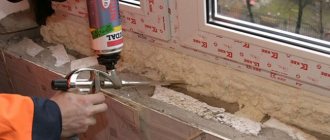
- The third window element that can be a source of cold air entering the room is the window sill. It is easier to solve this problem by installing insulating material on the street side; ordinary polyurethane foam for wall insulation will do.
After all the work on insulating the window opening has been completed, you can begin to directly apply the sealant.
Installation
To install the seal, you do not need to have any specific knowledge or skills; just prepare the installation site and stick it on. You will need the following tools for installation.
- Penknife.
- Silicone glue gun (if a non-self-adhesive sealant is used).
- Silicone glue (if a non-self-adhesive seal is used).
- Alcohol or any other degreasing material.
- A piece of clean cloth.
After all the necessary things have been purchased, you can begin installing the sealing tape on wooden windows. This process consists of the following steps.
- It is necessary to open the windows and clear the installation site of dirt and debris.
- The cleaned installation site is degreased with alcohol or other means.
- If a self-adhesive seal is used, then it is necessary to remove part of the sewn-in film of the adhesive coating and glue part of the sealing material to the window frame. Gradually removing the sewn film from the seal, it is necessary to glue it around the perimeter. If the seal is not covered with adhesive, the pasting area must be coated with liquid silicone using a gun.
- The joints of excess material are cut off with a penknife.
After the entire gluing process is completed, you need to check how the window closes and whether there is an excess section of the seal. When choosing a material, it is not recommended to choose something much thicker than necessary, since there is a possibility that the door or window will not close. The seal can be installed either on the stationary part of the window or door or on the movable part, this will in no way affect the quality of the seal.
Where to insulate?
Of course, before you start insulating plastic windows with your own hands, you need to wash them, since dirt on the windows prevents the passage of sunlight, which can also slightly increase the temperature in the room. The next step of preparation is that if chips are visible on the glass or it is broken, it needs to be replaced, otherwise the heat will not be retained even with the most careful sealing.
Before moving on to direct insulation, you need to understand where the draft is coming from. The main reason, as a rule, is slopes - heat loss can be about 15%. Self-adhesive thermal insulation will help reduce this figure. Another “weak” point of the window is the window sill, since cold air can also pass under it into the room.
Replacing the seal of wooden windows
Like everything in our world, the seal does not last forever and after a certain period of time it wears out and ceases to perform its original functions. If the sealing material is worn out, it should be replaced with a new one. The replacement process consists of the following steps.
- Removing the old seal.
- Cleaning residual glue or silicone from old material.
- Degreasing the cleaned area.
- Installation of new material.
The sealing material is replaced not only in case of mechanical damage, but also after its service life has expired, since the material shrinks and does not provide the original effect.
Therefore, it can be summarized that with the help of a sealant it is possible to increase the thermal insulation of a building without spending a lot of money and time. This material can also be used to restore old wooden windows or doors.
Features of preparing windows for insulation
Preparing a window for insulation with tape is almost no different from preparation for other insulation materials. At the same time, there are some peculiarities.
The main stages are as follows:
- Everything is removed from the windowsill. The blinds are removed from the window.
- The frames are washed with soapy water and then dried. The tape requires a dry and grease-free surface.
- The glass is carefully inspected. Wooden windows may have cracked glass. They must be replaced as they are a source of heat loss.
- Grooves are prepared for the sealing tape. They should not contain old tape, dirt or paint.
- Before starting work, they determine the places where cold air comes from the street. They are insulated first. Weak points are the sashes, slopes, and window sills.
How to choose and install self-adhesive window seals yourself
Owners of apartments, cottages and houses are often faced with the need to replace sealing materials on windows and doors. With frequent use of such structures and constant exposure to external factors, gaskets lose their properties and appearance.
In such a situation, people have to install self-adhesive seals for windows and doors on their own, which can be made from different raw materials.
Advantages and disadvantages of using self-adhesive tape
The main advantages of using tape to seal windows:
- ease of use – gluing one window takes about 5-10 minutes;
- self-adhesive insulation on windows will be almost invisible if you match it to the color of the window;
- when opening/closing windows it will not tear or stretch;
- high resistance to temperatures (from +45 to -50).
Despite significant advantages, self-adhesive thermal insulation also has disadvantages:
- fragility compared to some other materials, which means you will have to spend both your time and money every few years;
- carrying out preparatory work (for better adhesion of the seal and the window, it is best to degrease the surface).
The main purpose
Self-adhesive sealant for window and door structures performs important functions:
- provides protection from wind, moisture, drafts coming from the street;
- softens the impact force when closing the doors;
- prevents the penetration of dust, unpleasant odors, exhaust gases, cigarette smoke, and allergens into the premises;
- protects against noise coming from the street;
- prevents the entry of harmful insects.
Important! Self-adhesive rubber seal helps keep the room warm. During the winter season, people can save money on electricity bills. They do not have to use heaters to maintain the optimal temperature.
Vapor barrier device
There are three layers:
- From the inside - thermal protection prevents heat loss from the room to the street
- The middle load-bearing insulating layer provides thermal insulation and sound insulation. These problems are solved by polyurethane foam or other porous material. It is rational to include vapor barrier self-adhesive tapes in this inner layer if the window unit is installed in wet rooms - kitchens, baths or showers
- The outer layer waterproofs the joint and protects against the penetration of cold street air
Vapor barrier tapes are available with a one-sided adhesive layer and double-sided. A one-sided sticker is used if the film is mounted on the side surface of the window frame. Double-sided tape gives an advantage in choosing fasteners: on the frame or in the window opening. According to climatic versions, tapes are also produced in two types - for areas with low winter temperatures - a winter version of the tape, and for areas where temperatures do not fall below +5⁰С - a summer version.
The base for the adhesive layers of the tapes is butyl rubber or metal.
Main types of vapor barrier tapes:
- PSUL, or pre-compressed sealing tape, is used for finishing and vapor barrier of external joints, ensuring a tight connection between the window frame and the external wall. The base material is butyl rubber; the thickness and elasticity of the tapes provide good insulation.
- BC - vapor barrier tapes for sealing joints for dry finishing of slopes - made of plastic or plasterboard. sizing with BC tapes reduces the risk of condensation.
- VM - vapor barrier tapes attached to the window frame, with an overlap, in order to improve the thermal insulation of joints.
- GPL is a polyethylene foam tape, laminated on one side, with metal strips and an adhesive layer over the entire width.
In addition to the main layer of non-crosslinked polyethylene foam, which is 2 mm thick and is waterproofing, the GPL tape has a second layer - both vapor barrier and protective. The thickness of the outer layer is only 20 microns, the material is polypropylene.
GPL tapes are used for all types of door and window blocks as universal ones. They combine two tasks - waterproofing and vapor barrier. The structure of foamed polyethylene is elastic and closed-porous, so the material does not absorb moisture and its hygroscopicity is almost zero. The tapes are flexible and suitable for installation on uneven surfaces. Metal lamination and the quality of the main polymer (polypropylene as a protective layer) determine chemical resistance in both acidic and alkaline environments, and as a result, good durability of GPL tapes.
They produce GPL tapes in standard width sizes of window and door units, width 9; 12; 15; and 20 cm, in rolls of 15 m.
Existing varieties
On the domestic market, sealing materials for window and door structures are presented in a wide range. For example, liquid foam rubber, thermoplastic or rubber gaskets.
They are classified according to the following parameters:
- manufacturer;
- terms of Use;
- raw materials that were involved in production;
- useful life;
- appearance, color scheme.
Synthetic rubber
This type of product is reliable, high quality, and resistant to moisture.
Synthetic rubber sealing materials based on ethylene and propylene are classified as follows:
- Sulfurous – sulfur was involved in the vulcanization process. Such a product should not be installed in white plastic window or door structures, as it can cause yellowing on the surface of the frame and window sill.
- Peroxide – peroxides of organic nature are involved in the vulcanization process.
Synthetic sealing materials can withstand strong temperature fluctuations from -60 to +120 degrees. They are resistant to mechanical stress, aggressive environments, and ultraviolet radiation.
With proper care, the useful life is 20 years.
The disadvantages include the presence of an unpleasant odor (sulphurous gasket). It is also worth noting the high cost of fixation only with special glue.
Thermoplastic gaskets: features
Products made from thermoplastic elastopolymer are intended for use in mild climates, as they lose their properties at too high or extremely low temperatures.
Their advantages include the following:
- high environmental friendliness;
- resistance to open fire;
- good springiness;
- reasonable cost;
- wide color gamut.
Attention! With regular mechanical impact, deformation will occur, since the raw material is not highly elastic.
Silicone seals: pros and cons
Seals made of silicone are very popular today, as they have affordable prices.
This material also has excellent characteristics:
- moisture resistance;
- ability to withstand temperature fluctuations (vary from +100 to -60 degrees);
- long useful life;
- UV resistance;
- ability to withstand the harmful effects of aggressive environments.
Important! The disadvantage of silicone products is their susceptibility to mechanical stress. They quickly deform and tear, which is why they require frequent replacement.
Rubber seal: features
Self-adhesive rubber seal is a universal material. It is able to provide reliable protection from drafts, noise, and unpleasant odors. Such a gasket will be able to retain heat well and will not crack or deform over a long period of time.
In addition to excellent technical properties, the rubber product has another important advantage - low price.
Rating of products from famous brands
Self-adhesive material Izolon is in first place in popularity. At its core:
- polyethylene foam composite;
- reflective layer;
- sticky side.
The insulation is used equally successfully both for heat and sound insulation of air ducts and for insulating cars.
In second place is an equally popular thermal insulation option - Isolontape. A material with reflective properties and the ability to reduce noise levels, available in two variations: with rubber adhesive on one side or impregnated on both sides.
Third place in the ranking of self-adhesive thermal insulation belongs to Penofol 2000 type C. Just like previous brands, the material has a glue-impregnated side and has a reflective effect.
Tibilite Black Star Dact is sold in sheets with a closed cellular structure. Excellent for thermal insulation of pipes with large diameters, all kinds of tanks and containers, fittings, walls, floors and ceilings. It has all the advantages of modern reflective material from the self-adhesive category.
Next in the rating is PenoProf NPE LF type C - an elastic material with reflective ability due to the foil surface based on polyethylene foam. The heat insulator is additionally equipped with a layer of foil and is simply attached using a self-adhesive layer.
Porilex NPE LF type C also has a reflective effect, demonstrates high performance characteristics and, what is important, is simply fixed to surfaces due to the adhesive layer
A worthy solution is Tepofol S, included in the rating of popular heat insulators with reflective properties. The material is also equipped with a self-adhesive side and is made on the basis of polyethylene foam in tandem with a polished aluminum (metalized) coating.
Thermal insulation PENOLENE NPE MK PET also has an adhesive base for ease of installation. It has reflective properties and does not require additional packaging with glassine, plastic film or roofing felt.
A variation on the theme of the previous material is PENOLENE NPE K, made on the basis of polyethylene foam with an adhesive side. The heat insulator actively reflects radiant energy and does not require reinforcement with glassine and other materials.
A convenient solution is SFP foil, also reflective, based on polyethylene foam with laminated sides and a polished aluminum layer made of a special film. The peculiarity of the material is high strength and low weight.
Adgilin-M NPE is an ideal solution for reflective thermal insulation of ventilation systems and air ducts. The material is based on polyethylene foam. Sold in rolls with a self-adhesive side.
ARMOFOL TK type C is an elastic material for thermal insulation based on fiberglass, resistant to atmospheric influences and UV rays, equipped with an adhesive layer, and has self-reflective ability.
SPMP foil plastic is a variation of the previous brand, suitable for thermal insulation of any surfaces. Made from polyethylene foam, additionally covered with metal polypropylene or aluminum foil.
Porilex type C is also finished with a self-adhesive foil layer and is made on the basis of NPE grade polyethylene.
Stizol LM KS is domestically produced, sold at an affordable price, and demonstrates excellent thermal insulation properties. Allows you to insulate a room while retaining up to 93% of heat.
Rounding out the rating is Megaflex NPE-LK, a self-adhesive material based on polyethylene foam with the main function of reflection. Easy to install due to the convenient adhesive layer.
All of the brands listed are worthy of attention. You should choose among them materials with an optimal ratio of performance characteristics and cost.
How to independently replace a plastic window
After purchasing adhesive-based foam rubber or other self-adhesive sealing material, you can begin installation:
- Initially, you should photograph the window frame.
- The sashes are removed from the hinges.
- The old gasket is removed. You need to make sure that there are no fragments of sealing material left in the grooves.
- Dust and small particles of debris are cleaned from all recesses.
- The groove cavities are wiped with a dry piece of cloth.
- All cracks are sealed.
- A piece is cut from the roll (a few centimeters should be added to the desired size).
- The protective film is removed from the tape.
- The product takes root tightly so that its base is securely glued.
- After checking the reliability of fixation of the installed sealing material, the sashes should be hung in their original places.
A little about the manufacturers
Of course, since window seals are currently a popular material, the number of manufacturing enterprises is steadily growing every year.
Listing all domestic and foreign manufacturers is impractical. Familiarization with manufacturers, characteristics, descriptions, parameters, properties and advantages allows you to correctly understand and determine the necessary seal to meet your own needs. The combination of these factors allows you to choose the most suitable material option to improve the comfort of your home.
Checking correct installation
After installing the self-adhesive window seal, you need to check:
- how securely it is fixed;
- whether its fragments remain in the grooves at the moment of opening or closing the doors;
- whether there is a draft;
- Are there any obstacles to the smooth opening and closing of windows.
Once it has been determined that the sealing material is correctly and securely installed in its place, it is necessary to treat its surface with a special silicone-based lubricant. This will help extend the useful life of the gasket. Its performance characteristics will also increase.
Attention! Treatment with silicone grease should be carried out only in the warm season. It is recommended to do this in autumn and spring.
Thermal reflective film
Experts say that windows can only be insulated by replacing them with vacuum double-glazed windows. It is guaranteed to last for more than forty years, but it is quite expensive to install. It is much more practical to install a special heat-reflecting film in the space between the glass.
Before installing it, check the frames and make sure that all the glass is held tightly. If you notice that they are loose in some places, treat the cracks that have appeared between the glass and the frame with silicone sealant. Ideally, you should use a sealant that dries clear. Reinforce the corners of old frames with metal corners.
How to install or replace wood windows
A foam or rubber product in wooden structures will serve as insulation. The gasket should be fixed in the grooves using silicone sealants. You can also use self-adhesive materials.
Installation procedure
The gasket installation process consists of several stages:
- The working surface is cleaned of dust and dirt.
- After degreasing, the grooves are dried.
- The sealing material is cut into strips of the required sizes (with a margin of 1-2 cm).
- The gasket fits into the groove. If it has an adhesive base, then you need to press the strip tightly to the base. In all other cases, silicone or rubber sealant is distributed over the groove cavities, after which a gasket is placed there.
Heat loss through the ceiling
All the heat goes up. And there it strives to go outside, that is, to leave the room. Heat loss through the ceiling in your home is one of the largest quantities that characterizes the loss of heat to the street.
The thickness of the insulation on the ceiling should be 2 times the thickness of the insulation in the walls. If you mount 200 mm in the walls, mount 400 mm on the ceiling. In this case, you will be guaranteed maximum thermal resistance of your thermal circuit.
What are we doing? Walls 200 mm, floor 300 mm, ceiling 400 mm. Consider that you will save on any energy carrier that you use to heat your home.
Gasket care
The installed material must be properly cared for. Then he will be able to perform his functions for many years.
Dust and dirt must be removed systematically. You should also perform wet cleaning by wiping surfaces with a sponge moistened with water or a special solution.
When choosing detergents, people should carefully study the composition. Otherwise, aggressive chemistry will damage the structure of the gasket.
He has built thousands of multi-storey buildings and knows almost everything about thermal insulation and sound insulation. I am always happy to answer your questions on these topics.
Interpretation of the data obtained
Thermal imaging devices record a temperature difference of 3 ºC, and this will be displayed on the thermogram as an anomalous zone in a characteristic color spectrum. However, the spectrozonal image itself is not sufficient justification to consider the diagnosed area to be defective.
For all anomalous zones, it is necessary to carry out thermotechnical calculations and then draw conclusions about the state of the objects under study
Therefore, portable thermal imagers come complete with instrumental software for qualitative and quantitative analysis of thermograms, as well as creating reports.
All this means that no special training is required to operate an infrared camera. After studying the user manual, it is easy to independently carry out a thermal imaging test and process the results in the proposed program. After analyzing the obtained indicators, the application will give an expert assessment of the pictures.
In addition, the information collected by the equipment can be transferred to programs for processing statistical data - spreadsheet processors or special engineering utilities, for example, MathLab.
It is also worth noting that the thermal imager may produce incorrect results if configured incorrectly. Similar situations occur when examining surfaces such as glass, glossy tiles, and mirrors.
Infrared radiation from nearby objects will be reflected in these surfaces, which will lead to distortion of thermograms. To correctly determine the temperature of mirror surfaces in thermal imaging devices, it is necessary to additionally adjust correction factors.
Cold radiation, which can be reflected from windows and the roof of a residential building, should also be taken into account. The resulting thermogram may be significantly colder than the actual condition of the house. The quantitative method for analyzing the distribution of temperature fields over the surface of structures does not take into account the emissivity and background radiation of the environment
Moreover, it does not matter whether the shooting is carried out with an IR camera on site or whether the results obtained are processed by software
The quantitative method for analyzing the distribution of temperature fields over the surface of structures does not take into account the emissivity and background radiation of the environment
Moreover, it does not matter whether the shooting is carried out with an IR camera on site or whether the results obtained are processed by software
When carrying out diagnostic measures inside a building, more reliable results are obtained, since external climatic conditions do not affect the surfaces being examined. The final thermograms after processing with appropriate programs correspond to reality.
The use of a building thermal imager allows you to objectively assess the quality of a building’s thermal protection, detect cold bridges and subsidence of insulation, as well as find hidden damage and defects in the installation of window units, doorways, and poorly executed joints of roofs, walls and ceilings.
Infrared diagnostics makes it possible to correctly, and therefore economically, carry out work to minimize heat loss in a residential building, reduce the cost of floor insulation and thermal insulation of other structures.
Carrying out a research procedure will make it possible to correctly select insulation for the walls and ceiling of a private building. As a result, the cost of heating a private home will decrease.