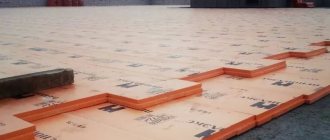
Since plaster still remains one of the most popular methods of finishing walls and ceilings, the use of this method of applying a decorative protective layer to reinforced penoplex is completely justified. Despite the certain roughness of the surface of the extruded polystyrene foam slabs, to more reliably secure the layer of hardened building mixture, a mesh for penoplex plaster is used. A properly reinforced mesh for penoplex allows you to provide protection to the heat-insulating material and a reliable lining layer for finishing plaster.
Mesh for penoplex - creating a reinforcing layer
Since plaster still remains one of the most popular methods of finishing walls and ceilings, the use of this method of applying a decorative protective layer to reinforced penoplex is completely justified. Despite the certain roughness of the surface of the extruded polystyrene foam slabs, to more reliably secure the layer of hardened building mixture, a mesh for penoplex plaster is used. A properly reinforced mesh for penoplex allows you to provide protection to the heat-insulating material and a reliable lining layer for finishing plaster.
A little about the material
Before you putty penoplex, you may need a set of certain knowledge about this material. Please note that there is a penoplex Foundation that has its own specifications. There are also materials for walls, floors and ceilings.
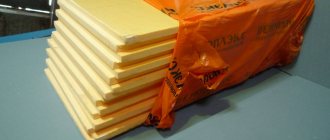
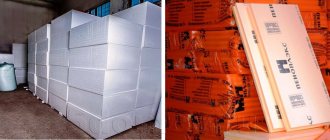
Penoplex is not quite the correct name. This is extruded polystyrene foam. And the concept of penoplex is nothing more than the name of the company that produces the material. That is, Penoplex. It’s like calling copy machines a photocopier, and all types of diapers diapers. And jeeps are also a misnomer. Although everyone is used to calling any SUV a jeep. You get the point.
The basis for creating extruded polystyrene foam is polystyrene foam. But due to the refinement of raw materials, it was possible to achieve a significant improvement in the main characteristics:
- density;
- smoothness;
- homogeneity of structure;
- almost zero water absorption;
- vapor permeability.
In terms of performance properties, penoplex outperforms polystyrene foam. And by a serious margin. But these advantages led to a strong decrease in adhesion. Materials do not adhere well to the surface of penoplex.
A common mistake is to apply the solution to penoplex using the same technology as when putting polystyrene foam. As a result, the putty, as well as the mesh, simply disappear.
Many people are interested in whether it is even possible to process penoplex using plaster. I'll say this. Initially, the material was not intended for wet finishing. But our masters can do anything. Therefore, a technology was invented that allows you to achieve excellent results.
Why do you need penoplex reinforcement?
A high-quality reinforced layer of penoplex insulation, made in compliance with all installation rules, without the use of metal fasteners, creates reliable thermal protection for a building or structure. But this same insulation itself needs protection from the destructive effects of a number of natural factors. No, he is not afraid of either cold or precipitation. But prolonged exposure to sunlight can destroy thermal protection in one season.
The use of plastering the surface of penoplex, followed by strengthening the protective finishing layer (siding, for example) is quite justified, but significantly increases the cost of the work. The created reinforced mesh for penoplex plaster reliably performs protective functions, preventing premature destruction of foamed polystyrene obtained by extrusion. How can this protect against all-pervasive ultraviolet rays?
This task is perfectly accomplished by a reinforced layer, which is applied over the entire outer surface of the reinforced insulation. This layer consists of a special glue and a façade mesh embedded in it. It withstands the stresses that arise on the insulated surface when the temperature changes.
The construction of a reinforcing layer on a fixed penoplex has its own characteristics:
- mesh strips are attached overlapping (up to 10 cm) with horizontal and vertical connections;
- the strips should be completely immersed in the adhesive layer, but not more than half its thickness;
- the reinforced layer made on reinforced insulating material should not be thicker than 3 mm.
To reliably protect structural elements exposed to the greatest mechanical loads (basement and walls of the first floor, balconies and terraces), it is recommended to reinforce them with a double layer. When strengthening the reinforcing element at the corners of the house, it is wrapped around the corner of the building (by 15 cm).
How to reinforce corners?
In order for the plastered surface of the penoplex to be smooth, it is necessary to secure the corners with a mesh. Slopes and window openings are also covered.
This is important: if you disturb the order, it will be problematic to obtain a good quality finish, since finishing corners and slopes after the walls are covered is much more difficult.
When gluing the mesh to the corners of the walls, it is worth considering some important nuances and following a proven scenario:
- cut a strip, thirty centimeters wide, and the length is equal to the length of the slope or about a meter;
- the strip is folded in the middle, smoothing the fold thoroughly;
- using a spatula, apply the solution to the corner; its thickness is approximately two to three millimeters;
- it is placed on the wall, pressed on with a spatula and smoothed, running the tool from the corner - along the sides and down;
- When the material is glued to the corners, they begin to glue it to the rest of the wall surface.
Penoplex insulation reinforcement
A completely natural question arises: “Having attached penoplex to the wall, how to attach the mesh?” Based on the basic requirement of thermal insulation systems, the use of metal fasteners is strictly contraindicated, since the “cold bridges” created in this case will turn all efforts into a simple waste of money, time and effort. What to do? How is the mesh attached to penoplex if metal is contraindicated?
In the event that the thermal protection layer is mounted on a surface where the structure is not expected to move, the mesh for penoplex plaster is attached using an adhesive mixture (recessed into the adhesive layer, and if necessary, a second layer is made). If the mesh for penoplex is attached to the insulating material in those places where movement is expected, plastic dowels (fungi) cannot be dispensed with, or it is necessary to use thermal panels with a ready-made polymer-cement coating.
An approximate technology for creating a reinforced layer for subsequent application of plaster is as follows:
- On the surface of the penoplex 1 meter wide (standard width of the façade mesh), glue is applied with the smooth side of the spatula, which is distributed in an even layer using a notched spatula.
- The reinforcing element is applied to a fresh layer of adhesive and pressed into the adhesive layer with a smooth spatula (trowel). The following strips are laid overlapping (up to 10 cm).
- Plastering is carried out only after the reinforced layer has completely dried.
During the work process, the question may arise: “If penoplex was used to insulate the external slopes, how to attach the mesh and how to achieve a smooth vertical surface for subsequent application of plaster?” Insulation of slopes of window and door openings is carried out as follows:
- Before fixing the insulation to the opening, you need to glue the façade mesh, wrapping it 15 cm onto the wall.
- Penoplex is attached to the glued mesh so that it protrudes from the wall by the thickness of the insulation plus 3 mm (thickness of the reinforced layer).
- Wooden strips are placed under the penoplex to create an expansion joint.
- The mesh for subsequent plastering is glued to the insulation (be sure to wrap it and glue it at least 15 cm to the wall).
It is recommended to strengthen the outer corners of the house and slopes with aluminum perforated profiles.
- Before plastering, the corners are sanded with sandpaper or a special trowel, which allows you to create an even layer of plaster.
Grinding
It is necessary to plaster Penoplex with a third layer under the putty; if you plan to apply decorative bark beetle, then this stage is skipped. The task of grinding is to perfectly align the texture of the wall. This will reduce putty consumption and speed up finishing work.
The finishing Ceresit CT 85 is made more liquid and applied 24 hours after the primer in a layer of 1-2 mm. The range of movement of the tool is wide. After completing the plastering, there are no minor defects on the wall, the surface takes on a mirror-like appearance, like a cat’s egg, to use the language of builders.
The technology is suitable for outdoor and indoor use.
Application of putty or bark beetle is allowed 2-4 days after the Penoplex has completely dried.
Polystyrene foam, penoplex and expanded polystyrene are very common insulation materials in modern construction. They are used as a heat insulator in residential buildings and industrial buildings. They are actively used for exterior and interior decoration.
Thermal panels with polymer cement plaster
It would seem that it couldn’t be simpler by strengthening penoplex - plastering on a mesh can be done at any free time. Unfortunately, the creation of a high-quality and reliable reinforced layer requires a certain temperature, since the adhesive mixture must dry completely. But do not stop work during the cold season, especially since the installation of penoplex can be carried out at any time of the year. It is for these purposes that the manufacturer created thermal panels with a polymer cement coating (penoplex with a reinforced mesh, which is already plastered with a special polymer cement composition).
Such building panels, having all the characteristics of high-quality insulation, allow you to quickly install penoplex with plaster mesh, regardless of the weather. This significantly reduces the work time, and applying the finishing layer of plaster is not difficult, since there is a prepared surface. In addition, these panels, prepared in the factory, are used to create decorative columns, arches and other finishing works. The thermal panels offered by PENOPLEX SPb LLC are high quality and reliable.
Famous manufacturers
The main well-known brands for plastering polystyrene foam are produced by the following companies:
- the Sto AG concern (Germany) offers a line of Stolit plaster mixtures;
- Henkel concern (Germany) produces Ceresit plaster mixtures;
- Ecomix company produces mixtures of the same name for Wet facades.
Line of materials from the Russian subsidiary of the German concern Sto AG:
- Sto-Baukleber (for gluing polystyrene foam);
- StolevellDuoplus or Uni (for gluing and reinforcement);
- StoPutzgrund or StoPrep Miral (intermediate priming);
- Sto-Strukturputz or StoMarlit (finishing plaster mixtures).
Ecomix offers:
- adhesive for mounting polystyrene foam – BS-113;
- plaster and adhesive composition for making a reinforced layer on top of slabs - BS-106;
- quartz primer – BS-707;
- for finishing – decorative mixture “bark beetle” BS 208 or pebble BS
The German company Knauf offers the “Warm Wall” line, including the following compositions:
- Sevener (plaster and adhesive);
- Decorgrund (primer);
- Diamond (decorative).
Plastering penoplex
The closer it gets to cold, the more pressing is the issue of home insulation. A modern and convenient material that copes well with this purpose is penoplex. It is very easy to use and has a low price.
But even such reliable material needs additional protection.
It is necessary to apply plaster on top of the foam layer; it will help protect the material from damage.
Foam plaster performs a number of important functions, such as:
- protection of insulation from moisture. During operation in conditions of high humidity, the insulation and what is underneath may collapse if they are not treated with special products;
- protection of penoplex from the negative effects of sunlight;
- improving the appearance of the building.
Extruded polystyrene foam (EPP).
This is plastic in the form of sheets that can work under constant exposure to ultraviolet radiation. The manufacturing method used gives EPP enhanced strength and thermal insulation characteristics.
The composition of EPP is similar to polystyrene foam; they are based on one material – polystyrene. But, manufacturing improvements have given it hydrophobicity; it does not allow moisture to pass through or absorb. This is due to the absence of pores; the cells in it are filled with gas. For extruded polystyrene foam, dry plaster is used.
Plaster mixture for penoplex
There are many types of plaster. Some manufacturers offer one universal mixture, while others offer two: one adhesive, used for attaching penoplex to the surface, and the second for application on top of the insulation.
For plastering work carried out using penoplex, it is better to use a universal mixture.
The mixture consumption is approximately 4 kg per square meter. For a leveling layer, approximately 6 kg per square meter is required. After preparing the solution, you can begin applying plaster.
Priming
Unlike classic plaster, the layer of soil when plastering Penoplex is 2-3 mm. Its task is to hide traces of reinforcement on the surface and prepare the wall for putty or finishing grinding.
Primer is applied to Penoplex after the first layer has set and the wall has been roughly cleaned with an abrasive. Stripping is not necessary, but helps reduce the amount of glue used on the ground. At a temperature of 20 degrees. and average humidity, the leveling primer is applied after 6-12 hours (the setting speed also depends on the absorption of the wall material).
The primer is applied with the same spatulas or polishers that were used when attaching the mesh. The consistency of the plaster is thicker than when fixing the reinforcing layer.
Preparatory work
How to plaster penoplex? The process can be divided into several stages.
Penoplex grout
First you need to prepare the surface for plastering. This is done by grouting penoplex. All holes and bumps are removed in this way. At this stage, it is worth working out the surface of the walls with special care, since further coatings will be layered onto the base and any defect will become noticeable after finishing.
Fastening the plaster mesh
Next comes the installation of the plaster mesh. This is a mandatory step in the plastering process. If the mesh is not glued, the plaster applied directly to the penoplex will subsequently crack or “slip.”
It is best to use a mesh designed specifically for facade work; its density is 140 – 160 g/m2.
The density of the mesh determines how even the layer of plaster will be: the higher it is, the better. However, there is another side to the coin - it is difficult to attach a dense mesh to the corners. Penoplex plaster is often based on cement, so it is worth choosing an alkali-resistant mesh.
The mesh must be secured using an adhesive mixture; the layer thickness should be 2-3 mm. The mixture is simply applied to the surface, and a mesh is placed on top.
It should be remembered that the mesh is pressed into the composition halfway, and the adhesive mixture must completely cover its surface.
The glue is applied gradually so that it does not have time to “set”; the mesh is attached in small strips.
You can press it down with a smooth spatula. The strips of plaster mesh should be glued overlapping. You need to make an allowance of at least 10 cm.
If you leave sections of the mesh unglued and apply the compound only to the joints, the resulting coating will look too rough. Most likely, irregularities will appear even through a fine finish.
Corner processing
Corners are a problem area; they need to be covered with special care.
It is best to start working with them.
To process corners, take a strip thirty centimeters wide, 1 m long, bend it in half and apply it to the corner.
Next, you need to press it against the wall covered with adhesive.
Grouting and leveling
When the mesh layer has dried, it is important to grout the surface. To do this you will need an emery cloth and a plastic grater.
The drying time of the mixture is affected by weather conditions: the hotter and drier it is outside, the faster the composition will set. Sometimes two or three hours are enough. In the winter season, it is better to wait a day before starting grouting. Expanded polystyrene plaster does not need to be rushed.
Grouting a plastered wall
The procedure is carried out without much effort; you need to make circular movements counterclockwise. Once all visible defects have been smoothed out, the grouting can be considered complete.
After this you need to level the surface. Apply another layer of the mixture. Plastering polystyrene foam is carried out with the same mixture as at the previous finishing stage. You will also need a spatula with which to apply the mixture. The layer should be thin - approximately 3 mm.
Final grout
At the last stage, it is necessary to carry out the final grouting of the walls. It is necessary to wait until the leveling layer is completely dry and only then begin to grout; this should happen no earlier than a day after the last layer has hardened.
However, you should not go to extremes. After four days, the mixture will become so hard that it will be too difficult to process.
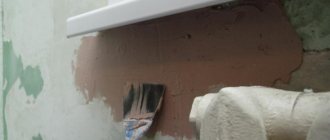
Penoplex putty
When the penoplex plaster is completed, you can begin to putty. Penoplex putty is the final procedure before decorative work. For putty, a powder or acrylic mixture for the facade is usually used.
Puttying process
If dry putty is used, it will need to be diluted first. To do this, take a bucket of water and gradually add powder, while the composition is stirred using a construction mixer. The consistency of the putty should resemble mashed potatoes. After the putty has reached the required level of consistency, it will need to be left for 5 minutes, then stirred again and only then begin puttying work.
Important! Before the puttying procedure, it is recommended to treat the surface with a special primer, which will ensure adhesion and a high level of waterproofing.
How to putty penoplex correctly? To apply the solution, you need to use a wide spatula, onto which the mixture is applied with a narrow spatula. When performing finishing cladding, it is extremely important that the new treated area of the surface merges with the previously puttied one. The joints should be almost invisible, so if you have no experience in performing such work, it is better to seek help from specialists. They know how to putty penoplex quickly and correctly.
The maximum permissible thickness of the putty layer when applied is 5 mm; after it hardens, the entire coating is grouted. Grouting is done in a circular motion using an abrasive mesh. It should also be taken into account that grinding is carried out no earlier than 4 hours after applying the composition.
Having finished grouting, you will need to apply the primer again - it will remove settled dust from the surface and make the coating even and smooth. After the primer has dried, you can proceed to painting or other decorative cladding.
As can be seen from the article, penoplex insulation is a good solution. This material can be plastered and puttied without any problems, which provides it with additional protection and an attractive appearance. The main thing is to take a responsible approach to the choice of mixtures for processing and their application, since the result of the work will directly depend on this. If any complications arise, it is better to immediately contact a specialist.
Coloring penoplex
To give the walls a more finished look, you can paint them. However, it is worth considering the type of putty pre-applied.
You also need to pay attention to the compatibility of the paint with penoplex. Usually this information is on the paint packaging.
Quite an impressive list, which, nevertheless, is worth familiarizing yourself with, since paints based on the listed substances can destroy penoplex. These substances may also be included in other finishing products; their contact with the insulation should also not be allowed.
But mineral paints, on the contrary, are perfect for finishing penoplex. They are made on the basis of cement and lime, which do not react with the insulation.
You can also use silicate paints; they do not cause any harm to penoplex. Water-based finishing materials are also well suited for painting insulation.
Perel KS Termix
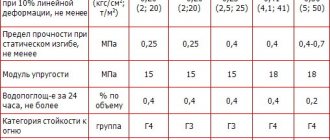
This plaster-adhesive mixture under the mesh is available in both summer (articles 0319 termix and 0320 termix-m) and winter (articles 5319 termix and 5320 termix-m). The summer version provides for use at temperatures from +5 to +30 °C, and the winter version - from -5 to +10 °C). Can be used with alkali-resistant meshes with a density of at least 145 g/m2.
The main component of the mixture is cement; it also contains mineral and polymer additives.
Advantages:
- frost resistance of at least 50 cycles;
- fairly low price (about 20% lower compared to more expensive analogues);
- suitable for gluing mesh to any thermal insulation boards, while providing an adhesive strength of 0.7 MPa;
- dries completely in 24 hours.
Please note that decorative coatings can be applied over the reinforced layer after three days from the end of the work.
Among the disadvantages of Perel KS Termix, one can note a higher mobility of the mixture than its competitors and a short adjustment time (only 5 minutes).
Facade plaster using penoplex
When the approach of cold winter is already felt in the air, we can’t help thinking about how to better insulate our home. Penoplex is a very popular option, optimal in price and quality. In use, the material will not take much effort and time from the builder, but it will definitely be necessary to protect the insulation from mechanical and weather influences. How to do this will be discussed in this article.
Penoplex is often used as insulation of buildings from the outside or inside. Working with it is made easier by the consistent physical characteristics and dimensions of the slabs. The strength of penoplex is not enough to prevent the slabs from collapsing from pinpoint impacts and other physical impacts (dents cannot be avoided in any case). Therefore, it is necessary to protect the material from the adverse effects of ultraviolet radiation, humidity, etc. And visually, a wall insulated with slabs still seems unfinished and requires additional finishing. The use of penoplex implies, in addition to insulation, also additional finishing.
Facade plaster using penoplex
A simple and inexpensive method of finishing surfaces after insulation is plaster. This type of construction work is appropriate when the slabs are attached to the surface by gluing. Penoplex can be installed in another way: in a supporting frame, in the cells of the sheathing. With this option, the facing of the plane will be done either with panels, or clapboard, or something else.
PRO SR-62
Adhesive used when working with polystyrene foam insulation boards. It will appeal to those who are looking for budget building materials for laying facade mesh - the price for a 25 kg package is only 250-300 rubles. At the same time, the fixation strength and quality of the mixture are in no way inferior to more expensive options.
Advantages:
- frost resistance - its reserve will be enough for 50 cycles if the operating temperature does not exceed 70 degrees Celsius and does not fall below 50 degrees below zero;
- the solution remains usable for 2 hours;
- good resistance to moisture (though only after drying - until the solution hardens, the walls need to be protected from precipitation);
- minimum adhesive strength - 0.7 MPa.
It is recommended to carry out work at temperatures from +5 to +25 °C. If the air is too dry, the mixture will dry out faster, so the optimal air humidity is 80%.
The plane of the penoplex must be prepared
We check if there are any gaps between the plates. Almost no one succeeds in laying insulation perfectly the first time. We seal the joints if this point was missed during installation. Pay attention to the curvature of the entire plane, because the adhesive solution is then applied in a thin layer. It will not be possible to level out unevenness due to the specific composition. To close the gaps between the foam boards, you can foam the gaps with foam for insulation systems (or usually mounting foam), for example, Ceresit CT-84. For one can (850 ml) you will need to pay approximately 600 rubles.
Insulation of the facade with penoplex
Penoplex prices
Let's sum it up
Penoplex is laid between the base and the cladding
Each reader was personally convinced that penoplex is easy to putty - it is unlikely that anyone will have any difficulties here. However, you need to be able to handle a hammer, spatula and other similar tools, or at least have some experience in interacting with them. It is also recommended to follow the sequence described above - if you want to get quality and not repeated repairs.
The process of penoplex plastering is described in more detail in the thematic video:
If, after studying the article, there are still some unclear places or questions arise, the video material will definitely give the answer and help in solving difficulties. The main thing is to believe in your own strength and everything will definitely work out!
Rating: 5 / 5, total ratings: 3
Penoplex has many advantages over other insulation materials, so it is not surprising that many home owners try to use it when insulating their homes. However, not everyone knows that the process of filling this heat-insulating material has a number of nuances. Therefore, in this article I decided to share with you the technology for filling penoplex, which allows you to obtain a reliable and durable rough coating.
Making a plaster solution
Do not use a standard cement-based mortar with sand, as it will not give a good quality plaster composition. The store is full of mixtures with a composition suitable for laying on penoplex.
Experienced finishers advise using:
When mixing, strictly follow the instructions left by the manufacturer on the packaging. Experienced craftsmen make a mixture that is similar in thickness to sour cream. To glue fiberglass mesh, the consistency of the mixture should be slightly thinner than required by the manufacturer. In the case of a leveling layer, the solution should be so liquid that it flows freely from the spatula. Hence the different consumption of the composition: gluing the mesh will require 4 kg per 1 sq. meter, for a leveling layer - 6 kg of mixture per square meter. meter.
Preparation of plaster mortar
The compositions of different manufacturers, despite being very similar, have different components. Therefore, it is better to use products from the same manufacturer at the same facility to avoid unnecessary problems.
Use formulations that are universal in application, and you won’t have to think about additional nuances associated with limitations in the scope of application.
Prices for popular types of plaster
"Perfekta Ecotek"
Assembly adhesive for thermal insulation boards and reinforcing mesh. Can be used on different types of substrates: brick and stone masonry, concrete, cement plaster. Made on the basis of the same components as other similar compositions: cement, fractionated sand and modifying additives. Available in summer and winter series.
Advantages:
- suitable for most thermal insulation systems;
- has excellent adhesion;
- resistant to weather conditions (snow, rain, fog);
- the winter series allows you to carry out work even at 10 degrees below zero;
- the smell of glue disappears quickly;
- frost resistance – 50 cycles.
The holding power of this glue is comparable to that of nails or screws. But to achieve this indicator, the solution should be prepared taking into account all the manufacturer’s recommendations.
Primary layer sketch
Penoplex is prepared for plastering by laying the primary layer. For this purpose, alkali-resistant PVC mesh should be used. By using PVC, you will insure yourself against the aggressive influence of cement on the exposed mesh. Cement is known to react with many materials.
Cut strips the length of which should be slightly greater than the height of the wall. Please note that installation is done from top to bottom. Apply the strip to the fiberglass with one hand, and apply the solution to the mesh exclusively along the top edge with the other. Thus, the mesh is, as it were, “welded” to the penoplex. As a result, the primary layer should be up to 5 mm thick.
Penoplex insulation scheme: 1 - penoplex slabs, 2 - glue, 3 - dowels, 4 - reinforcing mesh, 5 - primer, 6 - plaster coating
When the top edge is fixed to the plane, apply the solution to the mesh so that it is evenly distributed across the entire width. Every movement comes from top to bottom. Be sure to leave a vertical “tape” clean of the plaster mixture on the right side, because each subsequent strip will overlap the edge of the previous one by almost 1 cm.
As a result, it turns out that the wall will be strip by strip covered over the entire surface with a mesh. Look at all the places on the wall where the geometry of the plane changes (door openings, slopes, window openings) - this is where you should first start laying the mesh.
Reinforcing mesh for foam plastic
Prices for reinforcing mesh for foam plastic
Advantages
The material has a number of advantages:
- Long service life. Up to 50 years old.
- Moisture resistance. Mold or mildew does not appear under a layer of plaster, even with high humidity.
- Ecologically pure. Penoplex does not decompose over time and does not release toxic substances.
- Keeps its shape well. Does not deform due to temperature changes. This quality protects the applied layer of plaster from cracking.
- Easy to install. It is enough to securely fasten the sheets to the wall surface using plastic dowels with wide caps.
- Ease of processing. The material is easily cut with a simple stationery knife.
- Light weight. The load on the walls and foundation practically does not increase.
The material is widely used for external insulation of basements and facades of buildings.
To improve the thermal insulation properties and increase the service life of penoplex, or as it is also called, foamed polystyrene, it is necessary to cover it with a layer of plaster.
Step-by-step instructions for plastering penoplex
To plaster the foam yourself, you need to do a series of preparatory steps, one after the other in a strict order.
First step. Ensure good adhesion by treating the surface with a deeply penetrating primer “Betonkontakt” (from manufacturers such as VIOLUX, Ceresit, Feidal). Price 700-1000 rub. for 15 l. A large brush or paint roller is suitable for the job. Before application, you need to shake the composition and pour some part into a suitable plane. Dip the brush into the liquid and apply an even layer of primer to the surface. Liquid should not leak or accumulate in certain areas. The surface is treated with a primer one more time after the first layer has dried.
Second step. Attach the base profile to the wall. You will need a measuring tool (for example, a ruler or tape measure) to mark the points on the wall where you will make holes with a drill. It’s better to take a hammer drill for this - you’ll waste less time.
Types of base profile
Fastening the plinth profile
Third step. To glue foam boards to the wall, mix the adhesive solution. To simplify the process and reduce work time, select a container that fits the entire bag of mixture. It is most convenient to knead with an electric mixer with a collapsible attachment.
Fourth step. As soon as the prepared solution is on the facade, glue the foam boards to it. But it will be more convenient and economical to apply glue to one side of the slab, distributing it evenly along the entire perimeter. And in the middle it’s enough to throw a few “cakes”. Place the insulation against the wall carefully along the pre-set load-bearing supports. It is recommended to slam the stove several times. Use a spatula to remove excess solution.
Insulating the facade with 5 cm penoplex and framing the corners with 2 cm penoplex
Fifth step. Each penoplex plate must be rigidly fixed using a dowel umbrella. This operation is carried out using a drill. 4–6 holes are made throughout the entire area, into which dowel umbrellas are placed. Cover the dowel caps along with all the recesses in the penoplex.
Facade dowel umbrella for thermal insulation
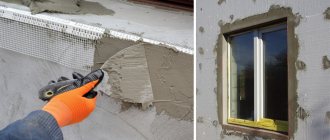
Sixth step. A reinforcing layer is made from perforated corners and fiberglass mesh. Aluminum corners are glued to the outer corners. The same glue is used for the corners and mesh: either Ceresit ST 83, or KREISEL 210, or Glims KF. Price 350-600 rub. for 25 kg. It is necessary to cut out a reinforced fiberglass mesh. It should be taken into account that the canvases should overlap each other no more than 10 cm when they are glued to the slabs. Also leave a distance of almost 10 cm for turning the corners. Apply the adhesive composition approximately 3 mm thick - it is more convenient to do this from top to bottom in small areas at a time. Its thickness should be slightly less than indicated on the packaging by the manufacturer. Compliance with these points ensures that the glue does not have time to set before the completion of the reinforcing layer. Then use a putty knife to glue the fiberglass to the wall.
Advice! If the fiberglass mesh does not have sufficient flexibility and the corners cannot be bent normally, apply liquid glue at the bends to make the fabric more elastic.
Corner with reinforcing mesh for building corners
Seventh step. The adhesive solution is applied to the reinforcing layer. An ordinary spatula will help you apply a layer of glue evenly. In essence, it looks like rough plaster.
Eighth step. A finishing layer (or two) of primer is distributed over the thermal insulation cake. This is done using a wide brush.
Facade facing brick
A description of the types and installation of facing bricks for the facade can be found in this article. We also recommend reading about decorative polystyrene foam elements for facades.
Ninth step. Plastering and painting of the facade is carried out at the final stage of work using a plaster falcon and a paint roller. The primer must dry before doing this. After drying, the finishing is completed with decorative plaster. It is rubbed over after the applied layer begins to set. When the plaster dries, the surface is painted with special facade paint. For these purposes, water-dispersed compositions are used.
Finishing the facade with decorative plaster
At the ninth step, work on insulating and protecting walls from freezing can be considered completed. When insulation is carried out inside a building, instead of plaster, putty is applied to the reinforced layer, followed by decorative finishing (wallpapering or painting). It should be noted that staining is not necessary in all cases. To the question of when to paint and when not to paint, you can find the answer on the packaging of the putty you are using.
Decorating the coating
Before plastering the penoplex with decorative material, you need to apply a primer using a roller or paint brush. This composition provides a sufficient level of adhesion, which significantly increases the service life of the finished coating. In addition, primers provide protection against fungi and mold. The mixture is applied to the plastered wall fragment in two layers with an interval of 3-4 hours. After the material has dried, begin applying the decorative layer.
Application of decorative plaster
Most often, structural or textured plasters are used to decorate facades. In the first case, the application process is as follows:
- First, apply the solution with a spatula and level it. The thickness of the layer should be equal to the grain size of the material.
- After several hours, when the plaster has set, you need to rub it again. Only now they use not sandpaper, but a trowel or grater. The tool is pressed against the wall and processed with vertical movements.
- The wall is then left to dry, after which paint is applied in two layers. The first coat of paint should be slightly darker than the second.
- After the paint has dried, the surface is treated with varnish.
Textured surfaces are designed in the same way as structural ones, but instead of grouting, a different technique is used. It involves applying relief designs with a roller or brush. It is also permissible to use special stamps or a regular sponge, which are simply touched to different parts of the surface, leaving marks. After drying, textured plasters are painted and varnished.
Finishing the facade of the building with textured plaster