Cold glazing of balconies and loggias from 3,087 rubles/m2
Order a service
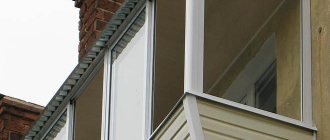
Do you want to install inexpensive aluminum glazing to protect your balcony from rain and wind? glazing balconies and loggias with aluminum profiles at competitive prices.
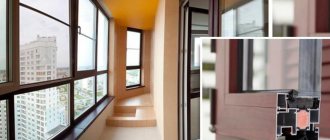
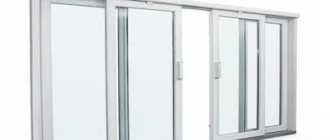
Sliding aluminum 60 mm is the most economical option available. Involves the installation of sliding frames assembled from aluminum profiles. Minimum weight of structures means minimum load on the building.
Key Features
- System: Plus 60
- Material: Aluminum
- Width: 60 mm
- Glass: single
- Frame color: white
Glazing from the developer vs new glazing
Glazing from the developer
- Leaky connection of the sashes - dust and precipitation enters the balcony
- Low quality of products and materials during installation - short service life
- Poor locking system, which quickly fails - the possibility of uninvited guests getting onto the balcony from the street
Balcony glazing at Moscow Windows
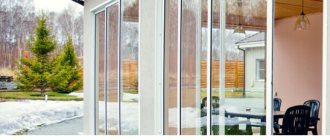
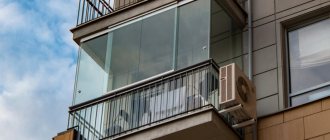
- The light weight of the structure allows you to glaze even dilapidated and weak balconies
- Aesthetic appearance
- Protection from wind, dirt and dust.
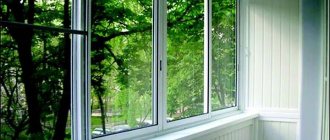
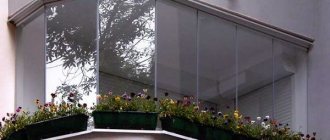
- Parallel sliding opening saves space, which is so important for every balcony.
Types of profiles
Before glazing a balcony, it is recommended to familiarize yourself with the features of swing and sliding systems. Each door opening mechanism has its own advantages and disadvantages.
The swing system has the following advantages:
- simplicity and ease of use and maintenance;
- The package includes fittings and seals for maximum tightness and thermal insulation of the structure.
Nowadays, pivot windows are not very popular. They are less often used for glazing, because... the opening option assumes the presence of internal space. There is not much of it on the balcony and loggia. For example, it will not be possible to pull clotheslines to dry clothes.
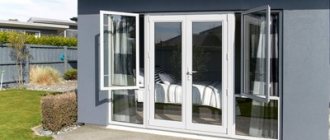
Sliding sashes do not take up the required space, the window sill remains free. Modern double-glazed windows are designed in a special way. The sash can be easily removed, making the windows simple and safe to use.
The sliding system has some disadvantages, such as:
- the fittings cannot provide a high level of tightness, which has a bad effect on thermal insulation in winter;
- The guide sashes become covered with ice in cold weather, making it more difficult to open the window.
Warm aluminum is used for glazing a balcony or loggia with the subsequent transformation of the area into a living space. If your home has inconsistent or poor heating, icing may occur.
While it’s warm on the loggia, condensation forms on the double-glazed window frames. It accumulates at the bottom of the structure, later freezing. Therefore, if there are problems with heating, it is recommended to choose warm aluminum; glazing the balcony with such a profile will help make use as comfortable as possible.
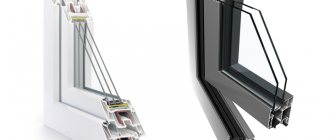
Many characteristics will be common to all warm aluminum profiles. But the level of thermal resistance may vary. The number in the model name indicates the installation depth of the frame/sash.
The German Schuko profile is the most expensive. Very strict requirements are imposed on the quality of manufactured structures. Schuco AWS 70 HI windows provide excellent heat conservation.
Reynaers is a well-known Belgian company offering high-quality products. This option will be expensive, but will last a very long time (about 80 years). Reynaers windows have an elegant design and are slightly cheaper than Schuko. The Reynaers CS 77 HI+ series has excellent performance. The CS 86 HI model demonstrates especially high energy saving parameters (due to the presence of a multi-chamber thermal bridge).
A worthy alternative to these two systems is produced by the Belarusian company Alutech . Its product range is not as diverse as that of its Western competitors. But the quality of the products does not raise questions, and the cost is more affordable. The buyer may also be attracted by its characteristics to the Alutek 72 system with a thermal bridge length of 34 mm. Compared to Alutek 62 or Newtek 68 profiles (thermal insert - 18-24 mm), this window is more expensive, but provides better thermal insulation.
NewTec deserve close attention , in particular the windows of the most popular NT 68 series. The profile of this brand is characterized by increased water and gas resistance. Apart from Reynaers and Schuko, it received the least complaints from consumers. We can note a good balance of price and quality, ease of operation and unique product design.
Newtec SY-68 profiles are warm aluminum made from high-quality raw materials. Modern equipment allows the installation of thermal inserts made of polyamide to prevent heat loss. The design is suitable for use in heated rooms.
The products are made from anodized metal. The weight of the profile depends on the number of leaves: 150 kg with 2 and 180 kg with 3. The width of the frame is 60 and 68 mm, respectively. Heat loss with such glazing is 0.35 m²*°C/W. The thickness of the glass unit reaches 40 mm, but the recommended one is 36 mm.
An important feature of Newtec profiles is considered to be bold design solutions that allow you to make glazing based on personal preferences.
Aluminum hardly rusts or deforms. A balcony glazed with this profile will withstand increased loads. Therefore, Newtek products are used for installation in shops, offices, etc.
ALUMARK S70 is a joint development of Germany and Russia. The system boasts two sealing circuits with the possibility of installing a third. This provides a high level of heat and sound insulation.
Products with 34 mm thermal bridges and foam inserts are suitable for apartments. The 24 mm aluminum profile is not entirely suitable for our climate. From a price point of view, it is more profitable to glaze a balcony or loggia with domestic systems.
For new buildings with durable balcony slabs and reliable metal parapets, there is another option. Warm glazing is possible due to the lack of critical mass of the structure. However, it will cost 3 times more than cold aluminum. For example, glazing PVC windows costs 2 times more. In addition to the costs of the products themselves, you will have to insulate the flooring, ceiling and parapet. Warm aluminum glazing of loggias reduces the footage of the balcony.
Additional elements for cold balcony glazing
Mosquito net
For balconies with cold glazing, nets are installed on the street side of the structure. On already installed loggias, a mosquito net is installed on the inside of the structure. Important! When ordering a balcony with cold glazing, it is advisable to order a mosquito net immediately. Installing the mesh yourself is quite problematic.
Roller blinds
For balconies with cold glazing, roller blinds are attached not to the frame, but to the window opening. In this case, roller blinds do not lose their functions and do not in any way limit the movement of the window sashes.
Differences in the installation process for a loggia
The loggia is enclosed by the walls of the building and stands on a solid floor slab.
Important. It will not be able to collapse, since it is an integral part of the entire house and therefore can withstand a large load. Despite this, you cannot exceed the total weight limit.
Features of installing aluminum frames on a loggia:
- The base for installation is carefully prepared; it must be level; in some cases, the level is raised using foam concrete blocks.
- The aluminum system is installed on the parapet before laying the window sill.
- Corner, end and intermediate posts can be made of timber.
- The support posts are secured to the top and parapet with corners and self-tapping screws.
- Remove the glass unit from the frames.
- Remove the doors.
- Fix the support profile at the bottom of the aluminum frame according to the level.
- Insert anchor plates into the grooves of the block and secure the structure.
- The frames are inserted into the finished gaps.
- Fix the frames with self-tapping screws, inserting them into the prepared holes.
- Install sashes and double-glazed windows.
- Perform adjustments to the operation of mechanical components.
- The seams are sealed and the installation is completed by finishing work.
Ready-made cold glazing solutions:
Cold glazing
Solution price:
Glazing Provedal 47,517 rubles
Window sill: matte white 150mm 1584 rubles
Exterior siding: 8,200 rubles
The price includes the Provedal design for a U-shaped balcony, ebbs and canopies, connecting elements.
Cold glazing
Loggia 3 meters
Solution price from:
(-10% on promotion) 25,395 rubles
(without discount) 28,385 rubles
The price includes sliding aluminum glazing (four sliding sashes), sills, canopies on the outside, additional profiles, installation.
Cold glazing
Loggia 6 meters
Solution price from:
(-10% on promotion) 46,440 rubles
(without discount) 51,890 rubles
The price includes sliding aluminum glazing (six sliding sashes), sills, canopies on the outside, additional profiles, installation.
Cold glazingSolution price:
Glazing Provedal47 517 rubles
Window sill: golden oak matte 300mm6,594 rubles
Roller blinds: art. 300100-5173 white box2 141 rubles
The calculation was made for a U-shaped balcony measuring 850×3500×850 mm. The cost of additional elements is not taken into account, delivery is paid separately
Cold glazing
Solution price:
Glazing Provedal47 517 rubles
Window sill: golden oak glossy 300mm7 266 rubles
Roller blinds: art. 300100-1852 white box2 141 rubles
The calculation was made for a U-shaped balcony measuring 850×3500×850 mm. The cost of additional elements is not taken into account, delivery is paid separately
Cold glazing
Solution price:
Glazing Provedal47 517 rubles
Window sill: glossy mahogany 300mm7 266 rubles
The calculation was made for a U-shaped balcony measuring 850×3500×850 mm. The cost of additional elements is not taken into account, delivery is paid separately
Cold glazing
Solution price:
Glazing Provedal47 517 rubles
Window sill: white pvc 300mm2 433 rubles
The calculation was made for a U-shaped balcony measuring 850×3500×850 mm. The cost of additional elements is not taken into account, delivery is paid separately
Cold glazing
Solution price:
Glazing Provedal47 517 rubles
Window sill: white pvc 150 mm1 584 rubles
The calculation was made for a U-shaped balcony measuring 850×3500×850 mm. The cost of additional elements is not taken into account, delivery is paid separately
Cold glazing
Solution price:
Glazing Provedal47 517 rubles
Window sill: white pvc 150 mm1 584 rubles
Roller blinds: art. 300100-1852 white box 2,141 rubles
The calculation was made for a U-shaped balcony measuring 850×3500×850 mm. The cost of additional elements is not taken into account, delivery is paid separately
Cold glazing
Solution price:
Glazing Provedal47 517 rubles
Window sill: white pvc 150 mm1 584 rubles
Roller blinds: art. 300100-5850 white box 2,141 rubles
The calculation was made for a U-shaped balcony measuring 850×3500×850 mm. The cost of additional elements is not taken into account, delivery is paid separately
Cold glazing
Solution price:
Glazing Provedal47 517 rubles
Window sill: white pvc 150 mm1 584 rubles
Roller blinds: art. 300106-2850 white box 2,141 rubles
The calculation was made for a U-shaped balcony measuring 850×3500×850 mm. The cost of additional elements is not taken into account, delivery is paid separately
Cold glazing
Solution price:
Glazing Provedal47 517 rubles
Window sill: white pvc 150 mm1 584 rubles
Roller blinds: art. 300504-1881 white box 3,442 rubles
The calculation was made for a U-shaped balcony measuring 850×3500×850 mm. The cost of additional elements is not taken into account, delivery is paid separately
Aluminum windows to the balcony - step-by-step installation instructions
Now that you know about all the features, advantages and disadvantages of aluminum balcony windows, let's look at how the installation takes place.
Dimensions of a sliding aluminum glazing frame for a typical loggia of a panel house
List of tools
But before starting work, any master needs to stock up on a set of tools. You can see the list of what you will need to install aluminum windows on a balcony from the table below.
Mosquito net for aluminum windows
Table. Installation of aluminum windows on a balcony - necessary tools.
| Tool name | What is it used for? |
| Scrap | Dismantling old glazing elements |
| Hammer | Hammering fasteners into dowels, adjusting, dismantling old sashes and frames |
| Chisel | Removing the window sill and ebb |
| Wood saw | Dividing the old frame into several parts to facilitate dismantling |
| Roulette and level | Carrying out measurements and control of evenness vertically and horizontally |
| Screwdriver | Screwing in self-tapping screws and other fasteners used when installing aluminum windows on a balcony |
| Screwdriver | Used to loosen or, conversely, tighten fasteners more tightly |
| Drill with drill bit for concrete | Creating holes in the parapet to secure some aluminum glazing parts |
| Hex key | Working with some aluminum window mechanisms |
| Gun with silicone sealant or polyurethane foam | Processing the joints of various glazing elements and sealing gaps that could remain after installing aluminum windows on the balcony |
Prices for popular models of screwdrivers
Screwdrivers
Important! It is advisable that the screwdriver have two batteries - while one is working, the other is charging. Afterwards they change places. Thus, continuity of the work process is achieved.
Removing old glazing - step-by-step instructions
Before you begin installing new aluminum windows on the balcony, you need to get rid of the old glazing.
Step 1. The dismantling of old glazing begins not with breaking the window frames, but with preliminary measurements. Using a tape measure, the length, height and depth of the opening on the balcony are determined. Without this data, it is impossible to select aluminum glazing of suitable dimensions.
Preliminary measurements
Step 2. Next, the window sashes on the balcony are opened and the width of the ebb is measured. The number of sashes in the new aluminum glazing and the width of the window sill, if installed, are also determined.
Measuring the width of the ebb
Step 3. A building level is drawn along the top of the balcony opening - you need to find out how smooth the concrete slab is and whether there are any distortions. Such defects are typical of old houses that are in disrepair, and this must be taken into account when installing aluminum windows on the balcony.
Checking the flatness of the concrete slab
Prices for building levels
Construction levels
Important! In the process of performing all measurements, it makes sense to record the results of the work. Craftsmen working in window and balcony glazing companies use standard forms for these purposes, as in the image below. You can use a regular piece of paper for notes.
Standard form for measurement results
Step 4. Only after all measurements have been completed can you begin to dismantle the old glazing. Work begins by removing the sashes from their hinges. If they (the doors) are in satisfactory condition, then the process is done carefully, using a screwdriver. But more often, the sashes of old balcony glazing are removed using a crowbar. Much faster, more efficient and safer, such work is done in pairs.
When disposing of old window sashes, you must be careful not to allow any parts to fall out onto the street. It is also undesirable to break the glass itself - there is a risk of injury from them at one time or another
Step 5. Use a crowbar to pry up and remove the window sill and ebb. If they are held too tightly and tightly and simply cannot be dismantled, then the craftsmen resort to using a hammer and chisel - the latter is driven between the parapet and the window sill (or ebb) in several places. Then a crowbar is inserted into the resulting cracks, the glazing part is pryed up and removed from the fasteners.
The tide is going out
Step 6. Then, with a regular wood saw, cuts are made at several points on each side of the window frame. This operation greatly facilitates the subsequent process of dismantling the structure, making it possible to remove it in small parts.
Making cuts
Step 7. The sawn parts of the balcony glazing frame are removed from their place and put away with the rest of the construction waste. If necessary, resort to the use of crowbar.
Removing sawn parts of the frame
Step 8. After removing all parts of the old glazing, the opening on the balcony is protected from concrete fragments, individual small parts of the frame or from fasteners. Then minor irregularities are smoothed out. All construction waste generated during the dismantling of old glazing is disposed of.
Cleaning work surfaces
Important! Before installing aluminum windows, serious defects and unevenness of the window opening are eliminated using cement mortar.
Installation of aluminum windows on a balcony - step-by-step instructions
Now that the balcony opening is free of old and deteriorating glazing, new aluminum windows are being installed. As in the previous section, information about this case is presented in the form of step-by-step instructions.
Step 1. In this example, leveling the edge of the parapet is done by installing wooden boards. They are secured with long self-tapping screws screwed into the concrete. In this case, the boards are leveled horizontally using a building level.
Drilling a hole
The self-tapping screw is tightened
Step 2. The delivered aluminum window parts are unpacked, counted and checked for defects. Then the frames are assembled from individual elements, with rubber gaskets necessary to seal the connection placed between them. The parts are connected to each other using self-tapping screws.
Attaching the rubber gasket to the end part of the frame element
Assembling the horizontal and vertical frame members together
Fixing frame parts in connection using screws
Step 3. Using the same principles as outlined in the previous operation, all other frames are assembled. As for the sashes, they are usually supplied ready-made - assembled and glazed.
Window frame assembly
Step 4. Anchor plates are installed on the upper part of the frame, with the help of which the structure will be connected to the ceiling on the balcony. Places for installation are not chosen randomly - from the edge of the frame to the anchor plate there should be no more than 20 cm, and the interval between elements should not be more than 40 cm.
Anchor plates are screwed
Step 5. A window sill is installed on top of the board laid on the parapet. To begin with, it is aligned horizontally.
Window sill leveling
Step 6. Then the window sill is fixed to the board using screws screwed into the part.
Window sill fastening
Step 7. The second window sill is laid and secured using the same principle. In this case, both parts should fit tightly together, and their edges should lie on the same line.
Installing a second window sill
Step 8. A metal casting is laid on the outside of the parapet on top of the newly installed window sill. It is secured with small self-tapping screws.
Metal drip is installed
Step 9. Another ebb is laid nearby, and it is not just joined to the previous one, but overlapped with it, as shown in the image below.
Ebb tides meet overlap
Step 10. Installation of the aluminum window frame begins from one of the edges of the balcony. One of its components is inserted into the opening and secured there from bottom to top. Its vertical position is controlled by the building level.
Window frame installation
Window frame installation process
Step 11. Part of the aluminum frame is attached to the parapet using self-tapping screws. They are inserted into the corresponding holes in the lower part and tightened with a screwdriver.
Attaching part of the aluminum frame to the parapet
Step 12. Another part of the frame is installed nearby. It is then mated to the glazing element installed in the previous operation. Fixation is carried out using self-tapping screws screwed into the side parts of both parts of the aluminum frame.
Installing the second part of the frame
Connection of two structural elements
Step 13. Holes are drilled in the concrete slab on the balcony ceiling for attaching anchor plates. Then dowels are inserted there and screws are driven in. The latter fix these plates, and at the same time parts of the aluminum frame on the upper side of the opening.
Drilling holes
Prices for popular hammer drill models
Hammers
The self-tapping screw gets clogged
Step 14. Between the ceiling of the balcony and the upper edge of the aluminum frame from the outside, a canopy is inserted and installed, which is necessary to protect the glass from contamination during rains and other precipitation. The visor is attached using self-tapping screws screwed through holes in the anchor plates.
The visor starts
Fastening the visor with self-tapping screws
Step 15. The “canopy-frame” and “frame-drip” joints are treated with silicone sealant - not a single drop should penetrate through them into the balcony, even during the heaviest rainfall.
Sealing joints with silicone sealant
Where to order?
Order swing aluminum windows
possible in! We also offer cold-type ones made from , Reynaers, AluTech and NewTech. Thanks to the variety of profiles, our consumers have a wide range of choices. Our windows can have almost any size and have decorative coatings in different colors. We offer a complete service that includes design, manufacturing, delivery and professional installation. This approach allows our customers not only to save a lot of time, but also to be confident in the quality of the window structure.
Customer Reviews
Andrew Vladimirovich
06/21/2019, Moscow
I thank the Alyumok company for the excellent work. I ordered an aluminum window for my bedroom here. I called them on Friday, on Tuesday morning they already delivered the window and installed it in a couple of hours. They cleaned up the trash after themselves, the slopes also seemed to be done properly.
Eremin M.
06/20/2019, Balashikha
Six months ago I ordered windows here. After so much time I can talk about quality. Everything is fine, no problems arose. We are soon going to change the windows at our dacha, I think we will contact you again. The company is excellent.
Kulagin
06/22/2019, Moscow
A reliable company that you can trust to replace your windows and not regret it. The employees are polite and respond quickly to all requests. Within a couple of months, my handle became loose, so they immediately sent a technician and replaced it. There are no problems with the new one. Thank you.
Read all reviews
Ways to open windows
Fixed windows
Windows without sashes, not intended for opening and ventilation. Profiles without moving elements and fittings for opening/closing.
Price: from 6,000 rubles per square meter
Hinged windows
Windows consisting of two pivoting sashes or one fixed and one pivoting. Pivot doors can be opened by removing the latch and pulling the handle towards you.
Price: from 7,000 rubles per square meter
Sliding windows
The doors close and open in different directions, moving along special guides. An ideal option if there is little space in the room to open the doors.
Price: from 8,000 rubles per square meter
Hinged windows
Such windows are opened by turning the handle, and only the upper part of the sash is separated. This is the standard ventilation mode.
Price: from 7,000 rubles per square meter
Please note that it is possible to combine windows of different types. For example, on one balcony you can install 3 fixed windows and 1 turning window.
Proper care is the key to reliable operation
Aluminum windows, like any other mechanical structures, require constant monitoring and analysis of their condition. To make the operation of such systems practical and durable, experts recommend following a few simple rules:
- The moving elements of the window must be periodically cleaned of dust and lubricated with oil, which is used in sewing machines.
- To mask all scratches that appear on the surface, they are covered with a layer of acrylic paint.
- It is not recommended to open the doors in winter, as ice may form on them, leading to destruction of the structure and loss of mechanical properties.
- Windows are washed only with soap solutions that do not contain abrasive ingredients.
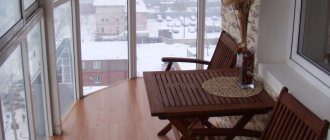
Aluminum glazing is a universal opportunity to transform the balcony area into a useful area used for solving various problems.