Additional elements are often included in the door block kit. They often have to be fastened when installing entrance doors and interior models. They make the opening more neat and give it aesthetics. Installation of extensions on interior doors can be done with the help of a specialist. But such a service is paid. Those who want to save money install the extras themselves. This work is simple and can be done with your own hands. You just need to know the process of installing such elements.
Extensions and platbands: what are they needed for?
Extensions are special wooden, plastic or metal strips used to disguise door slopes. Installation of additional elements is provided in cases where the wall thickness exceeds the width of the box. Extensions are built into areas with a bare wall, extending the box of the entrance structure.
Important! Platbands hide the ends of the panels, cracks and seams between the wall and the door block. Plates with built-in cable channels are designed for wiring that can be hidden. Such elements are made of plastic and consist of two parts. The first is built into a wall or box beam, the second acts as a cover behind which the wires are located.
The color of the decorating parts is matched to the canvas and box. It is recommended to purchase all additional parts complete with the box in order to select the appropriate shade the first time.
How to calculate?
Installation of extensions always begins with measuring the thickness of the wall. The choice of type and quantity of consumables depends on this parameter.
You can calculate the fees using this simple algorithm:
Initially, you need to get the width of the free space on the wall near the box. Measurements are taken using a ruler or a corner. The latter option is more accurate, since it is necessary to take into account the angle between the door frame and the board. It is advisable to find out the width along the entire perimeter of the opening. The next step is to measure the thickness of the door frame. This is necessary in order to select the appropriate addition, under which you will need to place a minimum number of supporting elements. The procedure ends with the calculation of the number of additions. This takes into account not only the width of the board and the opening, but also their height. It is advisable to take these parameters with a small margin, so that you can then adjust the canvas to the dimensions of the opening
Please note that all extensions on the market have standard sizes. Therefore, when choosing, you should focus on them.
What will you need for finishing?
To finish a doorway, you need to have on hand a small repair kit consisting of the following tools:
- roulette;
- hammer;
- construction square;
- masking tape;
- tape for framing the edges of the plank;
- foam for installation;
- electric saw or jigsaw;
- saw with miter box;
- fasteners in the form of liquid or regular nails and self-tapping screws;
- ready-made or homemade boards.
If the plans are only to close the slopes without replacing the door leaf, the following materials will be useful for the manufacture of extensions:
- wood boards;
- pieces of wood fiber sheets (MDF);
- several long chipboard strips;
- plastic elements.
When cladding with natural wood, it is recommended to pre-treat the surface with a special impregnation. The antiseptic composition retains the properties of the material over many years of use.
Attention! In terms of external characteristics, resistance to moisture and temperature fluctuations, wood or MDF panels are more suitable for finishing external entrance openings. Indoor use of particle boards is allowed.
When installing plastic inserts, it is better to use panels with a metal base.
How to do it yourself?
Extensions are ordinary planks or boards that perform a decorative function. Therefore, you can make them yourself from various materials. They are often formed from natural boards of small thickness or sheet products (chipboard, plywood, etc.).
The process of making accessories at home can be divided into several successive stages:
Initially, measurements of the opening are taken
It is important to measure slopes in different places to eliminate inaccuracies in dimensions. This procedure must be carried out for each side of the slope separately. Based on the data obtained, a workpiece should be made
To do this, the dimensions of the future addition are marked on the board. Please note that it is best to provide a small margin so that after installation, gaps do not form at the joints. When the markings are ready, the board is cut into extensions. It is better to perform such operations using a circular saw, as it will provide a more even and high-quality cut. The procedure ends with fitting and finishing of the frame. If the board is slightly larger, then the ends should be leveled using an electric plane. To give the board a unique design, the wood needs to be sanded and painted with stain or varnish. If laminated chipboard is used, then care must be taken to cover the ends with special tapes. They are glued to the material using an iron or a special hair dryer.
Finishing the opening with extensions
Masking elements are easier to install in grooves. To do this, at the stage of purchasing the box, you need to pay attention to the presence of ready-made holes into which the additional strip is pushed.
If there are no grooves, more scrupulous work or qualified assistance will be required. In such cases, the boards are fastened tightly to the nearest millimeter. The planks are adjusted to one another and built in as carefully as possible.
Into the groove
The arch made of extensions is mounted in several stages. Installation of inserts is carried out after fixing the box to the wall.
Step-by-step description of installation work:
- Carefully measure the distance from the box to the edge of the opening.
- The width of the additional element is determined as the sum of measurements of the width of the slope and the depth of the groove.
- Additional strips are specially purchased in slightly larger sizes in order to adjust the width of the element to the required dimensions during the installation process.
- The planks are built into the grooves.
- When assembling telescopic elements, the structure is fixed with liquid nails or adhesive. The parts are connected by deepening the tenons into the grooves.
- The horizontal bar is attached to the side ones at a right angle, forming a U-shaped structure. For precision work, use adhesive tape to secure parts.
- Before filling the gaps with foam, temporary spacers are installed between the planks to prevent the extensions from being squeezed into the passage.
- Excess foam is removed after complete drying.
Important: each slope is measured separately in at least four places.
Without groove
In the absence of grooved holes, a portal made from additional parts is made in the following order:
- Adjustment of planks based on measurements.
- The edges must be treated with edge tape. The side with glue is placed on the edge of the plank and ironed.
- At the ends of the elements, nails are driven half the length with the same distance between them. The caps need to be bitten off, forming sharp ends. If you plan to strengthen the block with glue, three fastenings on the side planks and a central one for the top are sufficient.
- The horizontal extensions should be installed first, then the vertical ones. After driving in the elements, you need to make sure that there are no gaps in the resulting structure.
- Gaps in the opening are eliminated with foam.
Installation with foam
The fastest installation method. The main thing here is not to overdo it with polyurethane foam. Otherwise, the extension will lose its geometry due to high pressure from the wall. So, for this method you do not need to drill any holes.
Install the extensions into the opening and secure them in place with wooden wedges. The additions must be in the position of the final result. Eliminate all gaps between the frame and the extensions. Next, at the base of the contact between the extensions and the frame, draw a line of polyurethane foam, and then horizontally in several places. Align the extensions again so that they are fixed with foam in the correct position.
Finishing the opening with platbands
You can begin attaching the platbands after the foam between the frame and the wall has dried.
To calculate the length of the side trims, you need to add the measurements of the width of the top to the height of the box. The upper parts are filed using a miter box (45 degree angle). The platbands are secured with nails at the bottom and in the middle.
The edges of the vertical board are also formed at an angle for the joint. To do this, you need to attach the platband to the attachment point and apply markings for filing. Next, all the platbands are joined, secured with nails, and then the caps are removed in order to hide the fasteners as much as possible.
If you use self-tapping screws, you will need to pre-drill recesses for the caps. The twisted screws are hidden under plastic plugs.
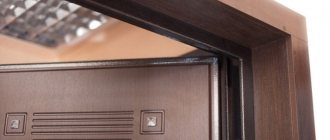
Installation of telescopic parts is carried out using a comb built into the grooves on the extension. To strengthen the joints between the parts of the block, glue is applied. The lower part of the platbands rests on the floor and connects with the baseboard on the side.
Preparatory work
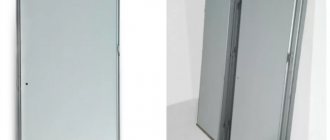
When installing platbands from the extension side, as a rule, no problems arise. But on the side of the door frame, carpenters quite often encounter a situation where the door block is either slightly recessed into the opening or protrudes outward. In this case, it is necessary to carry out work to hide these shortcomings.
The box is recessed
If the structure of the door block is recessed into the opening, and there is no way to correct the mistake by adding more, a thick platband is taken and an undercut is made in the wall under it. The work order is as follows:
- the platband is attached to the box;
- the line of the platband is marked on the wall;
- using a grinder with a cutting wheel for concrete or brick, an incision is made into the wall along the drawn line;
- use a chisel and hammer to knock out a recess for the platband - no need to be afraid to make the cut deeper or go beyond the line;
- a small amount of cement mortar is made (it is better to use ready-made putty);
- the knocked-out recess is lightly covered with mortar and the casing is immediately applied, as tightly as possible. Excess mortar that appears is removed first with a trowel or spatula, and then with a rag or rag;
- The casing is removed, and the solution is given time to set.
To prevent the solution from sticking to the back of the plank, it is first moistened with water.
The platbands will look strange if the box is slightly recessed into the opening.
The box protrudes
If the box protrudes beyond the wall, a plane and wooden trim will help. The technology is simple: the size of the box is marked on the back side, after which a quarter is selected from the back side of the casing using a plane. You need to work slowly, constantly monitoring the process of selecting a recess for the box.
Tips and tricks when finishing an opening
In most cases, you can install an arch from additional panels and platbands with your own hands. If structural elements are purchased separately, some points should be taken into account:
- Before starting installation work, it is recommended to level the wall.
- Don't skimp on buying edge tape. Installation errors will not be noticeable on the machined edges.
- Edged ends protect the material from deformation in rooms with high humidity levels.
- It is better to purchase telescopic parts ready-made. For self-production you will need special tools.
- Aluminum trims are fastened with self-tapping screws.
- If there is a metal door, all elements are attached by welding.
- A layer of insulation can be placed in the gaps between homemade additional boards and the wall. This layer improves thermal insulation properties and prevents the penetration of extraneous sounds.
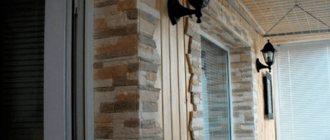
- You can achieve sealing of the slopes using silicone inserts in the grooves of the box beams.
- In metal structures, plasterboard sheets are used to install the extension.
Important: the thickness of the additional boards should not exceed the width of the grooves of the box.
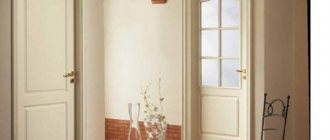
Finishing doorways with extensions and platbands completes the framing of the opening for both entrance and interior doors. Additional elements give a finished look to the entire door structure.
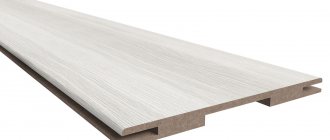
Types of additional elements
Extensions to entrance doors are required when the wall thickness is more than 140 mm . This determines the dimensions of the bar. The second feature is the presence of an end groove for fitting on the box. This design limits the thickness to at least 10 mm. They make an extension 7 mm thick, but in such cases an overlay strip is attached to the edges, which forms the necessary groove.
Running sizes:
- Thickness – 10, 14, 15, 25 mm. Thin ones are more suitable for interior doors. For the entrance group, it is recommended to take 15–25 mm thick panels.
- Width – from 90 to 400 mm. The most popular are 90, 130, 170 mm. You can order the rail of any width. The product is easily made in any workshop specializing in the production of doors.
The length of the bar is not regulated. The home craftsman independently determines the required size and cuts the extensions to length.
Varieties
Wooden overlays are distinguished by design.
- Without edge - the simplest rectangular trim with raw edges. The latter needs to be varnished, painted or decorative trim installed to cover the ends. It is necessary to close them: moisture penetrates into the wood through the end.
- With edge - a model with a machined edge, sanded and sealed with a protective coating. This product lasts longer. In addition, during installation you can do without platbands. However, you need to be careful during installation. If the plank is cut unsuccessfully, the coating is damaged. If the joint is loose due to a matching angle, the parts left without an edge become the cause of damage.
- Telescopic – universal option. It is a set of strips with grooves on both ends. The elements are joined to each other using connecting strips. This allows you to increase the width of the finish almost unlimitedly. The length of telescopic extensions reaches 2150–2500 mm, so you can decorate any doorway with them as large as you like.
Valera
The voice of the construction guru
Ask a Question
For telescopic extensions, you must choose a special door frame - with a groove and a connecting strip. Also, not just any platband, but an L-shaped one, is suitable. On the inside it is equipped with a protrusion that easily fits into the groove of the extension.
Criterias of choice
Modern doors are often equipped with platbands and extensions. However, when repairing or installing an entrance leaf, it becomes necessary to refinish the slopes.
Select extras, observing the following rules.
- Measurement is done in two planes, horizontal and vertical. If the walls are very uneven, parameters are measured at 3 or more points. The smallest value is selected from the data. If there is no element of the required width, choose a slightly larger one, since trimming the model, especially without an edge, is not difficult.
- Color and pattern - match the color of the door, baseboard, floor. You can choose contrast or white.
- The thickness of the paneling for the entrance block must be at least 15 cm.
The design of the lining is selected based on the size of the opening. If the slopes are not wide, a regular strip with an edge is sufficient. If the wall thickness is large, you will have to order an extension or take a telescopic one.
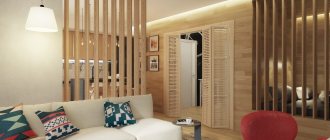
Ready-made arch kits
If you are not confident in your own abilities, and the educational video lessons from the Internet are not entirely clear to you, you can make your life much easier by purchasing a ready-made kit for forming an arch. Such sets can be made from different materials, have different designs, colors, designs and textures, which will allow each person to find the most suitable option. The most suitable option is a set made of fiberboard or MDF. Such materials are very similar to wood, but are less complex to process and install. The ready-made standard interior arch kit includes:
- 2 vault panels.
- Platbands.
- Inner plates.
- Elements for connection.
To choose the right set, you only need to measure the height, depth and width of the doorway. We hope that our article will be useful to you and give you confidence in your own abilities!
Source
What materials can be used to form arches?
To make an arched vault, you need to stock up on the following material:
It is worth noting that it is best to sheathe the frame with sheets of plasterboard, because in the future it can be decorated with various decorative materials. But, if you need to create a more sophisticated shape, choose plywood sheets as they bend better. The preparation of the arched frame is formed from:
- Metal profile.
- Wood beams.
But, to build an arch, you can also take concrete, aerated concrete and brick, which are decorated with finishing materials. Despite the fact that such structures are solid, it is prohibited to erect them in high-rise buildings due to their heavy weight. It is also prohibited to make door frames from metal, which, moreover, will cost a pretty penny. And how to make an arch in an apartment with your own hands from metal? After all, this is a very labor-intensive process that requires the use of specialized devices. That is why plasterboard is the most acceptable material for finishing apartments.
Installation of a plasterboard arch
Working with plasterboard, as with plywood, is very similar and does not cause difficulties, but is cheap. If you have the opportunity to build walls and form an arch at the same time, this way you can complete the work as quickly as possible. Before forming an arch, you need to prepare the surface step by step, namely:
- Remove the old door panel, decorative trims, trims and other fittings.
- Repair all damage to the walls to avoid troubles in the future.
- Get some tools.
- Draw up a detailed work plan and sketch.
You can install a plasterboard arch in different ways; below we will describe each method in more detail. The first option is the most popular:
- Take 2 sheets of drywall, one of which is cut in half.
- A U-shaped frame is formed in the doors using a metal profile.
How to form a frame from a profile
- One segment is fixed to the frame, having previously been marked into 2 equal parts and marking the center.
- A hole is drilled in the rail from the edge and in the center. The distance between them should be equal to the middle of the arc of the formed arch. To do this, determine what distance will be maintained between the edges of the semicircle.
- Then a curved line is drawn to connect the hole in the middle of the batten with the center of a piece of drywall sheet that is fixed to the frame. You should immediately check whether the height of such an opening is suitable.
- Then the sheet is removed and the excess is cut off, after which it is fixed again on the frame.
- The second sheet of drywall is installed on the opposite side. Taking a corner and the first segment (like a stencil), transfer the dimensions of the arc. Next, cutting out the arc and fixing it is repeated according to the same pattern.
- After the work has been done, a void is left in which the frame is mounted. To do this, the profile is cut and bent. The resulting structure is fixed to the racks and drywall. It is also worth installing jumpers for the reliability and strength of the structure.
Internal frame for an arch made of plasterboard sheets
- Next, cut out the required strip, bend it, and make deep cuts on the inside. You need to fix it without haste, with careful movements.
- That's all, the arch is formed. All that's left to do is to paste the wallpaper or paint it in the desired colors.
The second method is much more complicated. The masonry is formed using the following technology:
- Drywall pieces are fixed from the corners on both sides using a mixture of PVA glue and water.
- Drywall is cut so that each next fragment is smaller than the previous one.
- Work continues until the smallest fragment is installed.
- Self-tapping screws or anchors are used as additional fixation.
Forming an arch from plasterboard
This is only a preparatory process. Further it will be even more difficult. The next stage will require plaster and putty. Large expansions and other defects are sealed with plaster, and a smooth arc is created with putty. This is quite a painstaking work that requires a strong and experienced hand of a master, so it is better for a beginner to immediately purchase template blanks.
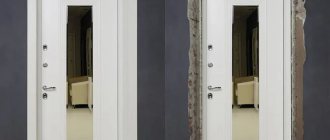
How to attach the extension to the door frame if it is thicker than the selected quarter
Often the extra is thicker than the quarter selected in the box. What to do then? How to make sure that the extension rests without cracks and holds tightly? There is a simple way - drill holes diagonally, screw in self-tapping screws, then close the holes with matching plugs. Here everything is more or less clear, but not very beautiful - the stubs are still visible.
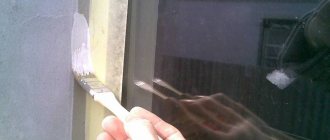
There is another way. Need drywall hangers. Only they should be the strongest and thickest. We separate the perforated parts of the tape from the hangers. Each one makes two pieces. You will also need small screws (fleas). We screw the perforated tapes onto the door frame around the perimeter - at the corners at a distance of 10-15 cm, also at the bottom, and in height at a distance of 40-50 cm.
How to secure the addition
We screw in the screws at a distance of 1.5-2 cm from the edge of the box (middle photo). One self-tapping screw per piece of metal tape is enough. When you install the door frame, the tape will stick out. These strips are thin, so there will be no problems with even the smallest gap. If the extension to the interior door is the same width, simply insert it. Due to their elasticity, the plates press it tightly.
How to install extensions if they are thicker than a quarter
If the extension is wider, first we bend them to the front part, then return them back. Due to the fact that they are not fixed at the edge, they bend and become like an arc.
This is how it can work out - without the slightest gap
Now we insert additional strips, placing them between the plates and the groove. They will press the bar tightly. The cracks will not be visible even upon closer inspection.