Interior doors perform several tasks: they block free access to the room, provide heat and sound insulation, and also guarantee privacy for those in a closed room. But at the same time, they are part of the apartment’s design, and therefore must meet certain aesthetic criteria.
Interior doors
Canadian interior doors perform all the listed functions and, moreover, are inexpensive.
How to select and install a “Canadian” door
Interior doors perform several tasks: they block free access to the room, provide heat and sound insulation, and also guarantee privacy for those in a closed room. But at the same time, they are part of the apartment’s design, and therefore must meet certain aesthetic criteria.
Canadian interior doors perform all the listed functions and, moreover, are inexpensive.
Surface preparation
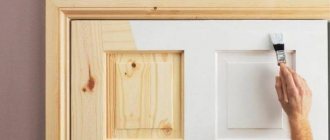
Having selected the necessary materials for painting wood-look doors with enamel, you will need to prepare the surface, and then apply a drawing of the structure of the wooden fibers. It is always necessary to prepare the surface by removing old paint or varnish, using a grinder or sandpaper.
To paint interior doors Canadian wood, as well as other types, you need to bring the surface to perfect condition. To do this, use a sander or sandpaper with small or medium grain. If there are cracks, holes or other flaws, it is necessary to additionally putty the surface using a wood compound. This condition is mandatory, but when using transparent varnish, the color of the putty should match the color of the wood itself. When the mixture dries and hardens, it must be sanded. After which the preparation is completed and you can proceed to coloring.
It should be immediately noted that an imitated wood pattern can be applied to almost any material. This could be a metal entrance, plastic or plastic, on a steel sheet, etc. the main difference lies in surface preparation.
Design Features
A sash of this type received its name due to its production. The design was first developed and released by the Canadian company Masonite back in 1980. The manufacturing technology of the product is quite simple and does not require the use of expensive components, making all models of this kind quite affordable.
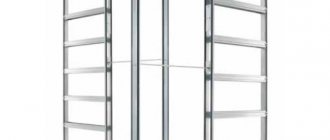
The basis of the sash is a frame made of inexpensive types of wood - pine, as a rule. The frame is lined with MDF panels, and the space between the sheets is filled with honeycomb filler. The latter, thanks to its cellular structure, provides heat and sound insulation when installed in a doorway. The dimensions of the product correspond to standard openings.
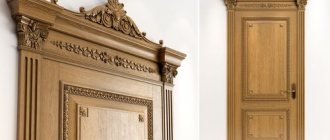
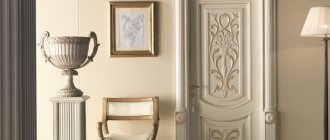
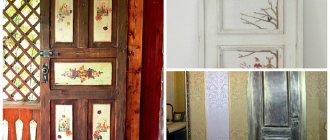
The facing panel can imitate wood of a certain color - such as the Kanadka white door DO-8/70 in the photo. But it can also be a primed surface specifically for painting. It is not necessary to paint the interior door, but, as a rule, this technique is not neglected: you can get a color that completely matches the style of the room, and the material is additionally protected.
About products
Canadian doors are products prepared for painting. Their design involves the use of special MDF overlays, edged with timber, filled with a special honeycomb filler. The manufacturing technology was developed in Canada, hence the name – Canadian. Back in the 1980s, the Canadian company Masonite created a similar technology and implemented it in its doors.
The advantages of this option are a small production budget with excellent appearance and excellent quality. Such characteristics allowed the technology to reach the forefront and made it very popular among consumers.
It would seem that the principle of manufacturing Canadian doors is quite simple, but this is a deceptive impression. In reality, the manufacture of doors using this technology is quite complex and differs in a specific technological process. In order to create such doors, wood shavings and various lumber are used, which are crushed and dried. After the drying stage is completed, the panel is formed by squeezing under a powerful press. The panel has excellent properties and is similar in appearance to a fiberboard sheet.
Advantages and disadvantages of the Canadian interior door
Like any other design, this model has its advantages and disadvantages. The advantages of the product include the following qualities:
- more than affordable price due to production features compared to traditional wooden models;
- noticeably lower weight - almost 5 times lower than a wooden sash, which makes installation easier and allows the use of lighter and cheaper fittings;
- You can install Canada on the thinnest room partition;
- The MDF panel is prepared in production for painting; Kanadka doors can be painted with almost any composition;
- the interior door is easily repaired: even with severe damage, it is enough to simply replace the front panel;
- Thanks to the honeycomb filling, the product has good thermal insulation properties.
The disadvantages of the Canadian are the following parameters:
- difficulties with installing the lock: only the frame has sufficient density, so you need to be careful when choosing the installation location;
- the structure is fragile - neither the wooden frame nor the cardboard filler have high strength;
- doors are sensitive to humidity fluctuations;
- These products are standard. So a relatively individual option, as reviews say, can only be achieved by painting.
Step-by-step instruction
If the installed interior doors exactly fit the existing opening, then it is recommended to install them at the final stage of renovation of a cottage or apartment. Then, when the ceiling has already been whitewashed and the wallpaper has been hung. But if the doorway needs to be widened, then this work should be done at the rough finishing stage. A lot of dirt and dust is generated when breaking walls.
Step-by-step instructions for installing interior doors
Direct installation of interior doors with your own hands is carried out in six steps:
- Assembling the box.
- Installation of hinges.
- Door leaf canopy.
- Installation of thresholds and extensions.
- Fastening platbands.
- Installation of door fittings (locks and handles).
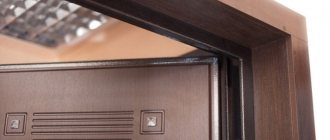
Box assembly
When studying which pipes are better for plumbing and easier to install, you have to consider many metal and plastic options. It’s much easier with door blocks for interiors. Almost all of them are made from lumber. Structures made of plastic or aluminum are extremely rare in private homes. As a result, when installing interior doors, you only have to work with wood, which is not so difficult.
Types of door frames
There are two ways to assemble a wooden door frame:
- cutting the corners of the top crossbar and vertical posts at 45 degrees;
- connecting crossbars and posts end-to-end without corner cuts.
The first option looks more elegant. However, the second one is easier to cut yourself. Only with it you need to be very careful when cutting the side on the top crossbar so that the vertical bars stand up straight and without gaps. At the same time, it is recommended to choose the method of assembling the external frame of the interior door depending on the interior design.
Required dimensions and tolerances for door frame assembly
To prevent the canvas from sitting too tightly in the box later, when cutting the crossbar, an additional 3 mm should be added to the left and right. The horizontal and vertical parts are fastened in the corners from above with self-tapping screws into the end of the racks from the outside. And so that when screwing in these screws the frame bars do not crack, you must first drill into the holes with a thin drill (a millimeter thinner than the fastener).
At the same time, the supporting post, where the hinges will be, should not be pulled tightly to the end at this stage of door installation. It should only be lightly fixed in its intended place.
Installing hinges
The hinges are first hung on the canvas with an indentation of 200–250 mm at the top and bottom. Hinges for interior doors can be overhead (“butterflies”) or hidden. The first ones are enough to be attached to the end with the inner small part and secured with self-tapping screws. And for the second, you will have to pre-cut the grooves.
Necessary measurements for installing hinges
Next, the canvas is inserted into a box laid on the floor. And the places where the hinges are attached to the racks are marked. But first, between the end of the canvas and the parts of the box, you need to insert pieces of wood (pieces of fiberboard) 3 mm thick, so that there will be gaps there later.
Then the supporting post, which is not fully tightened, is unscrewed from the crossbar and the loops are screwed to it. And then it is put in place and finally fixed with self-tapping screws.
Door leaf installation
After the almost completely assembled interior door should be placed in the opening and adjusted vertically and horizontally using a level. To fix the block in the desired position, wedges and pieces of wood are used.
Sealing cracks, holes and installing extensions
It is allowed to leave a gap of 0.5 to 3 cm thick between the outside of the block and the end of the wall. But if the house is wooden, then this gap should be at least 1.5 cm in case of shrinkage of the log house.
Accessories options for interior doors
The box is secured with anchor bolts, which are placed under the hinges and the lock plate. To do this, first holes are drilled in the vertical racks on both sides to the wall. Then the block is removed and the interior partition itself is drilled. If you use a drill without cleaning the box, there is a serious risk of accidentally damaging its decorative coating.
The box can also be secured with metal hangers. They are first screwed to the racks, and then, after bending them onto the wall, they are attached to it with dowel screws.
If the wall is thick, then you will need to install extensions (false slopes, additional beams). The box has a so-called coverage area. This is the interior space that needs to be decorated. Extensions are made from solid wood, fiberboard or MDF. After cutting them to the required dimensions, you just need to put them on the box and screw them to it with long self-tapping screws. Then, along the entire perimeter of the opening, spacer wedges and a spacer in the middle are also placed under them.
Instructions for installing the accessory
Then all that remains is to spray the mounting foam and leave the block closed for a while alone. It is recommended to continue installing the interior door the next day. The foam adhesive must completely harden and secure the door frame.
Installation of threshold and trim
The threshold and trim are installed after fixing the frame with anchors and polyurethane foam. The first is a metal strip with holes for dowel screws. It needs to be cut to the width of the opening, holes drilled in the floor and “nailed.”
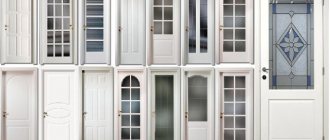
Platbands for interior doors come in the following forms:
They are fastened using a tongue-and-groove joint, nails or glue. They are cut at the upper corners of the door at 45 or 90 degrees. In this case, the joints of the crossbar and vertical slats should be made as tight as possible. The slightest irregularities and errors during sawing will later be visible.
How to paint a door Canada
The basic model is white. To be more precise, it is covered with white primer, so it is highly advisable to paint it after installation. The composition is suitable for any paints that are used to decorate a home. Water-based and acrylic paints are most suitable for painting.
But before you paint a Canadian door of any size, you need to pay attention to the decorative effect of the paint. The following groups are distinguished:
- glossy – provides bright color and high shine of the product. It is not always appropriate to paint Canada with such paint; moreover, all the smallest flaws and defects are visible on the glossy surface.
- You should use matte paint or varnish to paint a door in a bright room. The color can be any, and the matte texture of the coating will hide any defects. But if the interior being created requires a certain shine, it is better to use a different composition.
- Semi-gloss paint is the best option. This coating has a moderate degree of light reflection, but at the same time it does not dull the color like matte. Judging by the reviews, when the question arises of how to paint Canada, this solution is most often chosen. The photo shows the painting of the Kanadka door.
Installation of door structure
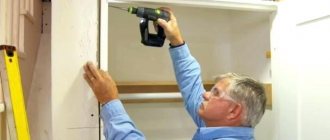
Despite the lightness of the sash, even when installing it yourself, you will need an assistant. The installation technology is very simple.
- First, they dismantle the old sash: remove it from the hinges, saw it and remove the door frame, and then put the slopes in order if they need it.
- The elements of the new frame are connected: the horizontal and vertical parts are connected at the end sides and fastened with self-tapping screws.
- The assembled structure, corresponding to the dimensions, is installed in the opening. Its position is adjusted using wooden wedges, which are driven into the gap between the frame and the walls.
- Only after the frame is precisely adjusted vertically is its hinge side secured with screws.
- Door hinges are hung on the canvas, and their second part is attached to the door jamb.
- Hang the canvas and adjust the position of the box with the sash until the structures assume a clearly vertical position and the sash opens easily.
- The canvas is removed and the second side of the box is fixed with screws.
- They install fittings on the canvas and the frame stand - a lock, for example, and hang the canvas on the hinges.
- Polyurethane foam is used to fill the gaps between the frame and the wall.
After installation, the product - UP TO 8/70, for example, can be painted along with the box in any color you like.
What is the best varnish to coat a door leaf?
Before you start painting an old door in a light or other shade, it is important to take into account that the painted layer of the door will definitely need to be opened with varnish so that the paint lasts longer and does not peel off. Typically, the choice of varnish will depend on the type of paint for the door
Most often they opt for acrylic varnish, which is suitable for painting any surface.
This type of varnish is quite durable, has a safe composition, gives the door leaf a characteristic shine and reliably protects the top layer from damage, abrasion and cracking.
As a rule, varnish is applied to the door after the last paint layer has been applied and completely dried. After the last layer has dried, it is necessary to apply a layer of acrylic varnish, which will help the paint adhere securely to the surface.
Is it possible to paint a veneer door?
Veneer is a very demanding material . You immediately need to decide whether to leave the solid wood or completely repaint the door in a different color.
First you need to cover up all existing unevenness with a special primer.
Veneered doors can be painted with polyurethane, water-based or glypthal paints.
Nitro paints are not used - they do not tolerate moisture, and your doors may become covered with dull spots. Water-based paints are the most suitable option in this case.
Wait until the primer is completely dry and start painting.
What to do if the door is made of laminated chipboard?
When preparing to paint a laminated product, you need to pay special attention to 2 points:
- Grinding. The surface should become slightly rough. To do this, it is treated with fine-grained sandpaper. Don't be too zealous and remove the film completely. If it is removed, the coloring agent will penetrate deeply into the slab and the product will swell.
- Priming. The use of a primer will significantly increase the level of adhesion of the paint and varnish and will allow you to achieve a durable coating.
How to paint MDF doors?
To paint such doors, you can safely use compositions containing varnish and tone in one ( Lakobeits, for example ).
This will help maintain the structure of the door, and at the same time it will have a pleasant appearance. The consistency of Lakobeits is liquid, so it penetrates deeply into the pores of MDF, filling them and forming a uniform, thin and moisture-repellent layer.
Conveniently, the tone and varnish are mixed together, so the door does not need to be tinted first and then varnished.
Since this door has a specific panel pattern, and when painting with a roller or spray gun it is very difficult to achieve uniform varnish coverage, painting should only be done by a professional .
No special skills are required for painting with a brush. You just need to be careful and immediately remove small smudges.
It is quite easy to prepare MDV doors for painting. You just need to thoroughly wipe the doors with a damp sponge or cloth so that there are no unnecessary particles on the surface.
We make soundproofing of interior doors with our own hands. More details.
A beautiful option for decorating doorways with decorative stone is written here.
If you have sliding doors, find out how to choose fittings for them.
Material Compatibility
It is not so easy to understand the modern variety of materials. Chemical compositions for the uninitiated person are a secret behind seven locks, and when buying a material to apply to old paint, many rely on luck, hoping that the old layer will not react in any way to contact with the new chemical. There are some recommendations according to which you should select the material depending on what the door is painted with.
Therefore, before you go for paint, you need to clarify what the canvas is painted with.
- Epoxy and polyurethane compounds contain aggressive solvents. Cyclohexanone or xylene are capable of destroying materials that are reversible polymers obtained by natural curing (nitrocellulose, vinyl, copolymer-vinyl chloride compounds). Simply put, epoxy or polyurethane paint will destroy the coating made with nitro paints.
- Epoxy and polyurethane materials are applied only over the same compositions or primers, maintaining drying intervals for each layer.
- Silicate compounds are generally not applied over any other types of paints.
- Alkyd paints are not aggressive and can be safely applied over any material.
- Copolymer-vinyl chloride compounds and compounds based on chlorine rubber are applied only over acrylic, epoxy, and silicate materials.
Painting paneled doors
Today, there are two most popular methods of painting paneled doors.
- One of them is to apply paint first to the door ends themselves. Next, you need to carefully clean the damaged areas of the panel and carefully apply a new layer of primer. After it has dried, you can safely apply paint, preferably in two layers.
- But the application of varnish or stain on these doors must be carried out strictly according to the manufacturer’s instructions. This method is mainly used for doors with a smooth surface.
- Another method is to tint the door panel. It should be used if the surface has a wood texture.
Any surface should be painted only with high-quality fabrics or brushes.
Features of painting over an old layer
At first glance, painting a door over an old layer seems like a trivial matter: just go ahead and paint it.
But in fact, to get a surface that is no worse in quality than factory paint, learn a few rules:
The surface of the door, regardless of its condition, must be carefully prepared. Against the background of the old paint, cracks and potholes are invisible, but after applying a new layer they will appear and ruin all your efforts. The right choice of material for painting. It’s not just a matter of proper selection of color, surface texture or the strength of the film formed
It is important to consider the compatibility of materials. Many paints are not compatible with each other, and if chosen incorrectly, the old coating may curl or bulge when it comes into contact with the new material. Decide on the right paint application technique
For doors with a complex structure, it is possible to obtain a smooth and neat surface with proper selection and combination of painting techniques and painting tools.
The last rule, common to all cases of working with paint, is to strictly follow the instructions for applying the selected paint material.
How to paint an iron door?
In this case, you will have to face a number of problems, because the iron door is capricious in terms of painting.
There are also big problems with choosing paint. You should not experiment with interior paints - they will not paint iron doors well.
A much greater effect in this regard will be from PF paint . Although its color scheme is too simple, it will not add any gloss or shine, but will almost completely paint over the door.
For painting, use a spray bottle - this will simplify the work.
Primed doors for painting
Perhaps the easiest way . The doors are almost completely ready for painting; all that remains is to prepare the necessary paint and tools.
Use a brush on uneven surfaces of the door pattern, and a roller on flat surfaces.
You need to be more careful with doors that have glass inserted into them. Pre-glue the glass edges with paper tape to prevent paint from getting on them.
You can learn about soundproofed metal entrance doors from this article.
Here we talk about the correct choice of door handles for interior doors.
And here is about how to repair them.
All information about doors is in this category - https://ru-remont.com/dveri
Typology of PVC doors according to GOST
In accordance with the standard, doors are divided as follows:
By purpose - external or internal. The latter, in turn, are divided into interior, entrance or plumbing units.
Depending on the internal filling of the door frame:
- glazed - a PVC door in which a double-glazed window or ordinary glass is installed;
- blind - door of opaque modification. It can be light or decorative.
Depending on the design:
- with one or more canvases;
- with a fixed or opening sash;
- with or without a threshold;
- with or without box.
Depending on the type of PVC profile.
Doors with glass inserts
Painting metal doors
If you want to improve the appearance of a metal door, you can paint it.
How to paint a metal door?
First you need to remember some rules .
First of all, before painting, you must thoroughly wipe the door with a sponge soaked in solvent or gasoline.
Welding seams can be removed with a metal brush or a special file. Next, the surface of the door must be coated with a primer, which slows down corrosion and serves as a binder for the paint to the surface.
The best paints for such a door are: pentaphthalic, enamel paint and acrylic enamel. Tools: special brush or spray can.
If you are going to paint a smooth door, then you need to divide the entire surface into small squares and start painting from the upper left corner. The paint must be applied in three layers . In the case where the surface is embossed, painting is carried out from the inside to the outside.
Recommendations and tips
To ensure that self-installation of interior doors does not end in failure, you should:
- Screw in all self-tapping screws only after drilling thin holes for them, otherwise the beam and canvas may crack;
- install the block strictly vertically (even if the slopes are crooked or at an angle);
- Properly dose polyurethane foam; a large amount of it can lead to distortion of the block;
- leave a gap of 10–15 mm between the canvas and the threshold to ensure natural ventilation.
Everything should be done carefully and without haste. Marking and cutting of wooden parts must be done only after two or three measurements. Removing an extra centimeter, much less adding it, won’t work here. You can clean and prepare the drainage pump for dirty water for winter in a couple of hours. In order to install the door block according to the rules, it will take at least a day.
On the one hand, it is necessary to carefully measure and prepare the walls, and on the other hand, do not forget about the time it takes for the polyurethane foam to harden. The latter not only fills voids, but is also an element of rigid fixation of the block in the opening, ensuring its resistance to external loads. There is no need to rush installation and neglect the rules.
Recommendations for door placement
If the opening is too high for the selected door, then you can close the empty space at the top using wooden blocks and drywall. On top they will be covered with wallpaper or other wall decor. If everything is done carefully, it will be difficult to distinguish the finish in this place.
Painting doors "Canadian"
These doors are best painted using a spray gun.
If this is not possible, then you can use a roller or brush. Now to the question “how to paint a Canadian door”?
As a rule, it is delivered immediately primed , but if you bought a different option, then it must be primed before painting.
If primer mixture is not available, use thinned paint. After priming, sand the surface thoroughly.
Next, you can carry out the painting itself.
It needs to be done in two or three layers when wet, of course, if you use a spray gun; and in another case, you need to wait until it dries.
Use alkyd enamel, as it does not fade in the sun and is quite durable.
As you can see, there are quite a lot of options for painting doors made of different materials. In this case, you need to be especially careful and follow all the above rules, and only then will you get an excellent result.
If you liked our article, look at the types of installation of suspended ceilings (an overview of all installation methods).
And for dessert: finishing the hallway with decorative stone. Follow this link.
Preparatory work
Painting furniture made of pine, which is a soft tree species, when done correctly, increases resistance to compressive loads and has high adhesion (cohesion of layers). The process must take place in a room with normal, regular temperature and humidity levels. Use personal protective equipment such as gloves, goggles, respirator
In order for the result to have a smooth surface without bubbles and streaks, it is important to complete the preparatory steps, namely:
- remove the fittings, cover glass and other inserts and areas that cannot be painted with masking tape;
- sanding the top layer is necessary for a uniform color, a surface without cracks and peeling, and hiding wood defects;
- cleaning of debris and dust, drying (if necessary), degreasing work areas;
- selection of tools, such as rollers and brushes with bristles of the required stiffness, a paint tray, and, if possible, a spray gun;
- selection of enamel (paint) by color, type of texture, performance characteristics;
- caulk cracks and joints of planes, apply a primer to provide a smooth surface for paintwork.
Removing paintwork
To give old furniture a new look, it is important to thoroughly clean the wooden surface of the previous layer. The fastest and easiest method for removing finish is to sand with a sander, or in areas with difficult geometry, use coarse sandpaper.
The modern market of finishing materials offers special flushing agents that are applied in a thick layer, left for a certain time, and removed with a spatula.
You can use a hair dryer to make the paint crack, peel off, and easily give in to the spatula. Control the pressing force of the working tool. Any method requires a certain skill in order to preserve the surface of the wood and prevent the appearance of chips and microcracks. The lower the grade of lumber, the thinner the layer being removed, the more labor-intensive the preparation process.
Painting of products
Painting solid wood furniture looks beautiful, can emphasize the structure of the wood, and have a dense, glossy, matte color finish. A varnish coating can be applied as a final layer. There are decorative and protective compositions for external and internal conditions, objects with high humidity
When working with a brush or roller, it is important to follow one direction of movement, apply the paint coating parallel to the fibers
Painting is carried out in one or two stages, requiring complete drying between each layer. If you work in a draft-free room, the drying process will go faster. For wooden surfaces, water-based, alkyd, and acrylic paints are often used. Depending on the composition, different indicators are provided for resistance to abrasion, fading, moisture, and mechanical damage.
How and what to paint a Canadian door
Now one of the budget door options is the Canadian door. It is not expensive compared to a wooden door, and it looks impressive. Many people install such doors in their apartments and houses. Yes, but they are sold in white colors, covered with white primer. Therefore, after installation, this door option must be painted. We will look further at how and what to paint a Canadian door with.
Considering that the Canadian door itself is not particularly durable, painting will not only give it a decent appearance, but also strengthen it. In addition, if such a door is not painted, then over time it will be scratched and covered with stains a tone darker than the coating itself, and in places where friction occurs the most, the base of the door will begin to show through. The door itself is tightly pressed cardboard, so it can be painted.
What paint is suitable for painting Canadian
Let's immediately divide the paints according to the type of structure: glossy, matte and semi-matte.
•A glossy coating will highlight all the unevenness and flaws of the door leaf, so when you have a choice, it’s better not to buy glossy paint.
•An excellent option for painting such doors would be a semi-matte paint texture. It has some shine, but at the same time it will not highlight all the irregularities. But when choosing, keep in mind that each manufacturer allows a different gloss. Some have more, while others have less.
•Matte paint is also well suited for painting Canadian paint; almost all flaws will be hidden under it, but not everyone likes it. Not many people want to see a frosted door in their home.
We select paint according to composition
If we answer the question in one sentence, how to paint a Canadian door, then let’s say that it would be suitable for this, any paint for wood. An excellent choice would be water-based and acrylic paint, which can be tinted. The oil coating on such a door does not look very nice. It is possible to use varnish, but it must be matte.
Canadian door painting options
•We paint the door and door frame with water-based latex or acrylic paint, simply applying it to the surface. The door frame and trim are primed in advance. After painting, the texture of the door and frame will look the same.
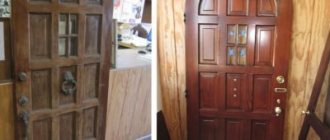
•An oil stain is applied to the door leaf, after some time the excess stain is removed with a linen rag. Where more stain remains, a wood grain will emerge, reminiscent of natural wood in appearance. After the stain has dried, the door leaf is varnished. The door frame and trim are treated with the same stain and varnished. After this process, the Canadian door looks the same as a natural wood door.
Pre-treatment of the door before painting
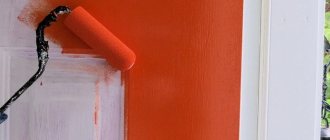
Basically, Canadian doors do not require additional processing. It is enough to clean them from dust and dirt, and after that you can start painting. Even small scratches will be smoothed out under the paint coating and will not be noticeable. When there are large flaws on the surface, these places are painted over with a layer of paint, and after it has dried, they are cleaned with fine sandpaper, comparing the edges. After this, the door leaf is painted over with a roller. And the relief areas are painted with a brush. If the paint is sparse, then two layers of coating should be applied.
How to paint a Canadian door
For painting you can use a brush, roller or spray gun. If the door is painted in the installed state, it will not be possible to paint it with a spray gun. Therefore, you will have to use a brush and roller. Painting a Canadian door is quite simple and anyone can do such work. Do not forget that defective areas should be painted over and sanded before the main painting.
Bottom line
Now you know how to paint a Canadian door and whether it can be done. If you have not heard about such interior doors, then pay attention to them. Canadian can be an excellent budget option for renovations in your apartment or house. These doors look quite decent, and if desired, they can be made to look like natural wooden doors. In addition, by painting all the raised areas with a different color of paint, you can completely transform the door leaf.
Repairing small dents and large holes
If the doors are very old or have been subjected to impacts that have left holes and dents on the surface, then they need to be restored. The damage is filled with special wax or putty, which subsequently hardens. To work you need:
- hard furniture wax, matched to match the color;
- soft wax;
- retouching felt-tip pen;
- soldering iron or special gas wax melter;
- lint-free microfiber cloth;
- fixing varnish.
The order of restoration work:
- Trim the edges of the damage along the contour, trimming them.
- Fill the dent with hard wax, melt it with a soldering iron and pour it into the recess. Wait until it hardens, remove excess with a knife to level the wax with the surface.
- Retouch the color with soft wax and a thin felt-tip pen.
- Secure the result with varnish.
It is not necessary to retouch the defect to match the color of the surface if the restored area is planned to be sealed or painted in the future.
If the hole is of impressive size, then wood putty is used instead of hard wax.
For through holes in a hollow door leaf, the restoration process is as follows:
- Trim the edges of the pothole, giving the edge a smooth shape.
- Fill the hole with soft paper around the edges - a kind of foam limiter, which is filled in at the next stage.
- Blow polyurethane foam into the hole.
- After waiting for hardening, cut off the excess.
- Putty the surface of the foam and the door, leveling it with a spatula.
- Clean the surface with sandpaper.
- Primed, painted.
How and with what to paint Canadian (mazonirt) doors
Among the many questions about Masonite doors, also called Canadian doors, the most common question is about their coloring. In most cases, Canadian doors are supplied and sold in white, so over time, dark areas inevitably appear that require painting. In addition to dark spots, various kinds of scratches also appear on Canadian doors, and abrasions appear in the corners, through which the base of the door appears. All these defects do not give respectability and sooner or later the understanding comes that it is time to get rid of them.
Canadian doors belong to the budget class of doors and have their own advantages and disadvantages, among which the low strength of the outer coating comes first. What to expect from textured MDF, which is essentially pressed cardboard? But it is precisely this coating that makes painting “Canadian” paint accessible to everyone - even the most untrained people will be able to produce quite high-quality painting. Let's figure out how to do this.
The main disadvantages of veneer
There is no material that does not have at least one drawback. Veneer is no exception.
There are few of them, but you can’t forget about the disadvantages:
- If veneer is fixed to the canvas using hot pressing, then formaldehyde is present in the binding materials. In significant quantities it is toxic to humans. In order not to cause harm to your health, you need to choose veneer doors only from trusted manufacturers with certificates confirming the safety of the product.
- Veneer tends to fade when exposed to direct sunlight, which is why it will lose its decorative effect over time.
- Veneered doors can only be used as interior doors, always in heated rooms. This is due to the fact that the coating does not tolerate sudden temperature fluctuations. Veneer is contraindicated in high humidity and condensation.
- Sometimes they try to sell synthetic veneer under the guise of natural. The materials are not much different in appearance for the average consumer.
In order not to spoil the veneer, you need to properly care for it. Do not use abrasive cleaning compounds. The rag should be thoroughly wrung out before wiping the door. To add shine and prevent the attraction of dust, veneer can be rubbed with wax-based polishes.
Veneer doors are an excellent combination of cost and quality. Due to the variety of colors and textures, such products will decorate any room with any interior. In order for veneer doors to last longer, you need to properly care for them and avoid exposure to high humidity and direct sunlight.
This is interesting: Installation of a telescopic box - let's analyze it in detail
What paint to paint Canadian doors
The budget segment of doors implies low build quality. We are not talking about the quality of gluing, the materials used, or the environment - in our case, the evenness of the door leaf and the evenness of the frame joints, which are hidden under MDF, come to the fore. Both of them are “lame”.
All paints are divided into glossy, semi-gloss and matte. Glossy, shiny paint highlights all surface irregularities and defects. And even a seemingly completely smooth surface can, after applying glossy paint or varnish, take on a not entirely expected appearance. In the case of Canadian doors, the joints of the door frame and other irregularities that were not noticeable before will definitely appear. From all of the above, the inevitable conclusion follows:
When painting Canadian doors, it is NOT advisable to use GLOSSY PAINT
The optimal result can be achieved with semi-gloss paint with a slight sheen, but different manufacturers have different gloss levels and this point must be taken into account. Matte paint will generally hide any unevenness, but many people don’t like the matte surface - it all depends on personal preference.
Let's move on - what type of paint is suitable for painting Canadian doors? Masonite doors can be painted with any wood paint. Waterproof emulsion and acrylic-based paints give excellent results. You can add dye to them and get the desired shade. I've seen doors painted with oil paint - to be honest, they don't look very good, although this is a subjective opinion. And once, a batch of veneered “Canadian doors” coated with a glossy shiny varnish was delivered to the door shop where the author of these lines worked at one time. They sold with difficulty - as you understand, all the irregularities and joints were emphasized. Therefore, if you decide to use varnish, then you need to use matte. This varnish costs, however, more than glossy.
If you were expecting to hear specific names of paints, then go ahead - there are many good reviews on the Internet about the use of Pinotex paint. This is an expensive brand paint and we can say with full confidence that all paints of this level will give good results. Whether it’s worth shelling out money for such paints is up to you to decide. But, believe me, sometimes this is not necessary - Canadian doors can be painted with less expensive paint, the one that is available in your region - just talk to the sellers and listen to their advice. The coverage of the paint should be taken into account - it varies from manufacturer to manufacturer and if you use paint with poor coverage, you may need to paint in two layers, which will increase costs.
Varnish selection
There are several types of paints and varnishes that are used when varnishing doors.
- Alkyd. They include solvents that give the wood a yellowish tone and are resistant to moisture. To improve drying ability, increase moisture resistance and strength, so-called hardeners are often added to the composition. The drying time for a surface coated with such paints and varnishes is approximately a day.
- Acrylic. Manufactured on a water basis. Odorless and non-toxic. To increase strength, hardeners can be added to the varnish composition, since without it the composition does not have good strength characteristics.
- Nitrovarnishes. The main advantage is very fast drying. The basis of this varnish is solvents. The disadvantage is increased toxicity, which often makes its use unjustified. The best method of application is a spray gun.
- Polyurethane coatings are durable. Polyurethane gives a dark tint, so the surface of the door needs to be primed.
There are other varieties that can be used when varnishing a door. However, the ones listed above are considered the most common.
Note! There is a pattern: the more toxic the varnish, the higher its consumer properties. Alkyd varnishes are more resistant to moisture, so it is recommended to use them in rooms with high humidity (for example, a bathroom)
Alkyd varnishes are more resistant to moisture, so it is recommended to use them in rooms with high humidity (for example, a bathroom)
Do Canadian doors need to be treated?
“Canadian” do not require special treatment before painting. If there are no significant defects, painting can begin immediately, after first cleaning the door from dust and dirt - standard requirements for any painting. It is advisable to try to apply a test coat of paint on a small area and make sure that everything is fine, the color and gloss suit you.
If the doors contain small scratches, then in 90 percent they are perfectly hidden under a layer of paint and are masked by the texture of the door trim. If the scratch protrudes above the surface of the door, then you can paint it over, wait for the paint to dry, go over it with sandpaper, leveling the edges with the surface of the door, and only then do a full painting. Nothing new, in general, also standard actions.
Nuances of preparing a varnished door
A door coated with varnish should be prepared for painting in the same way as one painted with paint. If, when painting an unpainted product, the step of removing the top coating from the working surface can be skipped, then in the case of a varnished door, this preparation stage is one of the most important.
The old varnish must be completely removed, otherwise the subsequent application of the coloring composition will not achieve an even and durable coating. The previous layer can be removed, as mentioned earlier, using a grinding machine, coarse sandpaper, a hair dryer or a paint thinner.