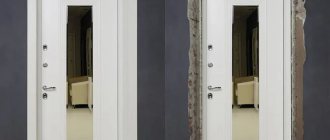
The product is intended to decorate the opening that was formed after the door was installed. They completely decorate the door slopes.
Extensions to the front door are wooden slats that increase the width of the frame if it is smaller than the doorway.
There are several types of planks. It is worth finding out about their characteristics in advance in order to correctly select and carry out cladding of the entrance opening. The installation technology is not complicated. Anyone can master it.
Are they really necessary?
The question of how much trim is needed for doors is largely individual, but often the planks help correct uneven walls and discrepancies between the parameters of the opening and the frame. The cladding allows you to harmoniously combine the entrance door frame with the trim.
The building element is intended for the design of deep slopes. Thanks to them, the design looks complete. It fits harmoniously into the overall interior and complements the design of the apartment.
Extensions for entrance doors are made in the same color, if possible from the same material as the furniture in the corridor. This nuance plays an important role in the design of a hallway or terrace.
Pros and cons of using
The main advantage of using cladding is that door panels help to increase the coverage area of the door frame. In addition, the elements are used for the design of entrance openings and doors. With their help, possible unevenness of slopes is masked. The big advantage is that you can make and install an element of the entrance door group yourself.
Among the disadvantages of the design, one can highlight the fact that if the accessory is made from low-quality and inexpensive raw materials, then its service life will be short.
The most common budget cladding option is MDF slats. Since finishing is done on entrance doors, where there are temperature changes and dampness depending on weather changes, the material loses its strength over time and becomes deformed.
The main difference between the slats is the raw material from which they are made and the width of the slats themselves.
Entrance door trims have different designs and, accordingly, characteristics. They are divided into 4 types.
Standard without edge
Standard entrance cladding is also called simple addition. This board has raw edges, so the joints must be covered with platbands. During installation, the planks are connected to each other using additional fasteners.
Simple extensions and trim on the front door are considered short-lived, as water vapor can penetrate into them.
Standard with edge
The additional board for the front door of this type has processed edges, which also improves its quality. Moisture penetrates less into such a structure, due to which its service life increases.
Telescopic
The telescopic door trim has an unusual design. It allows installation without additional fasteners.
The panels are easily and reliably joined together using connecting grooves and a tongue; these are the easiest elements to install.
Combined
This front door trim is the most practical and easy to install. Extensions that include platbands in their design are called combined. They do not require major fasteners; all you need to do is adjust the planks to the correct length and secure their grooves.
Classification of extras
To understand how to properly install extensions on entrance doors, you need to understand their design and the types of this device.
They are part of the door frame, thanks to which the door is connected to the platbands; with their help, you can close the wall in the opening. Very often the thickness of the walls is greater than the box itself , then you need to use strips, attach them to the box, thereby compensating for the missing material.
Most often, these devices are made from materials such as:
- MDF;
- metal;
- tree.
These elements are also divided into the following types:
- simple without edge - the simplest option is in the form of a straight plank, the edges of which are not processed. In the future, the cuts will be hidden by the platbands, but if the humidity is unstable, this may negatively affect their service life;
- simple, equipped with an edge - in this case, all edges of the planks are covered with a protective edge, which prevents moisture from entering the material itself. The structural elements must ideally fit the dimensions of the front door frame, otherwise the covering will have to be cut off;
- telescopic - the most comfortable, with processed edges, which are processed for a tongue-and-groove connection with the frame and trim. The width can be adjusted due to the fact that the element is able to extend to the desired distance.
Advantages of MDF panels
MDF is a wood-fiber material, a medium-density board, which is used for cladding doors, both on the inside and on the outside. Used to close iron passages, metal or to line steel doors. In addition, the material can be used to finish fire doors (FDM).
Types of MDF panels
The advantages of MDF panels are presented in the table:
| Advantage: | Characteristic: |
| Large selection of panels: | There are many different types of MDF panels on sale, with different surface textures and different colors. There is MDF, which imitates natural material, due to which you can get a very beautiful and elegant look at an affordable price. |
| Long service life: | Wood fibrous material lasts for a very long time and does not lose its characteristics. MDF is not subject to deformation from loads, tolerates direct sunlight well, and is also not afraid of temperatures. If we compare MDF panels and leatherette, there are more advantages, because the material does not tear, and is visually no worse; its characteristics are almost like wood. |
| Safe material: | MDF panels do not contain toxic or other substances that can harm human health. |
| Basic care: | To clean the MDF surface, it will be enough to wipe the panels with a damp cloth from time to time. In this case, there is no need to use special means. A slab made from such raw materials does not absorb unpleasant odors. |
| Easy to install: | Installation of MDF panels can be done with your own hands, without the help or call of specialists. All you need is a basic tool and some accuracy. |
| Insulation properties: | This covering has thermal insulation and sound insulation, in addition, if desired, you can lay another layer of insulation. |
| Low cost: | Of course, the price of MDF panels varies, it all depends on the manufacturer and type, but, in general, such raw materials are inexpensive. |
Another advantage is that panel slopes can also be made without much difficulty, which will complement the overall appearance of the doorway.
DIY slope for the front door made of MDF panels (video)
How to install platbands with your own hands
There are 2 ways to install such cladding: oblique joining of planks at 45º and direct joining of planks at 90º. In addition, there are serious differences in the installation of wooden (MDF) trim and plastic products, but let’s talk about everything one by one.
Method No. 1. Installation with cutting corners
This installation method is suitable for both flat or semicircular planks, and for curly trims. The oblique cut fits organically into the overall interior of the door and this cladding looks great.
Whatever method you choose, work begins with trimming the edges of the planks; in other words, you need to cut off a few millimeters from each edge. If you have a miter saw, you can cut it in batches, all at once.
Polyurethane foam is usually blown around the perimeter of the door frame, so you need to carefully cut it off; here it is more convenient to use a removable blade from a mounting knife.
We start marking with the strip that will be installed on the side of the door hinges. A couple of millimeters are left between the bar and the canopies so that when opening the hinges do not rub against the casing.
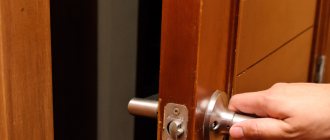
Important: the trims are attached after the doors are installed, and the finishing of the walls, ceilings and floors is completed, but before the baseboards are installed. The planks should rest on the floor, not on the baseboard.
The mark is placed on the lower edge of the future cut. All other strips are marked similarly. After marking, do not forget to number all the parts.
If you have a miter saw, you need to rotate the tool table at 45º, attach the bar to the stop and cut.
If there is no trim, then 45º can be marked with a square and pencil. To do this, draw a transverse line from the previously marked point.
Dismantling
Removal of platbands is usually required when cash is replaced. There is no need to worry about their safety, but the work is done carefully. Taking an ax with a sharp blade and a hammer in their hands, they begin to dismantle:
- To remove the trim carefully, the interior door is placed in an open position. Positioned in the doorway, the tip of the ax is inserted in the upper corner between the bar and the frame.
- The hammer is used to hit the butt of the ax until the blade plunges under the cash.
- By pressing the handle on the ax, the bar is separated from the box. The further procedure consists of similar actions. They use an ax in a circle until the dismantling of the platbands is completed completely.
The procedure must be carried out carefully so that no dents are left on the door frame. Instead of an axe, homemade sharpened strips of durable metal or other similar devices are suitable
Methods for installing extensions
Two methods are practiced. The choice of an acceptable one depends on the specifics of the room, the material of the wall and its condition.
Gluing the extensions
The simplest technology that does not require much time to implement. But it has significant disadvantages.
- The extensions have the correct geometry. Consequently, the surface on which they are attached must be as level as possible and not have differences in the height of individual sections, and this is not always possible or extremely difficult to achieve. Various techniques are used to eliminate minor panel distortions. But in this case, the manual cladding of the entrance opening becomes dramatically more complicated, and its strength decreases.
- Gluing the extensions eliminates the possibility of insulation and sound insulation. How important this is, you will have to determine for yourself.
Advice. For minor wall defects, it is advisable to use polyurethane foam as an adhesive. It will fill all the recesses, and after installing the extensions, it will ensure the evenness of the cladding and the reliability of its fixation. The large consumption of the product pays off in that finishing the entrance opening will not take much time, and the hallway will be free of dust and dirt.
How to install platbands on metal entrance doors
Installation of door frames can be carried out at an angle of 45º (separate elements are cut) or at an angle of 90º. Preliminary accurate measurements are taken and markings are applied. It must be remembered that the installation of platbands begins from the side where the hinges of the door structure are located.
How to install trim on the front door: main installation steps:
- Trimming side trims. Initially, measure the distance from the floor base to the top crossbar of the door structure. An additional 1 cm is added to this value. Appropriate marks are made on the platband, after which its edges are sawed off at an angle of 45º. A miter box is used for this. To prevent mismatches between the planks at the joining points, measurements are taken individually for each workpiece. This can be explained by possible distortions of the doorway.
- Fixation of platbands. The side strips are fixed initially from the bottom and in the center. They are fixed in the upper part after installing the lintel over the door structure (this stage of installing the trim is controversial - some people prefer to attach the top strip first, and then the side ones).
- Trimming the top lintel. This structural element is first placed under the allocated side strips, leveled, marked, and excess parts are sawed off. Only after this are all the planks secured.
Calculation of the number of elements
Before counting the additions on the door, it is worth getting acquainted with their sizes, which correspond to door production standards.
Width of standard extensions
Domestic manufacturers make doors of different widths and 2 meters high for serial production, while European sets have a height of 2.1 meters. The platbands, accordingly, have the same length.
In this case, the width of the door panels can vary from 50 to 550 mm, and the thickness is selected according to the thickness of the groove available at the end of the main frame. High-quality panels made from MDF, solid wood, laminate, usually have a thickness of 10 mm.
Many private houses, built without complying with standards and regulations for construction work, have doorways that are very wide and high, which makes it impossible to select a frame for the full width and height.
Installing an extension in the doorway
Next, we consider the question of how to calculate the addition for the door so that you do not have to buy it in addition during the work.
For this:
- The presence of a groove in the door frame is determined. During installation, the extension will go inside, which will reduce its size.
- The tape measure is installed at the extreme point of the door frame.
- The mark of the edge of the wall is located. Dimensions are checked in at least three places: on the left, on top and on the right of the opening.
- The largest value is taken as the basis.
For example, for a partition with a width of 250 mm, and a door frame with a width of 75 mm, the extension must be set to a width of 175 mm. A standard additional strip is suitable with a width of 200 mm. And during installation, the excess can be sawed off.
If the wall width is very large, it is better to use inlaid additions with a special connecting lock to connect the elements.
To better understand how to measure a doorway, it is better to watch the video in this article.
Installing trim on a metal entrance door
Simple and telescopic elements are mounted in different ways.
Installing a trim on a metal entrance door is usually done using liquid nails, glue or screws. The wall surface must be thoroughly cleaned of dust and old coating. In this case, care should be taken to level the surface. Otherwise, gaps will remain between the part and the wall. When installing platbands on a metal entrance door using glue or liquid nails, the composition must be applied precisely and without excess. If the fixation involves other fasteners, there are special grooves in the platbands, which are closed with decorative overlays after installation.
Telescopic models are the most preferred. Installation of platbands on a metal entrance door can be carried out on a previously installed extension. This method of fixation allows you to perform the operation quickly and without much labor. The resulting result is of high quality and looks very advantageous.
Installation of accessories
Additional elements, while fulfilling a decorative role, are also needed as a basis for installing platbands. Therefore, it is necessary to ensure that the end of the additional strip is flush with the wall. This requires an accurate calculation, and it can only be done after installing the loot in its place.
After all measurements have been taken, the planks are adjusted to size. For telescopic elements, it is necessary to additionally take into account the depth of the groove. Then don’t forget to add these numbers to the measured width of the opening from the opening to the corner of the wall.
In order to install extensions on the entrance doors, there is no need to call a specialist. Do-it-yourself installation does not require specialized knowledge. Enough skills to work with tools such as an electric drill, screwdrivers and a hammer. You also need experience in applying polyurethane foam.
Self-tapping installation
The method is quite complicated, but suitable for those who value reliability and durability. You will need mastery of a drill. The result is justified by the fact that the service life of the structure will increase and it will not be afraid of any vibrations.
Preparatory work
Since the additions to the metal entrance door are not only decorative, but also serve as the basis for the further installation of platbands, they must be measured in such a way that the end of the plank is located in line with the wall. This activity should be performed after installing the box. To determine the dimensions of the lower and upper parts of the product, you need to place a ruler on the box perpendicular to the wall. For more accurate calculations, you can use a level or square. To measure the extension with a square, you need to place it in place, and attach a flat strip to the wall. The width of the extension will correspond to their intersection. After this you can cut the board. In this case, you first need to cut the workpieces to length, and then make width marks at the ends.
The key to successful installation of the structure is correct calculations
It is worth knowing that vertical measurements for the right and left extensions must be carried out separately.
It is better if the inner line of the vertical panel is measured along the door frame, and the outer line is measured directly in the opening.
By the way, earlier we told you how to make extensions for the front door yourself.
Installation on foam
The easiest way to install extensions on the front door is foam installation. Marking and sawing of all structural elements is carried out in advance. When performing work, the accessories are first installed in their place. Then wedges are used to ensure a tight fit to the box seats.
To prevent the product from deteriorating after installation and foaming, additional spacers or masking tape are installed. The space between the opening and the product is filled with sealant.
Installation on studs
To complete the procedure, you need to drill holes for the finishing nails. It is important that the holes for these nails are less than their length. The nails are installed with the sharp side outward, and their heads are removed with wire cutters. You can also use mounting timber to drive nails. Extensions on metal doors can be installed after all fasteners are in place.
Platbands on the front door
If the extensions are a continuation of the box, filling the slope of the opening, then its completion can be called the platband. There is also a large selection here.
Purpose and varieties
The immediate task facing such an element as the platband is to frame the doorway. These interior elements are decorated with them. Modern door frames can be divided into the following categories:
- flat;
- rounded;
- curly.
The first option allows docking in any form. But rounded and figured platbands can only be sawn at an angle of 45 degrees . In this case, it is necessary to have a special device called a miter box.
Curly trims are sawed at an angle of 45 degrees
In addition to the shape, platbands can be divided into:
- Monolithic;
- With built-in cable channel.
The use of monolithic elements can be considered a classic option for framing doorways. But cable channels began to be placed in platbands in order to “hide” excess wires from prying eyes. These structural elements are made of PVC and consist of two parts. One is attached to a wall or box, and the other serves as a decorative cover that covers the wires laid inside.
Methods for installing trim on the front door.
Platbands according to the method of fastening can be divided into:
- Invoices;
- Telescopic.
Overhead trims are installed using fasteners, and telescopic ones using a comb
The first method involves fastening the elements using nails driven through the body of the platband into a box or wall. Other types of fasteners can also be used, which will be hidden under the decorative element.
Telescopic platbands are installed using a special comb inserted into a groove on the extension or additional strip. In this case, you can use glue to firmly fix the part in its place.
Rules and nuances of choosing wooden cash registers
Most manufacturers produce complex door designs with ready-made frames, leaves and trim, which simplifies the process of selecting door strips. At the same time, the complete set does not always correspond to a given room or its design. In such cases, an individual approach is required, so when choosing cash, it is important to take into account a number of nuances.
The first and most important parameter is the size of the door trim. If there are significant defects around the perimeter of the box after installation, then you should give preference to wide planks that will completely cover the technical gaps and shortcomings in the installation of the box and wall decoration. However, it should be remembered that platbands wider than 100 mm will visually weigh down the structure and it will look ridiculous, so it is better to focus on standard sizes.
Narrow strips with a width of less than 64 mm should only be purchased for narrow doors or due to nuances in the layout, for example, when the opening is located close to a perpendicular wall or furniture.
The length of the strips is also important when choosing cashing. It is calculated based on the parameters of the door frame. The planks should be slightly longer than the length of the vertical elements. That is why most planks are made in a standard size of 220 cm.
The cashing material must match the structure, texture and color of the door leaf, which, in turn, must be combined with the baseboards and furniture. If you plan to run a cable over the door, then you need to purchase cable ducts that are located inside the cavity of the strips.
When choosing a wooden frame, you should give preference to quality materials
It is also necessary to take into account the type of room. The best choice for entrance doors is wooden strips with special treatment, or metal trims. Openings to the kitchen and bathroom can also be decorated with ceramic tiles, but this option will look harmonious if the room is lined with the same material.
Related article:
Replacing a door lock: causes of breakdowns and detailed instructions for eliminating them
Common causes of lock failures. Types of castles. Replacement of cylinder, lever and crossbar devices. Replacing the larva. Advice from professionals.
Installation of platbands
The last stage of decorating the opening with your own hands is the installation of platbands. In most cases, their installation is mandatory not only from an aesthetic point of view; platbands allow you to more reliably fix the extensions themselves on the wall.
In order to secure the trim you will need nails and glue. If you do not want to compromise the integrity of the coating, you can use telescopic options and polyurethane foam as a holding material.
Installation of platbands is the final stage of doorway design
You can install platbands of any type from the inside of the home. For MDF and wood, you can use nails; the attachment points are masked with special furniture stickers. A more preferable option is to use liquid nails; they need to be applied pointwise so that the excess does not come out from under the elements. Telescopic models are first connected to the extensions, and then attached directly to the wall itself.
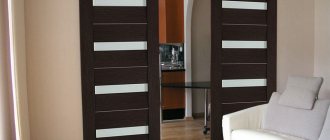
Extensions and trims are mandatory components not only for entrance doors, but also for interior doors. With their help, you can effortlessly bring the opening to perfect condition. It is important to select them in advance so that the shades and texture match the design of the canvas itself and the box.
Design Features
When planning how to sheathe the front door opening, it is useful to take into account the recommendations of the Guardian designers:
Decorative elements must be selected in the same style as the decorative panel.
You can choose the color of the decorative elements the same as the panel, or give preference to a shade that will highlight it.
The general style of the interior of the room may impose its own requirements on those elements that are placed on the inside of the door.
Non-standard openings require special attention. You can adjust certain elements to their size on the spot (trimming). But not every decor option will be possible if the size of the opening is too different from the standard.