Hello readers of my blog! Today we will talk about how to install a trim on the front door with your own hands. It would seem that this is not a tricky matter, but when you are faced with this problem, you have to think about how to do it correctly, what preparation to do, what materials to choose. Thus, I decided that this article would be useful to someone, and I am devoting my efforts to this topic. In it, I will answer a number of questions that will arise immediately before installing a trim on the front door with your own hands, and some even after that. This topic is quite broad, because before work, thorough preparation is necessary, but how to do this? And this is a separate topic. You can learn about all this in great detail in the article below.
Installation of MDF panels on the door
MDF door panels are increasingly used as a lining for armored or steel-reinforced door panels.
A simple addition helps to get rid of the overly gloomy and heavy appearance of the front door, retain heat, reduce noise and add positive emotions from attractive colors or a nice pattern on the canvas.
At the same time, its elegant appearance does not mean that the MDF panel cannot be strong and rigid enough.
Classification of MDF door panels
Most entrance doors with a metal leaf from well-known brands are equipped with decorative MDF panels of various designs, shapes and colors even at the manufacturing stage. It’s another matter if the entrance doors are made in a budget version or according to individual parameters. In this case, you will have to order the decorative panel from a workshop or make the decor yourself.
If you have experience in carpentry, milling slabs from pressed cellulose fiber mass, then it is quite possible to make a simple decorative panel - a door trim with your own hands.
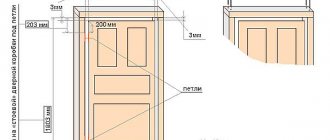
The only difficulty remains the correct measurement and precise adjustment of the panel to its place on the door leaf.
In this case, the door panel does not have to be located only on the outside of the entrance door. The entrance opening looks much more attractive if the back side is lined with MDF with milled and overlaid decor imitating wood carving.
Nuances of choosing overlays
Ready-made sets of overlays for car mirrors are offered in pairs. So if one of the linings is severely damaged, you should take care of the repair kit in advance. Considering the low cost of the pads, it is advisable to purchase two sets at once. However, most car owners, if such a problem arises, prefer installation of another type of these car accessories. In addition to simple covers for side mirrors, you can also find products with increased functionality (for example, with holes for connecting LED turn signals). The variety of shapes and sizes of overlays is huge, but this is not a positive factor in all cases, since you need to select only car accessories that are suitable for a specific model. If you are a big fan of a sporty driving style, relief linings with a predominance of longitudinal-horizontal lines will look perfect on your car.
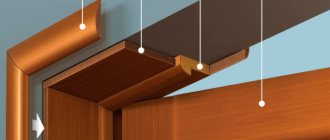
Veneered panels
Most often, individual parts of the overlay panel, panel, frame, overlay decor are made from different parts of MDF, covered with veneer and assembled into a single fabric, after which they are press-dried for 2-3 hours.
Veneered MDF panels are rightly considered the most expressive, but are used only for internal doors of private houses and entrance door blocks of apartments.
Laminated panels
Previously, edging, panels and decorative carving elements are cut out on the surface of an MDF board 8-15 mm thick using a milling cutter. The heated PVC film is rolled onto the surface of the cellulose fiber board and slowly cooled.
Instead of film, textured paper impregnated with melamine resin can be used. To achieve high quality gluing, the MDF panel is additionally “sealed” with a stamp.
Thanks to the polymer, the panel practically does not absorb moisture, which means that the MDF will not warp or peel off from the metal base even in conditions of severe waterlogging.
Overlay panels with laminate are cheaper and more practical to use; any dirt and dust can be removed from the MDF surface by regular wet cleaning.
Anti-vandal panels
Resistance to acts of vandalism is considered one of the most important characteristics for apartment entrance doors.
Ordinary PVC film and resin-impregnated paper cannot withstand cuts, impacts, or pinpoint exposure to high temperatures.
For harsh operating conditions, the doors are protected with panels with anti-vandal coating. Typically, a thin layer of epoxy compound with a polyurethane coating is baked onto the MDF panel under a press. The result is a slightly less expressive surface, but is heat-resistant and hard enough to withstand arson or a blow from a sharp object.
As a rule, heat-resistant hardened coatings give a slightly dark background compared to conventional varnishes and impregnations, so the pattern and texture of the panel surface is chosen either in a single color or in a darker texture, for example, like aged oak or hornbeam.
Of course, the anti-vandal version of MDF cannot compete in strength and stability with metal or impact-resistant plastic, but the panel’s capabilities are quite sufficient to protect against the attacks of small hooligans.
Today, some furniture companies offer their own version of anti-vandal lining for the front door.
The base of the slab is made of MDF impregnated with fire retardants, and the front part is covered with a wooden panel 3-5 mm thick made of real bog oak.
After treating the surface with ship's varnish, such a lining can compete with Chinese metal in strength and stability. At the very least, cutting or drilling stained oak will not be as easy as steel or painted galvanized sheet.
How much does it cost to make a door beautiful?
The easiest way to add nice decor to your doors is to order production in a specialized workshop or purchase a ready-made product for a specific type of door leaf.
The cheapest option with textured paper will cost 4500-5000 rubles. Such a board has a significant advantage - MDF with a paper finish can be installed with your own hands within a few hours without any problems.
The most popular MDF options with vinyl film, plastic and heat-strengthened veneer cost from 12-20 thousand rubles, depending on the size of the door and the complexity of the work.
Office models - MDF with a painted surface or a more expensive veneer finish with a wooden panel are estimated at 16-25 thousand rubles.
In any company, prices are given for the product only for one side of the door and without the cost of additional elements. Measurement services and delivery of goods are usually provided free of charge.
Differences between universal moldings and those made for a specific model
Rubber bands for car sills can be installed on any model, but car factories produce personalized moldings. Distinctive features:
- the presence of reflective stripes;
- stickers with the name of the plant, car model;
- diode inserts;
- chrome strips on plastic models;
- engraved lettering or car signs.
Even universal parts have differences. Some moldings have a corrugated surface or patterns, while other parts are distinguished by a combination of several materials. Car enthusiasts order personalized stickers or door sill protection with elements that highlight them.
Standard linings are not distinguished by bright details; they are made of metal, rubber or plastic and are almost invisible on the door rim.
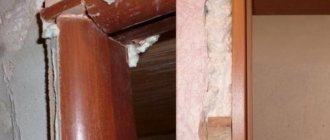
MDF panels for entrance door slopes
Simultaneously with the installation of the decorative overlay, the apartment owners also have to redo the slopes of the doorway. If a decorative MDF board is installed together with a door, problems with slopes, as a rule, do not arise.
The size of the overhang of the door frame along the line of joining with the slope plane is sufficient so that when the doors are fully opened, the MDF overlay does not touch the walls of the doorway.
If the decorative panel has to be installed much later, then the side slopes have to be redone at the same time. In this case, part of the plaster is removed from the sides of the doorway so that when opened, the panel does not rest against the sloped MDF.
Even if you plan to install the MDF overlay on the door yourself, it is best to buy additional trim and slopes complete with the panel in the same color and texture.
Covering the front door with MDF panels
Screw mounting is used primarily for doors that use complex internal deadbolt locks.
Most often, the loss of a key or failure of the secret, the breakage of the lock cylinder leads to the need to partially dismantle the front lining of the lock.
In this case, the decorative MDF trim is easily removed and returned to its place after repair; the holes for the heads are closed with plastic plugs.
With adhesive fastening, things are more complicated, so MDF is glued only to armored doors with internal installation of locking mechanisms or to simple and light wooden panels.
Door stickers
The easiest and cheapest way to update metal doors is to use vinyl stickers. No experience is required to use the stickers; even a schoolchild can do the job.
Modern stickers are resistant to ultraviolet radiation and moisture. They can be easily removed and re-glued to another place. Moreover, after removing the sticker, there will be no traces left on the door.
DIY MDF panel installation
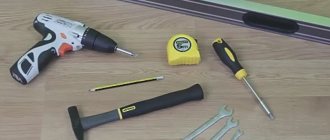
The first step is to disassemble the door, remove the handles, peephole, armor plates, remove everything that interferes with the tight contact of the MDF board with the surface of the door leaf.
The plane of the door is cleaned with emery cloth to impart artificial roughness and improve the adhesion of the adhesive mass to the surface of the door.
Next, a primer layer of glue is applied to the door leaf with a brush, and after 20-25 minutes the bulk of the adhesive mass is laid out.
The decorative overlay is placed on the canvas and carefully pressed with clamps in the upper part of the structure.
After final alignment, clamps are installed around the entire perimeter of the door and lining. After about 40-60 minutes, the fasteners can be removed, after which holes are cut for the well of the lock, peephole and handles. The thickness of the lining rarely exceeds 16 m, so it makes no sense to change handles and lock cylinders.
MDF panels for doors today are considered to be the best way to design a door leaf. Pressed cellulose board turns out to be much more practical and convenient than simple painting, vinyl wrapping or faux leather upholstery. A slight increase in the weight of the structure has virtually no effect on the operation of the hinges and pretend mechanisms.
Repairing front door handles: what usually breaks
First, let's understand one simple thing - almost all entrance doors are equipped with two types of handles. These are either push handles, which also serve to control the lock latch, or stationary ones, whose task is only to assist a person in opening doors.
With the latter, things are quite simple, and the essence of their breakdown comes down solely to mechanical damage - such handles, as a rule, are not repaired, but simply replaced with new ones. There is simply nothing to repair in them, since in most cases they are a single piece.
Another thing is the lever handles; in most cases they are the ones that cause the main trouble. There are not so many options for their breakdowns - only four can be distinguished from the main ones.
When the handle falls off, but its part that provides fastening to the door leaf remains in place.
The problem can be solved simply, within 10-15 minutes - in most cases, such an accident indicates that you purchased a low-quality product.
The inner square in the handle breaks and the latch stops opening. This only happens if the manufacturer uses a material called “silumin” to make the door handle, which itself is fragile - it simply bursts under constant loads.
The latch does not open due to wear or sinking of the outer square connecting the handles on both sides and directly turning the latch mechanism. The square wears out extremely rarely; we can say that such cases are isolated.
As a rule, the latch stops opening only when this square is obviously short in length - this is a defect of the installer or his careless attitude to the matter. In such situations, the square eventually moves towards one of the handles, and the other handle, abandoned by it, stops opening the latch.
Such a breakdown is easily determined - as you already understand, the handle works on one side of the door leaf, but not on the other.
Repairing the front door handle with such a breakdown is very simple. The handle does not return to its original position after pressing it. There is only one reason here and it lies in the spiral spring - it either burst or simply flew out of its place. Although repairing such a malfunction is simple, you will still have to tinker.
There are other types of breakdowns, but they are all interconnected with those described above, so it makes no sense to consider them. Having understood and learned to eliminate the main ones, you can easily cope with the rest.
The most commonly used materials for finishing the inside of the door
The methods listed above allow you to realize any designer’s idea, provided the following materials are available:
- Natural wood of valuable species - oak, walnut, beech, and ash.
Natural wood paneling
- Boards made of natural coniferous materials - pine, cedar.
Pine paneling
- Genuine leather for carriage screed.
Covering with genuine leather
- Leatherette for soft upholstery.
Leatherette upholstery
- Ready-made MDF panels.
MDF panel in assortment
- Chipboard or OSB sheets, moisture-resistant plywood.
OSB sheets for the door
- Laminated film.
Film sticker
- Nitro paints, alkyd, acrylic, hammer, oil or other paints and varnishes.
Dyed canvas
- Carpeting, laminate and other materials used as floor finishing.
Laminate as a finishing material
Large factories that supply doors of modular dimensions, or on individual orders from premises owners, usually use the technology of constructing MDF panels with high-quality lamination. Modern materials in this category are characterized by increased wear resistance, durability, and are resistant to mechanical damage and temperature changes.
Factory for the production of entrance doors
How to properly disassemble a door handle: description of the process
If you have all the necessary tools, disassembling the front door handle is not so difficult - if, of course, you know what to do, then it will take no more than five minutes. This process looks like this:
At the bottom of the handle, closer to the door leaf, there is a small screw with a groove for a hex key.
The first thing to do is unscrew it - but not completely, because the screw is small and if it falls out, it can easily get lost.
Next we screw together the decorative trim covering the main fastener of the handle. It is screwed counterclockwise - this is done by hand, without using keys.
By removing the decorative trim (it is removed through the handle), you gain access to the fasteners - as a rule, these are either small self-tapping screws or screw ties. They unscrew almost the same way - take a screwdriver and unscrew the fasteners.
Now we simply remove the handles from the square and, as they say, that’s the end of it - the handle is dismantled.
If we talk about handles for entrance doors, made in the form of one large overlay (such handles are used on Chinese doors), then they are removed a little differently. On the inside of the door (at the top and bottom of the trim) you will see a couple of screws - unscrew them and simply remove the handle along with the wide trim. It should be noted that by unscrewing two screws on one side of the door leaf, you can remove the handle from both sides at the same time.
As you can see, everything is quite simple, and if you perform such an operation once, in the future the question of how to remove the handle from the front door will no longer arise.
By the way, having mastered this simple operation, the question of how to replace the front door handle will also automatically be resolved. After removing the old one, a new handle is installed in its place in the reverse order of disassembly. The only nuance that arises here is the selection of a handle of a similar design.
Products by topic
- Choose …
View
Aluminum embedded profile “Confident STEP” 50 mm
653 ₽ – 1450 ₽
- Choose …
View
Aluminum embedded profile “SafeStep” 43 mm
420 ₽ – 841 ₽
- Choose …
View
Aluminum embedded profile “ALPB” 32 mm
609 ₽ – 754 ₽
- Choose …
View
Rubber embedded profile “Safe STEP” 30 mm
348 ₽ – 377 ₽
- Add to cart
View
Self-adhesive facing strip 29 mm
218 ₽
- Choose …
View
Aluminum strip with one rubber insert 46 mm
180 ₽ – 594 ₽
- Choose …
View
Aluminum corner with one rubber insert 42 mm
193 ₽ – 616 ₽
- Choose …
View
Aluminum strip with two rubber inserts 70 mm
277 ₽ – 945 ₽
- Choose …
View
Aluminum corner with two rubber inserts 70 mm
288 ₽ – 972 ₽
- Choose …
View
Aluminum strip with three rubber inserts 100 mm
408 ₽ – 1368 ₽
- Choose …
View
Aluminum corner with three rubber inserts 98 mm
456 ₽ – 1512 ₽
- Choose …
View
Aluminum strip with five rubber inserts 162 mm
960 ₽ – 3132 ₽
How to fix the front door handle: main types of breakdowns
So, we have decided on the types of accidents that occur. We also dealt with the question of how to disassemble the front door handle, now it’s time to tackle the issue of how to fix the damage. Let's start in order.
The handle fell off, but its base remained in place. As mentioned above, this is a clear sign that the retaining ring has fallen out or burst.
Putting it back is quite simple, but you will have to tinker. The question of how to repair the front door handle in this situation is solved in the following way - first, remove the remaining part of the handle from the door leaf. There should also be a retaining ring there.
If it is normal (and this is unlikely), then we simply connect the two parts of the handle and install the locking ring in place, after which we mount the handle itself on the door. Almost always you have to purchase a new retaining ring - if it is bent or even broken, you will have to purchase a new one.
The inner square in the handle broke. Often, manufacturers save money and make the most important part of the door handle from fragile silumin - if it bursts, then there is nothing else left to do but completely change the door handles.
We go to the market and, now wise with experience, purchase a high-quality steel handle for entrance doors.
The handle works, but the latch does not open. We already said above that this happens due to the shift of the square - it is simply short. It is for this reason that you will need to remove one of the handles (on either side of the door), remove the short square and put a normal one in its place, and then return everything to its place.
The markets sell long squares that are suitable for door leaves of any width - however, you will have to adjust them to the required size yourself. This is not difficult, especially if you have a grinder or at least a hand hacksaw on hand.
The handle does not return to its original position. The reason is that the coil spring has burst or jumped off.
It is restored in almost the same way as installing a locking ring - the handle is removed, the spring on it is replaced, which is pressed with a washer, and it, in turn, is fixed with the same locking ring. Everything would be fine if it were possible to purchase this spring on the market.
Unfortunately, this is not possible, and repairing such a simple problem in most cases comes down to completely replacing the door handle of the front door.
In general, repairing front door handles is a simple matter and quite accessible to almost every person who knows how to use basic tools.
Finally, I’ll tell you a way that will help you figure out what to do. You can understand how to properly repair anything at all only when you study the design of the device and its operating principle. What you need to do first of all with the door handle is to disassemble it and understand what is in its design and what it is intended for.
How to install a plastic entrance door with your own hands
We do not recommend making a threshold under the door yourself; it is better to buy a plastic door with a ready-made threshold. This way you will experience significantly less difficulties during subsequent adjustments;
Many people advise, before inserting the door, to drive small nails into the walls on which it will rest for ease of alignment. We do not recommend doing this, so as not to waste the walls with unnecessary materials.
Just place the door frame in the opening, place 2 wedges on each side of the perimeter and then check the level when the door is fixed and does not fall. In places of deviations, either add pads or reduce existing ones;
When the door is fixed and all sides (horizontal, vertical and vertical in section) have been checked, we proceed to “drilling” holes for attaching the frame.
It is advisable that the manufacturer create these holes, but if they are not there, then measure the same distance from the top and bottom of the box (about 20-30 cm), and also find the center.
At the top of the frame and in the threshold, also measure 20 cm from the edges. At all marked points, make holes with a diameter of about 1 cm. Then insert dowels into the holes; We screw the bolts into the dowels, starting from the hinge side. Screw in not all the way (about 2/3 of the bolt length).
When all the bolts are screwed in, re-check the vertical and horizontal along the perimeter of the box, as well as the vertical in the section;
The main thing is that the frame stands vertically in section (that is, when you look at the frame from the inside). And the perimeter vertical and horizontal can always be adjusted with wedges;
When the door is level, tighten the bolts to the end and check the verticals and horizontals again, just in case;
We put the door on the hinges and check the movement and pressure. The door should open completely and press evenly against the frame.
If not everything goes smoothly, you need to adjust the plastic door.
Also check all locks and handles for functionality; If the door does not need adjustment, then foam the space between the door frame and the opening, after moistening it with water. It is advisable to remove the wedges after the foam has hardened for several hours and foam the resulting gaps. The door must be closed and not opened for about a day.
How to adjust a plastic entrance door
As a rule, a plastic door needs to be adjusted if it is either warped or does not fit well. If a plastic door is difficult to close, this may be a consequence of either sagging of the sash (due to loosening of the hinges) or deviation of the clamp from the vertical.
If the sash (the door itself) sags, then you need to adjust the hinges. More precisely, you need to tighten the screw from the bottom of the hinges that supports the sash at the desired level. Then the door will be completely pressed against the frame.
If the door does not press tightly in some part of the frame, then you need to adjust the vertical pressure.
To do this, you need to remove the decorative plastic covers from the hinges and adjust the screws that look inside the door. If the sash does not press well at the top, then you need to tighten the screws on the top part more tightly.
And vice versa. You may also need to unscrew the screws a little. In general, manufacturers make the mechanisms for fastening and adjusting plastic doors in the same way.
It is also possible that the door does not press well, for example, at the bottom because at the top it is loosely screwed to the hinge mount and is pressed first at the top, not allowing the bottom part to reach the end. You can either loosen the screws at the bottom or tighten them at the top.
If the plastic door is skewed to the side, you just need to move it towards its hinge in the part where it is skewed, adjusting the position of the screws. The screws that are screwed into the door need to be moved towards the door by a division or a few millimeters.
Door trims
Decorative finishing of entrance doors can be carried out in various ways - for these purposes, all kinds of structural paints, and wooden slats are used, and, if we are talking about covering the canvas on the inside, even laminate and other similar materials.
This type of door finishing is a complex process, the final result of which largely depends on the hand of the craftsman.
Door trims are another matter; they are a solid decorative element that can quickly decorate a door, and the end result depends little on the craftsman.
Installation of overlays
Such products are usually sold on a self-adhesive basis, so installing decorative elements should not cause difficulties:
- First of all, you need to thoroughly rinse and degrease the thresholds.
- Wait until the surface is dry and wipe it with a soft cloth to remove any remaining dust.
- Remove the protective film from the trim and stick it to the threshold. In this case, you need to press firmly on all parts of the element and make sure that no air forms under the pad.
It is recommended to perform all manipulations at a temperature not lower than +18 degrees. If it is cold indoors or outdoors, then after gluing the product, it is recommended to use a hairdryer.
Healthy! When installing elements with backlighting, you must first connect the wiring to the dashboard (connect and solder the wiring) and check that all lighting devices are working properly. Only after this should you glue the linings themselves.
In order for the products to last longer, it is better to use specialized glue. Double-sided tape or self-adhesive backing is not as reliable.
Door trims: types and their features
All decorative overlays on doors can differ solely in two ways - in appearance and the material from which they are made. If everything is more or less clear with the appearance, then it is worth understanding in more detail the materials that determine the quality of these products, their service life and, to some extent, their appearance. Let's look at the main materials that are used to make the so-called door linings.
Wooden door trims. Several types of overlays can be produced from this material, which are determined by the use of one or another method of decorating the wood. In this regard, this type of product can be divided into varnished, painted, veneered or laminate overlays.
Depending on this decorative layer, not only the appearance, but also some characteristics of the door linings change. For example, veneer does not withstand the effects of high humidity quite well - it is better not to use such linings on the entrance doors of a private house.
They are great for an apartment, but not for private buildings, the entrance doors of which have direct contact with the street.
Laminated wooden door trims have exactly the same characteristics, only to a slightly lesser extent. In general, painted or varnished door cards are more suitable for private sector doors - over time, such protection will have to be restored, but this is better than simply throwing it away, as happens with laminated or veneered overlays. Although they can be restored, it will require more effort and money.
In principle, this is practically the same option as wooden overlays - the difference lies in their price and, naturally, in technical characteristics.
It should be understood that plywood itself is a derivative of wood - in fact, it is thin veneer glued together in layers, which, under the influence of external factors, begins to delaminate, no matter what moisture-resistant qualities the manufacturers endow this material with.
I have nothing against it, but it is better not to use door cards made of plywood on entrance doors that are in direct contact with the street.
This is an option for an apartment and, as in the previous case, it can be covered with decorative veneer, lamination film, varnish or paint, which may or may not preserve the wood texture.
MDF door trims. In some ways, this material (MDF) can be called a wood derivative - it is made from fine wood dust, joined together by modern polymer compounds, thanks to which MDF becomes less susceptible to moisture. But these polymers, like the sawdust themselves, cannot fully withstand moisture without additional protection, which is the outer layer of the laminate.
The latter is quite thin, and such protection, as you understand, is not very reliable - the slightest scratch leads to damage to the MDF card. But with careful handling of such products, they can withstand outdoor operating conditions very well (if they do not have direct contact with water and are installed under a canopy), but still the most optimal area for their use is an apartment.
Plastic door trim. Let's be honest - this is exactly what will serve in outdoor conditions (even despite direct contact with water) for a long time until it gets old.
Plastic is also good because it does not have a decorative layer - or rather, it does exist, but it is embedded directly in the plastic itself and is not exposed to environmental factors.
It should be understood that there are very, very many different plastics, and the service life of the card fully depends on them. Let's just say that cheap plastic fades in the sun and is easily scratched, but if we talk about expensive plastic made using modifiers, then these shortcomings are not observed in it.
Now think and choose what to install, synthetic or natural material. And we move on and move on to studying the technology of installing an overlay on a metal door.
What is a car door arch trim?
This part of the vehicle is not protected from the effects of an aggressive external environment. Universal thresholds on cars act as a safety fragment. They can cover minor damage to the body part and additionally protect the interior from precipitation. Automotive stores offer many different types of linings, but regardless of the type, they perform a number of the same functions:
- improve the appearance of the vehicle;
- change visual sections, body geometry;
- hide small dents, chips, scratches;
- protect from moisture, debris, dirt, sand.
Rubber or silicone linings provide additional protection against metal corrosion. It is important to install these elements correctly, otherwise the element may cause the destruction of steel parts.
How to install a door trim yourself
When approaching the issue of installing overlays on entrance doors, the first thing you need to understand is that there are two types of door cards - internal and external.
The differences between them are only in size and installation method. You will understand why the installation differs a little later, since we will examine not just the installation of one card, but a full-fledged door trim technology using these products. To make it easier to understand this technology, let’s present it in the form of instructions.
To begin with, we remove all the fittings from the doors, including the lock. Let's start with the inner trim on the front doors and apply glue to the card.
It plays a supporting role and serves as a kind of insurance - I don’t think I’ll tell anyone the secret that using two types of fasteners at once ensures a more reliable installation of something.
We place the card on the door leaf, position it and fix it with four clamps, placing soft rags under them so as not to damage the lining.
Now we drill holes in the metal from the outside of the door leaf (in principle, they can be drilled earlier, even before installing the card). We place the holes in vertical rows - four rows of five pieces each.
After we are done with them, we screw long wood screws through the holes directly into the card - their length must be carefully calculated so that they do not come out from the front side of the lining.
We remove the clamp and transfer them to the card from the outside of the door according to the slots and installation holes in the metal.
Now it’s up to the outer cover - the principle of its installation is almost the same, the only difference is in the places where the screws are installed.
They are screwed in around the perimeter of the card, in the place where the sheet of iron protrudes beyond the frame of the door leaf. Installation of self-tapping screws around the perimeter of the door leaf is done in increments of 200-250mm - here everything depends on the weight of the product itself. Subsequently, the screw heads are closed with a sealing gasket, which prevents air from penetrating between the leaf and the door frame.
As you can see, door linings are installed simply enough to do without specialists. All you need for this is the appropriate tools and devices, knowledge of the principle of installing door cards and a clear head.
Well, now it's time to finish the article. All the material I wanted to share has been reviewed. I hope it will be useful to you, and you will use it if you need to install a trim on the front door with your own hands. Improve your own practical skills and gain new knowledge, they say: “It’s never too late to learn!” That's all, thank you for your attention, successful and easy repair!
Types of overlays
Car door sills are subject to high loads, which is why they are made of durable polymers and alloys. Steel moldings can be of any shade, so it’s easy to match them to the color of the body. Plastic ones will suit a modest wallet.
Chrome plated
Withstand maximum wear and shine, these trims are suitable for SUVs with clearly defined sills. They can also be installed on other models if it matches the chosen style.
Made from fiberglass and plastic
Polymer car door sills can be hard or soft. The common feature is a relief pattern, but the latter are distinguished by their elasticity. Plastic can take a strong blow, it is inexpensive, and if necessary, it is easy to replace a damaged element.
Backlit
Modern moldings with LEDs are made of steel, and the insert - LED backlighting - is made of wear-resistant polymer. To power such a threshold, you need to connect it to the on-board network.
Universal moldings are suitable for cars of different brands, but personalized ones have advantageous differences:
- reflective stripes;
- chrome elements or brand name;
- engraving.
If you want to achieve a certain effect, these points should be taken into account when choosing a specific solution.