Quite often we are faced with the problem of lack of free space in rooms. We can solve this situation in apartments by installing sliding doors.
Already now, when planning an apartment, we always take into account our space and try to save space when implementing interior design ideas. You can install a sliding door or sliding door yourself, without even involving expensive specialists.
RECOMMENDED ON THE TOPIC
- Do-it-yourself parquet scraping
- Installation of sliding interior doors
Maybe you still need to install a swing door? Read about installing doors yourself.
So, we will talk about how to install such a door, what they are like and what you will need for this.
Materials and tools
You will need the following tools:
- tape measure, ruler, square and pencil;
- jigsaw or circular saw;
- screwdriver;
- drill;
- drills of different diameters for wood and concrete;
- self-tapping screws;
- roller mechanisms;
- construction plumb and level;
- milling machine;
- sandpaper or sander;
- chisel and hammer.
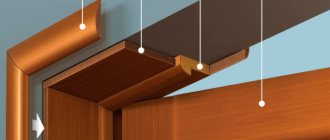
Canvases can be made from the following materials:
- plain or laminated chipboard;
- MDF;
- strained glass;
- solid wood;
- combination of several materials.
The weight of the structure depends on the material of manufacture. To install sliding doors with your own hands, you need to select mechanisms based on this indicator. The material for the door leaf is selected based on the owner’s budget and the functional purpose of the door.
Selection of accessories
In order to install sliding roller doors with your own hands, you will need to buy special fittings for them. The same locks and handles for them will not be the same as for ordinary door leaves. Thus, the handles for sliding doors are recessed into the leaf. This structure was made so that the canvas could easily move to the side and then drive into its niche. And the lock is designed so that the latching occurs vertically and not horizontally.
If you buy a ready-made sliding door, it often comes with a set of fittings. But very often, when installing a structure with your own hands, you have to buy additional handles, locks and other devices separately. Be very careful when choosing these elements so as not to make a mistake.
How to make sliding doors with your own hands?
To make glass partitions, you need skills to work with this material. If they are missing, you should contact a professional. To work with glass you need special tools that are expensive.
It is necessary to consider how to assemble a sliding door made of wood. This material is easy to process, stronger and more reliable, has better sound insulation, frame products weigh less than solid wood, and panels can be made if desired.
Design Features
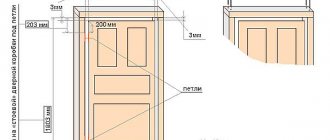
Before starting work, you should draw up a diagram or drawing of the structure and indicate all the parameters. The design of sliding doors can have one or more leaves depending on the size of the opening. You can make a solid canvas or with panels of various materials. Depending on the weight of the structure, the door can be suspended or on roller mechanisms.
Sometimes a product is installed that slides deep into the wall. To do this, dismantle part of the partition and make a niche from plasterboard.
Preparatory work
Before making a sliding door with your own hands, you should prepare the material. Boards or bars must be processed with a plane and sanded with sandpaper or a sander. You should also prepare a shield if you plan to have a hollow door inside. It is worth deciding in advance on the method of attaching the boards. Common connections are:
- half a tree;
- tongue and groove
Measurements and markings
When making a door on rollers with your own hands, you must take into account that the door leaf should be several centimeters larger than the opening on each side. If the passage does not exceed 80 cm in width, then a single-leaf door is made. When the opening width exceeds 1 m, 2 panels are made. All dimensions are transferred to beams or boards.
Manufacturing
To make frame sliding doors with your own hands, you need to make a frame. Pre-prepared beams are cut according to the drawing. If the structure includes panels, recesses are made in the inner part of the frame and lintels using a milling machine into which the inserts will be mounted.
The joints of boards or beams are coated with wood glue or PVA. Wood should be treated with an antiseptic to protect the material from rotting and the harmful effects of insects. Additionally, the structure is coated with fire retardants, which prevent the wood from quickly igniting.
To make a sliding door mechanism with your own hands, you will need:
- upper and lower guides along which the canvas will move;
- a wooden beam to which the top rail is attached;
- rollers and fastenings corresponding to the weight of the structure;
- clamps that prevent the web from coming out of the rails.
Paneled
First, a frame is made from solid boards or laminated veneer lumber. The cross members and the mullion are made from this material. On the inside, the timber is processed with a milling cutter, making a groove for the panels. If you make a shaped cut, you don’t have to use glazing beads. When it is planned to install the latter, the surface near the groove is made smooth.
Vertical and horizontal elements are connected to each other using a tongue and groove. The tenon is cut out in the transverse parts. It should fit into the groove up to half the width of the beam. The recess is adjusted to the dimensions of the tenon so that the parts fit tightly into each other.
The panels can be:
- glass;
- plywood;
- chipboard;
- thin boards, etc.
Inserts can be smooth or have a textured surface. In the second case, plywood or boards are used, which are processed with a milling machine. The edges of the product should be 1-2 mm smaller than the groove in the frame. This will allow the panels to move freely. When all the elements are ready, they are treated with antiseptics.
Assemble the entire structure on the table to avoid distortions. The joints are coated with glue. First, all the crossbars and panels are inserted into one longitudinal beam, then the second vertical beam is glued. The beads are installed after assembling the entire structure and are fixed with glue.
Panel
This structure can be solid, small-hollow or hollow. The first type consists of a frame and boards that are laid between the vertical elements. Hollow and shallow-hollow contain transverse elements that give rigidity to the entire structure.
First, a frame is made according to the size of the canvas. To do this, cut a beam with a section of 30x120 mm according to the drawing. The elements are connected to each other by fastening in half a tree or in a paw. The surfaces are coated with glue and clamped with clamps. It is necessary to ensure that the internal angles are 90°.
After the glue has dried, the joints are additionally secured with dowels. To do this, make holes of 7-9 mm and insert dowels pre-treated with glue into them. Then one side of the frame should be covered. The material chosen is plywood or fiberboard, which is cut to the size of the frame. The facing material is fixed with glue.
If the structure is solid, then the frame is filled with timber, pieces of MDF or other low-quality wood. All parts are glued together and additionally glued to the facing sheet. In the frame of hollow or hollow-core doors, cross members are installed, which are fixed with glue to the sidewalls and facing material. The second sheet is installed only after the glue has completely dried.
How to install a sliding door?
The installation of sliding doors may vary depending on the design features. Installation involves the following steps:
- doorway preparation;
- fastening guide elements;
- installation of the canvas;
- insertion of handles.
To ensure proper installation, you must follow the sliding door installation instructions exactly.
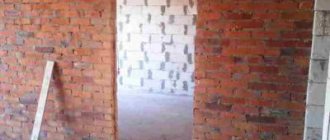
Preparing the interior opening
First of all, you need to prepare the opening. If the canvas moves along the wall, you should remove all protruding elements, level the surface, and fill the cracks. The canvas should move without obstacles. Since the design does not provide for luting, the walls are plastered. The opening should be as even and smooth as possible.
If you plan to install a sliding door inside the partition, you should dismantle part of the wall. To do this, increase the opening by the width of the door leaf, and then install a plasterboard niche. The partition should fit into the wall so that only a small part of the canvas remains, on which the handle is located.
Installation of guides
If the canvas is light, it is hung only on the upper guide. If the sash is made of wood and has a lot of weight, it must be fixed in the lower runners. Since the sliding door can be installed on 1 or 2 rails, it is necessary to consider both options.
To mount the upper guide, a canvas is placed against the opening. Measure the position of the door in the closed and open state. From the resulting line, step back 7 cm and draw a horizontal line. It determines the position of the beam on which the rail is attached.
The length of the beam must match the guide. It is placed so that the middle is exactly above the upper corner of the opening on the side of the open door. Then the guide profile is attached.
The upper runners are fixed using self-tapping screws. Then the carriage with rollers is assembled and inserted inside the guides. It is necessary to check whether the mechanism moves freely in the rail. Stoppers are installed along the edges of the guides to prevent the canvas from jumping out of the track.
The bottom groove is made using a milling machine. It should be 1-2 mm larger than the guide knife, and the depth should be 18 mm. If the design does not provide for a bottom rail, then a flag guide stopper is installed on the floor. It should fit into the groove in the door leaf. Its task is to limit the movement of the canvas and eliminate transverse vibrations of the sash from below.
Installation of the canvas
Installation of sliding doors is carried out after installing all the guides. First you need to install the mounting brackets. They are fixed with self-tapping screws to the upper end of the door, after making holes using a thin drill. The canvas is hung on the upper rail, and then inserted into the lower guide. The carriages with rollers are connected to the brackets so that the nut and washer are on top. Then the fasteners are tightened with a wrench. After checking the movement along the upper guide, the blade can be installed in the lower groove.
Accessories
Installation of sliding interior doors will be incomplete without installing fittings. For such structures, mortise handles and special locks are used. Locking devices are rarely installed, since the level of protection of such mechanisms is low. To make handles you will need:
- Ruler and pencil;
- milling machine;
- chisel and hammer;
- screws and a screwdriver.
First, mark the position of the handles. They are placed at waist level at a distance of 4-5 cm from the vertical edge of the canvas. The handles are applied to the door and outlined with a pencil. A recess is made to fit the thickness of the fittings using a milling machine or chisel. You can also use a drill with a core drill of the required diameter. A hole should be made on the bottom and top sides of the handle. The wood between the recesses is removed with a chisel or router.
To install sliding doors with a mortise lock, you need to make a hole in the end of the door with a drill. A locking mechanism is installed in the groove and closed with a special strip. In this case, the handle is not a mortise one, but a bracket. A recess is made in the opening for the counter plate. If the lock is padlocked, it is screwed with self-tapping screws to the door leaf.
To prevent dust from entering the room, special brush seals are attached to the lower end of the canvas. If the partition design includes 2 doors, special seals are additionally installed at the ends of the adjacent panels.
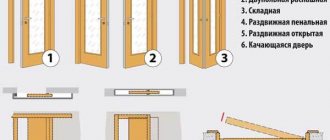
Types of sliding structures
The sliding type of door may differ in the method of rolling, the number of leaves, the location of the rollers, as well as the material of manufacture.
As for the opening method, the canvas can be moved either along the wall or hidden in a wall niche. The second option, as a rule, is thought out at the renovation stage, because the wall in which the canvas will be hidden must be thickened by making a pocket from plasterboard or a metal cassette.
Installing a sliding interior door along the wall does not require the installation of a special pocket, because the leaf moves along the wall, so it can be installed at any time.
Depending on the number of sashes, the structure can consist of one, two, three or four panels. The single-leaf design is considered the most compact and is installed in rooms with a small area. When opening, the door can move either to the right or to the left.
Structures with several doors move in different directions, but there are models in which one door remains stationary, and the second moves to the side.
Depending on the material used, the canvases can be made of wood, glass or chipboard. Combined models are also possible, for example, wood combined with glass. Installing a glass structure will make the room visually larger and goes well with another stylistic direction.
Saving Tips
Installation of sliding doors should be carried out on high-quality roller carriages. Despite the high cost of the mechanisms, they significantly save money in the future. Cheap rollers quickly break down with frequent use and need to be replaced. High-quality carriages will last a long time.
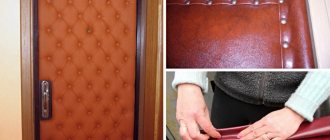
The cheapest way to make a door leaf is from plain or laminated chipboard or MDF. This material can be decorated to your taste. This can be done using varnish, paint, self-adhesive film, wallpaper or any other method.
For wooden doors, you should choose material that has been dried in special cabinets. Otherwise, the structure may become deformed in the first months of operation, and then the frame will have to be redone.
Caring for sliding structures
If sagging is noticed during the operation of the canvas, then adjustment may be required. To do this, you need to remove the top extension and find an adjusting screw on the roller, which rotates and thus corrects the sagging of the structure.
Periodically, it is necessary to clean the guides from debris and lubricate the rollers. If it is noticeable that they are already worn out, then completely replace them. It is prohibited to close the blades abruptly, because the rollers may fly out of the guide.
Thus, having studied all the intricacies of installing a sliding structure, you can do all the work yourself and save money on calling a specialist.