We make roller blinds for windows
Roller shutters on windows are a fairly common way to protect a room from light and prying eyes in the modern world. Not everyone knows about such devices and doubts their functionality. Industrial roller shutters are not cheap, and not everyone can afford them. But there are budget options made by yourself.
Design
The main part of roller shutters, which affects their aesthetics and functionality, is the canvas. Its surface is coated with a protective substance. The canvas is complemented by the following details:
- guides with contour filler;
- gearbox;
- remote control system;
- engine;
- drum;
- switches;
- smart protection system against incorrect or security-threatening commands;
- emergency unlocking system in case of power failure;
- handle for mechanical opening.
The design may have additional technical equipment according to the developed project.
Types of blinds
Blinds are light-protective devices that consist of vertical or horizontal slats (plates).
Currently, there are 12 types of roller blinds:
- Vertical - a fairly common type. They are easy to use, look beautiful, and can make a room more comfortable.
- Horizontal - are considered a kind of “old man” among all types of blinds, as they are very popular and have been used for a long time. They protect the room from light and can be installed on any windows.
- Pleated - they got their name from their appearance; they fold into an accordion. The best option for arches and openings of various shapes.
- Blinds for arches and bay windows. They are ideal for decorating windows and openings of non-standard shapes and sizes.
- Roller blinds - roller blinds. An excellent replacement for regular curtains and curtains. They are a fixed solid canvas, and when twisted, a roll is formed.
- Attic blinds - their design is designed to hold up and not sag at any angle.
- Inter-frame blinds - used for installation on old wooden windows. This design allows you to significantly save space by opening the window sashes one at a time. The adjustment system is brought out with a special flexible control.
- Multi-texture blinds are the most colorful and attractive type of product.
- Photoblinds are products with different patterns.
- Roman blinds are also classified as blinds and can be compared to pleated blinds. When folded, they form horizontal folds of fabric. Suitable for the interior of any room.
- Electric blinds will eliminate problems with closing and opening the mechanism on high windows. Just press a button.
- Protective blinds (roller blinds) - designed for outdoor use.
You may also be interested in: Self-installation of curtain rods
What are roller gates and why are they needed?
Before installing outdoor roller gates, you need to understand what they are. Garage doors of this type resemble a regular roller shutter, the leaf for which is made from an AG77 profile with a thickness of 14 and a width of 77 mm. These parameters allow you to close even very large openings without reducing the strength of the structure.
Advantages of a roller shutter entry group:
- environmental friendliness, lack of toxicity of raw materials;
- maximum preservation of usable space;
- minimal space occupancy of a compact design;
- durability of operation, due to the fact that the system is made of practical aluminum slats;
- the material easily withstands corrosion, is not afraid of moisture, negative natural factors;
- ease of maintenance of the entry system;
- high level of resistance to wind force, due to the presence of an end grip;
- complete opening of the opening, which allows you to easily drive inside in any car;
- variety of shades;
- the ability to create space for organizing a partial view of the surrounding space;
- creating different levels of illumination, organizing ventilation: the ability to order a system with a different number of holes, which allows daylight and air flows to pass inside. Equipping the structure with polycarbonate, transparent inserts
Fabric blinds
Blinds or roller blinds are gaining popularity. They are beautiful and practical. Their only drawback, like many other roller blinds, is their high cost. Not everyone can afford to buy or have such roller blinds made to order, especially for windows in all rooms. But it is possible to make fabric roller blinds for windows with your own hands. This is not a very complicated matter, and the cost is much cheaper. The design of such curtains is simple and clear.
The fabric for making blinds must be dense and intended specifically for such products. Regular and other curtain fabrics are not suitable for use in roller blinds - they complicate the normal functioning of the mechanism.
To make such a design yourself, you need to prepare the necessary material and tools:
- canvas;
- double-sided adhesive tape;
- fabric winding shaft;
- weight for fabric - bar (wood, plastic, aluminum);
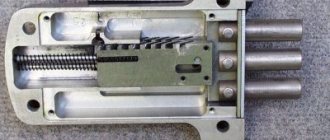
- The roller blind mechanism consists of a driving and driven element, a chain with a weight and a lock; the set may include additional brackets for lower fixation.
Disadvantages of roller shutter structures
When considering the issue of purchasing a roller shutter mechanism, the question inevitably arises about what possible disadvantages this type of gate may have compared to other varieties. Let's list what disadvantages they have:
- The need to treat products with antifreeze and compounds that protect products from rain. By the way, when icing occurs, the structure functions worse;
- The design of the lamella fabric is such that it will not be possible to install a gate in it. It is beneficial where a solid canvas is appropriate or where its presence will not strain the owner;
- They are not very resistant to burglary by ill-wishers compared to some other types of gates. However, this parameter is variable and depends on the type of lamellas and the control of the mechanism.
Assembly steps
First, you need to measure the window in order to properly sew the curtain fabric. You need to determine the height and width of the frame, do not forget about allowances of about 2 cm.
It is better to choose a dense material - cotton or. Before starting work, it must be washed, starched and ironed. Everything should happen on a flat surface. After this, the material will become denser and smoother, and will wrinkle less. The size of the material should be 2-3 mm narrower than the width of the shaft on each side. A strip is sewn into the bottom edge of the fabric. It should be even and the width of the curtain: this way the stretch will be better.
Now take the shaft. It can be plastic, wood, metal, aluminum. It is allowed to use the plumbing pipe left after the repair, or you can purchase a new one of not very large diameter. A tubular cornice would also work. The main thing is that it is round and does not have too thick walls. Double-sided tape is glued to the shaft along its entire length and the fabric is fixed. Instead of tape, special glue will do.
You may also be interested in: Day-night blinds - what are they made of and where are they used?
Now we insert the mechanisms into the shaft. They must match the hole. They must be firmly fixed. If the hole for the elements is too wide, then it is worth wrapping tape or insulating tape around it, which will increase the internal volume of the bracket. If the shaft is smaller, then you can carefully grind the mechanism down to the required size. It is important to remember that the brackets can only be reduced or increased by 5 mm, no more. In this case, the mechanism will work as efficiently as possible. The curtain is ready, all that remains is to fasten it correctly.
We make roller shutters on our own quickly and easily
Today everyone knows about roller shutters. Complex roller shutter systems provide maximum security for your home or office. And that is why they can often be found not only in residential buildings and apartments, but also in offices, enterprises, shopping centers and banks. But the most important thing is that you can make roller shutters with your own hands without any outside help.
To work, you will need to collect the necessary tools and materials, as well as order components for roller shutters. Installation can be carried out on any opening:
- window;
- doors;
- Garage Doors;
- showcases, etc.
If you want to make roller shutters yourself, you must first decide how the installation will be carried out. It can be overhead or built-in, external or internal. The most common is external, overhead installation, when the box is installed from the street side above the opening. It does not require preparatory work and can be completed after construction is completed.
Preparatory stage
Now you will need a construction slope and level. They check the horizontality of the wall above the opening and the verticality of the side walls. In case of unevenness, they should also be removed. You can use plaster or install special overlays. The latter will cost more, and may also slightly spoil the appearance of the structure. To reliably install roller shutters with your own hands, you need to check the quality of the slopes. They must be intact, without cracks or chips. Only in this case will the structure last a long time. If there are any defects, they should be eliminated before work begins.
- drill;
- drills for metal and stone;
- screwdriver;
- metal scissors;
- pliers;
- riveter;
- spanners;
- screwdrivers;
- hammer.
If you plan to install automation, you will need an indicator screwdriver and a multimeter. At the end of the work on installing homemade roller shutters, you will need sealant and a mounting gun to seal existing joints and cracks.
Roller blind
Do-it-yourself fabric roller blinds can be made in another way, without a purchased mechanism. This option assumes the presence of a winding shaft at the bottom of the product, and control will take place using a thick thread, rope or cord. What you need to prepare:
- wooden or aluminum strip;
- construction stapler or double-sided tape;
- pipe with a diameter of 2-5 cm;
- fabric cloth;
- cord;
- stationery clothespins (can be replaced with rings).
The upper part of the material must be attached with tape or a stapler to the bar (cornice), and do the same with the shaft. You can use special high-quality glue. But you shouldn’t overdo it with it: it will dry out and be visible through the fabric. To make the product look neat, the shaft must be completely wrapped in fabric. Therefore, it is better to make the product with a slight overlap in length. On the cornice at both edges, you need to retreat 10-15 cm and secure the fabric with clothespins, lower the ears down. Tie the cord in a knot at the back eye of the clothespin. Then pull it through the bottom of the curtain and thread it through the front ring. Do the same with the second ring.
If the roller blinds are wide enough, then a third cord in the middle will not be amiss. Now all the laces need to be pulled through the front eye of the outer clothespin. The length of the cords should not be less than 70 cm. Then you need to tie it in a knot and cut it. The cornice can be decorated with fabric or other materials.
The roller blind is ready. You can secure it with tape, adhesive tape or small self-tapping screws to the window frame. To raise the blinds, you need to pull the knot of strings tied together. And to fix the curtain in this state, clothespins will come in handy. The curtain is raised to the required height and the position is secured with a clothespin, while grasping the cords and the upper part of the curtain. You can also secure the cords using a hook installed next to the window.
You may also be interested: Application ideas and 50 photos of a blue sofa in the interior
What are the types of control systems?
Features of installing roller gates with your own hands require choosing one of the types of system control. It can be manual or automated. The latter option rotates on its own, and the first – with the help of electric current. Here it is possible to equip the device with an “automatic unlocking” function. It will be needed when there is a power outage.
The structure can be controlled in the following ways:
- Wall switch.
- Remote control.
- Connecting intelligent system devices (light, temperature, time sensors).
Paper blinds
A curtain made from wallpaper is interesting and budget-friendly. You can change it quite often, depending on your mood.
What you need to prepare:
- roulette;
- paper knife;
- long ruler;
- awl or hole punch;
- cord, rope or thick thread;
- retainer;
- double sided tape;
- bead;
- roll of wallpaper.
Assembly steps:
- First, measurements are taken, which are then applied to the canvas and the required piece of wallpaper is cut off. It should be noted that about 30-40 cm must be added to the actual length, since the accordion will take up some of the length. It would be more correct to make a significant reserve; you can always cut it off later. If the width of the wallpaper is not enough, then it is permissible to carefully glue 2 sheets of tape or glue together.
- Now the piece of paper needs to be folded like an accordion. The width of one fold can be 2-5 cm. We try the folded workpiece against the window and cut off the excess.
- You need to make holes along the center of the folds with a hole punch or an awl. A cord or thin rope is inserted into them. And they secure it on top with tape. The excess part of the rope is cut off.
- The upper zone of the blinds is covered with double-sided tape - this is a fastening. The bottom one is only half sealed. And then the halves are assembled and fixed with a fan.
- A retainer is placed on the lower end of the cord, and a bead is placed on the tip itself for beauty.
- Attach the blinds to the frame.
The cord can be replaced with a satin ribbon. Instead of one, you can stretch two, then the lower edge of the blinds will be straight.
How to choose a gate
Rolling gates are selected taking into account their intended purpose. They can be installed outside, inside or in the opening. For garage buildings, you need to choose double-walled foam-filled profiles. They have reliable sound insulation properties. A varnish coating applied to their surface protects the canvas from corrosion. Such profiles reduce heat loss and are suitable for garages.
Lightweight single-wall profiles are recommended for use in industrial premises where there is no connection to temperature stability. This type of rolls is inexpensive.
When choosing a roller gate, it is important to consider how it opens. If you plan to install automation, you must choose an electronic control system. Often, due to a lack of space, opening the entrance group using an electric drive becomes the only possible solution, for example, if the vault has an arched or even more complex shape. It is especially convenient to control opening and closing remotely using a remote control.
Installation of the structure
According to the diagram, on the surface of the wall or the upper part of the opening (for the built-in version), it is necessary to place marks for future fastenings, and drill holes in the box itself:
- overhead installation - on the back side of the box;
- built-in - at the top of the box.
Another hole must be made for the drive cable. At the next stage, the connection with the guides occurs. Next, you need to try on the box, check the marks and punch holes. Insert dowels into them, and a protective spring into the recess for the drive.
When installing the roller gate frame, you should carefully ensure that the notches and the corresponding holes are aligned, and that the structure itself is positioned strictly horizontally in relation to the floor level. Tighten the fasteners evenly to prevent misalignment in the future.
Control and automation, if provided, are installed strictly according to the instructions, observing all safety precautions. For these works, consultation with a professional is required.
At the last moment, the web is assembled, wound onto a shaft, and the edges are passed through the tires.
Installation ends with checking the operation of the entire structure. If everything is in order, plugs and gaps are inserted and sealed, and all technical seams are covered with polyurethane foam.
Preparation
Before installing rolling gates, measurements are taken and the method of fastening the structure is determined. Rolls can be installed at entrances with roofs or awnings. When located under the roof, they are placed above the gate. Any jumper is suitable for their installation. At the preparatory stage, openings and walls where the rolls are installed are inspected. The points for attaching the guides are marked.
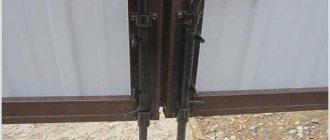
Installing guides
After the marking is completed, the guides are installed at the designated points. They must be connected to the shaft holder. After fixing the guides, the blade casing is mounted.
Shaft installation
The winding shaft holder is connected to the visor using screws. The shaft is aligned along the slope and secured with bolts. Then it is connected to the canvas using screws.
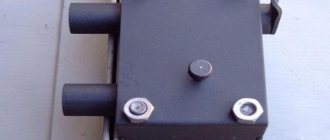
Installing the drive
After placing the chain in the drive mechanism, the winding shaft is installed. The connection of the drive to the control unit is made following the introduction of the emergency braking system. After installing the mounting belts, the rolled web is lifted up through the drive until the upper closing profile is connected to the grooves.
Types of profiles
The main materials for the manufacture of roller shutters are aluminum and steel. Aluminum profiles are lighter in weight, highly resistant to corrosion and are more expensive than steel ones. Steel lamellas must be protected from mechanical damage, because scratches on the coating lead to corrosion. Such a canvas has significant weight and requires the installation of a powerful engine. According to the manufacturing method, profiles are divided into two types:
With ventilated insertsroller strips that can be filled with polyurethane foam;
- extruded profiles with stiffeners, characterized by larger wall thickness.
Note! The type of profile affects the resistance to wind loads and burglary resistance; the maximum permissible width of the door depends on it. When installed in an unheated garage, roller shutters with vented or viewing inserts are used to provide natural light and ventilation.
Subtleties of choice
In order not to make mistakes when choosing a design that is suitable for you, it is important to decide on several points:
- What degree of protection do you need?
- Is there uninterruptible power supply?
- Which opening method is preferable - automatic or manual;
- Frequency of equipment use;
- Priority of operating comfort or cost.
The answer to any of these questions can greatly change the price of the structure. To save money and time, you can consult with professionals.
Typical mistakes
In order for the design to function for a long time and reliably, several nuances must be taken into account during operation. There are typical mistakes that novice installers often make:
- The guides are not level during installation. Deviation from a vertical or diagonal line may cause the blade to jam. Often such a nuisance occurs in the summer, at which time the metal heats up and because of this increases in volume;
- The box is not sealed, as a result moisture gets into it, which leads to corrosion of metal elements and a decrease in the service life of the mechanism. If it rains often, then it is advisable to place a seal between the base of the box and its lid;
- When closing the door leaf, it must cover the fastening bolts. Otherwise, it will be easy to unscrew them, and the protection of the structure will be minimal. If you encounter such a problem during installation, you will need to drill out the screw heads to make the job much more difficult for intruders. Of course, if you need to remove the roller shutter gates, you will also have to suffer a little to unscrew them.
Installation
If you have an engineering education and assembly skills, installing roller shutters in your garage is not difficult. For automation, the mandatory connection of a specialist is required.
There are three main installation methods that determine the position of the box and guides:
- invoice - the box and guides are attached to the outside of the garage;
- built-in - a niche for the roll is equipped in the upper part of the opening, guides along its vertical posts, of course, if the thickness of the facade wall allows;
- combined - the cover for the canvas is located immediately behind the opening, already inside the garage, the movement slats are also installed in the room, immediately behind the entrance.
There are also more complex options, for example, when the box is located inside the box and the guides are built-in. It all depends on the required degree of protection and the financial capabilities of the customer. Overhead installation is especially simple.
In addition to standard tools for such types of work, such as a hammer or drill, you will need: a hammer drill, a gun to make rivets, and a multimeter to connect an electric drive. Finishing involves the use of sealants - silicone and acrylic, for seams - polyurethane foam.
Strength classes
Roller shutters are divided into strength classes from P1 to P8 (GOST 52503-2005). Class is determined by the ability to withstand:
- influence of various instruments (not calculated for P1);
- shock load;
- static load.
To class P1
include foam-filled lamellas, the width of which is 3.7-4.5 cm.
Class P2
– foam-filled parts with a width of 4.5 cm, as well as extruded profiles.
To classes P3 and P4
only extruded products are included.
Classes P5 and higher
elements made of steel, as well as special extruded aluminum parts with a large cross-section, correspond.
A visual indicator is the time required to open (break into) blinds of different strength classes:
For private houses and objects that do not require increased protection against intrusion, class P1 roller shutters are usually used. Where a high level of security is required (banks, jewelry workshops and shops), profiles of a class not lower than P3 are used.
Anti-vandal roller shutters are made in a reinforced version:
- profiles of increased thickness and with additional stiffening ribs;
- guide bars with reinforced structure.
- The box with the shaft is additionally protected from opening.
- The castle is located in an inaccessible place.
Such roller shutters are equipped only with an electronic drive.
Required Tools
If you decide to assemble and install roller shutters yourself, then there is nothing difficult about it. To work, you will need the usual tools that almost every home craftsman has:
- hammer drill or powerful impact drill;
- drills for concrete;
- screwdriver with a set of bits;
- pliers;
- metal scissors;
- wire cutters;
- a set of keys;
- Screwdriver Set;
- building level;
- plumb lines or laser level;
- measuring instruments;
- marker;
- a multimeter, it is needed if the roller shutters have an automatic drive;
- ladder;
- mounting gun and sealant.
To install roller shutters you will need simple and accessible tools.