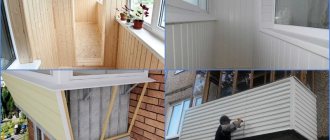
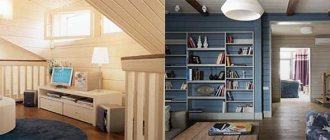
Lining will create a cozy atmosphere on a loggia or balcony. Lining is an excellent material that can elevate any room. Therefore, covering the loggia with clapboard will create an excellent corner that complements your apartment. The lining can be mounted either on the walls themselves or using lathing, which is the best option to help eliminate defects.
Lathing for lining on a balcony, how to make it correctly
Let's figure out what lathing for lining on a balcony is, why do it, what materials are used for this design, and also consider the order and progress of installation work.
Owners of apartments and private houses with a balcony or loggia often try to give it the status of a living space, insulate it by covering the walls and ceiling with PVC panels, clapboard or other materials. But for the sheathing to be successful, it is necessary to competently approach the installation of the sheathing.
If you have a question about how to properly make a lath on a balcony, then you should know that a lath, as such, is a structure made of slats, boards, bars, as well as metal profile elements fastened together. This is the so-called “skeleton”, or frame, onto which the sheathing material will subsequently be attached.
Material for lathing Why is lathing for lining necessary? Necessary materials and tools for work Lathing for lining - progress of work
Cladding technology
Impregnation for lining
After the walls and ceiling of the balcony have dried, you can begin the process of covering with lining. It includes several stages: installation of the sheathing, laying of the thermal insulation layer, fastening of the lining. Depending on the type of insulation, the sheathing is installed either first or on top of the heat-insulating layer. If roll insulation is used, the frame of the sheathing is stuffed on top, securing the insulation to the surface. When using slab materials, the sheathing is attached first, and insulation is laid between the posts. The second option is considered more reliable and easier to install.
To work you will need:
- building level and tape measure;
- timber 50x50 mm or aluminum profile;
- dowel-nails and self-tapping screws;
- drill;
- screwdriver;
- polyurethane foam;
- vapor barrier membrane;
- clamps for fixing the lining;
- hammer.
Step 1. Installation of the sheathing
Installation of sheathing
The corner posts are attached first: using a plumb line, a vertical marking is made in each corner and holes are drilled for dowels or anchors. Then the beams are placed, leveled and tightly screwed to the wall. The corner beams are attached to the ceiling in the same way. After this, intermediate frame beams are attached between the corner posts, which are placed either vertically or horizontally, depending on the direction of the cladding.
Installation of sheathing
Lathing for lining
The beams are connected to each other with self-tapping screws, and the pitch of the sheathing is 50 cm. Around the door and window opening, timber is additionally stuffed around the entire perimeter; it should fit snugly into the box and have no gaps. If there are noticeable unevenness on the walls or ceiling, place small wedges under the timber. The smoother the sheathing is, the easier it is to cover it with clapboard. Any deformations interfere with the fit of the wooden slats and make it difficult for them to adhere.
Step 2. Insulation of surfaces
Insulation
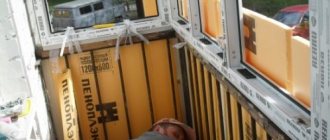
Mineral wool, polystyrene foam, and polyurethane foam boards are suitable for insulating a balcony. The most practical and convenient insulation is considered to be mineral wool with a foil coating. The slabs are cut so that their width is 2 cm larger than the dimensions of the frame cells, and then inserted between the beams. Start from the corner of the wall and gradually fill the entire sheathing. Next, the ceiling is insulated, making sure that the material does not sag between the bars. After laying the thermal insulation, check the surface for gaps.
How to insulate a balcony with penofol
Step 3. Attaching the vapor barrier
To get rid of condensation on the walls and ceiling of the balcony room, a vapor barrier film is attached over the insulating layer. It is convenient to do this with a construction stapler: by applying the film to the sheathing, it is fixed with staples in several places. Film pieces are always placed with an overlap of 10-15 cm, and the seam between them is taped. The vapor barrier is attached a little loosely; you cannot stretch the film between the beams.
Vapor barrier
Step 4. Covering the balcony
This stage is the most critical, because if fastened incorrectly, the locking system can easily be damaged and the boards will lie unevenly. First, they sheathe the ceiling: measure its width and cut the boards to size. The first rail is installed from the corner with the ridge towards the wall. Small nails are used for fastening - 3-4 per board.
Fastening the lining with nails
The next board is carefully inserted into the groove of the previous one, secured with nails and the locks are snapped into place. All the others are attached in exactly the same way, except the last two.
One of them is cut to width, the second has the tongue crest cut off by two thirds and rounded off. Now both boards are placed like a house, placing the cut strip against the wall, connecting the grooves and pressing lightly in the center. The boards should snap into place and click into place.
How to fasten the lining
Stages of fixing the lining
The walls also begin to be sheathed from the corner. To fasten the lining to the sheathing, it is recommended to use metal clamps. If the sheathing is made horizontally, the lining must be fastened vertically, and vice versa, boards are nailed to the vertical sheathing only horizontally. So, the first panel is leveled in the corner and fixed to the beam using a clamp.
We fasten the lining
Place the next board so that its tenon fits exactly into the groove of the already installed panel, check its level and snap the lock into place. Then everything is repeated in the same order.
We fasten the lining
When sheathing areas adjacent to the door and window frames, you should very accurately measure the parameters of the panels so as not to cut off too much. Large gaps are more difficult to close, and insufficiently cut panels will interfere with the installation of trims.
How to cover a balcony
When all the walls of the balcony are sheathed, you can proceed to the final stage: linings are mounted on the corners, trim and window sill are attached.
Lathing material
The choice of material is a very crucial moment. I don’t recommend saving on it, unless you are going to decorate the barn using improvised materials. In the future, the quality of the material prepared for the sheathing will affect the subsequent finishing, and will save you a lot of time.
- It is worth noting that if you are going to insulate a balcony or loggia, then it is not recommended to use metal for the sheathing, since it conducts cold better than wood, and a balcony with a metal sheathing will require additional use of heat-insulating material.
- But at the same time, metal is more durable than wood, and it is not afraid of temperature differences and changes in humidity in the balcony room, while a wooden structure can be “led”, and it will pull the entire wall with it.
If you still prefer wooden sheathing for the lining, then it would be a good idea to impregnate all the slats and pillar bars with some kind of protective impregnation for wood. It won’t get any worse (but for some reason many people neglect this step). Often, to install the sheathing, they take wooden slats and bars that remained unused during the previous renovation.
If there are none, then after calculating the required number, it makes sense to purchase them. Slats, like bars, the thinner the better in terms of saving internal space, but we must not forget about strength and reliability.
Size of slats and stand bars:
- stand bars 40x40, 40x50, 50x50
- slats 20x40, 20x50 and various small variations of these sizes
It should be understood that the dimensions of the material should be chosen taking into account your immediate conditions.
DIY installation
Self-laying of lining panels consists of several stages.
Preparation
The preparatory stage of installation includes:
- Removing old finishes, if any;
- A thorough examination of the surface for damage (cracks, chips, dents, etc.);
- If they are found, then at this stage of preparation they should be eliminated - by embroidering, plastering, puttying, concreted or using other methods of elimination - this depends on the material from which the balcony structure is constructed;
- The walls on which the lining will be located should be treated with a special antifungal compound;
It is advisable to purchase solutions that work in several directions of biological protection of surfaces at once, protecting them from many types and methods of sabotage.
Installation of sheathing and insulation
This installation step will be a little more difficult. It involves the installation of lathing and a thermal insulation system. It is also complicated by the fact that you first need to decide on the type of insulation. After all, the complexity of installation and arrangement of the sheathing depends on this. There are two technologies for insulating balconies:
- For the first, thermal insulators such as isolon, penofol and other foil materials of this category are suitable. If they act as insulation, then the sheathing needs to be strengthened over them;
- When choosing insulation, for example, polystyrene, mineral wool, the first step will be to lay not a heat insulator, but a sheathing.
Why is lathing under the lining necessary?
- to level the surface of a wall or ceiling vertically and horizontally, respectively
- The lining itself or other finishing material is attached directly to the sheathing
- In the gap that is formed thanks to the lathing between the outer (cold) wall of the balcony and the warm wall, you can place heat and sound insulation material, electrical wiring or other communications.
For those interested in how to attach the lining and the lining itself in general, read these articles. Everything is laid out sequentially and in detail here:
Installation highlights
Before you start installing the sheathing, you need to think through everything down to the smallest detail. They start with how it will look. There are two options here:
Balcony sheathing under the clapboard in the form of a grid is very rarely installed. This is only necessary if good ventilation is required.
It is necessary to consider the size of the thickness of the planks. In this case, you should take into account the degree of wall defects, as well as the method of insulation. The thickness of the guides also depends on the thickness of the insulation.
You should also correctly calculate the amount of material needed. To do this, you need to draw lines for attaching the planks on the surface, measure them and fold them. Let's get the total length of the strips used. To learn how to install the lathing using the example of a bathroom, watch this video:
Necessary materials and tools for work
Before proceeding with the actual installation of the sheathing on the balcony, you should prepare all the necessary tools and materials. If you decide to make the sheathing from wooden slats and bars and you still decide to treat the wood with some kind of impregnation, then give it time to dry completely.
To work you will need the following basic tools:
- building level
- construction foam
- pencil
- screwdriver
- dubles + self-tapping screws
- hammer drill with drill (6.8 or 10 mm)
- roulette
- different thickness of gasket
More information about the material
With modern lining installation technologies, three types of material are used:
Each of the presented types cannot be classified unambiguously as good or bad, since each has its own pros and cons, as well as its own area of application. The most popular is wood. It is more accessible and working with it is familiar. To provide lathing on the balcony under the lining, it is necessary to use bars measuring from 25 to 50 mm. The size of the beam is selected based on the load the balcony can withstand. If the lining is not heavy, then you don’t need to take bars that are too thick.
The disadvantages of wood lathing include:
Despite the fact that there are many means of protecting wood from moisture and fire on the market, experts still do not recommend using wooden sheathing on the balcony.
For a balcony, the best option is a metal sheathing, which is mounted from special galvanized guides. They are attached to the wall in the form of a grid of squares. This kind of lathing does not have the same disadvantages as wooden ones, but its cost is higher.
Plastic lathing is used very rarely. It is used only in a narrow focus, as it has many specific moments during installation. Its cost is also not small.
Sheathing for lining - progress of work
Installation of the sheathing should begin with the installation of vertical posts. Which, as a rule, are mounted along the entire parapet and in the corners of the balcony (loggia). The racks are designed to hold the entire structure together into a single whole and prevent it from “creeping”. The next step is fastening the horizontal slats in steps of 40 - 50 mm. You can start from the floor and upward.
If you need a parapet and what role it plays in glazing, read these articles:
- racks from each other, try to do them in increments of no more than 1 m
- horizontal in increments of 40 - 5o mm
- if there is no need for vertical racks, then horizontal slats are attached directly to the wall (concrete, brick)
- on the ceiling, they make a lathing, usually from three rows of slats, along the glazing, in the middle of the ceiling and along the wall with the balcony block
The vertical posts are fastened using dowels and self-tapping screws, directly to the parapet and walls of the loggia . , this mounting option will not work with a balcony (it’s all because of the parapet) . In such a situation, as an option, you will have to attach the racks to the floor and the already installed window sill using small corners. If the design of the parapet allows, then you can fasten to it.
The first horizontal rail is attached at a distance of 1 cm or a little more from the floor (this depends on the initial level of the floor itself). The resulting space can be foamed with construction foam, which, firstly, will allow you to fix the structure, and secondly, provide additional thermal insulation, since the joints of the wall, parapet and floor on the balcony are often not tight. The horizontal level of the sheathing slats under the lining should preferably be measured with a level. And so you should move sequentially from the floor to the ceiling, measuring the horizontal and angles if necessary.
The distance between the balcony wall and the sheathing lath is determined by the thickness of the vertical (standing) bar from which the sheathing is made (photo). If you plan to place insulating material or wires in the sheathing, more space may be required. Thus, you will have to either take a block of greater thickness, or place special inserts under the bars.
Such inserts can also be useful if the original balcony wall is very uneven and requires vertical alignment. It is worth noting that in this case, the best choice of material for the sheathing will be a metal profile. The kind used for installing drywall. But for people who have never dealt with the installation of metal structures, they should practice first. Although there is nothing difficult about it.
Do-it-yourself lathing under the lining is a rather labor-intensive undertaking. But with the right approach, you will achieve the desired result. A little advice at the end - for this activity it is better to choose a warm season, when the temperature and humidity outside and indoors are not much different (this applies to the installation of wood sheathing). Also, you don’t have to work in outerwear for fear of catching a cold.
If you liked this article, please vote for it by clicking on one of the social buttons below or leave your comment on it.
We find the rest of the publications and carefully read them in the map section.
Don’t miss the release of other new, useful and interesting articles with nuances on the topic of repair and arrangement, subscribe to updates. Good luck to all!
Related article: Do-it-yourself balcony finishing with plasterboard
Assembling the floor sheathing
The installation of the sheathing should begin with the floor (if you plan to insulate it), after which they proceed to the ceiling and only then to the fence and walls.
The timber, pre-treated with an antiseptic, is cut to size. The length of the blanks depends on the direction of the finishing material and the configuration of the balcony.
Logs with a minimum cross-section of 40x40 are attached along the bottom slab of the balcony (parallel to the fence). An 80 mm long anchor with a diameter of 8-10 mm is used as fasteners.
We level the logs with each other
Fastening frequency – not less than 50 cm; drilling depth – 50 mm.
How to make lathing on a balcony
If you decide to insulate your balcony or finish the inside of the loggia, you need to choose the right material. These materials can be: siding, lining, drywall, plywood or decorative panels.
For proper cladding, these building materials must be attached to a special frame, which is called “lathing.” Installing it is quite difficult, but anyone can do it. Proper assembly of the frame can affect the overall insulation and its service life.
The installation of lathing on the loggia is carried out for further insulation. You can do this work yourself, which will help save money. The lathing is made of two types of materials:
If you want to keep warm on the balcony, then it is better to choose the first one from the list. Metal conducts cold well; a metal frame is not suitable for retaining heat.
Why do you need a sheathing?
When using lining for wall decoration, regardless of the quality of the material, pay attention to the evenness of the surface being finished. To ensure quality, sheathing is almost always used.
Of course, some take risks and install directly on the wall, but in this case, any minor defect will lead to a level difference or misalignment. And since the level of each subsequent row depends on the quality of fastening of the previous one, after several rows the defect will be noticeable significantly. And it will be very difficult to fix it.
To avoid this problem, it is necessary to first install the lathing, with the help of which all defects are eliminated and the surface is leveled. Even if there are no visible defects on the surface, the ideal plumb level of the walls cannot be guaranteed.
The sheathing for the lining is a frame made of wooden or metal guides, which are arranged in the form of square cells.
The guides lift the lining from the wall level.
Tools, materials and work execution
Carrying out the sheathing will not be difficult for you and expensive equipment is not required for this. For lathing with your own hands you will need the following materials and tools:
- wood saw;
- rail with dimensions 40 x 10 millimeters;
- roulette;
- pencil;
- perforator;
- polyurethane foam;
- screws and dowels;
- screwdriver.
The first thing that needs to be done is to draw where the beams will be located; the sheathing will be carried out according to this drawing. The slats must be attached from the inside of the window. The remaining beams must be placed in the longitudinal direction. The distance between the holes should not exceed 40 centimeters.
After the above, you need to drill holes in the beams and on the wall, this will serve as a fixation for the permanent installation of the wooden frame. Beams must be installed vertically with your own hands. For reliable fastening of one beam, 4-5 holes are enough. To attach the slats, the step should not exceed 50-60 centimeters. The frame below must be secured at a distance of 1 centimeter from the floor, this will later help to foam and remove any existing cracks.
The next step is to check the position of the frame. To do this, you can use a building level. The first thing you need to know is whether there is a vertical blockage in the wall. If the top of the beam deviates outward, then it needs to be adjusted to the same level. After the work has been done, the structure must be leveled.
After installing the entire frame and checking the level, you need to foam the empty space with polyurethane foam. This will contribute to strength, additional thermal insulation and structural rigidity.
All work on installing the sheathing takes a lot of time, but does not require expensive tools and materials. By making the sheathing yourself, you can save money. It is important to remember that work can only be performed on closed balconies or any types of loggias.
- If the wood sheathing comes into contact with anything, then there should be no fungus or mold in this place.
- Many experts recommend sealing existing cracks, holes and crevices before lathing.
- Before cutting threaded connections, practice on a separate beam, this will prevent you from ruining the base.
- Before purchasing materials from stores, look for interesting surprises. For example, this could be a PVC profile with pre-pollinated edges at 45⁰.
Types of sheathing
Lathing scheme for panels or lining
The material and method of assembling the lathing directly depends on the finishing and on the structural features of the insulated balcony. The frame is assembled either from wooden blocks and slats, or from galvanized profile , which is often used for plasterboard structures.
Metal profile lathing
In addition, there is also a plastic profile, but due to its high price and low strength indicators, it is used quite rarely (most often, it is ceiling lathing).
Wood is a natural and warm material; condensation does not form on it, unlike metal, and it is easier to work with. For a balcony, this is a more preferable option, but with some reservations. It should be remembered that under certain conditions wood is subject to deformation; therefore, when choosing bars for sheathing, it is necessary to pay close attention to their quality.
Excessively high humidity of the wood can lead to the fact that when it dries, it will lead, and with it, possibly, the entire structure. The ideal option is dry planed timber of coniferous species (pine, spruce, larch).
Planed dry lath 20x40mm 3 m long will cost 50 rubles.
This will cost 2-3 times more than conventional scaffolding, which is also applicable (if you have the opportunity to choose and confidence in your own competence to make the right choice). In any case, it would be a good idea to treat it with an antiseptic solution before starting to assemble the frame.
To prevent the bars from moving, we foam the cracks!
A structure made from galvanized profiles will cost more than from scaffolding, but cheaper than from dry joinery. The main disadvantage is the high thermal conductivity of the metal, up to freezing in winter when located close to the street.
Assembly method
There are two options - either a horizontal arrangement of load-bearing elements or a vertical one.
Vertical arrangement of the sheathing
As a rule, various types of lining, including MDF and PVC, are mounted vertically, which implies a horizontal arrangement of the wall sheathing.
Horizontal arrangement of sheathing with vapor barrier
In the case of sheet finishing materials (plasterboard, OSB), there is no fundamental difference. The main thing is that the rail is located along the entire perimeter of the sheet being screwed, and the internal space is filled with sufficient frequency.
Required materials and tools
Installation of lathing does not require expensive equipment or any high qualifications in the field of construction. In most cases you will need the following:
- Tape measure, pencil (marker);
- When working with wood, you need a tool for end cutting (hacksaw, jigsaw or power saw);
- Hammer drill, screwdriver, electric drill (as a last resort, you can get by with one impact drill with a set of necessary drills and bits);
- Metal scissors or a grinder for cutting galvanized profiles (if the sheathing is made of it);
- Fasteners (dowels, screws, anchors);
- Installation of insulation and waterproofing elements will require polyurethane foam and a stapler with staples.
- For wooden sheathing: timber 40x40 and lath 20x40;
- For metal: rack profile and guide;
- Insulation (mineral wool, expanded polystyrene);
- Waterproofing (vapor barrier).
Varieties of Venetian plaster and application techniques
Material calculation
The amount of timber or profile depends on the size and configuration of the insulated balcony. Let's consider a complex option with load-bearing vertical posts and a horizontal rail that will be attached to them.
The distance between the vertical beams should not exceed 1 m, while the height on the balcony parapet corresponds to the distance from the floor to the window sill. On blind elements (for example, side partitions and walls) - from the floor to the intended ceiling.
Thus, for a 4-meter loggia with a meter parapet, you will need 5 bars of 1000x40x40 mm (2 along the edges and 3 between them, at equal intervals).
If you plan to insulate the partitions, you need to add 4 more bars of the appropriate length (approximately 2.5 m).
A rail is attached to the verticals with an approximate pitch of 40 cm. For the loggia described above, in the case of finishing with wooden lining or MDF panels, three rows of rails will be required (2 on top and bottom, 1 in the middle) - a total of 12 m.
If you plan to sheathe it with plastic, it is better to add another row in the middle, that is, in total you will get 16 m of slats with a cross-section of 20x40 mm.
To this value it is necessary to add the dimensions of the door and window openings (2 lengths, 1 width and depth), and also make the appropriate calculations for the adjacent walls, if they are planned to be sheathed.
Fasteners for various surfaces
The wooden elements are fastened together using ordinary wood screws of suitable length. At the same time, in some cases (in order not to split the dry lath, thickness more than 30 mm, hard rocks), it is better to drill a hole for the screw.
For example, to screw a 20 mm thick rail to a 40x40 block, you will need fasteners 55 mm long.
Fixation to concrete is carried out using plastic dowels (6-8 mm), which are inserted into pre-drilled holes, and self-tapping screws.
So, to secure a vertical beam into a concrete floor using a metal angle, you will need 6x40 mm dowels and 40 mm self-tapping screws. It is advisable to anchor particularly loaded elements (for example, a backfill under a dryer) into the concrete with anchors. Diameter – 8-10 mm; length – thickness of the fixed beam + 40-60 mm.
For an 8 mm anchor bolt, the hole needs to be drilled with a diameter of 10 mm!
Assembling the floor sheathing
The installation of the sheathing should begin with the floor (if you plan to insulate it), after which they proceed to the ceiling and only then to the fence and walls.
The timber, pre-treated with an antiseptic, is cut to size. The length of the blanks depends on the direction of the finishing material and the configuration of the balcony.
Logs with a minimum cross-section of 40x40 are attached along the bottom slab of the balcony (parallel to the fence). An 80 mm long anchor with a diameter of 8-10 mm is used as fasteners.
We level the logs with each other
Fastening frequency – not less than 50 cm; drilling depth – 50 mm.
Ceiling installation: dryer installation
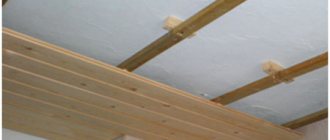
To lay the ceiling sheathing you will need a 20x40 mm cross-section batten installed at intervals of 40 cm.
The use of decorative plaster in finishing the balcony
However, if you plan to mount a dryer to the ceiling, the structure must be more rigid since the loads on such devices are quite large. It is considered optimal to use a beam with a cross-section of 40x60, fixed on a concrete base with anchors, at least every 80 cm (the smaller side is in contact with the rough ceiling).
Installation includes the following steps:
- For a four-meter loggia you will need 3 beams 4000x70x40 mm (or the same footage assembled from short pieces).
- Holes for anchors with a diameter of 10 mm are drilled in the block.
- When applying the blanks to the place of future fastening, it is necessary to mark the ceiling, and then drill holes in the concrete (also 10 mm in diameter) with a depth of 60 mm using a hammer drill.
- Next, using anchors 120 mm long, the prepared bars should be secured to the rough ceiling. To ensure the ceiling is level, do not forget to align the bars with each other!
Clapboard finishing
In order to give the balcony coziness, warmth and beauty, it is often lined with clapboard made of natural wood. A big plus for her is the instant insulation of the balcony, which will help keep warm in the winter. Finishing with such material yourself will not be difficult, but the amount of work is quite large.
The term lining often refers to a product made of wood. But sometimes plastic PVC panels can be called clapboard. Before choosing a given material, it is often based on its cost and practical considerations. In different regions, natural wood costs differently.
Most often they prefer to choose wood, as it is a natural material. In practice, of course, PVC is better because: it is easy to wash, practically does not require maintenance or treatment, and retains its presentable appearance for a long time.
Lining made of wood is more difficult to use: before installation it must be coated with a protective impregnation. Also, if desired, the lining should be painted or varnished, but only after complete installation. But, despite the difficulties in maintaining wood, it is popular for finishing balconies.
Lining: properties and types
If you carefully sand a thin board, select a groove on one edge, and form a tenon on the other, you will get the well-known lining. The finishing material got its name due to its close connection with railway transport.
In the 19th century, carriages were sheathed with such boards. The locking connections turned out to be so strong and waterproof that the builders borrowed this solution from the railway workers. Now lining is widely used for exterior and interior decoration.
Block house
Natural wooden lining is a lamella 8-25 mm thick and 70-250 mm wide. During processing, the front surface acquires a certain relief. The most popular profiles are “block house”, “calm”, imitation timber, soft-line and others.
Landhouse
To obtain an exclusive finish, artistic surface treatment is carried out - milling, embossing, brushing.
For cladding, it is recommended to use lining with a humidity of no more than 12-15%. When dried, a damper board is prone to warping and torsion, the locks come apart, which leads to a violation of the integrity of the coating and a complete loss of appearance.
When purchasing lining, it is advisable to give preference to kiln-dried lumber. Wood maintained at high temperatures is resistant to rotting and retains its geometry even with fluctuations in humidity.
Cedar and larch
The cost of lining primarily depends on the raw materials. The most affordable boards are made of spruce and pine; larch and cedar are somewhat more expensive. The most expensive products are made from deciduous and hardwoods - linden, ash, oak, and exotics.
The price within one category is determined by grade. The two highest quality classes - Extra and Premium (A) - do not have visible defects or they are located on the back side of the board. Grade B lining is cheaper, but a certain number of knots, resin pockets, and blind cracks are allowed on the surface. The lowest grade C is intended for cladding temporary structures where there are no strict requirements for external finishing.
Installation of lining
Facing with this material will be the final stage. This stage is determined by fairly easy work that will not cause difficulties. Installing the lining is quite simple, even if the instructions are not at all clear to you.
- Execution, as a rule, begins from the far corner, over time moving towards the exit from the balcony itself. All existing panels must be placed exclusively vertically; for correct actions, you must use a level. The first step is to install the first plank; it needs to be nailed to the beams using nails. It will serve as a guide for subsequent planks.
- In addition to nails, you can also use staples or special clamps, the latter will help you ensure a strong fastening. When using nails, they must be driven exactly into the groove, but quite carefully, since you can easily damage the lining made of wood.
- After nailing the initial plank, you must begin installing the next one; to do this, you should carefully insert it into the groove, level the position with a rubber hammer, delicately tapping the other side of the plank. After fixing the desired position, it is worth attaching the panel and proceeding with the installation of the next one. Therefore, it is appropriate to cover the entire space in this way.
- To finish the corners (external and internal), special corners should be used, which in turn will give a more presentable and neat appearance. Skirting boards made of wood should be used near the ceiling and floor, which will give your paneling the final appearance.
You can install window sills immediately after the balcony is sheathed. This will contribute not only to the simplest actions, but also to the quality of work. If the window sill is installed in front of the casing, it will only interfere with the installation of the panels. If there is no experience in this type of work, then more material may be needed, since there will be much more debris during cutting. After completing the clapboard covering, you can begin decorative work.
It is important to remember: wood paneling is quite attractive in its original form, but almost all experts recommend covering it with several layers of varnish.
Thus, we can conclude that many materials can be used for cladding, but the best material is wood lining. The lining will help make a small room attractive and also contribute to insulation, protects from winds and drafts.
Natural material is considered the most suitable for finishing because it is environmentally friendly and has a distinctive feature from cheap PVC panels. Anyone can carry out the installation, even if they have no experience in construction. Tools for sheathing and finishing can be easily found in any home or purchased at any specialty store.
Fastening the lining
After the sheathing of the balcony ceiling has been formed, you can begin covering it with clapboard. The cladding always begins from the ceiling, only then the walls are sheathed. The clapboard slats are equipped with a tongue-and-groove fastening, so covering the balcony ceiling with clapboard is not difficult if the slatted frame is made correctly.
Some installation tips:
And now more about the options for fastening the lining.
Installation with clamps
A clamp or kleimer is a metal plate with holes for self-tapping screws and a protruding tongue. The tongue holds the lining by the groove, making the fastening hidden and accessible for quick dismantling.
The first board is always fastened with nails: a clamp is put on the tenon of the lamella, which is attached to the sheathing using self-tapping screws or nails. Of the three holes on the plate, only two are always used. It’s easier to use a screwdriver, so the work will go faster.
Sometimes a stapler is used for fastening with clamps, but you need to know how to use it. If you press weakly, the staple will not fit into the wood tightly; you will have to either finish it off with a hammer or use another staple.
The fixation scheme is simple: first secure the clamp in the middle, then along the edges. The entire cladding is installed in this way, but the last die is cut to the required width. Then it should be inserted into the groove, secured with nails, recessing the caps. To decorate the fastening points, plastic skirting boards or corners are used.
Installation with self-tapping screws
When looking through the options for finishing loggia ceilings with clapboards and walls also with this material, you should give preference to this method as the most durable and reliable. The stages of work are as follows:
The fastener pitch is 0.4 m. The main thing is to recess the screw head into the body of the lamella, but not damage the die.
Nail mounting
An extremely simple option, in which there is a risk that the casing will burst. It is better to use finishing hardware that has a small head and a small diameter - such nails are driven in easily and the lamellas are not allowed to split. If the interior allows, it is possible to finish the ceiling with finishing nails with a decorative head - the suspended ceiling design in this case looks very original.
The distance between the nails is 0.4 m; more experienced craftsmen prefer to drive the fasteners into the groove of the lamella to completely hide the heads. An area of 10 m2 will require approximately 600 units. fasteners The technology of the work is simple: insert a nail into the groove, drive it into the fastening strip, and then use a hammer to push the head down so that it does not interfere with the alignment of the dies.
Finishing with nails requires great skill and dexterity. At the same time, dismantling the cladding is almost impossible - holes will remain, so the simplest and most affordable option is fastening it with clamps. Exactly the same technology can be used to sheathe walls.
The last stage is decorating the lining. The material can be painted, varnished, or left in its natural form. The choice is up to the owner, the main thing is that before finishing painting or varnishing, treat the board covering with a primer, let it dry, and then you can decorate it.
Source
How to upholster a balcony with clapboard: take the tools into your own hands
As often happens, at a family council a couple of days ago it was decided to improve the cold and cluttered balcony and make it more comfortable. And quite expectedly, the choice fell on lining, but you don’t know how to upholster a balcony with lining with your own hands, so you need experienced advice.
Related article: Armchairs for balconies and loggias
We are ready to share our experience, especially since the work ahead of you will be interesting and not very difficult, but it will require accuracy and patience. The reward for perseverance will be a cozy area, which will become another full-fledged apartment space, including a relaxation room, a workshop, a garden and a storage room for storing seasonal items.
Upholstery supplies and raw materials
What is the ceiling frame made of?
Wooden lining ceilings are attached to a durable frame, which is made of beams or metal. The choice of frame material and, directly, the finishing coating must be approached carefully and selectively, since these are the main structural elements, regardless of whether plastic or wooden lining is being installed.
Depending on what material you choose for the frame, you will need different tools for its installation.
If the choice fell on a wooden frame, then you need to purchase:
Frame block
- suspensions, brackets can also be used to attach to the ceiling;
- wooden beams, the parameters of which should be 40x40 mm, you can use plastic wedges;
- Suspensions can be attached to the ceiling with anchors;
- Do not forget about the self-tapping screws, with the help of which we will fasten the beams.
Important! The wood from which the beams for the future structure will be made must be smooth, dry and intact. To move on to the question of how to attach the lining to the ceiling, you need to make sure that all parts of the future frame are ready for fastening, and only then answer the main question
To make a metal frame you will need:
steel profile, always galvanized. It is this profile that will not be subject to rust in the future;
Remember! The profile for creating a metal frame must have rolled edges. This ensures the necessary rigidity, because PVC products are much lighter than ceiling linings made of wood.
- profile hangers;
- screws and anchors;
- connecting type elements.
Type of profiles
Selection of lining
With the frame all the issues have already been resolved, let's move smoothly to issues that relate to the finishing coating.
- metal lining;
- MDF products;
- PVC elements;
- classic made of wood.
Finished plastic product
Ceilings can be sheathed with any of the above varieties, and if we are talking about a living space, it’s probably worth excluding only metal products from this list. When you choose a material for cladding, first of all, you need to take into account the characteristics of the room or premises in which the renovation will be carried out.
If you are renovating a bathroom, then it is better to use plastic lining for cladding, because, for example, MDF panels will not withstand the high humidity of the room. Despite all the examples, the best option would be wooden ceilings made of lining; the natural material, in its properties, surpasses all analogues in all criteria.
In the event that the clapboard ceiling is finished in a residential area, the best option in the current situation would be to use wooden panels, and more specifically, panels made of hardwood, because coniferous wood tends to release resin, which negatively affects the appearance of the material.
If you, for example, decide to sheathe a balcony or loggia, then you can use pine panels and any other coniferous wood paneling with peace of mind
Be sure to pay attention to the class of the wood itself, because both the appearance and quality of the material you choose, as well as its price, depend on this
You can certainly choose a low-quality grade for the ceiling paneling in the room. But then you have a lot of other problems and questions, such as how to paint a not very aesthetic material, and how to level it, sand it, to give it a more or less normal look.
Among other things, you will have to paint such a lining in any case so that defects on it are not visible, but at the same time, you also hide the texture of the wood.
Eurolining for the ceiling deserves careful consideration; it needs to be given a special place. The design of such material is similar to a typical lining, but the quality varies, and for the better. In addition, finishing with eurolining is much simpler than standard.
Required Tools
After choosing the material, we need to start preparing the tools that we will need in the process of attaching the lining to the ceiling, so that they are always at hand.
- screwdriver;
- hammer;
- water level, or laser level;
- perforator;
- saw;
- scissors (suitable for cutting metal) or a hacksaw.
"Silent" helpers at work
You can begin installing the lining on the ceiling if all the tools listed above are at hand.
Material selection
Wooden crafts
Let's find out what lining is and why it received such an interesting railway name. Lining is a carefully processed board, equipped with grooves and ridges (locks) for ease of installation. Thanks to them, the possibility of gaps forming between the panels is eliminated.
Type of classic wooden paneling.
Manufacturers claim that for the first time, this method of joining boards was used in Russia to create cars for the railway (hence the name “lining” - board for cars).
And the phrase “eurolining” does not mean at all that this product is made in some special way. This is a common misconception or PR stunt.
There is a difference, and it lies in the size standard:
- thickness 12.5 mm,
- working width – 88mm,
- total width – 96mm.
Dimensions of imported lining
There is another misconception that the Eurolining, which is similar in name, does not need to be treated with anything - it is already ready for use. This is an extremely incorrect judgment - cladding a balcony with clapboard requires further protection, and maintenance is needed, like any other wooden surface.
Plastic products
It should be noted that the sheathing for the lining on the balcony can be made of plastic. Here we draw your attention to the fact that plastic panels and PVC lining have differences, both in size and in connection locks.
Note! Construction stores offer a large selection of plastic lining that imitates the natural texture of wood.
Of course, it is easier to care for plastic surfaces than wooden ones, but you will have to forget about the natural charm.
After weighing all the pros and cons, you decide for yourself what material your loggia or balcony will be covered with. But the installation procedure is the same for both panels made of synthetic materials and wooden lining.
Frame installation
Before starting cladding work, you need to equip the supporting system. For lining, the frame is made either from profiles for fastening drywall, or from wooden guide beams. Many craftsmen prefer to work with wood, because any type of fasteners can be used for it.
Photo - frame installation
Step-by-step instructions on how to install the frame:
- The surface of the wall is marked. For ease of work, it is recommended to first prepare a drawing of the room. Next, all angles are measured and marking begins from the lowest (minimum point). The first line is horizontal; for an accurate level it is recommended to use a laser pointer;
- Afterwards a line is marked near the floor. This is an important point, because often the floor is slightly curved, and this unevenness can cause the panels to be incorrectly attached to the wall. The measurement is made in the same way as from the ceiling, but the highest is selected for the starting point. Horizontal beams are installed on the marked lines; depending on the capabilities, they can be attached to the wall with nails or dowels. When covering a balcony in a private wooden house, it is most convenient to work with self-tapping screws;
- The pitch of the frame mesh is determined individually, the average value is 20 centimeters. Its width depends on the size of the sheets and panels.
When the frame is ready, you need to additionally insulate it and isolate it from moisture and condensation. For both plastic and wooden lining, to insulate the balcony, it is recommended to use either penoplex or polystyrene foam, since they do not retain moisture. Mineral wool will constantly absorb excess atmospheric liquid, which can negatively affect both the walls and the finishing of the balcony itself.
Photo - insulation
Afterwards, a waterproofing film is installed on top of the heat insulator. The installation technology is the same as for finishing roofs: the film is mounted on top of the frame beams, thereby separating the finishing panels from the external walls.
Photo - foil insulation
Preparatory work
Any work, including upholstering a balcony with clapboards with your own hands, begins with cleaning the room - completely free your workspace from unnecessary objects and debris.
- The first stage of installation is to install the frame. The sheathing of the walls is done with timber (preferably pine) in increments of 40-50 cm;
Note! The method of installing the sheathing is the same for both walls, floors, and ceilings.
Enemy of wood
Unfortunately, wood has enough enemies to spoil the appearance of the entire product. Bugs, fungi, UV rays, temperature changes, moisture. If you can protect yourself from direct rays of the sun with double glass with UVK coating, then fungi and parasites can come back to life (after some time), even after treating the wood with an antiseptic.
That is why upholstering a balcony with clapboards with your own hands is accompanied by a process of carefully treating the wooden panels with a protective material - PVA putty.
Ready-made putty option.
PVA putty is a modern barrier that prevents the development of various types of fungi. In addition, it significantly increases the resistance of wood to moisture and dampness. The consistency of the putty resembles PVA glue, but their technical characteristics and purposes are completely different.
If the wooden finishing of the balcony with clapboard is completed, then about 20 liters of material will be required to process the panels. The low price of PVA putty, as well as its environmental friendliness, allow you to safely use it for finishing residential premises.
Fastening technology
The fastening of the planks begins along the perimeter of the surface, and then intermediate elements are mounted at the same distance from each other. But before you start attaching the intermediate guides, you should decide on the direction of the lining. The fact is that the sheathing strips must be placed perpendicular to the lining strips.
The distance between the slats is determined by the quality of the finishing material. It should be such that after installation the lining does not sag.
We also pay attention to the dimensions of the insulation; it should be located tightly between the guides to ensure reliable fastening of the waterproofing. If the plank is long enough, you need to make several supports under it so that it does not “play”. Watch all the stages of finishing a balcony with clapboard in this video:
Do not forget to lay all planned communications during installation of the sheathing.
As you can see, installation of the sheathing is necessary, and it is not difficult to do. You just need to remember that ultimately, all guide battens must be placed at both horizontal and vertical levels. This will help get rid of many problems when attaching the finishing material itself.
Source
Let's get back to preparation
Be sure to eliminate all cracks, through gaps and holes. Problematic surfaces should be plastered, coated with PVA putty and left to dry for at least a day.
Important! Never use plasterboard (even moisture-resistant) for finishing work on the balcony. A small amount of moisture will eventually lead to cracking and complete destruction of the surface.
For lathing, you can use a metal profile, wooden blocks and slats. The main thing is to choose the right fasteners - nails, screws (for wood or metal).
Insulation options
There are various ways to insulate rooms, including balconies. You can take polystyrene foam - the simplest and most affordable material. Isover or insulation with a foil surface is also suitable. Here everyone decides based on their own preferences and financial capabilities.
Thermowood lining
This is a natural material made from solid wood using stabilization at temperatures up to 230°. After removing excess resin, the tree acquires moisture-repellent properties, resistance to biological destruction and a noble dark color. Even ordinary inexpensive pine after such treatment looks like a valuable species.
Thermowood lining is used for finishing rooms with high humidity. Its service life is measured in tens of years, and maintenance does not require regular painting and varnishing.
Sheathing process
To work you will need:
- hammer drill or drill;
- hacksaw or circular saw, jigsaw (for neat cutting of lining);
- building level or tape measure, pencil (for marking the sheathing and level installation of the first boards);
- hammer, screwdriver, nails and screws (fasteners must be made of stainless materials);
- brush or roller (for applying antiseptic, varnish);
- safety glasses, gloves (neglect of safety precautions sometimes leads to unpleasant household injuries);
Work should begin from the corner (we recommend from the most problematic one). We install the first panel level - the slightest distortion and the entire wall will have to be redone.
First step.
You can secure the lining using nails or self-tapping screws (driving them flush). The lining connected with special clamps is very carefully removed. But working with them requires certain skills.
Important: First, novice craftsmen want to figure out how to properly upholster a balcony with clapboard. Everything comes with experience, and nowadays also with the Internet. Our portal has numerous videos with visual examples of work.
But let’s consider one more thing that is unexpected for beginners. It happens that after going through the entire wall, the last board may be wider than the remaining space. Don’t be alarmed - measure the required distance from the beginning of the ridge, and the small gap will be closed with a plinth or decorative trim. The photo clearly demonstrates this situation.
Design
A white ceiling looks unusual and original in combination with various materials.
Lining on the ceiling in modern design is popular and in demand, as the trend towards economical materials contributes to the creation of a unique style. And lining is just such a product, characterized by a natural texture, adequate cost and ease of installation. To create it, various tree species are used:
- The uniqueness of pine products in soft brown shades attracts customers at an affordable price.
- Lining made from spruce is an interesting budget material. The final stage is painting the surface, since the structure of the wood is not very pronounced.
- The main advantages of larch products are durability, rich shade and expressiveness of the wood texture. This breed tolerates humidity well.
- Linden, plastic in origin, has attractive golden hues.
White color, which is the basis of any style, combines perfectly with other colors and can visually expand the space. Preference is given to oil and acrylic paints. By treating the surface with a solution that protects against moisture and insects, you can extend its shelf life.
Eurolining creates an elegant picture with the help of various combinations of diagonal stripes.
Individual elements created on the ceiling - around a chandelier, for example, allow you to add variety to the interior of a room. An interesting note in the interior will be the ceiling made of plastic lining, varying in texture and pattern. Using panels of contrasting colors, it is possible to zone the room.
Design finds using this material will allow the owner to give a unique and individual character to his home.
- narrow and long panels expand the space;
- designs made from lines blend harmoniously into any style;
- a lattice structure with cross-positioned slats creates the image of a ceiling made of beams;
- the lining with plastic plates of different widths looks great;
- by laying MDF panels in different directions, they achieve an excellent imitation of natural wood;
- luxury in decoration is achieved by using white color, diluted with gold or silver tone;
- fashionable interiors prefer slatted style;
- The combination of wooden and painted ceilings looks impressive.
In the living room it is appropriate to use this material in the design of the ceiling. Lacquered planks can transform the surface. It is possible to design the image of beam floors as in Alpine chalets or hunting lodges. This effect can be achieved by contrasting colors of finishing elements.
It should be remembered: to get a cohesive image, you need to decorate the entire interior in the same style. Painted lining will create a cozy atmosphere for relaxation in the popular Provence style, so necessary in the bedroom. It will acquire a barely noticeable element of antiquity and unsurpassed charm in the combination of forged furniture and varnished covering parts.
A more careful selection of such a product will avoid negative effects on people suffering from allergic reactions to the released ether compounds. The ideal room with a clapboard ceiling would be the kitchen.
Design in the above style would also be an excellent option. Here it is possible to use beige, white, and blue tones for coloring the panels. The interior design will be beautiful in the intended way. A room with stylish appliances and steel surfaces of household items will look advantageous.
A natural ceiling would be appropriate in a kitchen decorated with natural stone or its imitation. The use of panels painted in a color that matches other objects is suitable for decorating a corridor. Don't lose sight of the additional details and overall appearance of the interior.
The nursery and office are designed in a similar way. In a nursery, a careful and scrupulous approach to such coverage is also needed. The only room in the house where it is not recommended to install a clapboard ceiling may be the bathroom. Excessive moisture may cause the coating to deteriorate.
Selection of lining
Often, finishing a loggia with clapboards is done using wooden panels. However, given that the cost of natural materials is not available in every region, plastic PVC panels are used as an alternative. When choosing, not only price is taken into account, but also the practicality of the material. In this regard, PVC lining takes a leading position. It does not require additional care or treatment and is easy to clean.
Bright colors fade from the sun, so you should choose lighter colors in which the color loss will be less noticeable.
Wooden lining is characterized by capriciousness in operation; it must be coated with special impregnations, varnishes or paints. During operation, you will have to renew the coating, as the old one may crack and lose its attractiveness. But, these problems do not prevent consumers from preferring wood, because its finishes look more cozy.
Related article: Design of a balcony with panoramic windows
The cheapest ones are panels made of coniferous wood. The resins present in it act as preservatives and antiseptics, so the material is durable. Larch is highly resistant to weather conditions and dense. The excellent structure and beautiful color of the wood will make the finish impressive and durable. If you want to choose a lining made of hardwood, you should proceed from your preferences and wishes, since each type of wood has its own unique color and unique pattern.
Which lining to use
Basically, when they talk about lining, they mean wood products. Much less commonly, PVC panels are also called this term, adding the word “plastic”. Probably, the whole point is in the very similar principle of connecting the planks to each other and the method of their installation, and also in the fact that outwardly it looks like long boards with a tenon on one side and a groove on the other. When choosing which lining to use for a balcony, it is usually based on cost, aesthetic or practical considerations.
Covering a balcony with clapboard is a way to create comfort and at the same time insulate the room
In some regions, wooden lining is a cheap material, in others it is expensive. So you will have to compare the price of plastic and wood yourself. Wood is often preferred because it is natural. This is true, but in order to maintain its attractiveness, it is impregnated with protective compounds, and this is chemistry. Then it is painted or varnished. The compositions, as you understand, are also far from natural.
Based on practical considerations, PVC paneling is clearly ahead: it is easy to clean, does not require additional care or treatment, and retains its unchanged appearance for many years. It might fade on the sunny side, so it’s better to take light colors: the loss of color is almost invisible on them.
g storm on the sandpiper field print
Wooden lining is more capricious during operation: before installation it must be coated with protective impregnations. If you are only going to give it some shade, you can choose an impregnation that will immediately give you the desired color. Then this will be the end of its processing. If you decide to paint or varnish the finish, then you need to do this after installation (but still soak it with antiseptics before installation). During operation, you will periodically need to remove the old coating and re-coat everything: the varnish or paint may crack, and the finishing of the balcony will lose its attractiveness. This is such a hassle.
It’s up to you to decide which lining to choose for your balcony.
Despite all this, when deciding which lining is best for a balcony, they give preference to wood. Everyone's tastes are different, of course, but the general consensus is that a room lined with wood is much cozier. As a result, the desire for beauty outweighs practical considerations.
How to cover lining on a balcony so that it remains attractive for a long time, read the article “How to cover lining indoors”
Which is better
We will talk about wooden products. Let's talk about breeds first. The cheapest lining is made of pine and spruce. Despite the relatively low cost, it is durable: coniferous wood contains a large amount of resins, which are antiseptics and preservatives. In regions with hot summers, this can lead to resin being released in places on the sunny side in places of intense heating. Another disadvantage is soft wood. If you hit it (decently, for example with a hammer), a dent will remain. If this doesn’t bother you, you can line the balcony with pine or spruce clapboard: these are all the disadvantages of this type of wood.
Only you can decide which lining is best for a balcony: everyone has different tastes
There are also expensive varieties of conifers: larch and cedar. They have a very dense wood, are more durable, and resist weather conditions well. But these qualities are absolutely not needed for lining the inside of the balcony. A more compelling argument would be the beautiful color and structure of the wood, as well as the lower amount of resin. Cladding with clapboard made of such wood is beautiful and long lasting.
Deciduous wood is pleasing to the eye. Here, choose according to your taste: linden has a slightly pinkish tint, aspen becomes silver-gray, alder has a beautiful pattern, oak in terms of decorativeness and reliability is generally unrivaled, but also in price.
Profiles and appearance
Now about the technical specifications. Let's start with profiles. On sale there is just lining, and there is euro-lining. The main difference is that on the back side of the “euro” version there is one or more longitudinal grooves. They provide air circulation, which extends the “life” of the finish. Also, in theory, lumber with the prefix “euro” has standard sizes and should be produced from high quality wood. In practice, everything is different: the sizes “float” and the quality is not always good.
Most Popular Profiles
There are a couple of dozen profiles. Different chamfers, “waves” of different sizes and other shaped surfaces make it possible to obtain walls with different appearances. The photo above shows the most common ones, usually produced in large quantities.
These are some types that can be made to order
There are several other types that can be made to order. Such a “custom” batch will cost much more: you will have to reconfigure the equipment.
Varieties and humidity
The grade of the lining depends on the number of knots, cracks and discolorations on the board. Grade A or “Elite” should not have them at all, or in very small quantities. Grade “B” - no more than 4 knots of brown color and color changes in a small area; grade “C” can have many knots.
What is the difference between one type of lining and another?
The presence of knots does not mean that the wood is bad. The main thing is that they are brown, not black, and have no signs of destruction. And in general, knotty wood sometimes looks great. All this is a matter of taste and preference.
The situation with humidity is much more serious. Buying lining made from raw wood for interior decoration may be much cheaper, but also much more troublesome. If you nail trim strips with high humidity, it will gradually dry out and shrink in size. Gaps will appear between the boards, some of them will twist or bend. You will have to remove everything, sort it out and reinstall it. Moreover, maybe twice: it is difficult to predict when the shrinkage will end. Therefore, for the interior decoration of the balcony with clapboards, it is better to take chamber-dried lumber. Humidity then is not higher than 7-10%, it will no longer “lead” or bend: these materials were rejected after drying. That's why prices are higher.
About the thickness and width of the planks. For interior decoration, you can use a thin board: the atmospheric conditions are stable. But a balcony is not exactly an indoor space; temperature and humidity changes are more serious. Even with good insulation of the balcony. Therefore, the average thickness is suitable - 14-16 mm, but you can also use 12 mm.
The width and thickness of the houses varies widely
The width of the board can be from 60 mm to 150 mm. It takes longer to nail a narrow one, less work for a wide one, but in a small room, wide stripes “eat up” the volume. So for cladding a balcony, the optimal width of the lining is average, about 90-120 mm.
Creating a sheathing
Knowing how to choose a lining, all that remains is to decide on the material to create the sheathing, which comes in three types:
Each type has certain advantages and disadvantages. The most popular is the wooden one, as it is a familiar and affordable option. It is created from 2.5-5 cm bars. The main thing is that it can withstand finishing and not make the room smaller by absorbing “extra” squares. But wooden lining is highly flammable and intolerant to moisture. Despite the huge variety of existing impregnations, it is not advisable to use wooden blocks when finishing balconies.
The best option when decorating a loggia with clapboards with your own hands would be metal profiles. A mesh-like frame is constructed from them, to which panels can be easily attached. The cost of such sheathing is much more expensive, but it is practically free of disadvantages. Plastic is rarely used, since it is not available to everyone. Therefore, it should not even be considered for balconies.
Description of work
In order for the lathing for the lining to be strong and durable, it is necessary to follow a certain work technology.
It consists of three stages:
Each stage is important, so carefully read the entire review to avoid errors during operation.
To get the perfect result, you need to secure the frame correctly
Mounting methods
From the moment the project is created, the appearance of the sheathing is thought through and the required amount of material is calculated. It should be remembered that the frame is first installed around the perimeter, after which the intermediate ribs are installed, strictly observing the distance. When using insulation, its dimensions must be taken into account. In order for the insulation to lay down tightly, the cells should be made slightly smaller than the insulation sheets. The lining can be located:
- vertically, perpendicular to the floor;
- horizontally, parallel to the floor;
- using a counter-lattice, a mesh-like frame.
The direction of the sheathing is determined by the selected location of the panels, which must be attached perpendicular to the bars. Considering that you can almost always only dream about smooth walls, sheathing under the lining is simply necessary. It helps hide defects, eliminating numerous problems.
The first stage – calculation and purchase of material
To work we need a very simple set of materials:
- Wooden block.
- Fasteners See article nails or clamper.
- Insulation (if necessary).
The block is the main material that we will use.
But in order to calculate the required quantity of all components, you should know several important features:
- FEATURE 1: step of frame location. The optimal distance between the sheathing elements is from 40 to 60 cm. If the lining is thin, then it is better to place the bars more often, this will give the structure additional rigidity. The distance may be different if the length of the walls does not allow maintaining the same pitch of the elements.
- FEATURE 2: If there are openings, a block must be secured around the perimeter. If we are talking about doorways, then it is better to mount two racks at a time to strengthen the system. It is advisable to mount guides at the top and bottom.
It is important to strengthen the openings well
- FEATURE 3: when using insulation, the thickness of the block must be no less than the thickness of the heat-insulating material. The most commonly used option is 50x50 mm or 50x40 mm.
- FEATURE 4: When purchasing material, pay attention to its moisture content. It should be no more than 15%. Raw elements may become deformed or crack when dry, so they should not be used.
Draw an approximate diagram of the sheathing with the pitch of the elements and their location. This will allow you to accurately calculate the required amount of material and not buy an extra bar.
- FEATURE 5: the insulation is calculated based on the area on which it will be mounted;
- FEATURE 6: fasteners are selected based on the type of base. For concrete and brick, quick installation dowels are needed; for wood, self-tapping screws or nails are used.
The length of the dowels depends on the thickness of the bar
Stages of work
First of all, areas of old finishing that are falling off (paint, tiles, plaster) are removed. Then, it is advisable to prime the surfaces with any antifungal compound, especially if the balcony was open before. The sequence of work is as follows:
- lath is placed on the surface of the ceiling and walls;
- insulation is installed;
- walls are sheathed;
- the ceiling is sheathed;
- corners, plinths, and slopes are installed.
Now, let's look at each of the stages in more detail.
How to insulate
When starting to cover the balcony, you should first lay insulation. Which of the ones offered by the industry to choose is up to you.
The cheapest type is polystyrene foam, produced in slabs. It has good thermal conductivity, but is not able to withstand loads, so it wrinkles at the slightest pressure. But in our case, this does not matter much. Another negative quality is low vapor permeability, which can be overcome with ventilation.
Mineral wool is produced by melting rocks, fiberglass or slag, and is a natural insulation material. The only thing that upsets me is the use of formaldehyde resins in production. The positive aspects of the material include good thermal insulation qualities and easy installation, while the negative aspects include high hygroscopicity.
Extruded polystyrene foam provides excellent thermal insulation as well as high density. It adequately withstands mechanical loads, and is the most effective of the comparatively inexpensive category of insulation. A special locking system prevents the formation of cracks into which cold can penetrate. Therefore, if you have the finances, it is recommended to lay polystyrene foam boards for finishing.
Foil polyethylene foam is considered an effective vapor barrier that prevents moisture from reaching the insulation. Using mineral wool, the material is rolled out from above, nailed to the sheathing with staples, and the joints are sealed with special foil tape. This material is used independently only in the southern regions of the country, in the rest - as a supplement that improves the thermal insulation of mineral wool.
For those wishing to obtain an environmentally friendly finish, it is recommended to use foam glass. This is an absolutely natural material, characterized by high strength, frost resistance and non-flammability.
It has sufficient thermal conductivity and is easy to install using foam. True, the cost of this material is too high, and not everyone can afford it.
Making the sheathing
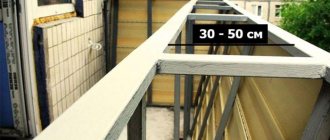
Finishing balconies and loggias with clapboard is practically no different from work in other rooms. As usual, it begins with the construction of the sheathing. For it, bars are selected that are 1.5-2 cm thicker than the insulation. This will help maintain normal humidity and prevent the formation of fungi. Balcony cladding is carried out mainly vertically, so installation begins with a strip located under the window opening. Its horizontalness is checked with a level. Secure the bar with dowels.
The slats are filled along the entire perimeter of the balcony, including the ceiling, with an indentation of about 30 mm from the corners. After this, intermediate bars are installed, the distance between them should be 40-50 cm. A lining will be attached to the resulting frame, the panels of which are made shorter than the required length by 5-10 mm. This will allow you to compensate for changes in parameters during changes in humidity or temperature.
Installation of lining
The panels are secured to the slats using nails or self-tapping screws. You can also use a construction stapler, which can significantly speed up the work. You should start from the most problematic corner, turning the panel towards it with a tenon. To prevent the wood from splitting, a hole is first made with a drill, into which a self-tapping screw is screwed or a nail is driven in. You can fasten the lining for balconies using clamps - mounting brackets. This option is more suitable for eurolining, equipped with a long tenon, onto which a clamp is placed and nailed.
The first panel should be fixed on each batten of the sheathing, the rest can be done one at a time. Each subsequent panel is inserted into the tenon of the previous one. For a tighter fit, beat it with a hammer, placing a piece of wood under it. In this sequence, the entire casing is assembled. The last part is attached closer to the corner, cutting it to the required size if necessary.
Processing of lining
Not only the sheathing, but also each plank of the sheathing needs to be treated with antiseptics. Some of the products listed below not only have a protective effect, but also give the wood a tint that can perfectly highlight the texture:
- Senezh Aquadecor is a tinting antiseptic, of which there are 16 shades. It does not require a topcoat.
- Impregnation U-409 covers the wood with a thin polymer film that prevents the penetration of dirt, but preserves the appearance of the material. It contains additives that prevent the formation of fungi.
The packaging of each product contains instructions for use, with application rules and consumption rates. If the balcony is located on the sunny side, it is recommended to use a light tint that can slightly whiten the wood. Such a wall is not afraid of fading and will heat up less. To create a shiny surface, it is enough to use any wood varnish used indoors.
How to process lining
When covering a balcony with clapboards, it is necessary to treat not only the finishing with antiseptics, but also all the sheathing strips. The most popular protective impregnations and primers are listed below. Some of them can immediately give the wood a shade, not by painting, but by emphasizing the texture.
The packaging of each product contains instructions for use and application. It describes the rules of application and consumption to ensure protection. Only by following these rules can you be sure that the lining and the frame underneath will serve for a long time.
If we talk about stains, most modern compositions, while changing the color of wood, also have protective properties. For example, Aquatex stain (analogous to Senezh Aquadecor). It has a wide range of colors and contains a hard-to-wash antiseptic that protects the wood from damage by fungi or insects.
Processing the lining on the balcony can be done in different ways. It is most convenient to use tinting antiseptics for finishing the balcony. A single treatment will immediately protect and add color. But they only add tint, leaving the pores open. Dirt can accumulate in these pores. And cleaning it out is not an easy task. If you also need a protective film that will prevent the penetration of dirt, you can cover the lining (tinted or not) with varnish or dirt-repellent impregnation such as Usadba U-409. Impregnation creates a polymer film on the surface that closes the pores, but does not provide shine.
I take a shovel and go to the country
Problems often arise on the sunny side: how to cover the lining on the balcony so that it does not fade. A light tint that slightly whitens the wood is best. A light wall heats up less and is not afraid of fading. This clapboard cladding looks great.
If you want to have a shiny surface, you can use any varnish for interior work. Watch the video about the types and types of varnishes. It will be easier for you to understand what varnish to coat the lining on the balcony with.
Painting the lining on the balcony with ordinary paint is no longer relevant today. Why spend money on wood and then paint over its texture? Then you can immediately install PVC. So choose: tinting, varnishing, or both.
Source
Correct installation of the frame
Before you begin, you need to find the lowest point in the ceiling. From there we measure down the wall, about 10 cm, and put the first mark at the end point. Then, using a building level, we also mark all 4 corners of the ceiling. The frame will be installed according to these markings.
Installation of a wooden frame
Diagram of a wooden frame for lining.
First, let's consider the option of installing a frame using wooden beams. First of all, treat all wooden elements with a fire retardant and antiseptic. The beams must be fastened so that they are directed perpendicular to the direction of the future lining. The distance between the bars should be kept between 50 cm and 1 m. The lower part of the wooden blocks should be parallel to the floor; use a level or rule for alignment.
First, fix only 2 bars at different ends of the room, try not to fix them close to the wall, leave a gap of about 10 cm. For every 60 cm of the ceiling, secure a bar with an anchor or dowel. One more point: the remains of wood can be used as bowls to place them in places where the timber lags behind the ceiling. Next step. Stretch the line between the beams just above floor level. That's it, the flat base is ready, now you can install all the other beams on it.
Next we make strengthening. To increase the level of structural strength, jumpers are installed between the main beams. They can be made from pieces of the same timber. Measure the distance between the main supports with a meter, cut pieces of the required length and secure them in the center of the ceiling - the lintels are ready. Do not overuse such jumpers, and you don’t need any extra material consumption. Place them only where heavy loads are expected. Most often these are places where lighting is installed on the frame.
Installation of a metal frame
Diagram of a metal frame for lining.
Now let's look at how to install a frame made of a metal profile to install plastic lining on the ceiling, although it can be used not only for plastic lining, but also for wooden ones. According to the installation method, a metal frame is not much different from the previous method of installing a wooden frame.
We also make a line along the perimeter of the walls and attach the UD profile using dowels. Then it is necessary to secure 2 control CD profiles according to the same principle as described in the example with wooden blocks. Using U-shaped fasteners, we attach the profile to the ceiling in half-meter increments. We fasten the remaining profiles strictly along the stretched fishing line.
Using a crab fastener, we fix the jumpers where necessary. Before finally installing the lining, carry out all the necessary wiring - Internet, lighting. Leave loops in the places where the wires will be routed for lighting after installing the casing.
Self-tapping installation
Through fastening with self-tapping screws through the entire board, and not through a groove, is the simplest, fairly reliable, but not the best solution for wooden lining. With this method, the integrity of the material is compromised, so the holes must be regularly treated with special protective mastics to prevent destruction and rotting of the wood. Despite all efforts, over time, the installation sites of fasteners may become noticeable, which significantly impairs the aesthetics of the decorative finish. Usually the first and last panels are mounted this way for reliability, and for the rest they use fastening with finishing nails or clamps.