Most owners rarely leave the balconies of modern apartments in their original condition to increase comfort, decorative exterior and interior appearance, and expand functionality. The balcony space is glazed to protect it from precipitation, insulated against the penetration of cold, lined with finishing materials inside and outside to give an aesthetic appearance, and when carrying out many works, balcony sheathing is used to secure the cladding.
The use of balcony sheathing is due to the fact that attaching finishing materials to concrete slabs, from which walls and parapets are often made, is difficult and impractical, and if the balcony is separated from the street only by a fence made of steel reinforcement, a lattice frame is the only option for installing any building materials on metal rods.
When carrying out repair and construction work with your own hands, it is useful to know the process of installing lathing on various bases for the most commonly installed types of cladding, the tools used, the building materials used, components and fastening fittings to hold the elements on the surface.
Rice. 1 Types of cladding on lathing
The best material for a balcony
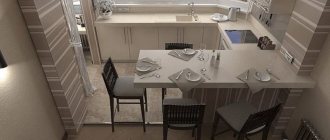
Of course, you can simply cover the room from the street with the profile and stop there. Starting a balcony renovation is not a task for the lazy. But the interior decoration with clapboard will transform the concrete walls, making them elegant and well-groomed. How nice it is to drink tea on such a balcony in the summer!
Cladding with clapboard will require some skills and costs, while many of the works can be done with your own hands and, in fact, it does not take that long. First of all, you should choose the finishing material, the rest will depend on it. Any slats for cladding are called lining (because carriages were lined with wooden slats for cheapness). Today it is a common name for PVC panels (“plastic” lining) and wood.
Plastic is not so difficult to install, it is light and easy to clean, resistant to temperature changes, humidity, and household chemicals. It is better to choose light panels that hardly fade over time (this is true if the loggia faces the sunny side). The cost of PVC and wood differs in different regions, this can also influence the decision to purchase a particular material. For some reason, plastic lining does not impress compatriots; many find the most budget-friendly wooden lining more interesting. Although there are many more difficulties with its preparation, installation and maintenance.
7 photos
If you want to cover the loggia with wooden lining, then be prepared for the following:
- Before installation, the wood must be treated with special compounds;
- If you plan to paint or varnish the panels, then this is done after installation;
- Wood is afraid of water and should not be wetted, washed with rough sponges or abrasive chemicals;
- After a few years, it will be necessary to remove the protective layer (coating) and again treat the lining with compounds.
There are no fewer people wanting to cover different rooms with natural lining, so advice on choosing will be useful.
Methods for insulating a panoramic loggia
Insulation of a panoramic loggia is slightly different from standard work
In a panoramic room, it is very important that the windows are installed correctly and efficiently, and the requirements for windows are also very high. You should familiarize yourself with two options for solving the insulation problem:
- Installation of heated floors. This method will make it possible not only to make the flooring warm, but also to heat the entire area using heat.
- If the panoramic loggia is connected to the room, then immediate repairs should be made to the room. Thanks to the overhaul, it will be possible to carry out not only insulation, but also the overall design. Then the balcony can be insulated using the standard method and an additional heating system can be installed in it. In addition, it can be heated from the heat emanating from the room itself.
The insulation of a panoramic loggia needs to be approached more carefully due to increased heat loss through window blocks
In general, insulating a panoramic loggia should begin by removing all cracks that could create a draft.
It would not be superfluous to install radiators and heated floors
In order to create comfort and warmth, the owner of the apartment will have to spend not only a certain amount of money, but also put in a lot of effort and time. Do-it-yourself insulation of a loggia according to our step-by-step photo instructions can be completed in a period of 3 days to 1 week. By insulating according to the instructions presented in the article, you can get a sufficient level of comfort, regardless of what the weather is like outside the window.
How to make lathing on a balcony
It is better to weed out the sheathing assembly from purchased linear elements according to a previously drawn up diagram in the form of enlarged elements (with dimensions corresponding to the opening of the balcony door) in a horizontal position on the floor of the room to which the balcony or loggia is adjacent. This will ensure convenient alignment of the frame in one plane, and will also significantly simplify the work of connecting adjacent elements. Thus, the assembly of the sheathing will be reduced to the connection of 3 or 4 parts of the frame, transferred to a vertical position, instead of the labor-intensive adjustment and leveling of many individual horizontal and vertical components.
The vertical posts of the sheathing must be secured between the slab protruding as the balcony floor and the slab of the overlying floor. It is best to use perforated tin strips for this purpose, capable of bending in different directions, and screws with plastic wedging dowels. If it is impossible to obtain permission for this method of installation from a neighbor on the top floor (and this requires drilling holes in the slab of his balcony), you can use wedges mounted on some suitable glue.
Installing sheathing on an open balcony that has only a metal fence has its own specifics.
In order not to use two frames - for external and internal cladding, it is better to increase the thickness of the wooden frame elements so that it exceeds the cross-section of the metal parts of the fence, and usually these are strips and rods of round or square cross-section. The frame should be installed so that the fence is “fitted” inside it, serving as an additional load-bearing structure and not interfering with subsequent cladding carried out on the outside and inside.
The sheathing on the balcony for plastic panels, wooden lining and other sheet finishing materials differs only in the size of the cells, the dimensional module of which must match the similar cladding module. The sheathing under the lining on the balcony can be installed in both horizontal and vertical cladding versions.
Panoramic double glazing with hinged or sliding doors is usually installed in the front wall of a balcony or loggia. The sheathing of the side walls of a balcony differs from the front wall in the absence of such windows and is usually carried out under continuous cladding or cladding.
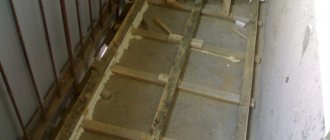
Technology for installing wooden floors on joists
In some cases, it is possible to lay wooden flooring on top of a cement screed, but practice shows that it is more reliable to install a balcony floor on joists. This will eliminate the height difference on the balcony and in the apartment, and will make the balcony warmer.
Floor joist installation plan
This stage of construction work can be called the most critical; its implementation will ensure the horizontality of the balcony base. To install a wooden frame, you will need three well-dried timber of a certain cross-section. We begin laying the boards on the base of the balcony slab.
- We lay two beams along the length of the balcony - along the edge of the base near the wall and parallel along the edge of the balcony.
- Having measured the distance between the logs, you need to cut the bars according to the measured length for laying crossbars between the longitudinal beams.
- We fasten the transverse and longitudinal bars of the sheathing using metal corners and self-tapping screws.
- To level the structure horizontally, we use a level and use plywood or plastic as supports.
- The resulting wooden frame is fixed with dowels to the surface of the concrete base.
Preparing the balcony for finishing
Regardless of the type of finishing material, the preparatory process includes dismantling the old coating, sealing cracks, and insulating surfaces. Each stage must be performed as carefully as possible, because this affects the quality and durability of the finish.
Preparing the balcony for finishing
To work you will need:
- cement-sand mortar;
- Master OK;
- primer;
- metal spatula;
- polyethylene film;
- slab or roll insulation;
- wooden slats 40x20 mm;
- screws, screwdriver;
- drill;
- dowel-nails;
- level;
- polyurethane foam.
Removing the coating and sealing cracks
They take out everything unnecessary from the balcony, remove baseboards, wallpaper, and lighting fixtures. Peeled paint and plaster are cleaned off with a spatula, and metal surfaces are treated with a metal brush. Large cracks need to be opened using a grinder, pieces of mortar and concrete chips must be removed. At the same stage, if necessary, replace old windows with new ones.
Removing the coating and sealing cracks
All gaps, cracks, cracks are sealed with thick cement mortar, large holes are first filled with foam cuttings. Vertical seams are blown with polyurethane foam, the excess of which, after drying, is carefully cut off with a sharp knife. It is also recommended to foam the cracks around the perimeter of the window opening rather than cover it with mortar. As the window is used, the dry mortar will crack and crumble, and over time you will have to get rid of the cracks again.
It is also recommended to foam the cracks around the perimeter of the window opening
The subfloor is checked for defects, small gaps are filled, and the seams around the perimeter of the walls are sealed. If the base is too uneven, make a new screed and suspend work until it dries completely. After this, all surfaces are cleaned of dust and primed.
Preparing the balcony for finishing
Balcony insulation
Balcony insulation
Before finishing the room, the ceiling and walls of the balcony must be insulated. For this purpose, foam plastic, penoplex, expanded polystyrene boards or roll insulation with a foil surface of penofol are suitable.
Balcony insulation
The slab materials are fastened after installing the sheathing from slats, but if roll insulation is used, the sheathing is stuffed on top of it. The thermal insulation of the balcony must be continuous so that there are no cold bridges, so the ceiling, walls, and floor are insulated at once.
Tools
To assemble the frame and subsequent installation of the PVC profile, you will need the following tools:
- Tape measure, square, simple pencil or marker, for marking on the ceiling, lath and plastic panels.
- Tool for end cutting of wood. The ideal option is a power saw; a jigsaw or a sharp hacksaw will also work.
- Drill, screwdriver, hammer drill. In most cases, one electric impact drill is sufficient, but it can be difficult to drill into a concrete ceiling. In such situations, it is better to use a hammer drill.
- Metal scissors or an angle grinder (grinder, preferably small). This tool is necessary for cutting galvanized profiles; besides, a grinder is convenient for cutting plastic panels.
- Level. To mark the ceiling around the perimeter, it is better to use a water (hose) level; if one is not available, a construction bubble level (preferably at least 1 meter long) will do.
- Rule. It will be needed during the installation of transverse elements of the frame to control their location in the same plane. It can also be used during installation of a perimeter profile in conjunction with a building level.
You will also need a hammer, pliers, a silicone gun, a knife, a spatula, and a stepladder (stool or table).
To construct the sheathing, a metal profile or wooden blocks are most often used. Let's look at each option in more detail below.
How to choose PVC panels for a balcony ceiling
The service life of the material is 10 years or more, and in order for the decor to serve properly, it is important to pay attention to the following factors:
- Connections. A simple combination of parts will help determine the quality: the density of the lamellas without play or cracks along the entire length of the joint will indicate that the manufacturer strictly followed the manufacturing technology. The joint error is no more than 0.2 mm per 1 lm.
- Evenness of the plane. If low-quality or recycled raw materials are used, stiffening ribs will be visible on the surface of the lamella.
- Ribs thickness. See the parameter in the product specifications: the thicker the stiffeners, the stronger the lamella itself.
And now about how to calculate the required amount of material: first you need to decide on the layout (lengthwise or crosswise). Then divide the ceiling area by the area of one element, add 10% to the final figure and this will be the required purchase volume
It is important to consider the width of the dies. If the length parameter is 3 m, laying across with a ceiling width of 140-150 cm, one lamella is divided in half without waste
The most popular dies lengths: 150; 200; 300 cm.
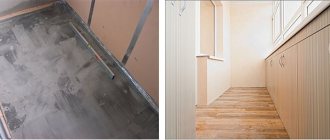
Preparation of materials and concrete slab
First you should take care of the wooden joists. To prevent their deformation, you need to let it rest in the apartment for two weeks. Then the timber is treated with an antiseptic. Apply it with a brush 2-3 times. Drying one layer takes 2 hours.
The most time-consuming step in constructing a deck is preparing the concrete floor for installation. It is necessary to remove finishing materials, clean the surface of the structure from mortars and greasy stains, and treat cracks and seams.
Preparing the base for a wooden floor step by step:
- We remove loose particles of concrete.
- If there are deep cracks in the slab and the reinforcement is visible, we clean it of rust with a special acid. Corrosion removers can be found at hardware stores. The composition is applied with a brush or spray, then you need to let it dry. The treated fittings on the balcony are cleaned with a stiff brush, small particles of dirt are removed with a vacuum cleaner.
- Concrete floors, cracks and crevices are treated with a deep penetration primer in 2 layers with an interval of 2 hours. You need to let the composition dry.
- We seal the joints between the panels with foam or sealant.
- Slots and cracks are closed with cement mixture.
- Protrusions above the finished floor surface are removed with a hammer drill chisel, spatula or grinder with a cutting disc.
- Remove dust from the stove with a broom or vacuum cleaner.
The permissible height difference over the entire floor surface is 2 mm. It is important that the base is level. Otherwise, you will have to level the floor on the balcony with a cement screed.
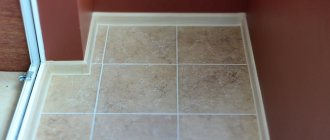
Stage 7 Installation of skirting boards, strips, completion of the main work.
During the installation of the lining, a lot of debris, trimmings, shavings accumulate on the balcony - do not forget to periodically remove all this. We inspect all the walls and floors for defects, and sand the lining if necessary. Next we move on to the installation of skirting boards, here everything goes according to the “top to bottom” principle. The tools you need are furniture nails, a 100-150g hammer and a hammer in the form of a dull nail. Also, if you don’t have an angle cutter, you will need a miter box to cut the baseboards at an angle. We attach the ceiling plinth to the nails, lightly press them down with a hammer, and then sand them with sandpaper up to 300 grit. In this way, we clean the place where we hammered the nail and mask it.
Next, you can nail the wooden corners onto the slopes, according to the principle described above. We cut the corners at 45 degrees, fasten them to the same nails, preferably every 10-20 cm, because the place will be a passage, and we need the corner to withstand some loads. Next, we need to lay the floor and screw on the skirting boards so that they come with vertical skirting boards.
After laying linoleum and installing plastic skirting boards, we complete the process by installing vertical skirting boards and strips. After thorough cleaning, we coat the walls with water-based varnish. 2 times, thereby gaining the ability to wet clean wood, moisture and dust-repellent properties.
Laminate ceiling
Advantages of this material:
- environmental friendliness;
- durability;
- ease of installation;
- a wide variety of textures, colors, shapes and beautiful appearance.
Flaws:
- sensitivity to temperature changes;
- sensitivity to moisture.
Installation instructions:
- Preparing the ceiling slab. Cleaning the surface of old coating (putty, paint, etc.) and treating it with an antiseptic.
- Installation of the lathing in increments that depend on the size and width of the laminate panels. We install slats around the perimeter with a width of at least 50 mm. Installation of the sheathing begins with the installation of guides, then crossbars are attached to them.
- Installation of laminate. We apply liquid nails to the sheathing at the place where the first plank is attached and fix the tiles, and hammer nails into the place of the lock so that it does not stick out, otherwise the next plank will not be fixed. It is necessary to make a technological gap between the walls and the laminate of 1 cm. We apply liquid nails to the sheathing in place of fastening the second tile and insert it into the lock and also fix it with nails. Thus, we cover the ceiling on the balcony with laminate to the end.
How to decorate a balcony with your own hands: step-by-step instructions
Decorating a PVC balcony with your own hands correctly is very simple. Even someone who has never taken on such work and does not have special skills can do such work. The most important thing in this work is to have perseverance, thoroughness, prepare all the tools, and read the instructions that are presented below.
It is very important to prepare all the tools and materials so that there is no need to stop the work process and run to the store. The following tools may be needed for work:
The following tools may be needed for work:
- Screwdriver with magnetic attachment;
- Drill;
- Construction foam for installation;
- Level;
- Set of plastic corners;
- Window sill profile;
- Insulation material;
- Suspensions;
- Metal profiles;
- Self-tapping screws.
The most important stage is the sheathing; it is performed after the waterproofing has been carried out and before the sheathing itself is carried out. The sheathing is the part on which the entire structure will be supported, so it should be given as much attention as possible. After this, the profiles are attached to the wall, their interval should be at least 50 cm. After finishing work with the lathing, you can begin finishing the ceiling. Finishing the entire loggia with panels begins with decorating the ceiling.
After the metal frame is installed, work should be carried out as follows:
- Galvanized metal profiles are fixed around the entire perimeter;
- Using a drill, holes are made in the walls and dowels are inserted. The structure is attached to the wall using a screwdriver.
- A profile is attached in the middle of the ceiling using iron hangers. If the loggia is large, you may need several profiles. If the width of the loggia is no more than 1.2 m, then one profile is sufficient.
- Profiles for plastic panels are attached to the profile, which is central;
- We are working on the wiring that will provide lighting in the future; to do this, we stretch it around the perimeter;
- We insert the first panel into the profile and fasten it with self-tapping screws. We do the same with the remaining panels until the very last one.
- Cut the last panel to the appropriate size. It should extend 6 mm beyond the profile.
- The last and penultimate panels are swapped. This is done to avoid unsightly gaps.
If there is a need during the work, you can use moldings to adjust the length of the skin. After the work with the ceiling has been completed, we sheathe the walls. Basically, interior wall cladding begins from the place under the windows. In this work, most of the actions are similar to the previous ones.
Step-by-step actions are as follows:
- The metal profile is attached to the bottom of the window sill.
- The location of the profiles located on the side is checked using it; for this you need to use a building level;
- Next, the profile is attached, which is located at floor level and in the middle of the wall;
- Metal hangers are installed, their distance should not be less than 50cm;
- The void between them is filled with insulation, and the resulting gaps must be lined with construction foam;
- A metal profile is attached to the hangers;
- The panels are installed on the installed profiles; they need to be fastened with self-tapping screws;
- The gaps that remain between the floor, window sills and panels are covered with special skirting boards.
What to do with the windows?
Think about it: is it worth insulating a balcony with cold glazing? If you want a truly warm corner, you shouldn’t skimp on windows. You can insulate the ceiling, floor and walls to the highest standard, but cold air will still leak through old or low-quality double-glazed windows. If your balcony is not glazed, first of all pay attention to the parapet - a low wall that protects the balcony from the street. It must be strong enough to support the window structure. Which windows to choose? If you are planning to make a balcony a living room, double-chamber plastic windows with hinged sashes are suitable. They are more airtight than sliding window systems, and such windows also have better heat and sound insulation properties. The only negative is that since the balcony area is generally small, the arrangement of furniture may interfere with opening the windows. In general, you can install plastic windows yourself. But it’s better not to take risks if you don’t have experience: after all, even some companies specializing in window installation make annoying mistakes in their work. In order not to encounter unfortunate installers, frosted windows and condensation, be sure to study the reviews of people who have collaborated with a particular company.
If installing new windows is still not possible, it is quite possible to find another way out. It is easy to insulate windows on the balcony using available materials.
Installation of sheathing
The next step, which involves finishing the balcony with siding from the outside, is installing the sheathing. It is necessary in order to level the surface on which the finishing material will be mounted in the future. For these purposes, you can use a wooden beam or galvanized profile. The latter must be installed using special hangers on which you can string insulation, for example mineral wool or, as in the photo, extruded polystyrene foam.
Various options are used to fix wooden elements:
- It is attached to a metal base using special copper clamps;
- On brick or concrete, using anchors or dowel nails;
- The timber can be attached to a wooden surface using self-tapping screws or nails.
When using wood as a sheathing for a balcony, you must treat it with an antiseptic or other protective solution.
Instructions for installing the sheathing
In order to prepare the sheathing on which the siding will need to be attached, the following requirements must be met. The distance between the slats should be in the range from 50 to 60 cm
If you install panels at a greater distance, the load-bearing capacity of the sheathing may not be enough! Particular attention should be paid when fixing the upper horizontal guide. Most carefully you need to attach it to the base (wall, metal structure)
It is recommended to use metal rods or corners, fixed with self-tapping screws to the timber, and facade anchors to the base of the facade. Before covering the balcony with siding with your own hands (if further insulation or glazing is implied), you can additionally insulate the surface
In this case, it is extremely important to take into account that the overhang of the sheathing (its thickness) exceeds the thickness of the thermal insulation material intended to be used by approximately 3-4 cm, in order to create an analogue of a ventilated facade. Plates of insulating material (foam plastic or mineral wool) are placed under the panels.
The step-by-step instructions assume that the next layer must be a layer of waterproofing.
useful in work
During the process of decorating a balcony with siding yourself, you can lay electrical wiring inside the structure. Which will be needed later when installing lighting and sockets. This will hide it inside the wall.
The question of how to fasten the lower horizontal beam is no less important than fixing the upper crossbar. You can fix it to your balcony using anchors or dowel nails. Only after the upper crossbar is connected to the lower one by means of vertical posts can you raise the question of how to cover the balcony with siding yourself.
Requirements for material selection
The composition of the base of the balcony room must be laid without complications on a brick or concrete base, not bend, not be deformed during installation, and can withstand the weight of the future facing sheet.
Other requirements include:
- environmental sustainability;
- be resistant to physical activity;
- have protection from moisture;
- differ in simple installation technology.
Two main components meet these requirements: a wooden beam and a metal frame, which serve to decorate the room.
Sheathing the side walls of a balcony or loggia
Internal lathing of balcony walls
A certain difficulty is presented by the lathing of the side walls of the balcony and its front part. As strength elements, you will have to use steel racks installed at the corners of the balcony. And also steel bars for the balcony fencing.
Some craftsmen are trying to carry out this fastening using dowels. Don't waste your time: such fasteners will loosen in a matter of weeks. Both wooden joists and aluminum profiles should be fastened to metal load-bearing structures exclusively with screws.
To do this you will need a drill, drill bit, and taps. In corner posts you can cut M6-M8 threads, in fence rods - M3-M4.
If you were unable to get long M3 or M4 screws, then drill blind recesses in the joists - “glasses” with a diameter slightly larger than the screw head, leaving a “bottom” 5-10 mm thick at the bottom through which the threaded part of the screw will pass. After screwing in the screw, this “glass” can be plugged with a wooden plug or simply covered with epoxy.
There is an option when pieces of wooden beams measuring 50x70 mm installed in the corners are used as a load-bearing support. But they also have to be fastened with screws to the corner metal posts, and wooden joists are nailed to them.
Often in this case, transverse bars are also installed - “from the floor to the window sill”. The design turns out to be quite massive.
Keep in mind only one thing: welding work can only be carried out if there are no flammable materials on the balcony.
Lathing the internal wall of the balcony
As a rule, insulation of the internal wall of a balcony or loggia (the one located between the balcony and the living space) is not done. She is already considered “warm”.
But sometimes, for purely decorative purposes, it is also sheathed with the same material as the rest of the balcony, with the installation of sheathing.
There is a slightly different difficulty here: you need to frame the door and windows facing the balcony. But this operation does not require anything special except accuracy: wooden slats are nailed to the wall with dowels or dowels in the same way and serve as the basis for covering with finishing material.
Insulating the sidewalls of loggias is not a significant difficulty, since in this case a buttress protruding from the wall can be used as a load-bearing element. The front part of the loggia is processed in the same way as the front part of the balcony.
Balcony sheathing with insulation laying
Currently, it is practical to cover balconies and loggias from the inside with siding and PVC panels. In this case, instead of wooden slats and beams for sheathing the side walls and ceiling, it makes sense to use the so-called CD profile. It may be called differently by different manufacturers and in different stores: “CD strip”, “ceiling rail”, “PP”, etc. This does not change the essence: this is a profile made of galvanized sheet, having the shape of the letter “P” in cross-section.
It is produced in a variety of standard sizes, the largest (60x27 mm) can be used for assembling power structures. It is convenient to attach plasterboard boards in it (take note if you are thinking of using this material to insulate your balcony!), It is affordable, since many companies and individuals use it to install suspended ceilings.
CD profile appearance
Working with it is fundamentally no different from working with wooden joists or slats. You just need to remember that if you are doing siding, then you need to attach the CD profile with the “legs” of the letter “P” to the wall, and with the “crossbar” outward. Otherwise, you will have nothing to attach the siding to. Or you will have to put wooden slats into the grooves of such a sheathing, which will only make the work more expensive and take a lot of time.
This kind of profile is durable, you can, without fear, attach it to the wall with dowels in blind holes with a pitch of 50-70 cm. The CD strip differs favorably from wooden sheathing in that it does not warp, it does not burn, and bugs are indifferent to it -woodworms, but...
A tree is a tree! It accompanies a person throughout his entire history, it is closer and dearer
Ceiling sheathing: a “bookmark” for the dryer, and what to do if there is no balcony on top?
The ceiling of a balcony or loggia is lathed in the same way. In this case, thinner bars are used - 20x40 mm. But it is also necessary to take into account that the ceiling beam can be used to install a dryer.
We check the strength of the embedded board with the weight of an adult man!
Assume that the weight of a wet carpet will easily exceed the weight of an adult. Therefore, you need to choose a stronger “beam for the dryer” (50x70 mm) or use paired beams (firmly sewn with nails or bolts, screws) of regular thickness (20x40 mm) instead of one thick beam. You need to nail them to the concrete of the “ceiling” (upper floor balcony) with dowels in increments of 30-40 cm (in the area where the dryer will be attached).
A special case is the lathing of the ceiling of a balcony located on the very top floor of the building - where there is actually no “ceiling”.
In this case, above the balcony, at a height of approximately 2.2 meters, it is necessary to attach a structure, which experts sometimes call a “half-loft” or “canopy”. Most often it is a right triangle welded from a steel angle profile. Sometimes, instead of a steel profile, a durable wooden (oak, birch) beam is used.
Balcony roof installation
With its short “leg,” such a “triangle” is attached with dowels to the main wall, its long one hangs over the balcony, and its “hypotenuse” sets the angle of the slope along which the snow will melt in winter. 2-3-4 such structures serve as the frame for the roof of the upper floor balcony.
It is quite difficult to install such a “half-loft” above the balcony. Usually, a team of industrial climbers or experienced builders is hired for this.
But after the “canopy” is strengthened, further work proceeds according to the same pattern: the longitudinal beams of the sheathing are stretched, the slope is covered with tin, tiles, slate; the ceiling part is insulated with mineral wool or other material suitable for this purpose, and sheathed with plywood or siding.
Frame for balcony
Before proceeding with the lathing, in some cases it is necessary to strengthen the structure of the balcony. How to do it? – Read the article “How to make a frame for a balcony with your own hands?” One of the most difficult repair tasks is installing a canopy over the top floor balcony. A separate article on our website is devoted to its solution. When repairing a loggia, it is often necessary, along with the sheathing, to first insulate the parapet. Another material on our website is devoted to this - https://oknanagoda.com/balkony-lodzhii/remont-otdelka/kak-otremontirovat-parapet.html
But regardless of what material was used as the frame of the “canopy” - a steel profile or a wooden beam, the structure turns out to be very massive. Under the influence of additional weight of snow or gusts of wind, it can collapse, turning out part of the main wall. Therefore, very often owners of apartments on the upper floors of old panel buildings are asked to refuse such reconstruction of their balconies.
Stages of work
Installation of sheathing
The spacing of the sheathing strips should be no more than 40 cm from each other. Wooden sheathing bars must be treated with antiseptic mixtures to prevent the appearance of mold and mildew.
When decorating the upper part of the sheathing, special attention is paid to its fastening to the wall. To do this, it is better to use small metal rods, which are fastened with self-tapping screws on one side to the wall, and on the other to a wooden beam.
The thickness of the sheathing should not be less than the insulation layer.
Installing sheathing for lining the balcony with siding
Insulation boards are laid under the frame, and utility lines can be laid (if necessary). If desired, you can make a metal frame for finishing. In this case, the frame is mounted according to a similar principle, but an additional layer of insulation will be required. You can use mineral wool or other more modern insulation.
A layer of protective membrane must be laid on top of the insulation, which is secured with self-tapping screws. If the balcony base is concrete, then the lower part of the sheathing is secured with a special construction adhesive, and it is attached to the rods with clamps.
Sheathing: installation of the lower horizontal chord
Laying concrete beams on the balcony slab. The side beams are nailed to the facade. You can use a tenon joint if you have a woodworking tool.
The bottom beam is glued to the concrete with silicone-based glue, and the balcony is blown from the inside with polyurethane foam. You can attach the timber with dowel nails if you are sure that the edges of the balcony panel are strong enough.
The height of the lower belt of the bars is from 76 mm. 1-2 rows of beams are nailed onto the lower beam to obtain a total height of 80-90 mm.
Installation of the lower horizontal belt
Sheathing: installation of the upper horizontal chord
First, the required number of siding strips is calculated. 1-3 rows of beams are attached to the railing of the fence, so that the upper part is 1 cm higher than the top edge of the cladding. The first beam is fastened with countersunk screws or self-tapping screws through the holes where the cladding was previously attached. The remaining beams are nailed on top.
Decoration of cladding corners
Fittings are usually sold complete with siding covering. To install the corner parts, take a piece of the platband and cut out triangles in the middle of its short side - these are the thrust bearings.
The platband is heated and bent at an angle of 90 degrees to form shelves with short sides. The lower edges of the corner part will be installed on them.
The thrust bearing is attached to the beams of the lower chord with screws at the corner joint.
The corner for decorating the outer corner is placed on its shelves. The thrust bearing is screwed to the bars of the upper and lower chords with screws.
Installing Connectors
Installation of siding strips
A starting strip is installed, which is attached to the lower belt of the grille with the lock down, nailed or screwed. Elongated grooves are made in the parts so that the siding does not stand rigidly, otherwise it may swell or break off the fastening.
Attaching the starting profile
Using a nail or a metal marking pencil, a recess is made in the middle of the groove for a screw, which is driven in with a drill or screwdriver.
Then the screw is turned out a quarter turn to loosen the strip of siding slightly. When the starting bar is secured, the bottom panel is lowered until the lock clicks.
Then it is pulled up until the entire hook enters the lock. Make marks along the top edge of the panel on the fencing bars.
The strip of siding is disengaged, removed, and the second belt of sheathing beams is attached according to the marks made. Holes are made in the fencing bars, and the beams are secured through them with bolts or self-tapping screws.
When the second chord is installed, the siding strip is again lowered along the grooves of the corner pieces until the lock of the starting strip snaps into place. There are already holes for the screws, the fastening is made again in the middle of the mounting groove, the screw is screwed in and turned a quarter turn.
The remaining belts are attached in the same way.
The upper belt is combined with the installation of the platband. To strengthen the structure, vertical bars can be installed.
Installation of siding strips
Vapor barrier
Due to temperature changes outdoors and indoors, condensation forms on structures, which destroys them. To protect the wooden mesh and insulation, vapor barrier films are used. Penofol or polyethylene is suitable for these purposes.
Rules for installing vapor barrier on insulation:
- Foil films are placed with the metallized side facing the room.
- The material should be stretched well, the sheets should be overlapped. The joints are glued with tape or special glue. Punctures and tears of the film should not be allowed.
- On the joists, the vapor barrier is secured with slats up to 3 cm thick.
- A ventilation gap of at least 3 cm is left between the film and the rough flooring.
If all the rules are followed, a wooden floor on the balcony is laid on top of a layer of vapor barrier and slats.
Siding
It is necessary to fix the material on the wall in strict compliance with the manufacturer's recommendations: Be sure to take into account the temperature conditions during installation. External finishing of the balcony with siding should be done only at positive temperatures. When exposed to cold, the material may burst during work; The length of the panels should be selected taking into account the fact that its maximum length is achieved when exposed to direct sunlight in the summer. In “construction” language this is called – Compensation for temperature deformation. The average range is 1.2 – 2 cm for vinyl or acrylic siding; Siding is installed using self-tapping screws or nails. In this case, they should be located in the center of the technological holes; The caps should not fit tightly to the panel. There should be a gap of approximately 2 - 3 mm between them.
Advice from the “façade designer”
Failure to comply with these requirements will lead to “blowing” of the siding and possible cracking. Therefore, the external finishing of the balcony with siding should be carried out taking into account all the above points
Molding installation
- various strips and moldings for siding, including starter and finish strips
- “famous” G-trim bar
You need to start installing plastic from the outside with your own hands by attaching the molding. Having measured the height along the completed sheathing, you should cut off 2 outer corners of the same size. Fix one of them so that the outer corner is as correct as possible and secure it to the sheathing. The first self-tapping screw is screwed into the upper part of the technological hole. In this way, the “lowering” of the angle downwards is limited. Subsequent ones are twisted strictly in the center. The second outer corner is fixed similarly to the previous one. In order to close the cut of the panels on the wall side, strips called “J - trim” are installed. Just as with the corners, the height is measured (if the sheathing is installed correctly, then their dimensions will be the same). Fastening is carried out similarly to the corners. The first self-tapping screw is screwed into the upper part of the hole, the subsequent ones into the center.
Next, you need to install “G-trim” on the bottom of the sheathing. Using the correct technology for finishing balconies with siding, you can use a special starting strip, but this is only allowed when the work is carried out from the outside of the loggia (when finishing the first floor or working from scaffolding). When installing panels from a balcony, inserting the panel into the lock of the starting bar will be extremely inconvenient. After cutting the strip to the required length, secure it between the outer corners. Install the same one at the top of the sheathing. It can be replaced with the original finishing strip, but in order to properly fix the panel in it, additional locks will be required, which will need to be cut manually or using a special cutter. Therefore, using “G-trim” is much more practical and convenient.
Siding installation
Facing the balcony with siding begins with finishing the front side. This is explained by the fact that this part of the surface has the greatest length, trimmings from which can fit on the sides, which have a smaller size. The length of the panel is measured taking into account the temperature conditions at the time of installation. If work is carried out in hot weather, under direct rays of the sun, installation of siding with a free movement step of 0.5 cm is allowed. Cool weather means a larger gap left to increase the panel in the summer. Moreover, these requirements apply to all categories of vinyl, acrylic or basement siding.
The first strip is fully installed into the bar, and the upper part is fixed with self-tapping screws. Fastening is carried out in the same way as previously performed: there should be a small gap between the cap. They are twisted into each vertical beam of the sheathing. The remaining surface should be finished similarly to the previously described steps, connecting the top panel to the bottom. The last top panel is cut to the required size and installed in “G-trim” or finishing.
As can be seen from what was written above, in order to independently secure siding on a balcony or loggia, no special knowledge is required and absolutely anyone can cope with it. The work will not take much time, but the result will not be long in coming. The impression of the transformed appearance of your house or apartment walls will not leave any owner indifferent.
Wiring and lighting
When assembling the suspended sheathing on U-shaped brackets with the laying of communications, no difficulties arise.
In addition, if the distance from the main ceiling is at least 8 cm, you can use tall lamps with replaceable lamps. If the rail is screwed directly to the ceiling, it will have to be grooved (at least at the intersection of the timber and the wiring), and the choice of lighting fixtures is limited to thin LED models.
It is necessary to install spotlights during the installation of the panels, and it is advisable to immediately check their functioning so that you do not have to solve any problems that arise after finishing the cladding.
When choosing lighting, you should not purchase devices with incandescent lamps, as they heat up during operation, causing the plastic to turn yellow and slightly deform.
The actual insertion is performed with an electric drill using special crowns.
You can also use a jigsaw with a fine file, but this will require some skill in using this tool. It is possible to make a hole in other ways, for example, with a narrow knife, the main thing is to correctly assess your skills so as not to damage the plastic and avoid injury.
When using chandeliers and other pendant lamps, you should take care of their mounting location. This must be done at the stage of constructing the sheathing. So, for massive chandeliers, an additional backing made of slats or galvanized profiles is installed. The main thing is that this element is firmly fixed to the main ceiling.
Video instructions for installing a ceiling made of PVC panels:
Preparing the balcony for finishing with plastic panels
PVC panels have long been considered a popular finishing product. This is due to their advantages, such as:
- good level of additional insulation;
- resistance to moisture and temperature changes;
- ease of care;
- excellent appearance.
Material selection
Types of plastic panels for finishing
When pre-selecting a material, you should not focus on the cheapest PVC panels. They will not have all the properties listed above. You need to start considering materials from the middle price category. They have a very wide range of colors; some models can have almost two hundred different shades.
To understand that plastic panels are truly of high quality, you need to pay attention to the following factors:
- a large number of stiffeners;
- high-quality material is uniform in color and has no foreign inclusions;
- the design of the front surface should not have unpainted areas;
- during the process of joining the panels to each other, a characteristic click should be heard;
- no deformation on the front panel.
If these conditions are fully met, we can say that the selected panels belong to a truly high-quality product. This material should be used when finishing balconies or loggias.
Recommendations from the experts
Floor plinths are usually installed on top of decorative trim. In these places it is necessary to provide an additional support bar. This is not necessary only in the case of plastic sheathing for PVC panels. The main thing here is not to overtighten the fasteners so that the finishing fabric remains without deformation.
Fastening the floor plinth with self-tapping screws Source prom.st
Less often, it is planned to hang certain objects on the walls. Fastening locations must be provided in advance. Here the frame is complemented by reinforced jumpers. Also, to increase reliability, they need to be secured to the walls with plasterboard hangers or supports made of wooden beams.
Features of panels
In construction supermarkets you can find a wide selection of different types of this material. There are both narrow and wide options for planks, the length of which is three meters. There are also longer varieties, however, the finishing of the balcony ceiling is usually done with just such plastic panels, which are attached to a pre-assembled base or sheathing.
A little different are the parts, which are made in the form of large sheets of the same material. They can be glued directly to the surface of the ceiling, without the use of lathing. The most suitable type of adhesive for this is “liquid nails”. However, significant differences in height or serious defects cannot be hidden with such finishing. Therefore, long parts with a width of 10 to 30 centimeters have become more widespread.
From such planks you can assemble a continuous surface. To do this, you need to purchase so-called “seamless” panels. They are distinguished by a special connecting edge, which allows the parts to be joined without visible gaps. In addition, you can choose the appearance of the future coating. The wide range of colors is not limited to just plain colors. There are imitations of different types of wood, various natural surfaces, like marble or reed fabric.
Often, on a balcony it is necessary to insulate the ceiling and in this case, covering with plastic panels can also help. Being a suspended structure, this design allows you to place a layer of insulating material in the ceiling space.
Installation of panels on mounting strips and clamps
Installing a plastic coating using clamps and mounting strips has certain nuances, but in general it is not as complicated as it might seem at first glance. Having carefully studied the step-by-step guide and having the necessary consumables available, you can carry out the installation yourself without any problems.
Installation technology:
- At the very beginning, control measurements are taken over the entire surface to be coated.
- The second step is cutting the material to the required size. To cut plastic, you can use either a hacksaw or an electric jigsaw.
- The first panel is fixed with a “spike” in one of the most difficult corners of the room.
- The next one is carefully mounted into the groove of the previous one, after which they are both secured to the frame using a clamping clip and self-tapping screws.
- Installing the last panel can be a bit tricky. If it is not possible to fix it with a clamp, then it is possible to attach the last final element with glue.
Fastening the panels to clamps is carried out quite quickly. The main advantage of this installation method is that it almost completely eliminates the possibility of damage to the plastic during its installation.
Mounting the frame on the ceiling
The step-by-step work steps are as follows:
- Waterproofing is laid on the concrete surface.
- The guide rail is sawed off to the required length and laid out over the waterproofing; holes for dowels are drilled along the rail in increments of 60-80 cm.
- Using a drill, holes are made in the ceiling (depth 5-6 cm) for fasteners.
- Insert plastic choppers into the spacers and attach self-tapping screws.
- Align the rail evenly and drive in the dowels. It is better to drive it in, leaving 7-10 mm to the end, and then screw it in with a screwdriver until it stops.
- The fastening spacing of the slats is 60 cm, all guides are leveled.
- The insulation is laid out between the guides.
In the area of window and door openings, vertical and horizontal slats are placed so that one plane with the frame is maintained. The lathing is mounted on the walls in the same way, but the first batten must be mounted 1 cm from the floor, having determined the state of its outlet by level.
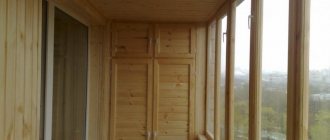
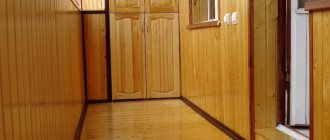
Clapboard finishing
In order to give the balcony coziness, warmth and beauty, it is often lined with clapboard made of natural wood. A big plus for her is the instant insulation of the balcony, which will help keep warm in the winter. Finishing with such material yourself will not be difficult, but the amount of work is quite large.
The term lining often refers to a product made of wood. But sometimes plastic PVC panels can be called clapboard. Before choosing a given material, it is often based on its cost and practical considerations. In different regions, natural wood costs differently.
Most often they prefer to choose wood, as it is a natural material. In practice, of course, PVC is better because: it is easy to wash, practically does not require maintenance or treatment, and retains its presentable appearance for a long time.
Lining made of wood is more difficult to use: before installation it must be coated with a protective impregnation. Also, if desired, the lining should be painted or varnished, but only after complete installation. But, despite the difficulties in maintaining wood, it is popular for finishing balconies.