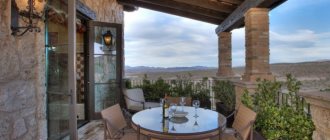
Open balcony in a private house
Balconies and loggias are integral elements of modern residential buildings. When properly designed, they become an excellent place for a comfortable rest, exciting pastime, conversations, and romantic evenings. The selection of finishing materials, furniture, accessories, the use of design techniques - all this helps to create the necessary atmosphere, regardless of the size of the available space.
Types of structures
Regardless of appearance and size, all balconies have mandatory structural elements. Among them:
- base plate, which bears the main load;
- fencing (parapet);
- additional elements (visor, wind screen).
The main structural element is a slab, which is made of reinforced concrete or wood. The first option is applicable only for buildings built from durable materials (stone, brick, reinforced concrete blocks). The wooden slab is lightweight, so it can be installed on the facade of any building.
Depending on the method of attaching the slab to the wall, balconies can be:
- with a cantilever beam clamped in the wall (the reinforced concrete slab is recessed into the wall during the construction stage, and the overhang of the structure cannot exceed 1 m);
- with a cantilever slab and support on beams (beams are recessed into the wall, on which a reinforced concrete or wooden slab is placed on top, while the width of the balcony can reach 1.2 m);
- with a slab supported on triangular brackets (this option is used when the balcony is attached to an existing building);
- with a slab on supports (an attached balcony rests on columns, walls, and beams standing near the facade).
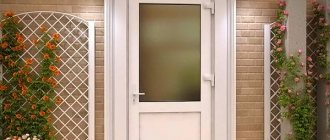
The French balcony also belongs to the category of balconies, although, in fact, it is only a beautiful enclosure of a window opening.
Material
Durable and durable materials are used to make balconies. Most often it is concrete and wood.
Concrete balcony
This architectural structure has its own characteristics:
- load-bearing structures are recessed into the wall. The reliability of the structure depends on the thickness of the wall; if it is not very strong, then additional supports are used;
- the balcony overhang is at least 1 meter in length;
- if the house is brick, then the base slab is inserted into the wall along its entire length;
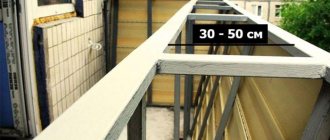
- the upper level of the slab is set 5-8 cm below the expected level of the floor covering;
- the concrete base must be thoroughly waterproofed;
- The height of balcony railings should not be less than 1 m.
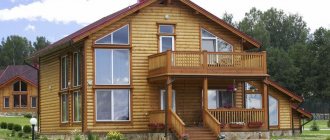
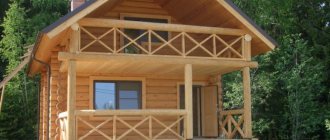
Wooden balcony
Usually inferior to concrete in size and reliability, but superior in decorative terms. Externally, the balcony resembles a cozy wooden house or hut. Wood is a material that has many advantages. First of all, it is the atmosphere of comfort that natural wood creates, its smell and appearance. Wood goes well with different finishing materials.
Features of a wooden balcony:
- for the manufacture of load-bearing structures, beams with a cross section of 10*20 cm are used;
- the minimum depth of beams in a stone facade should not be less than 25 cm;
- the beams are fastened to the walls with bolts or metal angles;
- vertical posts (boards 4*10 cm) and longitudinal ones (5*10 cm) are attached to the console;
- flooring and handrails are installed;
- All elements made of wood and metal are treated with oil paint, gratings and handrails are coated with frost-resistant and water-resistant varnish.
The gaps between the lattice bars for any structure should not be wider than 10-12 cm.
What will a waterproofing device do?
- Protection from moisture will ensure long-term use of structures without additional repairs. If you ignore protective measures, wooden structures will swell and, over time, simply become unusable.
- High-quality waterproofing will allow you to avoid such unpleasant phenomena as mold and mildew, which also destroy structures.
- And, of course, the appearance will remain the same if the building is protected from moisture.
So how do you waterproof a balcony in a wooden house with your own hands? Protecting a wooden balcony or loggia from moisture can be done in several stages. It all depends on the type of balcony: open or closed, as well as the functions it performs (resting place, work area, or storage room). In any case, you cannot do without reliable waterproofing, and in some cases, insulation.
Advantages and disadvantages
A balcony, like any other architectural structure, of course, has a number of certain advantages and disadvantages, which must be weighed at the stage of developing the design of the future home.
The advantages of a balcony include the following:
- Possibility of using the balcony area as additional living space;
- Attractive appearance, beautiful facade decoration;
- Free access to the street. It's always a good time to spend time in the fresh air with a pleasant conversation or a cup of coffee. In addition, fresh air in close proximity to living space can be a real salvation for people with disabilities;
- Depending on the design features, the balcony can serve as part of the porch, roof or veranda;
- In the event of a critical situation, the balcony can always be used as an emergency exit to the street.
In addition to the advantages, a balcony in a private house also has its disadvantages. Among them:
- Adding a balcony to an existing house is always financially very expensive;
- The attached balcony is a high-risk structure. Incorrect calculation or installation error can lead to the collapse of the structure;
- The balcony door leads to significant heat loss in the room. Unless we are talking about a completely isolated extension.
Balconies can be closed or open. The open structure consists of a base slab with a fence. A closed balcony requires mandatory glazing of the area.
Open
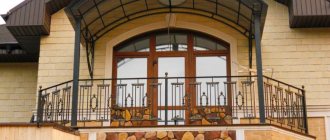
Most often, private houses are decorated with open balconies. This design is used as a decorative element, so special importance is given to the choice of finishing materials and the design of the fences. One of the most beautiful and stylish options, which has become increasingly popular in recent years, is the use of wrought iron fencing.
In addition to its unconditional visual appeal, forged fencing has its own characteristics:
- its size should not exceed the size of the load-bearing slab and the balcony opening;
- before installation, it is necessary to carefully assess the condition of the slab, because the metal structure will add a lot of extra load to it;
- It is necessary to start installing a metal grating or other metal structure only after the reinforced concrete slab has been completely restored (elimination of cracks and chips, leveling).
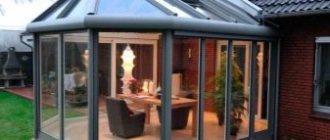
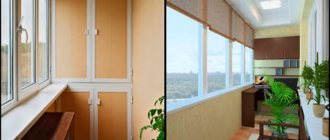
Closed
Glazing significantly increases the functionality of the room, allowing you to use the balcony not only as a place to relax, but also as one of the living rooms.
Let's rise higher
The frame structure of the floors of the future veranda is laid on the prepared base. At this stage, columns supporting the balcony are erected above the terrace (brick, wood, steel). Steel beams are connected to the caps on piles, or poured with concrete along with the foundation. Brick columns are laid out as a continuation of the underground part of the pillar.
The timber is laid on piles and secured with anchor bolts. The lower belt should hold firmly to the base. The frame structure can directly rest on the supports, or it may be necessary to additionally tie the piles (if the height or area is significant). For tips on how to make a veranda with your own hands, see here:
The remaining vertical cladding elements will be lighter and will not perform load-bearing functions. They will get the wind load on the glazing and their own weight. The materials chosen for cladding are wood, aluminum, plastic, and glass. They are fastened together with metal corners for rigidity.
The rafters are secured to the support posts with self-tapping screws (nails). For strapping, a purlin is attached to the wall of the building. The roof slope leads from it with a level decrease of 0.15 cm towards the cut. Posts for balcony railings are produced higher. Roofing material is laid.
The balcony railings are made 0.9 m high. Logs under the flooring are attached to the railings. A floorboard is placed on them. The top of the railing is covered with handrails. These can be, in addition to wood, modern weather-resistant materials (plastic, anodized aluminum, stainless steel).
Lightweight construction materials
A budget option for a balcony can be made like an openwork wooden veranda with a used roof. To do this you need:
- frame beam 4m long with edge 10×10 cm;
- floor and balcony logs – timber 10×50 cm, 4 m;
- flooring board, thickness 4 cm;
- beam for railing 5x5 cm;
- material that will be used for the roof (corrugated sheeting, metal tiles, ondulin);
- impregnation for wood.
First, you need to attach the longitudinal beam to the wall of the house so that it is 5 - 10 cm below the upper edge of the floor, this will protect against water entering the house when it rains or melts snow. It must be secured firmly, because this is where the main load will be placed. The support beams are placed parallel to the wall at the required distance. A cross beam is attached to the top. Between 2 longitudinal beams, a transverse board with a thickness of 5 cm is laid, the distance between them does not exceed 0.5 m. Having made such preparation of the frame, they begin to lay out all sides, and, if necessary, the roof. See this video for details:
Do you need a balcony?
Conventionally, all owners of suburban housing can be divided into two categories: the first - those who consider the presence of a balcony to be a mandatory attribute of their home, the second - those who are not ready to sacrifice extra square meters for the sake of a panoramic view.
It would seem that what’s wrong with a balcony? Opponents usually give two arguments for this:
- Typically, a balcony in cottages is located on the second or attic floor, and occupies some area of the house. This means that the rooms will be smaller than they could be.
- In addition, there is not always something to see from such a site (this is especially true for small areas): there may be a neighboring cottage, a road, a construction site, etc. close to the house.
It's hard to argue with that. If the area of the cottage or dacha is small and, especially, the top floor is of the attic type, the balcony can “eat up” a decent area. But this could be an additional bedroom or bathroom. Think about what is more important to you?
Features of forged structures
These designs are quite beautiful, but require a large investment. There are several things to consider during installation:
- Before installing the gratings, you need to make sure that the base plate is secured securely enough, since metal products are heavy;
- the grate should be installed only after the concrete has completely hardened (if a ready-made slab is not used);
- to restore the concrete slab of a wrought-iron balcony, you should not use cement-sand mortar, as it will quickly fall off;
- To get rid of small cracks, you should add tile adhesive to the solution.
The creation of a forged balcony occurs in the same way as the construction of a concrete structure, but instead of supports, forged elements are fixed.
Where does the redesign of an open balcony begin?
The process of decorating a balcony space should begin with a thorough cleaning of the area and assessing the condition of the facade. Cleaning involves removing unnecessary, old things. Inspection of the facade is necessary so that after completion of the work, the pastime will be comfortable and cozy. Therefore, if there are defects, it is advisable to eliminate them during the re-registration procedure.
The scheme of subsequent actions is determined by the type of balcony structure. The most commonly used concrete systems are characterized by high strength, durability, and endurance. But wooden systems are also often found, in particular in houses built from such material. When professionally performed, they have equally impressive characteristics.
The canopy also requires attention, without which it is difficult to imagine an open balcony. Since the presence of a visor provides protection from rain, bad weather, and hot sun. It must be larger than the balcony itself and installed at a certain angle.
Roofs or canopies: which is better?
The roof is not a mandatory structural element; however, it greatly expands the functionality of the balcony. The canopy is a simple structure, most often curved, that protects the balcony space from precipitation.
The roof should be slightly larger in size than the slab and balcony railing and have a slight slope to prevent snow accumulation.
The roof can be single-pitched (the simplest and most economical option) or gable (this option looks especially good on corner balconies).
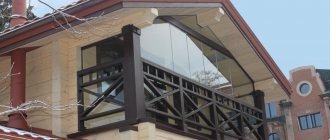
An original canopy called an “awning” will allow you to hide the open space of the balcony from direct sunlight. This metal structure, covered with a special fabric, not only effectively protects the balcony area, but also gives it a very beautiful and modern look.
The dome type canopy is not very popular due to certain technical difficulties in manufacturing. However, many owners of private houses choose this particular design method for their balcony.
The arched visor looks very interesting and elegant. In addition, it is also quite functional and practical to use.
Balcony
Most people will not have problems differentiating a balcony from any of the other options listed above, since this is the most popular option and the majority are accustomed to it, but still it would not be superfluous to mention its features. It must be unheated, protrude above the facade and be very limited in area. But the situation with heating can be changed by glazing it, laying linoleum, and you can also create a separate area for storing things, for example, for household items or a recreation area.
Do-it-yourself balconies on a summer cottage, ideas and tips
When the summer season ends, for many of us the balcony replaces beds, flower beds, and a corner for relaxation. However, you can arrange a kitchen, an office, and a gym on it.
How to make a balcony at the dacha with your own hands
Many of us prefer a peaceful, cozy and comfortable holiday in the summer at the dacha. Winter time spent at a summer cottage with family, relatives, friends or relatives is no exception.
We are building a balcony at the dacha
In modern times, two or three-story country houses are the most popular.
Such buildings are comfortable enough for long-term stays, accommodating guests and even holding various banquets and parties.
As you know, any high-rise building must have a balcony. What to do if your layout did not previously include a balcony, the dacha was built a long time ago, and the need for a balcony urgently arose?
With the help of modern technologies and repair tools, you can easily make a balcony in your country house with your own hands.
Let's rise higher
The frame structure of the floors of the future veranda is laid on the prepared base. At this stage, columns supporting the balcony are erected above the terrace (brick, wood, steel). Steel beams are connected to the caps on piles, or poured with concrete along with the foundation. Brick columns are laid out as a continuation of the underground part of the pillar.
The timber is laid on piles and secured with anchor bolts. The lower belt should hold firmly to the base. The frame structure can directly rest on the supports, or it may be necessary to additionally tie the piles (if the height or area is significant). For tips on how to make a veranda with your own hands, see here:
The remaining vertical cladding elements will be lighter and will not perform load-bearing functions. They will get the wind load on the glazing and their own weight. The materials chosen for cladding are wood, aluminum, plastic, and glass. They are fastened together with metal corners for rigidity.
The rafters are secured to the support posts with self-tapping screws (nails). For strapping, a purlin is attached to the wall of the building. The roof slope leads from it with a level decrease of 0.15 cm towards the cut. Posts for balcony railings are produced higher. Roofing material is laid.
The balcony railings are made 0.9 m high. Logs under the flooring are attached to the railings. A floorboard is placed on them. The top of the railing is covered with handrails. These can be, in addition to wood, modern weather-resistant materials (plastic, anodized aluminum, stainless steel).
Lightweight construction materials
A budget option for a balcony can be made like an openwork wooden veranda with a used roof. To do this you need:
- frame beam 4m long with edge 10×10 cm;
- floor and balcony logs – timber 10×50 cm, 4 m;
- flooring board, thickness 4 cm;
- beam for railing 5x5 cm;
- material that will be used for the roof (corrugated sheeting, metal tiles, ondulin);
- impregnation for wood.
First, you need to attach the longitudinal beam to the wall of the house so that it is 5 - 10 cm below the top edge of the floor, this will protect against water entering the house when it rains or melts snow. It must be secured firmly, because this is where the main load will be placed. The support beams are placed parallel to the wall at the required distance. A cross beam is attached to the top. Between 2 longitudinal beams, a transverse board with a thickness of 5 cm is laid, the distance between them does not exceed 0.5 m. Having made such preparation of the frame, they begin to lay out all sides, and, if necessary, the roof. See this video for details:
The importance of choosing the right materials
Attractive balconies can be designed both in an apartment and in a country house. Of course, there are many more possibilities in cottages. But even a small area can be made as functional and ergonomic as possible. In any case, the final result will depend on the selection of building materials.
These must be products designed for use in harsh conditions, able to withstand temperature changes, moisture, and exposure to sunlight. Building materials that will be used for work on the south, sunny side require special attention. They must be resistant to fading and ultraviolet radiation.
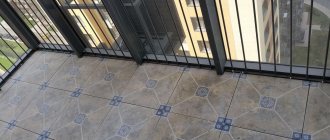
Flooring options for an open balcony
When decorating an open balcony, it is important to install the flooring correctly. The durability and attractiveness of the finish in the future largely depends on this. Regardless of where the work will be carried out - in a country house or in an apartment, it is recommended to ensure a slight slope of the base.
It may be completely invisible, but it will avoid the accumulation of moisture and subsequent destruction of the coating. As a base, it is recommended to make a screed that is suitable for further installation of almost any material. Sometimes design features require searching for other solutions.
Among the finishing options used, the best characteristics are:
- Porcelain stoneware is an incredibly strong and durable material that attracts with its best properties. Exceptional resistance to destruction and various impacts is determined by the structure. The absence of pores prevents moisture penetration and subsequent destruction. When decorating a balcony in a private house, it is better to choose a product that meets certain operating conditions and has a non-slip surface.
- Tiles provide a more affordable, but no less impressive and practical solution. Selection for an open balcony should be made taking into account the weight of the product, frost resistance, and ability to withstand loads. A non-slip surface is required.
- Self-leveling flooring helps create a uniform, high-quality coating. Here you cannot make mistakes in performing the work. This will affect durability and results.
- A balcony in a private house, like a terrace, is often decorated using decking boards. The latest production technologies and special processing guarantee the durability and attractiveness of the coating on the open balcony. This solution is indispensable for wooden balconies, when you want to make the structure as light as possible.
Other flooring options
Work on finishing open balconies is accompanied by the use of other materials. Applicable:
- linoleum;
- dye;
- It is possible to choose a mat, for example, artificial grass.
But each case has its own subtleties. Linoleum often does not withstand harsh operating conditions and is destroyed when exposed to frost. The choice of paint involves repeating the finishing work in a few years. The paint coating will last up to four years with proper preparation of the base.
Roof with frame independent of glazing
Glazing of balconies with a roof is often a necessary measure when finishing a balcony on the top floor, or in a house with alternating balconies between floors.
will install you a roof of any type and design, including the most modern and practical roof for a balcony today - a roof with a frame independent of the glazing.
A glazing-independent roof frame is not connected to the glazing support, but instead is simply attached to the wall of the house, avoiding load on the balcony.
With complex glazing of a balcony with a roof, we can install a roof with the balcony removed, as well as carry out any work on its arrangement.
We also produce another lightweight type of balcony roof made from wooden blocks. This type is more economical and easier to install. But such a roof on a balcony requires additional support; usually, the support is the balcony glazing frame itself.
There is also an intermediate version of a roof for a balcony with a support made of metal posts . The frame of such a roof is made of welded corners, and the edges rest on parapets using metal racks made of a profile square pipe. Typically, this type of roof is installed on a balcony if the roof overhang from the facade of the house is of impressive size.
Roof with independent glazing and frame made of corrugated sheets
Roof on balcony on racks with support
Balcony canopy made of polycarbonate on racks with a new parapet
Source: moskov-balkon.ru
Roof terrace of an apartment building
Engineers began to design some projects of apartment and multi-storey buildings in such a way that residents would have some of the advantages of country houses. Large apartments may have their own terraces instead of the usual balconies.
Others equip a common recreation area on the roof. This option is also attractive because the roof of any high-rise building can be rebuilt. Such projects require serious preparation, qualifications, construction work and high-quality materials.
Not every high-rise building can support such a recreational area. The foundation, supports and supporting structures must be designed or reinforced for such loads. In order not to make the structure heavier, you should make do with light wooden materials, boards and timber. You should also choose the simplest, most durable furniture that is easy to care for.
For greater immersion in the atmosphere of nature, the floor should be laid out of wood, and the terrace should be filled as much as possible with unpretentious plants such as moss, ferns, and dwarf coniferous shrubs.
Such a rooftop park is very attractive not only in expensive hotels. A common recreation area promotes communication and getting to know people, because people often don’t even know the names of their neighbors.
Any large-scale work should be started if you are sure of its necessity, because it will require a lot of effort, time and money. Verandas and balconies are a good place for rest and relaxation. But they also require maintenance, so it is necessary to weigh the resources spent with the benefits brought before starting work.
Related advice
For the roof above the balcony, it is better to use the material that lies on the main part of the building. If for some reason this is not possible, a light polycarbonate visor would be a good solution. It will not require the manufacture of capital load-bearing structures and will not create a large load.
The veranda with a covered glazed interior area looks modern and stylish. For this purpose, glass sliding panels are produced. If necessary, they can easily be moved to the side, allowing access to air and light.
Balcony designs in a private house: a balcony over a porch or other extension
The design of any balcony includes mandatory elements.
This:
- Balcony slab;
- Fencing or parapet;
- Protective elements in the form of a visor and wind screens (not mandatory, but desirable elements).
Balcony slab is the main structural element, usually made of reinforced concrete or wood.
A balcony with a reinforced concrete slab can only be mounted on a building with walls made of heavy building materials (brick, ceramics, reinforced concrete blocks, etc.).
Due to the lightness of its structure, a wooden balcony can be mounted on a building made of almost any building material.
The balcony can be either based on a concrete slab or wooden
For private houses, the following main structural types of balconies are used, which differ in the method of attaching the balcony slab to the wall of the building:
- Balcony with a cantilever slab jammed into the wall. When making such a balcony, a reinforced concrete slab is embedded into the wall to a certain width, while the overhang of the slab (and, accordingly, the width of the balcony) cannot exceed 100 cm.
- Balcony with cantilever slab supported by beams. In this case, it is not the slab that is clamped into the wall of the building, but reinforced concrete beams, on top of which a balcony slab is laid, which can be made of either reinforced concrete or wood. But do not confuse a terrace with a veranda because there is a roof over the façade of a private house. Thanks to the beam support, the width of such a balcony can be up to 120 cm.
- Balcony with a slab supported by triangular brackets. This design can also be used in the case when the house has already been built and the owners decided to acquire a balcony during the operation of the building. In this case, a frame is driven into the wall of the building, on which a balcony slab is laid, which can be either wooden or reinforced concrete. A balcony in a private house usually does not mean above the veranda or in private houses. Metal or wooden triangular brackets are used as supporting elements for the slab. This design allows the installation of balconies up to 150 cm wide.
- Balcony with a slab standing on supports. In this case, the balcony slab rests on columns, walls, etc. In this case, the width and shape of the balcony are limited only by the designer’s imagination and the cost of construction materials. An attached balcony can also be made on supports, when the supporting elements are not connected in any way to the structure of the house and are attached separately. Would you like to have houses on the facade of your private house. Balcony above the veranda. Such a balcony can also be attached to an already finished house.
Nuances of construction
Balcony over open veranda
For a dacha or even a country house for permanent residence, you can build a veranda by arranging a balcony on its roof, and the price of such a structure will be relatively small. For this we need:
- timber 400x10x10 cm for the frame;
- timber 400x50x10 cm for roof and floor joists;
- edged board 40 mm for the floor;
- 5x5 cm block for railings;
- cement, sand;
- wood antiseptic.
The principle of arranging a columnar foundation with a lower grillage
Considering the fact that our entire structure will be made of wood, most likely pine, it will be possible to build a columnar foundation with a concrete lower grillage:
- For the posts, you need to dig holes 40x40 cm and half a meter deep, with a distance of no more than 2 m from each other, but with a mandatory presence at each corner and near the main foundation, but at a distance of 5-10 cm.
- Along the line of these holes (with the same width), dig a trench 10-15 cm deep and place formwork 40 cm high above it.
- At the bottom of each hole you pour crushed stone 10-15 cm high, and at the bottom of the trench a sand cushion 2-3 cm high will be enough, and compact it all.
- For the grillage, it is advisable to make light reinforcement so that it does not crack, and simply insert 2-3 reinforcement into the holes for the posts for the same purpose.
- Fill it all with concrete (M300 will be enough) and leave it for a week.
- If necessary, raise the grillage with a brick plinth, although the grillage itself can be immediately raised to the desired height. However, the brick structure looks more beautiful.
- Then, after laying the base at the required height, you cover it with cut-off waterproofing - this can be the most ordinary roofing material laid in two layers.
- While you are waiting for the foundation and base to dry, don’t waste your time - treat the wood you need with an antiseptic and leave it under some kind of canopy or blanket. Arrange the profiles with slats so that the liquid is well absorbed and dried.
Columnar foundation with wooden frame
- Then, from a 50x10 cm beam, assemble a grillage, which will simultaneously serve as joists for the floor and the foundation for the entire structure (see photo above).
- Place the timber around the perimeter and easily fasten the corners with nails or self-tapping screws.
- Then measure the diagonals - they should be the same (±2 mm).
- When you achieve the correct geometry, you will need to fasten the beam with anchor dowels, recessing the bolt head into the recess. After this, install the lag in the center using the same method.
Fastening risers with reinforced metal corners
- Now, if the perimeter of your foundation is 4x4m, then on each side you will need to install three vertical beams of 10x10 cm of the same height, and two more in front to define the entrance (total, 8 beams).
- Each of the beams should be fixed with a metal reinforced corner on both sides, as shown in the top photo.
- On top you need to install exactly the same trim as below from 50x10 cm timber, just make sure that the vertical on the risers is not lost during installation.
Having a board 40 mm thick, you can, of course, do without additional joists, but a board span of 2 m is only possible under light loads. So I advise you to still make a sheathing from the same boards in increments of 30-40 cm, and then lay the floor on it.
Advantages and disadvantages
Each model has positive and negative sides. And it's not that easy to build. Let's consider the advantages of the design:
- creating additional living space;
- decoration of the facade of the building;
- access to fresh air. On this you can have a pleasant time with a cup of tea or breakfast;
- if danger arises, the balcony can turn into an additional emergency exit.
Additional structures on the facade of a private house complicate and lead to higher costs at all stages of house construction.
Disadvantages of the arrangement include:
- additional financial costs for construction;
- if the calculations are carried out incorrectly or the requirements of regulatory documentation are not followed, the structure may collapse and lead to an accident;
- Heat will escape through the balcony door, no matter how high quality it is.
Depending on the design features, the balcony can serve as part of the porch, roof or veranda
Features of wooden structures
The load-bearing elements of a wooden structure are beams. Their cross-section should be 10x20 cm. During construction, it is worth remembering that the beams should be fixed in the wall no more than 25 cm deep. If this rule is not followed, the balcony may not withstand the load acting on it. All beams should be located at a distance of no more than 80 cm from each other.
The supporting elements are fixed to the wall with metal corners or strips. In this case, it is necessary to install racks under them. After completing such work, the longitudinal beams are secured. They are created from boards with a section of 5x10 cm. They must be installed at a distance of about 30 cm from each other.
To make the structure more rigid, it is worth creating grooves about 30 mm deep in the beams. The floor on the wooden extension is created from boards 4 cm thick.
Fences are best made from boards with a section of 3x13 cm. All structural elements are secured using screws and nails. It is worth remembering that all wooden structural elements must be coated with a protective composition, since due to constant exposure to moisture, the balcony can change greatly over time.
Which canopy is better to choose?
There are single-pitch structures that have a sufficient slope for water drainage and more stable gable-type canopies, which are suitable for corner loggias.
For the construction of canopies, slate, ondulin, metal tiles or polycarbonate are used. Polycarbonate products are considered the best option. The structures are easy to install, have a high level of noise absorption and a long service life. Wide canopies are complemented by special racks.
The elegant look has an arch-shaped visor, which is also quite functional and practical to use.
A solid and expensive dome canopy is a less popular solution, as it has certain technical difficulties. But despite this, cottage owners prefer to decorate the loggia using this method, which makes the building presentable.
The photo shows a loggia in a private house, decorated with a fabric awning.
You can protect the open loggia from the sun using the original awning canopy. Such a product will advantageously decorate the facade of the house, and will also prevent the accumulation of snow and the formation of icicles.
Placing a balcony under the roof helps expand the functionality of the loggia. The size of the roof should have a slight slope and be slightly larger than the balcony slab.
The photo shows an arched transparent canopy over an open balcony structure in a private house.
Decoration
The terrace and balcony should definitely stand out on the facade of the house, because in fact, that’s what they were built for.
Many designers recommend using decorative elements from the materials from which the terrace or loggia was built. In our case, we are considering, first of all, an extension, which means the optimal solution is decorating with natural wood.
What can be included in the decorative elements?
- decorative beams;
- decorative panels;
- furniture;
- flowerpots with plants;
- vegetation right on the terrace (they weave and gradually grow, which is very fashionable in the West).
The decor on the wooden terrace is very original and attractive (photo).
Creating a French balcony
This type of extension is a completely glazed structure. Many home owners use tinted glass if the house is located on a busy street. This will protect you from the views of strangers. But if the balcony is directed towards the garden, you can glaze the structure with transparent glass.
A French balcony is created on supports or under the roof of a house in a space where an attic is usually equipped. In this case, it can be located at the end of the house or on the side. In the second case, you have to completely dismantle part of the roof and re-create the rafter system taking into account the size of the extension.
Where to place the extension
Most often, a balcony is created above the entrance, since this part of the house is directed towards the street. But it is worth considering that this is far from the best option, since privacy is necessary for a good rest. It is best to place the extension on the back side of the house. If a beautiful garden has been created near the building, the balcony should be directed in its direction.
Before creating a design, you should consider the negative points:
- the cost of creating a house with an extension is significantly higher than without it;
- creating a balcony leads to an increase in heat loss;
- complexity of creating a design.
Before starting work on creating an extension, you need to decide whether it is needed or you can do without it. First of all, the house must be functional, so in some cases the balcony should be abandoned. It is worth remembering that a balcony cannot be created on the flat roof of a house.
Criteria that a balcony and terrace must meet
Most owners of country houses have a rather narrow idea of what these premises should be like. In order for these façade details to be useful, they must meet the following requirements:
Be functional
Think about the purpose of the open area in advance so that later it is not empty and does not cause your disappointment. If your home already has a non-functional balcony or terrace, they can be modified and adapted to specific needs, for example, turned into a flower greenhouse or equipped with a workplace.
Be safe
In pursuit of additional square meters, some owners add balconies to their houses. As a result, this unauthorized construction is not used due to its instability or simply disfigures the façade of the building.
Look harmonious
The balcony should be decorated in the same style as the entire facade of the cottage with the maximum use of identical building materials. If the house itself is covered with wooden inserts, and the terrace is covered with plastic, then such a building will look awkward.
Constantly used
If you don’t feel comfortable going up to the balcony to drink your morning cup of coffee, consider installing a terrace on the porch of the building. This option is often used in Canadian and American style homes.
The lower balcony will also be convenient for those who prefer to maintain privacy or cannot enjoy the beautiful view from the upper floor.
Video description
Why you shouldn’t make balconies and verandas without a canopy
Balcony under a common roof
The most common design option. A terrace is designed on the narrow side of the house, with a balcony located above it. Despite the similarity with a simple frame structure in terms of load-bearing pillars, here it is closed on both sides and has a full roof.
The house, together with the terrace, is built on a common foundation, which allows the structure to be covered with a full roof. In addition, the structural strength of such a structure is much higher than that of an attached one.
The biggest problem here is the huge overhang of the roof, which requires special elaboration of the rafter system, which increases its cost. One of the advantages of this design is the possibility of organizing a balcony and terrace of almost any depth.
Closed balcony above the terrace
The most practical design. An enclosed balcony allows you to organize a full-fledged lounge area for relaxation or work. Continuous glazing has a number of advantages:
When choosing such a design, the requirements for the tightness of the floor on the balcony are reduced, and it is possible to insulate it. The closed design allows you to use expensive finishing materials without fear for their safety.
The only drawback is its price. The cost of constructing a balcony of this design is higher than other options.