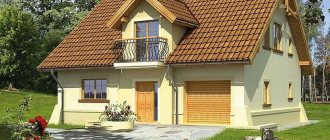
A balcony is an indispensable element of any multi-storey building, allowing you to be in the fresh air without leaving the apartment. At the same time, it can be not only a functional extension of the room, but also a real decoration of the facade, if it is correctly integrated into the exterior. That is why many private owners who build small houses, limiting themselves to two floors, still prefer to use balconies. It would seem that it is not so difficult to go down from the second floor and go outside, and use the terrace as a recreation area, so the balcony design in this case is not a necessity, but rather a whim, a desire to decorate the facade or an opportunity to admire the beautiful landscape from above , if available.
construction of a balcony in a private, country house
When building a house, it can be designed initially, but there are cases when the owners want to complete it in an already finished structure. How to make a balcony with your own hands, and is it even possible? This will be discussed further.
Do-it-yourself balcony in a private house – is it possible?
The balcony is a beautiful addition to the facade, a place to be in the fresh air. It is possible to install the structure with your own efforts, subject to scrupulous adherence to installation technologies.
Advantages of self-building:
- regulation of deadlines;
- independent choice of materials;
- varying possible designs;
- regulation of construction costs;
- correction of building design.
Construction work begins with choosing the type of structure in accordance with the design and style of the dacha.
Waterproofing an open balcony above a bay window. Preparation
In addition to purchasing all the necessary mastics, it is necessary to completely clean the balcony. If any cladding was installed on the floor, walls, or ceiling, then before starting work it will need to be completely dismantled, leaving bare concrete. Then you need to check the quality of the concrete slabs themselves. If any defects are found on them (cracks, mold, unevenness, etc.), then you need to completely get rid of them by sealing them with plaster or removing the damaged areas (in the case of unevenness). After completion of the work, dust and dirt are completely removed, and the concrete can also be treated with special antiseptics.
If the walls, floor and ceiling are rotten to such an extent that rusty areas of the reinforcement are visible, then clean them as completely as possible from rust, and then apply special protective compounds for metals. Cracks that are too large will have to be widened and filled with screed. Small cracks can be filled with regular plaster. Also, all large irregularities are removed with a spatula and the depressions are covered.
If the concrete slab is damaged too much, it will have to be completely replaced, but most often this can only be found in old and dilapidated houses.
Provided that all preparatory procedures have been carried out, mastics and sheets will lie more densely and evenly on the surface, thereby making the coating more durable and of higher quality. High-quality waterproofing of the floor of an open balcony is especially important if it is located above the bay window of the neighbors below. Nobody wants to flood them.
Rules for constructing a balcony
The construction of a balcony room is subject to a number of requirements that determine its location, length, height, type of fencing, and material.
When constructing a balcony room, the following requirements are taken into account:
- the building contains at least two floors;
- the loggia is mounted on the side of the house with access to the garden, park, quiet part of the street;
- the structure must support the weight of several people;
- installation of supports is required;
- the decision on glazing is made taking into account the possible weight of the house;
- The material of the loggia must match the main material of the house.
The balcony room is also an exit for additional evacuation in case of fire, so it is built in accordance with all safety standards.
Glazing options
Many owners of private houses consider glazing this architectural element to be a convenient and practical solution. With its help, they come up with interesting design solutions taking into account all individual preferences. There is also a wide choice of frame designs: wood, plastic and aluminum.
Cold glazing method
Balconies often serve as a place for fresh air to come in from the street, so owners use a cold glazing method using aluminum profiles. The disadvantage of this method is significant heat loss through the balcony room.
The profiles do an excellent job of their tasks: they prevent precipitation from getting inside, and also protect the balcony from wind and dust. This ensures a favorable microclimate in adjacent living rooms. Aluminum is lightweight, resistant to mechanical damage and fireproof; installation of profiles is quick.
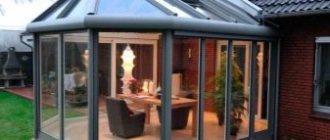
Warm glazing method
The owners choose this option if they plan to turn the balcony space into a living and warm room. Balconies with warm glazing are used as a study, a billiard room, a mini-bar, and a winter garden.
Plastic windows are absolutely sealed, which prevents precipitation or the formation of drafts. The aesthetic appearance harmonizes with almost any interior design, so extensions with warm glazing are practical and attractive both inside and out.
Basic materials
A loggia in a private cottage is built from natural, artificial materials with high strength, load-bearing capacity, and long service life:
- tree;
- metal;
- concrete;
- glass.
Balcony with concrete floor
The design, type, and choice of material for the balcony room depend on the type of decoration of the house and its material. It should fit into the overall design, without standing out or resonating.
Methods of finishing and decorating a balcony
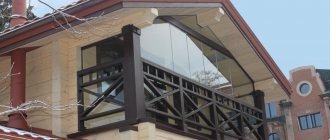
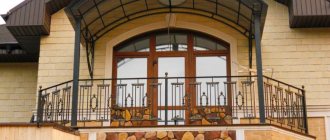
The balcony, which is simultaneously part of the interior and exterior, must be properly designed so that it fits into the overall ensemble. In itself, it is already a kind of facade decor, and its decoration should match it in texture, color and style. Particular attention should be paid to the canopy. Fencing is often represented by forging elements, which is always beautiful and relevant. Intricately intertwined patterns combined with the strength of metal are an ideal option. It is better to make a balcony in a wooden private house with your own hands, also from wood, decorating it with wooden railings with carvings. This solution looks good if the carving is also present on other elements of the facade, which creates an overall complete picture. At the same time, both wooden and metal fences are universal; they can be combined with brick, aerated concrete, and other building materials. If the house is in a modern "glass and concrete" style, fencing can be made from tempered glass, plastic, aluminum or chrome steel.
It is advisable to use the same roofing material as the material for the canopy as on the main roof of the house. Sometimes the canopy is made of polycarbonate, which partially transmits the sun's rays.
Construction safety requirements
A balcony room in a country house is subject to a number of technical requirements that guarantee the safety of the structure. The loggia must withstand the assigned load, not sag, or deform.
To do this, it is built in accordance with the following requirements:
- the base plate is designed for a minimum of 200 kg, the outer strip - 400 kg;
- permissible vertical load on the balcony parapet – 100 kg;
- permissible horizontal load on the parapet – 40 kg;
- standard parapet height is 1 m;
- ensure that the structure is adjacent to a load-bearing wall without a window, with a minimum length of 1.2 m;
- laying a drainage system;
- the minimum slope angle of the base slab is 3 degrees;
- length/height parameters of the structure in accordance with the housing design;
- installation of additional racks, supports, columns for a large loggia area.
After studying the basic requirements for a balcony room, they move on to choosing the type of structure, materials, and measurements.
Preventive measures when arranging a balcony
When designing a building, first of all, you need to ensure that the balcony (loggia) is protected from rain, snow and summer heat. Otherwise, there is a risk that you will use it for recreation infrequently, but the hassle of maintaining the building will noticeably increase: in winter you will have to remove snow, and in summer you will have to renew the finish that has been damaged by moisture and sun.
Orientation to the cardinal points. Ideally, the balcony should face east or southeast. Then it will be sheltered from damp and cold western and northern winds, well lit in the morning and protected from the midday summer sun. Alas, in the conditions of village development, it is not always possible to orient a building in the required way.
Roof. A canopy should be provided above the balcony or the roof overhang should be increased. In this case, the cornice should protrude beyond the plane of the balcony railing by at least 40 cm. The wide overhang is supported by pillars, and in the male roof its basis is the outlets.
Bearing structures. When installing ceilings and cantilever supports, it is desirable to avoid extended cold bridges between the street and the room. From this point of view, in a stone house, external reinforced concrete beams are preferable to a slab pinched by a wall.
A balcony that protrudes beyond the plane of the wall by more than 1.5 m usually has to be supported by pillars (columns), which transfer the load to the foundation of the house. It is also possible to install independent drilled or screw piles under the columns below the soil freezing depth.
Photo: IZBA De Luxe
A lightweight balcony with a projection of no more than 1 m can be “hung” on the facade using decorative forged brackets, which are attached to the wall using embedded elements or studs through through holes (anchors and cap screws in this case are not reliable enough).
During construction, wooden consoles and beams of the lower railing of the balcony should be treated with an antiseptic 2-3 times and only then painted. Steel beams are protected from rust with bitumen varnish or paint with anti-corrosion additives; forged brackets are best coated with powder enamel or artificial patina. A cement-polymer or bitumen-polymer water-repellent composition is applied to load-bearing concrete elements.
Floor construction. When choosing it, it is important to take care of the drainage of rain and melt water, which should be drained according to the same principle as from the roof: flow through a drip into the gutter and then into the drainpipe.
When installing decking, hidden fasteners are used. Photo: TermoWood
If the base of the floor is a concrete slab, then you can pour a cement-sand screed on top of it with a slope of about 2% from the house, and lay a waterproof coating on it, for example, clinker or porcelain tiles.
The floor covering for the balcony must have anti-slip properties and resistance to moisture and ultraviolet radiation.
Another option is a double floor covered with decking boards on joists. The logs must last at least 15 years, so for them you should choose larch or wood impregnated with an antiseptic under pressure (impregnated). The most durable logs are aluminum, but they cost from 800 rubles. for 1 linear m. You should not lay an ordinary planed board on the balcony: it is too smooth and, when wet, becomes slippery, especially if the wood is infected with fungus. It is better to choose decking made of larch or wood-polymer composite.
The joists are leveled using plastic support wedges and secured with galvanized steel plates. Photo: Terradek
Railing. The fencing structure must withstand a horizontal load of at least 150 kgf/m applied to the handrail. A solid (screen) fence should be supported by a horizontal beam, which is installed at a distance of at least 5 cm from the floor using spacers. This gap is necessary for water drainage; with a smaller value, it will become clogged with leaves in the fall, and with ice in the cold season.
Photo: Moscow Forging
Types of balconies
The range of loggias includes various designs for summer cottages and private houses. The choice of design depends on the size, style, dimensions, and design of the cottage.
Loggias are divided into types based on materials and location.
Depending on the loggia material, there are:
- wooden;
- forged;
- concrete.
Wooden balcony
According to the method of arrangement there are:
- hanging;
- attached;
- attic;
- console
Constructive solutions are distinguished by design, weight, method of construction and fastening of balcony slabs in relation to the load-bearing wall.
The best waterproofing for a balcony. Materials for waterproofing a balcony or loggia
Waterproofing a balcony or loggia is carried out mainly in three ways - pasting (roll), coating and penetrating using appropriate materials.
Pasted waterproofing
Pasting waterproofing is carried out using weld-on or self-adhesive roll materials. In the first case, a burner is used when laying the material. The second option, more modern, allows you to lay the material without additional equipment.
When using rolled materials, the surface must be dry and smooth (permissible unevenness is no more than 2 mm). The base must first be treated with a bitumen primer, and installation must be done with extreme precision and accuracy.
The most common rolled material used for waterproofing a balcony or loggia is roofing felt.
More modern is penofol, or foam foil, also known as “folgoizolon”. This material can simultaneously perform the functions of hydro- and thermal insulation. A layer of this material with a thickness of only 4 mm is comparable to brickwork of 1.5 bricks.
If necessary, waterproofing from foil-isolon can be improved using an additional layer of roofing material or preliminary sealing of the seams with polyurethane foam.
With the help of foil isolon, both the floor and walls of the balcony or loggia are protected. The surface to be treated must be fairly flat; the material must be laid as tightly as possible and without gaps.
Coating waterproofing
Coating waterproofing is carried out using various sealants, cement and cement-polymer, bitumen and polymer mastic. Liquid coating compounds are easy to use and almost universal.
The most popular coating material is mastic (bitumen, bitumen-polymer and bitumen-rubber).
To ensure a high-quality waterproofing coating, after applying such materials it is necessary to make a cement screed reinforced with polypropylene fiber, which increases the durability of the material and reduces the likelihood of cracks.
Another popular material is cement-polymer mastic. Its cement component ensures good adhesion to the base, and plasticizers give it elasticity.
A coating layer with a thickness of only 1-3 mm already provides the necessary tightness.
Coating waterproofing mastic can be purchased either ready-to-use or in the form of a dry mixture, the solution of which will have to be diluted immediately before work.
It is very important that the solution from such a mixture is prepared with high quality, for which it is necessary to use clean water with a temperature of +15-20 ° C and ensure that there are no lumps left in the solution.
The solution must be infused for 3-5 minutes, mixed thoroughly and used immediately. It is better to knead it in small portions, since after 40 minutes it loses its properties. The container in which the ingredients are mixed must be thoroughly washed before each new batch.
Coating waterproofing should be carried out at an air temperature not lower than +15 ° C and a humidity not exceeding 60%. It is advisable to set this temperature two days before the start of work and maintain it around the clock for another 2 weeks after completion.
Coating waterproofing is applied with a brush, smooth spatula or roller. Drying and hardening time depends on the thickness of the layer (the thicker it is, the longer it will take to harden), as well as the temperature and humidity in the room.
Penetrating waterproofing
This method of waterproofing is suitable for treating porous surfaces of the floor and ceiling of a balcony or loggia. This is a modern means of universal coating protection not only from water, but also from aggressive chemical environments.
For such waterproofing, mixtures consisting of quartz sand, cement and special chemically active additives are used. The mixture penetrates into the structure of the building material to a depth of 900 mm and reliably protects it from water penetration.
Before using penetrating compounds, the surface must be cleaned, treated with water and, after complete drying, the remaining dust must be removed using a vacuum cleaner.
Then you need to moisten the surface again and apply a layer of solution with a synthetic brush. When the composition has set, the surface should be moistened again and a second layer should be applied.
Helpful advice
When waterproofing a balcony or loggia using penetrating compounds, you must take precautions using rubber gloves, goggles and a hat for protection. It will not be superfluous to use a gauze respirator. If the solution gets on your skin, it should be washed off immediately with water. In general, when working with this material, you need to exercise maximum care and caution.
Documenting
Before proceeding with calculation and construction work, it is necessary to obtain permission to build a loggia.
Documents for installing a balcony in a country house with your own hands include:
- permission from the company on whose balance sheet the house is listed;
- official written agreement of the residents of the house for construction;
- a finished loggia project from an architectural agency;
- construction agreement from supervisory and municipal services of the city;
- ownership of the house;
- BTI certificate;
- owner's application for redevelopment;
- photo of the cottage.
For advice and a detailed list of documents for the construction of a balcony room in your home, contact the planning inspection in your city.
How to make a balcony in a private house - help for beginners
The construction of a balcony structure begins with studying the installation technology and its stages.
When installing a loggia it is important:
- design begins at the cottage construction stage;
- calculate the maximum load on the load-bearing wall;
- when building a balcony on the roof, take into account the load the roof can withstand;
- think over the laying of the rafter system;
- designate places for laying waterproofing material, insulation, screed;
- A mandatory requirement for an extension is an adjacent wall made of massive, insulated material.
Thinking through the design of a future extension taking into account the design of the dacha eliminates the risk of unforeseen errors in the work.
Advantages and disadvantages
You need to decide whether a balcony is needed in a private house and weigh the pros and cons before starting to develop a design project for the future cottage.
| Advantages | Flaws |
| Due to its attractive appearance, the loggia becomes a beautiful decoration of the facade. | Adding a loggia to a house requires a lot of money. |
| The glazed internal balcony is used as additional living space. | Due to an installation error, the structure may collapse. |
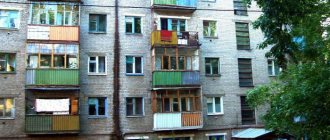
| Free access to fresh air is provided. | If the loggia is not insulated and not insulated, the balcony door contributes to significant heat loss from the space. |
| A balcony can be part of a veranda or porch structure and protect the extension from precipitation and other factors. | |
| If a critical situation arises, the loggia can serve as a spare emergency exit. |
Preparation for construction
The first stage of the start of construction work is the selection of material, its purchase, the design of the future extension, and the preparation of tools. The material for the loggia is selected taking into account the design of the entire house. The material should fit into the overall style of the cottage, not stand out, not resonate against the general background.
Necessary construction tools include:
- metal fittings;
- wire;
- plywood, boards, metal profile;
- concrete solution;
- hammer;
- putty knife;
- channels for the frame;
- metal pipes.
The type of equipment varies depending on the type of balcony, material, and main construction project.
Detailed design and calculations
The preparatory stage of construction work begins with the development of a detailed design of the future loggia and calculation of the dimensions of the material.
The working draft includes the following details of the balcony:
- marking the installation of supports on the ground;
- marks for the depth of entry of support pillars into the ground;
- marking the future frame of the loggia;
- marking the location of sheets of material on the sheathing;
- layout of the balcony room relative to the living rooms;
- type of cladding;
- location of window opening, door;
- glazing decision;
- type of roof and its fastening;
- detailed diagram of fastening corners.
Correctly carried out, detailed calculations eliminate the risk of irreparable errors during construction, damage to the material, and additional payments due to incorrect calculation of materials.
Main stages of construction
After obtaining permission for construction and planning work, choosing the type of structure, preparing tools, you can begin work. The construction of a balcony includes several stages.
Stage 1 - installation of struts, foundation
Base frames and struts are the basis on which the entire structure is supported. They are made by hand from galvanized metal, or purchased in a specialized store. The size of the struts is 50x50 mm.
There are a number of requirements for the installation of struts:
- one side of the slope protrudes up and down by 50 mm;
- the distance between the struts corresponds to 100 cm;
- Anchors are used for fastening;
- tying the struts with metallurgical angles;
- mandatory jumpers are created across the triangles;
- Additional anchors are attached to the adjacent wall.
A metal frame made of struts is a reliable basis for a hanging or attic balcony.
Stage 2 - installation of floor, frame
The floor of the future loggia is laid on the base frames. Due to the limited load-bearing capacity of the frame, casting a concrete base is excluded.
The floor of the structure is performed in two ways:
- Fastening metal sheets under base frames. A layer of expanded clay is poured inside, a reinforcing mesh up to 5 mm thick is attached with wire, and welded around the perimeter. A layer of cement mortar is poured on top.
- Sheets of rigid material are laid on the base frame, a waterproofing layer is laid, and covered with wooden boards secured with self-tapping screws. Logs are attached to the top, an insulating layer with a vapor barrier is laid, and a subfloor is laid.
The metal frame is welded on the ground, then placed on the prepared base. The side edges of the frame and the top lintel are secured to the wall with anchors. This increases the durability of the structure and reduces the load on the base.
Stage 3 – insulation, finishing
The finished balcony frame is sheathed with profiled sheet material. The type of finishing material depends on the type of construction and design of the house. After cladding, an additional insulating layer and sealing are laid to prevent moisture from penetrating into the room.
Stage 4 - roof construction
A support-cantilever roof is mounted on the finished frame. Attached to the wall with metal corners with lathing. The roofing material must be strong, reliable, withstand heavy loads, resistant to temperature fluctuations, and have a high reflection coefficient. Corrugated sheeting, seam roofing, and metal tiles are suitable for this.
Stage 5 – glazing, cladding, wiring
The final stage of construction and planning work is interior decoration, cladding, glazing of the balcony (in most cases, laminated plastic windows with a wood look are used). Finishing material is laid on top of the insulation for additional comfort indoors.
For internal lining use:
- lining (more details in the article “lining a balcony with lining“);
- drywall;
- plastic panels (discussed in detail in the article “finishing a balcony with plastic panels“);
- MDF, chipboard, plywood;
- Tiles (we recommend the article “tiles for the balcony“);
- PVC.
At the stage of covering the loggia, electrical wiring is installed, electricity is supplied, and heating is connected inside the room.
What to make a durable balcony floor from?
Terrace boards are very popular now. This modern material is made from wood fiber and plastic. It looks exactly the same as wood. This board is easy and quick to cut and process. The surface of this material is polished and imitates beautiful wood species. It is best to purchase a decking board that has hidden fasteners, in which case the floor will be perfectly smooth and aesthetically pleasing.
This board is good because it is not afraid of moisture at all, it will never crack, bark beetles or mold will not grow in it. It does not need to be hidden with varnish, paints or antifungal treatment. But it is quite possible to make the flooring from ordinary wooden boards. In order for them to serve for a long time, they must be pre-treated with antifungal impregnations and then hidden with varnish or paint. Please note that these materials must be designed for outdoor use and for use in high humidity conditions.
Construction of balconies of different designs
There are many variations of balcony buildings, differing in appearance, type and method of construction. Depending on the chosen design, different requirements are imposed on it. Let's consider the nuances of building different types of loggias.
Made of wood
The wooden suspended structure has an attractive design, ease of installation, and accessibility.
Among the features of a wooden building:
- using wooden beams as the main support;
- load-bearing beams enter the wall to a depth of at least 25 cm;
- impregnation of wood with an antiseptic agent is mandatory;
- metal corners and strips are used to secure beams;
- the racks are secured with M12 bolts;
- for greater rigidity and stability of the structure, grooves are made at the intersection of the beams;
- wooden boards are used to create the floor;
- The preferred fencing material is wood.
Strength and durability of the finished building can be achieved by using antibacterial impregnation and coating the elements with a layer of hydrophobic paint.
Idea 3: create a real garden on your balcony
Arrange pots with flowering plants on the shelves and windowsill, place the largest ones on the floor, and hang pots or trellises for climbing plants on the walls. You can even create a living carpet of plants on the wall—a vertical garden.
And if you are not a gardener at all, you can choose plants that you can grow without difficulty.
Common problems during construction
When building a loggia yourself, a number of problems often arise that interfere with the progress of construction. Most problems arise due to lack of experience and knowledge of performing such work. Therefore, before starting construction and planning work, it is recommended to familiarize yourself with the installation technology of various balcony structures and recommendations for them.
How to attach a loggia to a wall?
Connecting the extension to the load-bearing wall is carried out in two ways:
- fastening beams with support on support boards - the construction principle is similar to the cantilever structure; the beams are supported on support boards, and not on the wall;
- mounting the second support row close to the wall is done by installing wooden slopes with an additional transverse beam.
An extension supported by support beams is not reliable and cannot withstand heavy loads, so installing furniture on such a loggia is not recommended.
How to install a fence?
Balcony railings are made of metal, wood or sheet materials manually, or purchased at a hardware store.
Installation of the fence is carried out according to the following scheme:
- Marking the future building.
- Installation of fence supports according to the project plan.
- Applying markings for fastening railings;
- Fastening reference points along the markings using anchors;
- Assemble and secure the fence.
- Final painting, decoration.
The installation method differs depending on the selected type of fencing and material.
Plus five wonderful transformations
Reed Corner
The balcony transformation plan included natural cladding on the cold concrete walls. The reed rugs were made by hand and then used to cover the old wall.
Source
A small master class on how to make exactly the same sofa as on the updated balcony.
Balcony "caravel"
The narrow balcony with two “wings” lacked an idea that would unite it into a single whole. Translucent curtains became such a connecting link. Thanks to them, this balcony “caravel” literally floats in the air.
In the evening, the dim light of lanterns creates an enveloping atmosphere of relaxation and peace. This idea is also suitable for a glazed version of a balcony.
Big possibilities in a mini space
It’s amazing: there was still room for furniture on this tiny balcony. Not plastic, but wooden, giving comfort and warmth.
Source
The design of the folding “trio” is quite simple. When folded, you can simply cover it with a curtain. And don't forget to make a railing on the balcony for safety.
Get rid of the trash!
From a place to store repair materials and old things, the balcony has turned into a romantic corner for two.
Hanging shelves, lanterns, baskets for flowers - everything here sets the mood for a good mood and elevated feelings.
Instead of a boring balcony
The advantages of this balcony began and ended with good glazing. Everything else required immediate rework. Everything - the floor, walls and even the closet - was painted white. He added light and visually expanded the space.
Source
A shelf under the window was made especially for potted plants. This is the best place we could think of. In order not to tear off the dark tile, it was covered with gravel. The result is a bright and cozy mini-room.
Dear friends! If you want to keep these ideas from getting lost, save them on your computer or on your social media page. Time is fleeting, but ideas are eternal! :)