Insulation
The topic of “warm windowsill” is relatively new, but no less topical. Many owners of houses and apartments, especially residents of the northern regions of Russia, are not satisfied with the quality of heating of their homes. Some insulate their facades, others supplement their heating with a “warm floors” system, and, to be fair, this gives some results. It also came to the window sills.
Easy way
“Warm window sill”: how does it help get rid of drafts and condensation on the windows?
It would seem that the window frame and double-glazed windows are installed flawlessly, the seal is of high quality, the joints are securely sealed, but in the window area you still feel a cold “blow” and the glass becomes covered with condensation. What is the reason?
And the reason lies in the window sill, which becomes a conductor of cold into the room. However, competent developers, learned from the experience of others, are aware of this problem and take appropriate measures in advance.
To heat window sills in private houses, taps are made from the water heating system with a pipe laid over the wall under the window; — they stretch the electrical cable here; — install a heating film (including along slopes), used in infrared heated floors.
An in-floor convector is built into the window sill
There are also options such as installing a perforated window sill so that the air from the radiator can freely rise to the glass; embedding an in-floor electric convector into it, creating a thermal curtain near the window; or even point integration of heating sleeves into the window sill.
It must be said that water heating is tied to the operation of the heating system, while electric heating depends on the stability of the energy supply, requires sufficient allocated power and increases overall operating costs. A ready-made ceramic or PVC window sill with a built-in cable is not cheap in itself, and the low-voltage IR system, being the most economical in terms of energy consumption, needs to be equipped with a step-down transformer or converter. In a word, although with varying degrees of costs, the problem is solved one way or another. However, today you can deal with it in a much simpler, more effective and financially less burdensome way.
Warm window sill on a polystyrene cushion
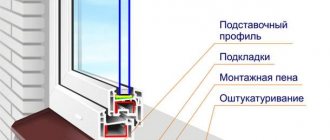
The essence of the technology is to seal the joint between the window sill and the partition on which it rests - this is the weakest point in the sealed window contour, becoming an area for cold air to penetrate into the house and heat to leak out of it. Moreover, even heating the window sill is not able to prevent air from blowing under it.
This solution is based on a special block of polystyrene foam, which serves as a kind of pillow for the window sill. It forms a strong, load-resistant, stable base, which also provides high-quality hydro- and thermal insulation of all joints in the area of the window slab from inside the room and from the ebb - from the outside. Plus, installing such a cushion eliminates the need to level the window structure using wedges during installation.
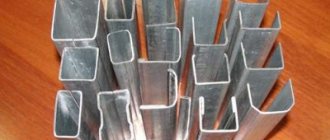
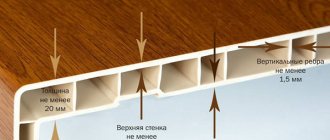
The blocks are made from extruded polystyrene foam XPS (or its cheaper variety EPS) in the form of profiled products with a standard length of 1200 mm. The material is safe, has high heat-insulating properties and is not destroyed by water, is not susceptible to rotting and other biological damage. In addition, it does not put pressure on the load-bearing support, is easily cut with a regular knife and lasts for decades. At the top of the blocks - in the area adjacent to the window structure - an expanding sealing tape is laid, which ensures complete tightness of the connection.
Expanded polystyrene blocks-pillows are “compatible” with windows made of any materials (wood, PVC, aluminum), however, each type is designed for use with certain profile systems, and this circumstance is important to take into account when choosing products
Installation
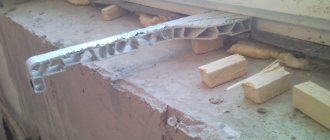
Installation of pillow blocks is simple, but requires special care, since any carelessly made joints here will negate the idea itself. First, you need to level the upper plane of the wall with plaster (or screed if the wall is brick), be sure to check the horizontal level, and then apply a layer of water- and frost-resistant insulation to the surface. Next, the pillow is cut to size (as a rule, it has to be spliced together from several elements of a polystyrene profile), tried on, and appropriate markings are made on the base. In this case, small gaps must be left along the edges of the opening for subsequent filling with sealant.
When working with expanded polystyrene, you should use specialized compounds that do not contain components that destroy this material (toluene, acetone, etc.) and are designed to fix it to a specific type of base
A special polystyrene foam adhesive is applied to the wall surface along the outline line of the block and into the grooves on the back side of the block itself, put it in place and pressed well. If the pillow is prefabricated, after installing all the elements, the joints between them are carefully sealed with the same compound, making sure that the seams are absolutely even, otherwise the frame will not fit tightly on them, and this is already a flaw in the sealing contour. Excess glue should be removed immediately before it has time to harden.
Finally, the gaps between the side walls of the opening and the finished block must be carefully foamed and, after making sure that it is installed correctly and evenly, you can begin installing the window frame, window sill and ebb.
The “warm window sill” technology based on polystyrene profiles produced by illbruck and Klinar is already used by many window companies operating in our market. When preparing to order a window, ask whether the company you choose offers such an insulation system
How to do it?
Procedure:
- Purchase the necessary materials, including glue and sealant.
- Level the surface on which you will attach the block. The solution will help cope with unevenness: apply it in a thin layer. For a brick wall you will need to make a concrete screed, and high-quality insulation will not hurt.
- Prepare your materials. The standard length of blocks is 1.2 meters. If the window openings are large, prepare several profiles and cut them with a knife, leaving gaps for sealing.
- Select places for the blocks: place them on the surface, mark control points with a pencil (glue will be applied to them). If you need to join several blocks, act very carefully so that you do not get uneven joints, otherwise the window block will not be able to stand firmly and evenly on this surface.
- Coat the blocks with sealant and the wall with glue.
The layer of glue should be located as close as possible to the edge of the wall; it should be applied in even strips with intervals of 3-4 centimeters between them. Fill the grooves on the bottom of the blocks with glue too. Move the product to the wall and press it, make sure (using the marks) that they are in the right place. Excess sealant that has protruded between the wall and the block must be removed before the substance dries. Press down the structure and check it with a level. Do the same with the rest of the details. - Any gaps that arise are filled with the same sealant, and the joints are filled with sealant and glue. If you leave the gaps as they are, the wind will blow in from the street. Do not forget to press the parts and hold for a while.
- At the point where the system connects to the window frame, apply sealing tape to seal it. Apply sealant to the top.
- Install the window frame, but only after you are sure that the unit has been positioned correctly and level.
Advice
If it is not possible to install window frames, but the blocks have already been installed, treat the profiles with plaster. A thin layer is enough - it will protect them from deformation.
Electric
- A finished heated window sill is a PVC product that already has temperature sensors and electrical cables built into it. This is a very convenient, but expensive option. You will have to buy a step-down transformer.
- You can install an electric two-wire heating cable into the window sill, and put a covering on top (any kind - even porcelain tiles, artificial stone, ceramic tiles). Significant disadvantages:
- firstly, the cable consumes a lot of electricity;
- secondly, installation is expensive and requires the use of special equipment.
- Another option: arrange an IR film floor under the window sill. It's simple and less expensive.
Water
- The effect will be best if you make a warm window sill together with a warm floor.
- Choose metal-plastic pipes (thickness D16–20), but it’s better not to buy pierced polyethylene.
- When planning the circuit, keep in mind: it should be continuous, without connections, and the return should be located parallel to the supply and next to it.
- It is advisable to install an additional circuit under the stone window sill.
- The depth of the laying is such that the layer of plaster above the pipe is at least 3 cm. Then the plaster in the place where the pipe is located will not crack.
- A reflector - penofol (thickness - 5 mm) can be attached to the entire area under the window sill using dowel nails. It will give the room more warmth.
We invite you to familiarize yourself with other materials about replacing, updating or dismantling window sills. Our experts will share all the secrets for installing plastic, PVC, wooden and concrete blocks. They will also tell you in what cases repairs are required and how to straighten the lopsided structure of this irreplaceable part of the window.
There are several ways to insulate a window sill - choose the most convenient one at your discretion. It all depends on the material of the wall, the depth of its installation, the type of window and the initial surface treatment. Go for it - and you will succeed!
What it is?
For our climate zone, where cold weather lasts for six months and strong winds are frequent guests, the technology for making a warm window sill is quite in demand. They can be installed during the construction of new houses or during the renovation of old buildings.
Reasons for installing a warm window sill:
- The need for additional heating . This issue becomes relevant in the off-season for residents of city apartments, when central heating is turned off and weather conditions may change for the worse.
- Concern for house flowers . Owners of mini-greenhouses often complain about the death of flowers in winter. The reason is non-compliance with the temperature regime, and this does not always depend on the owner of the apartment. It is not always possible to move pots from the window to another place. In addition to the temperature range, plants must receive enough light.
- The appearance of condensation or ice crust on the windows. Windows begin to “cry” or ice appears on them in cases where there is high humidity in the rooms due to temperature changes. This problem occurs in residential apartments, offices, warehouses and other premises. For example, in restaurants and banquet halls, where comfortable conditions must be created for visitors. Wooden furniture reacts negatively to temperature changes and high humidity.
If you feel that there is a draft coming from the window opening, the glass becomes covered with condensation in autumn and spring, and frosty patterns in winter, it’s time to think about insulation. The insulation had clearly worn out, sagged and began to let in cold air.
Attention! It is easy to identify draft bridges. Light a candle or match and move it along the seams connecting the frame to the window sill. By the reaction of fire you will determine the presence of “bridges”.
Design features of built-in heating convectors
A convector is a specialized device that is used to heat a room with a non-standard layout or a large area as the main or additional heat source. It allows you to warm up the room efficiently and quickly, while being an effective addition to the interior. Built-in convectors do not take up free space and can be installed almost anywhere in the room.
Currently, there are two most popular options for placing these heating devices: built into the floor or window sill. Products that are so similar to each other actually have several significant functional differences.
Floor heating convectors
Underfloor heating convectors are an excellent solution for rooms where it is impossible to install classic radiators. With their help, you can easily and quickly heat a room without spoiling the interior design. As we said above, convectors are
They are characterized by large sizes and the ability to use natural or forced convection. An in-floor water convector with natural convection has a heat exchanger and a control unit in its design - the air is gradually heated and evenly distributed throughout the room, first rising up, then falling down again. In products with forced heating, a fan is added - the air under its influence heats up and disperses throughout the room much faster.
The main advantages of built-in heating equipment include versatility. It fits perfectly into the heating system of residential and industrial premises. A built-in convector can operate from central or autonomous heating, be water, electric and even gas. However, the installation of each type of product is significantly different.
Heating convectors for window sills
If the heating convector is built into the window sill, the cold will not be able to penetrate through the window, and the room temperature will always be maintained at a comfortable level. Moreover, this option is perfect for rooms with high humidity to prevent the formation of condensation on the windows. It is this nuance that structurally distinguishes a water convector built into the floor from a model for installation in a window sill - the latter necessarily have a moisture removal system, which can be automatic.
Like an in-floor convector, the model built into a window sill has one or a pair of heating elements and the ability to control, but does not have a fan. Accordingly, the convector built into the window sill works exclusively in a natural way, heating warm air, which rises upward, displacing cold air.
Specifically, the advantages of water heating systems for window sills with natural convection include:
- Compactness and saving of usable space, invisibility during installation;
- Less weight and size;
- Ease of use and maintenance;
- Silence;
- Maintaining an optimal level of humidity in the premises without drying out the air;
- Fire safety and low heating of the grille;
- High productivity and low cost;
- Durability.
The products are almost invisible inside the window sill structure, but at the same time they are an excellent additional option for maintaining heat in the room.
Currently, you can also find convectors with forced convection on the windowsill, but this is more of an alternative installation option for small models for the floor. That is, the system itself has a similar installation, but at the same time heats the air in the room much faster due to the fan.
The main disadvantage of convectors built into the window sill is the complexity of installation. The problem is that even at the rough finishing stage, apartments already have finished window sills. Accordingly, to install a heating device, it is necessary to first dismantle the structures, and then prepare niches for convectors and directly carry out the installation.
In addition, products built into the floor evenly heat the entire room from floor to ceiling. In the case of installing a convector in a window sill, the gap between the floor and the window will periodically remain cold and allow a draft to pass through. Therefore, in addition to such equipment, it is better to use the “Warm Floor” system, which heats the air from the very bottom.
Advantages and disadvantages
Advantages of an electric window sill:
- Installation requires experience with electrical systems. If the master can make the electrical circuit himself, he can handle everything else.
- Organization of screeds for window sills.
- The amount of energy consumed by the system is minimal.
- Operational safety.
- A healthy microclimate is maintained in the home.
- The “bridges” of cold are completely closed.
- The windows are heated around the perimeter.
What does it consist of?
The main part is in the window sill block. The block is made of expanded polystyrene (high-rigidity, XPS or its cheaper variety, EPS), which can withstand loads well and create a decent level of tightness. The material is inexpensive, does not absorb moisture, and does not dissolve in it. Such blocks are compatible with windows made of any material: aluminum, wood, PVC, but the profile system must be taken into account.
Important! Expanded polystyrene is inert in a chemical sense, does not decompose, and is safe for human health. According to scientists, it retains these properties for at least 50 years.
Benefits of the latest technology
Infrared film is used not only for heating window sills; it is used in systems of heated floors and baseboards. Installation of this device is simple, and no special tools or skills are required.
The heating film has the following qualities:
- It heats up in a very short time: one or two minutes, and it is in the operating temperature range. It warms up efficiently, evenly, affecting the entire area.
- Electricity consumption is striking in its economy - 20 W. Three window sill plates - three 20 W each - the energy consumption is equal to one incandescent light bulb.
- Excellent aesthetic appearance. It does not damage the base at all, since for installation it does not require either a cement screed or an adhesive solution: it is applied to the surface using the dry method. This is very important: if it fails, there is no need to do “dirty” work. Replacement will require about an hour of free time.
- Sold in kits that include all the necessary accessories and elements for its installation: special tape, mounting wires, an insulating block, several clamps.
- To control such a heating system, a convenient electronic control has been created. There are both simple hand-held devices and programmable ones with an LCD display.
- Invisible to prying eyes. It is more convenient to measure thickness not in millimeters, but in microns.
Design
In order to select the correct components and technical parameters, you will need a thermal engineering calculation.
What does thermal engineering calculation include:
- required amount of transmitted energy;
- level of heat loss in the building (presence of thermal insulation, glazing of balconies, etc.);
- inlet and outlet fluid temperature;
- type and material of products;
- thickness of the concrete screed;
- type of coating material.
Based on this data, the specialist will calculate the throughput and the required laying step. The wizard will also build a wiring diagram. This can be challenging given the wiring requirements.
Wiring Requirements:
- It is not recommended to arrange contours that are too long. It is advisable that it does not exceed 100 m, since this is the standard length for a roll of polymer pipes with a diameter of 16 or 20 mm;
- all prefabricated elements must have approximately the same length (plus or minus 10%);
- they must be arranged so that all areas of the floor are heated evenly;
- The smallest possible number of fittings and connections should be used.
The gasket pitch may vary depending on the thermal load. In the zone of active heat loss (external walls, windows) it is made smaller (10-15 cm), and in the center of the room - larger (20-30 cm).
Laying scheme
When designing a layout, pay attention to turns in which the bend radius should not be less than the minimum allowable. This parameter depends on the material from which the prefabricated element is made. There are two schemes: “snake” and “spiral”.
"Snake" is simpler. It is often used by non-professional builders and designers. This scheme works effectively only in small rooms with an area of up to 10 m2. As the size of the room increases, the difference in heating in its different parts becomes more noticeable. In this case, a “spiral” is suitable.
You can do an approximate calculation of a water heated floor yourself using online calculators that are available on the websites of large construction companies. It will help you determine the nomenclature and cost of the main components. The layout of the contours must be calculated by a specialist.
The surface temperature must not exceed certain values (ISO7730 standard):
- in living rooms +26 °C;
- in the bathroom +30 °C;
- by the pool and in the basements +32 °C.
To prevent the bare foot from feeling the difference around the heating circuit, its step should not be more than 0.35 m.
Typically the liquid is heated to +35 °C. The maximum value is +55 °C. To do this, you have to mix the hot water supplied from the boiler with the water coming out of the conductor, which has already cooled slightly. This operation is controlled automatically using thermostat valves. It is their work that determines success or failure in creating the desired indoor climate.
It is very useful to also think about what the finish will be like in advance. For carpeting, it will be necessary to increase heating by 4-5 °C, which means increasing energy costs by at least 15-25%. Every extra 10 mm of screed thickness increases the required energy consumption by 5-8%.
Make and save a copy of the diagram indicating all dimensions or at least the pitch and position of the initial turn. This will prevent damage to the channels during future redevelopment. Obtain data on coolant flow from the designer; this will later be required when setting up the system.
Carry out installation at no less than 15 °C. Work should not be carried out outdoors in cold weather.
For which windows is it permissible to install heaters?
Almost all types of window systems are fully compatible with this technology. Most often it is used for heating large windows; they are used for panoramic windows, and for greenhouses, and for staircases with a second light, shop windows and glazing of swimming pools. A built-in convector in a window sill can also be placed in a small opening in a living room; there are no restrictions on size or type of device.
The heater can be mounted under a regular plastic panel or under a monolithic slab made of natural or artificial stone. You can install a convector when replacing a window with a new one or during repairs, as an additional option.
Main types and types of devices
Devices for heating window openings use two main energy sources:
- Water heating.
- Electricity.
The first method uses heated water as a coolant. The operating principle of electrical devices is based on changes in the physical properties of metals under the influence of electric current. Water types include simple tube heat exchangers and heat exchangers with additional fins. Electrical models include convectors, IR film elements, cables, and free-standing devices.
Water
The heating system coolant is used to fill the heat exchanger. Pipes are laid under the stove, connected to the main manifold or directly connected to the heating system with heating of the coolant in the boiler circuit.
The simplest water heater is a tubular heat exchanger. A hot water supply pipe is connected to one input of the radiator, and a cooled water outlet pipe is connected to the other. To make the heating area larger, the structure is made in the form of a grid of 3 or even 4 parallel pipes, and additional metal plates are installed between them. The temperature of the coolant in the circuit is regulated using a thermostat.
Warm water window sill
There are several disadvantages of such a system:
- High cost of installation work.
- It works during the heating season.
- High cost of repairs.
Among the positive qualities it should be noted:
- Efficient heat distribution.
- Possibility of placement under a monolithic slab.
- Durability.
Electric
The electric heating method has found its application in several types of devices. Today for installation they use a convector built into a window sill, a heater made of infrared film, and models of external miniature heaters. All of them are united by the use of a 220-volt household electrical network as an energy source.
It is much easier to install such electrical appliances under a window unit. All of them are made from high-quality materials for conductive conductors and insulation coating. They operate on DC voltage of 12, 24 or 36 volts, which is safe for humans. The temperature is controlled by an electronic control unit. You can turn them on at any time, rather than waiting for the onset of cold weather.
Devices using the principle of convection air flow require holes to be cut into the panel for air circulation. Infrared film and ceramic heating element can be mounted under a solid panel without cutouts.
Electric heater for windowsill
The easiest way to heat a window is to install a specially designed heater. A miniature heater with a ceramic heating element is installed 5-10 centimeters from the window frame. It is connected via an adapter to the mains. For ease of use, the devices are equipped with a built-in programmer. Using it, you can set the desired heating temperature, on and off times. The heater itself has a reliable ceramic body and is protected from moisture.
Kinds
For those who live in regions with harsh climatic conditions, window sills with a heating function are becoming in demand. The subzero temperature lasts for more than six months. Fogging and condensation are common even with very high-quality double-glazed windows.
Building materials are created that are used to make window sills. Today they are actively promoting in the construction industry. New manufacturing methods and technologies are being developed that use available heat sources, primarily central heating and electricity.
- The essence of all heating variations, regardless of the coolant, comes down to one thing: make a window sill like a heater or battery. Heating elements, heat-conducting tubes for connecting them to the central heating system and other innovative solutions are used as heating.
There are several ways to heat a room.
- Electric. The operating principle is based on the technology of warm baseboards and floors, where heating elements are used. This system is convenient as an additional source of heating on very cold evenings. They consume a lot of electricity, but they have one significant advantage - the ability to adjust.
Electric option
- Water heated – the absolute leader. Instead of heating elements, metal tubes are used, placed inside the window sill. It is possible to regulate the amount of heat generated and turn it off completely; this is done using taps. The method is budget-friendly because central heating is connected.
- Heating film is a new product in the world of heat. The method is becoming popular. The technology is very easy to install, efficient and economical: the power of a conventional device is 20 W.
Water heater
It is used for heating large areas of glazing - stained glass windows in halls, winter gardens, greenhouses and conservatories, shop windows and galleries. In the classic version, this pipe heat exchanger is connected directly to the heating of the building. When calculating power, the glazing area, frame material, wall thickness, and the number of chambers between the glasses in the frames are taken into account.
A more advanced installation scheme for a liquid radiator involves the use of a special heat exchanger made of stainless steel or copper with an increased surface area due to the use of radiator fins to increase heat transfer.
Now that all the subtleties of the device’s design are known, all that remains is to order the necessary components and install the equipment.
Electric warm window sill
Some disadvantages of warm window sills exist even at the installation stage. It is necessary to understand a little about electrical systems in order to properly make an electrical circuit yourself. In addition, some inconvenience is the need to make a screed on the window sill.
But, in principle, for a skilled owner, installing an electric window sill does not cause much difficulty. The principle of its design is quite simple. The “pie” of an electric warm window sill consists of a layer of insulation, a layer of reflector, an electrical circuit and a screed. A decorative window sill slab is installed on top. And if you don’t want to mess around yourself, you can use the construction services of specialists and get a warm window sill ready-made.
Pros and cons of an electric window sill
Even from the name of the system it is clear that installing electric heated window sills eliminates any damage. The electrical circuit, enclosed in a concrete shell, is protected from any external influence. Water poured onto the windowsill or a hot kettle placed will not lead to a short circuit or damage to the warm window sill.
Additionally, we can highlight the clear advantages of warm window sills. They are:
- the windows are heated along the entire perimeter;
- cold bridges formed due to cracks in the frames are completely blocked;
- the system consumes a very small amount of electricity;
- operational safety;
- a healthy microclimate in the living space is ensured.
There are practically no disadvantages of warm window sills. In some cases, the system does not work due to an incorrectly designed diagram. Another disadvantage is electromagnetic radiation. But the harm from it is a controversial issue. Humanity has been living in proximity to various electrical appliances for the second century, and their harm to health is still unknown.
A comment
- Registration: Jun 2010
- Posts: 45
Re: Warm window sills: myths or reality
I repeat. What I read here about Warm Window Sills (WWW) is more like that. experience of theorizing on this topic than a guide to their practical application. There are instructions on the net (I provided one link above) for practical implementation, but people are sparing in writing about the nature of the experience in operating this gadget. So what is TPO? An element of which heating system: radiator (there is experience when they were mounted on the return line of each radiator), underfloor heating (HF), mixed? The answers to these questions raise, accordingly, a set of questions regarding their calculation on such an area as window sills, installation features, etc. For large windows, which are the main source of heat loss, how justified is it to lose heat from the TP loops (in a system that is already low-temperature)?
Warm film window sill
Arranging a warm window sill in this case involves the use of infrared heating thermal film. The technology for installing thermal film on a window sill is recognized as advanced and does not require much effort or expense.
The design of the film window sill device is so simple that it does not require special knowledge or skills. This is what a film warm window sill system is. A heat reflector (aluminum foil) is lined on the base of the window sill. Next, thermal film is laid, which is covered with a protective membrane film. A decorative window sill panel is installed on top.
The width and length of the thermal film can be easily adjusted depending on your needs. If necessary, it can be installed on the entire plane, only along the edge of the window sill or in a separate part of it. In cases where maximum heating is necessary, 70% of the entire surface of the window sill is covered with thermal film; with minimal heat requirements, it is enough to cover 40% of the entire area near the window with film.
The system of film window sills itself “works” no less simply. When connected to the electrical network, the current-carrying elements located in the film conduct electric current. As a result, the film heats up and begins to emit pleasant infrared heat. It collides with the heat reflector and is directed upward, towards the window frame.
Drying mat 25x100 (50W) – Heating of window sills, heating of flowers, seedlings
- Description
- Characteristics
- Video
- Rules for using the product
- Warranty
Heating element - infrared heating film (assembled), for any final covering (carpet, linoleum, laminate, plywood, cardboard, sawdust, etc.).
The surface of the film is heated to 55 degrees (working temperature taking into account heat loss is 35-40 degrees).
The rug is connected directly to the 220V electrical network.
For ease of switching on/off (so as not to remove the plug from the socket each time), the mat can additionally be equipped with a switch, which is located on the wire near the mat itself.
To smoothly adjust the heating temperature of the mat, you can order an additional option - a power regulator.
This option allows you to smoothly increase or decrease the heating temperature of the mat.
The operating temperature range can be from 5C to 55C.
When using materials with low thermal conductivity as the final covering (thick carpet, plywood, mat, sand, etc.), in order to avoid overheating, it is recommended to connect the mat through a thermostat (Kvochka-1, Kvochka-2, Kvochka digital).
When using infrared heating, only objects and the human body are heated, not the air. The heat generated by the film can be compared in sensations and effects to the warmth of sunlight.
This type of heating is very economical to operate. It features very low power consumption. Operating costs are less than reading lamps! Using a local heat source costs less than heating a large area.
The scope of application of this heater is very wide:
- as a warming mat for feet
- like a shoe dryer
— as drying for mushrooms, herbs, fruits, vegetables (all the beneficial properties of the products are preserved)
— for heating poultry (chickens, ducklings, turkey poults) and other livestock (piglets, rabbits, etc.)
- for heating pets (cats, dogs)
— for heating the soil in greenhouses
The heat emitted by the rug is similar to the heat of the sun; it warms gently without burning.
Doesn't dry out the air!
Does not create electromagnetic radiation.
Infrared radiation has a beneficial effect on living organisms, therefore, in many clinics around the world, infrared radiation is used to treat and prevent a number of diseases.
Water warm window sill
Along with electric ones, warm water window sills are quite popular. Their installation requires some expense and effort. For example, it is necessary to make a screed under a warm window sill system. Yes, and you need to tinker with the installation of the pipe and components.
The device itself for a warm water window sill is quite simple. The heating element is a curved metal-plastic pipe. It is connected to the water supply system. Thanks to a small built-in pump, hot water passes through the pipe and gives off its heat. In addition to the pipe, it is necessary to connect a pump for water circulation, a distributor for supplying and returning water. If you don’t have confidence and experience, you shouldn’t try to make a warm water window sill yourself; it’s better to contact apartment renovation specialists. Inadequacies in installing the system yourself can lead to leaks, deformation and destruction of the window sill itself.
Positive and negative aspects of the system
The warm water window sill is completely fireproof. Unlike electric, it does not require additional energy costs, since it is connected to the central water supply, and in a private house to the heating system.
In some cases, when installing additional heated floors in the house, owners can completely abandon the heating system. Warm floors plus warm window sills fully provide warmth and comfort during the cold winter season. In addition, the installation of a warm window sill is made easier. The pipes simply need to be connected to the floor piping system.
In addition, the advantages of warm window sills are:
- windows are completely protected from cold bridges in ventilated frames;
- ensures complete drying of the entire perimeter of the window, due to which there is no condensation on the glass;
- ice does not form on the window sills during the cold season;
- with good heat transfer, the heating temperature is low (no more than 50 degrees Celsius);
- tangible savings in energy resources;
- heat is transferred in the form of radiation, which is more comfortable than operating a radiator under a window;
- the system is completely environmentally friendly, there is no electromagnetic radiation;
- Unlike an electric one, a water window sill does not require large costs for generating heat.
But there are also disadvantages of warm window sills. The mini-water system may leak. However, finding them is quite difficult. You will need to disassemble the window sill to troubleshoot the problem. The installation of the water window sill itself, although simple, requires some knowledge. Often, due to improper installation of the system and a pipe break, the window sill itself and the floors near it suffer.
If there is a need to install warm water window sills in all rooms of a residential building, it will be quite expensive. It will be necessary to create a complex water supply system. In addition, if the house is large, the windows in the back rooms warm up to a lesser extent. The reason is the loss of heat when passing through the thermal circuits of window sills, which are located closer to the source of hot water supply.
Now you know what the advantages and disadvantages of warm window sills are. Definitely, any of the systems is worth using when arranging your home.
Our works
Examples of heating work for various premises performed by our company’s specialists. All work was performed at sites in the city of Kazan and its environs. Any of these products are in our assortment - or rather, there are many more of them. This is only a very small part of the activities of our team - you can see more examples on our Instagram - we try to post the most interesting products and examples of our work there.
Warm floor Teplolux Tropics - an ideal solution for a bathroom
more details on our Instagram
| Porch heating with Fenix cables (Czech Republic). more details on our Instagram We assembled a stand with thermostats in our office - now clients can press buttons and see how the devices work)). Warm floor Teplolux Aluminum - under laminate. Breeze baseboard heaters. A very interesting topic is heating window sills - in this case, the Teplolux Tropics TLBE cable with a 50-year guarantee You can heat your balcony with TLBE cable | Heating the porch with a universal Nexans heating cable is excellent protection from snow and ice. | Teplolux ProfiMat mats with a lifetime guarantee in the guest bathroom. Cable heated floor Teplolux ProfiRoll is used for the main heating (without radiators) of the entrance area of the cottage. more details on our Instagram. more details on our Instagram | In the same gazebo there is an infrared STEP panel above the entrance opening. more details on our Instagram Infrared heater Vieto (premium segment of IR heaters) before installation - attached to 2 brackets in a couple of minutes. Controlled by remote control. Heating of a washing room in a bathhouse (main heating) with Teplolux ProfiRoll heating cable more details on our Instagram Heating the kitchen (comfortable heating) with American mats Raychem T2QuickNet Plus (160 watts per meter) more details on our Instagram | Heating a wall with infrared film in an apartment (the wall was without insulation, constantly damp and cold) Article rating: Warm electric window sill Link to main publication Related publications
|
Installation
Water convector
Warm window sill slabs are an expensive pleasure, unless they are made by hand.
The easiest way is the method of installing “warm” floors, but you will need to create a window sill. There are several technologies. We are not talking about a heat source here. The essence of the question is this: will the window sill itself act as a heater, or will a base be installed underneath it.
A simple solution is to equip the load-bearing base with a heater, and form 1-2 convection grilles in the window sill. A more complex and labor-intensive, but no less effective (and maybe more) design is a concrete block with heating elements (heating elements or water pipes).
Preparation of materials and tools
To install the heating device, you may need the following tools and materials:
- grinder (angle grinder) with a set;
- hammer drill and various attachments (chipper, mixer);
- welded metal mesh;
- foil isolon;
- adhesive solution (tile adhesive or the like);
- cement with sand (for a monolithic concrete window sill);
- copper tube (for water coolant);
- heating elements (for electrical devices);
- materials for creating molding formwork, etc.
Approximate installation
- Before installing the heating, the base should be prepared. To do this, use a hammer drill to deepen it by 5-6 cm.
- Formwork is formed from the side of the room with a height of 2-3 cm: two slopes, the bottom of the window block and a wooden board make up a container, which will later be filled with screed.
- Foil-coated isolon is placed in it with the foil facing up.
- A screed about 1 cm thick is poured.
- Foil is placed on it, on which heating elements (electric or water) are placed. They must be fixed in any convenient way (glue, screws, etc.), the main thing is not to damage them.
- Everything is filled with cement mortar.
After the solution has hardened, the window sill is attached to the resulting base. Products with high thermal insulation properties, for example, polyurethane foam, cannot be used as a binder.
The resulting device is connected to a heat source. If water is used as a coolant, the heater must be equipped with shut-off valves and a Mayevsky valve. When installing an electrical system, you need a step-down transformer, a control unit and a protection system.
Video about another installation option:
Step by step process
Let's consider two main methods of installing heating. Let's start by arranging the base on which the window sill with convection grilles will be attached.
Water coolant
Approximate order of work
The simplest design solution is to form a concrete slab with heating elements or water pipes placed inside.
Heater from scratch
- A form is being prepared for pouring a concrete slab. A plywood sheet of suitable shape is selected in accordance with the required dimensions. It is better to choose high-quality plywood with a smooth surface. This will avoid the finishing putty step. Sidewalls sufficient to pour a layer of concrete of the required thickness are attached to it.
- In the resulting form, a small-diameter copper water pipe or electric heating wire is laid at a distance of at least 1 cm from the plywood. You can attach these elements in any convenient way. For pipes, fastening for polypropylene tubes is used.
- A metal welded reinforcing mesh is placed on top of the heating elements. You can attach it to a binding wire or plastic ties.
- The pipes must be equipped with a Mayevsky tap and other fittings.
- A concrete solution is prepared for pouring: the ratio of materials is maintained in accordance with the brand of Portland cement.
- Concrete hardens within one day, and gains strength after 2 days.
- The rough window sill is ready, we move on to finishing it. The corners are rounded with a sanding machine. If necessary, when there are defects on the front side, the surface should be puttied.
- It is coated with paint and installed in place.
- Connect to power supply or heating
Sources
- https://OmShantiDom.ru/radiatory-otopleniya/uteplenie-pod-podokonnikom.html
- https://okcomfort.com/okna/podokonniki/svoimi-rukami.html
- https://mezhdveri.ru/28868-podokonniki-s-podogrevom-vidy-preimushhestva-sposoby-montazha.html
- https://okna-dom.net/teplyy-podokonnik/
- https://innstroy.ru/enciklopedija-stroitelstva/preimushchestva-i-nedostatki-teplyh-podokonnikov
Do-it-yourself remote glazing - step-by-step instructions
- Clear the subfloor by removing the old floor and removing loose concrete with a hammer drill. Pour reinforcing screed over the cleaned balcony slab using ready-made dry mixtures.
- Remove the old glazing and cut off the balcony railings. Treat the floor, façade and top slab, which acts as a roof, with penetrating waterproofing.
- Attach the vertical posts of the future metal structure to the façade using anchor bolts. Lay the metal logs of the future floor on the slab, securing them with anchors.
- Place a horizontal beam on the edge of the joist, butt-weld or overlap it. Before starting work, put on a safety belt and secure the beam with a cable.
- Assemble the side elements of the metal structure (left and right sides) “on the ground”. Lift them onto the balcony and weld the “sides” to the horizontal beam and vertical post.
- Prepare the vertical posts, weld them to the horizontal (support) beam and the side elements of the metal structure. Assemble the front part of the metal structure. Weld the counter-lattice to the front and sides to which the cladding is attached.
- Complete the installation of the metal structure by installing the top brackets on which the roofing sandwich (canopy) will rest. Paint the metal structure with an anti-corrosion primer.
- Fix the rolled waterproofing on the counter-lattice and secure the outer finish - a profiled sheet.
- Insert plastic windows into the openings, or rather, their frames (without double-glazed windows).
- Insert insulation panels (mineral wool or polystyrene foam) into the gap from the window sill to the floor. Fill the joints with foam. Cover the insulation with a vapor-permeable film.
- Install a counter-lattice made of wooden beams on top of the insulation, and screw drywall to it - the basis for interior decoration.
- Insert double-glazed windows into plastic frames, fill the cracks with polyurethane foam, install window sills, slopes, ebbs, upper and lower canopies.
- Assemble the roofing pie: fasten sheets of metal tiles to the upper brackets, laying rolled waterproofing underneath them. Glue the foam sheets that fly out onto the canopy to the ceiling. Sew up the ceiling with plastic or plasterboard.
- Place a heat insulator on the floor - extruded polystyrene foam. Fill the thermal insulation with reinforcing screed (at this stage you can organize the installation of a heated floor system).
- Take care of the interior decoration. Cover with plasterboard or use lining (as an option - balsa wood panels).
- Finish the flooring using floor tiles, linoleum, and decking boards.
Using this scheme, you can assemble the takeout with your own hands. However, at the installation stage you will have to deal with high-altitude work on a dangerous area - a balcony slab without railings, so we recommend ordering work from professionals. Experienced installers will assemble metal structures of any complexity at any height, completing the work in a matter of days.
vote
Article rating