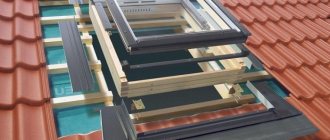
A window in an apartment, be it plastic or wooden, without such an element as a window sill, looks unattractive and bad. Therefore, architects provide this element in every house. When replacing a window, the board underneath is always replaced.
As a rule, the installation of a window sill is carried out by specialists, but you can do the work yourself. The main thing is to do everything according to the rules. Before installing a plastic window sill, you should read the instructions for the entire process.
Preparatory work
First you need to prepare the tool and material. Here's what you need to have:
- Hacksaw or electric jigsaw;
- Building level;
- Tape measure and pencil;
- Perforator with a set of drills and chisels;
- Polyurethane foam.
The pads ensure a tight fit of the window sill to the frame.
In addition, blocks of wood or special PVC pads, as well as a spray foam gun, may be useful. Based on the condition of the window opening, these elements may not be enough. In this case, you should provide perforated plates for fastening the window sill.
Fit to size
When all the tools and materials have been prepared, you can proceed to the next stage of work. It consists of taking measurements and transferring the markings onto a PVC board. To do this, you need to add 10 cm to the length of the opening. This measure is needed to create an attractive appearance for the entire window opening.
At the first stage, measurements of the window sill are taken
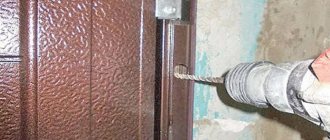
Once the markings are completed, you need to cut out the PVC window sill. This process is easily performed with a jigsaw, but if you don’t have one, you can use a regular hacksaw. But slopes require a lot of effort. Where the plastic window sill will be installed, it is necessary to make grooves. Their depth should be 5 mm greater than the length of the part being installed .
To insert window sill boards, grooves are made in the slopes
It is best to make grooves in the slopes with a chisel, which we install in a hammer drill. They should have an even shape that will not interfere with the entry of the window sills. After chiselling, the opening must be cleared of debris. And after that, proceed to the next stage.
Seal of slopes
It is better to start sealing the slopes and the wall under the window sill the next day, when the foam is guaranteed to expand and harden. As with dismantling, panel slopes are the least problematic to restore: they are inserted behind the end of the frame, a small amount of foam is introduced into the gap between the panel and the wall, then the slope is pressed against the support rails. The joints between the slopes and the window sill with the frame can be sealed after 2-3 hours with white acrylic or latex sealant.
Monolithic slopes are sealed with cement mortar, which must be pressed with a spatula to the entire depth of the groove. When the solution has set, which can be accelerated by adding a small portion of building gypsum, it is necessary to level the seal with the plane of the wall and slope with an abrasive trowel. After this, puttying is performed for final leveling and restoration of the finishing layer.
Installing window sill boards level
The base and slopes are prepared, which means you can proceed to fitting. To do this you will need a building level. Before correctly installing a plastic window sill, pads should be placed on the base. For small windows, two supports will be enough, but for a balcony, at least three should be used. This operation is easy to perform yourself.
The plastic panel is installed on pads
The pads should lie strictly at the level of the window, which will allow you to properly align the plastic window sill before changing it. When everything is ready, you should try on the part in a new place. To do this, we insert a plastic board into the grooves of the slopes. Next, move it all the way. Nothing should interfere with this process.
Next, the installation of the window sill continues to set the optimal slope. This is necessary to remove condensation naturally. It should not accumulate at the base of plastic windows. To do this, you need to lower the edge of the slab, looking inside the room, a couple of degrees. The building level will show how much the slope has changed. To ensure that the opening remains level, you need to check the position at the edges and in the middle.
The slope of the front edge of the window sill is 2-3 mm
The level is adjusted using pads. Without them, installing a new window sill will be very problematic. It is recommended to purchase special plastic elements, but they can be replaced with wooden linings. For work you should use an ax or chisel.
You need to install a plastic window sill with your own hands so that there is no gap between it and the window frame. This is a very important point that should be given close attention. The gap is eliminated with wood chips placed under the product. It is recommended to fix the edges of the panel when the position corresponds to the desired one . Each change must be checked at the building level so that the PVC window sill does not change its position.
Useful tips
- The distance from the heating radiators to the edge of the plastic window sill should not be less than ten centimeters.
- Do not block the access of warm air from radiators to the surface of the window. That is, the PVC board should not be very wide.
- If you did install wide window sills, then you need to provide special ventilation (convection) channels in them. With the help of gaps, heat will rise up to the window, which will prevent condensation from appearing on the glass.
- If the outer edge of the PVC window sill is extended beyond the edge of the wall plane by more than ten centimeters, then it is recommended to reinforce it with special supports in the form of metal corners. This will give the entire structure additional rigidity, which will affect the safety of operation of this element.
- Do not load the edge of the board, this can lead to its deformation.
- A prerequisite is that the ends of the window sill are closed with special decorative plugs. They are installed before the window opening is finished.
Convection gaps for warm air
And now the answer to the question of how to cover the polyurethane foam under the window sill. There are two options here. The first is to use a special decorative strip. The second is to carry out the process of plastering the gap.
Fastening the structure in place
After fitting, when the correct position is achieved, proceed to the fastening stage. This action is carried out by polyurethane foam, which evenly fills the space. But before installing the window sill, the cylinder needs to be heated a little. Temperature allows the foam to become more effective, which better fills empty spaces.
Window sill installation diagram
The best way to heat the balloon is to place it in warm water. But you can also use the heating system if the installation of a plastic window sill takes place from autumn to spring. The heated container is shaken well, mixing its contents. Next, the space under the slab begins to be filled. There should be no voids left.
The space under the window sill is carefully filled with foam
The work doesn't end there. The fact is that polyurethane foam has enormous expansion. This circumstance has a negative impact on the position of the board between the slopes. In order not to spoil the work, it is necessary to strengthen the element. Many people use ordinary bricks for this purpose, which are installed on the surface of the slab.
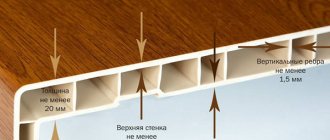
There is no need to worry about the product, since there are stiffening ribs inside the product. They can withstand heavy loads, allowing an adult man to stand freely on the window opening.
Which way is better
All three described installation and fastening methods have both their advantages and disadvantages. For example, the first option. Experts do not recommend using self-tapping screws under opening doors, and this fact reduces the strength characteristics.
Plastic window sill
The second method of installing a window sill is considered the best option. The only difficulty will be to install the spring clamps at the same level. Otherwise, it is a simple process that requires neither time nor much effort. The difficulties of the third method have already been discussed above.
Attention! It is not recommended to use the first two installation options without using pads.
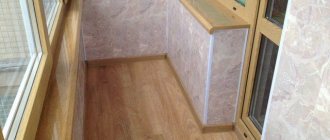
Installation of a window sill on a balcony
Modern loggias and balconies are now being actively glazed. This is not surprising, because the additional usable space will not be unnecessary for anyone. And everyone knows firsthand how much such pleasure costs. Therefore, a window sill on a balcony is no longer a curiosity.
(function(w, d, n, s, t) { w[n] = w[n] || []; w[n].push(function() { Ya.Context.AdvManager.render({ blockId: "RA-510923-1", renderTo: "yandex_rtb_R-A-510923-1", async: true }); }); t = d.getElementsByTagName("script")[0]; s = d.createElement(" script"); s.type = "text/javascript"; s.src = "//an.yandex.ru/system/context.js"; s.async = true; t.parentNode.insertBefore(s, t) ; })(this, this.document, "yandexContextAsyncCallbacks");
Basically, the installation of a plastic window sill on a balcony is carried out at the time of glazing. But if this has not been done, then you should install this interior element yourself.
Before replacing the window sill, you should prepare the metal brackets. This is necessary if it is not possible to install it under existing windows. In most cases, metal elements are required, which greatly simplifies the process. The brackets are attached to the parapet using anchors. They also allow you to strengthen the window sill, which helps to increase the payload on it .
Scheme for installing a window sill on a bracket
Fixed brackets should be located at a distance of no more than 1 meter from each other. The horizontal slope is checked using the building level. Before attaching the holders, you should tighten the thread. This will allow you to achieve levelness along the horizon and simplify the work.
When the brackets are completely secured, the installation of the PVC window sill with your own hands begins. It is secured using self-tapping screws, which are screwed into the bottom of the element. It is better to perform this operation with a screwdriver, because it significantly speeds up the process.
Fix the window sill using self-tapping screws
After installation, the window sill on the balcony must be treated with sealant. This measure is needed to get rid of a possible gap that is formed due to uneven edges. Unlike installation in a window opening, a balcony window sill does not need to be reinforced with polyurethane foam . All plastic elements quickly take their places, where they sit firmly, performing their assigned tasks.
Replacing a window sill in a wooden house
The installation scheme for a plastic window sill in a wooden house is very similar to the process performed in an apartment. First, the old wooden window sill is dismantled and the base is prepared. The side slopes must be put in order so that the plastic part can freely take its place.
In order not to cut and freely attach the plastic window sill, it is better to cut the sides from wood. For this work you will need a chisel and a hammer. This creates grooves where the fastening will be made. It happens that they may already be ready and have a wooden window sill in them.
The window sill panel is installed in the grooves
Once the grooves are ready, pads are placed on the base of the opening. Do-it-yourself installation of a plastic window sill into the opening is done only on them. The position of the stands can be fixed so that they do not move under the mounted element. Before fixing the product, you need to check the position of the plate. Afterwards it is fixed and the voids under it are filled with polyurethane foam . Many people ask the question of how to install a window sill in a different way. But foam is the best and most effective option.
Do-it-yourself window sill repair: restoration of the concrete surface
Now such window sills are practically no longer used - they were in use during the Soviet Union and we can say that since then they have already sunk into oblivion. Nevertheless, they are still found in old houses and apartments and attract people with their strength and durability. In a good way, such products need to be changed, but if there is such a need, then they can be restored. This is done in a very interesting way.
- To begin with, as in the case of a wooden window sill, it is necessary to carry out a series of preparatory work - that is, remove the paint that falls off over time in layers, sand the paint that adheres well and, of course, fill up all large potholes and cavities. You don’t have to bother too much with minor damage - they are not a hindrance. After the putty has dried, the old concrete window sill needs to be sanded again, then cleaned of dust and degreased with a solvent.
- The second stage of work related to solving the issue of restoration of a concrete window sill is the installation of some semblance of formwork - it is necessary in order to keep the paint from flowing off the window sill. It is best to use masking tape as formwork - for rigidity it is better to stick it in three or even four layers. You should not raise it too high above the plane of the window sill, as this will result in loss of rigidity. Five millimeters will be enough.
- Next comes the most interesting part. Take a can of paint (nitro enamel or oil), mix it well and simply pour it onto the windowsill. You will have to help a little with a spatula - the paint needs to be distributed in a more or less even layer. Do not smooth it, but simply push it in the right direction - in general, it should spread on its own. Only with this formulation of the question will its upper surface be perfectly smooth and, most importantly, glossy. Don't believe me? You can simply pour a large drop of paint onto the plywood and let it dry completely - you will be surprised how perfect and beautiful the stain will be.
Window sill repair photo
Naturally, a thick layer of paint will take quite a long time to dry - during this time you shouldn’t even touch it with your finger, as you will get an unsightly mark. The entire drying process, depending on the weather in the house, can take up to two weeks. After this, the masking tape formwork can be removed and the front edge of the window sill can be worked on. Unfortunately, it won’t be possible to paint it using the pouring method. Therefore, here you will have to carefully work with a brush or roller.
By and large, in this way you can even create a newfangled 3D surface of a window sill - naturally, for this you need to use not paint, but high-quality polyurethane varnish, under the layer of which you will need to lay a pre-prepared sticker with three-dimensional printing. And one more thing - you can paint this way not only a concrete window sill, but also a wooden one, and even a plastic one. In principle, the latest products of this type have their own method of carrying out repair and restoration work.
Old concrete window sill photo