Today we will touch on the topic of skylights. It is interesting because it is a non-standard option for the location of window openings. This is especially true for private housing construction, because until recently no one had heard of window structures of this type in Russia. We’ll tell you about their varieties, features and installation rules, as well as what ideas you can use for the attic. Once you understand this topic, you will understand what and why the craftsmen who have entrusted the installation of roof windows in their home do.
Construction and design of roof windows
The location in the roof slope at a low angle of inclination creates a high load on the windows in the attic. In addition to the traditional effects of wind and ultraviolet radiation for all types of windows, attic structures are negatively affected by layers of ice and snow in winter.
Under such operating conditions, the frame must stably maintain its initial geometric dimensions and comply with physical parameters. Dormer windows must have the following characteristics:
- Thermal efficiency - thermal insulation coefficient in the range of 2-2.6 W/sq.m.
- Tightness - ensured by the presence of sealing linings.
- Sound insulation is determined by the thickness of the glass and the space between them. The desired noise absorption is 35 dB.
- Strength. To ensure that windows can withstand hail and not collapse under heavy snow, they are coated with a pyrolytic coating or made of tempered glass.
Dormer windows should be equipped with high-quality locks for easy opening and closing.
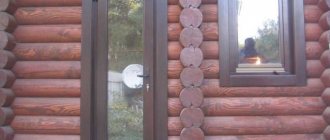
Structurally, a roof window includes a frame, sash and fittings. It differs from an ordinary window in the absence of a window sill and ebb. Depending on the design solution, internal slopes can be installed. The doors are connected to the frame by an axial suspension, which does not require special care and lubrication.
There are several options for opening the roof window sashes:
- Mid-turn. The sash rotates along the central axis up to 180 degrees and can be fixed in any position. This makes it easy to wash the glass on both sides.
- Panoramic. The sash opens along the upper axis, like a visor. Protects from raindrops and does not interfere with your view.
- Combined. The sash can open along the central axis and in suspension mode.
- Swing. The hinges are on the side axis, the sash swings open like a door.
Dormer windows are complemented with waterproofing flashings, which protect the joints between the roof and the window structure from the penetration of moisture. The water flows downwards along the guide. Tightness and maximum fit of the sash to the frame is achieved by installing several rows of seals.
Reflective curtains, blinds or roller shutters are used as accessories. You can install a roof window on slopes of various configurations and inclinations.
Installation nuances
In ninety percent of cases, problems with roof windows are not related to defects in the blocks, but to a violation of installation technology. Even if you follow the manufacturer's instructions and professional installation, moisture leaks are possible, mainly due to the accumulation of snow in the lower part. If installed correctly, the situation can be corrected by timely cleaning of the window; if necessary, lubrication of the seal may be required if it has become deformed due to ice. But when the installation of a roof window is carried out incorrectly, we are no longer talking about seepage - about full-fledged leaks, the elimination of which will require much larger investments.
Regarding do-it-yourself installation, opinions differ; manufacturers unanimously insist on the need to involve professionals and only professionals. Self-builders retort that examples of “crappy” installations carried out by installers for considerable sums are all too common, and “it’s not the Gods who burn the pots.”
The truth, as usual, is somewhere in the middle, but it is practical experience that is interesting, and not just theoretical recommendations.
Do-it-yourself installation of a roof window
vareniks FORUMHOUSE Member
Greetings, what follows is my opus on self-installation of a roof window from a well-known manufacturer. I advise similar self-builders to familiarize themselves with it in order to avoid the rake of others who have already mastered it. Roof pie from top to bottom: soft tiles, underlayment, sheathing (inch board), counter batten, protective membrane, thermal insulation 20 cm, cross insulation 5 cm, along the sheathing (block 5 cm), vapor barrier, vertical sheathing made of inch boards and GSP.
When choosing a roof window, there were two main requirements - double-glazed windows and a non-standard width, since it would illuminate the stairs and the hall of the first floor. Having opted for a cheaper design, vareniks did not delve into the technical details, which led to additional problems.
Roof windows with a universal mounting system can be mounted on various bases, including in a finished roof. The purchased window was “sharpened” only for the sheathing. But vareniks did not despair, talked to a consultant and, despite all the difficulties, decided to save 11 thousand on installer services and install a roof window with his own hands.
vareniks FORUMHOUSE Member
I waited until the weekend and boldly began installing the window. On the inside, part of the roof pie was deliberately left unfinished to make it easier to install the window - there were only rafters and the first layer of insulation. I added another rafter leg from the inside, narrowing the opening by 8 cm. Further, more: I cut the membrane, cut a hole into the sky - an opening smaller than the original one, through which I climbed onto the roof and dismantled the flexible tiles 30-40 cm further than the intended frame. I cut out an opening for the frame, cut out pieces of OSB less than 30 cm wide around the frame. The depth of the cut was set according to the thickness of the OSB in order to preserve the sheathing.
Then:
- secured wooden support bars (5×10 cm) from the outside and from the inside;
- I screwed an inch on top of the bars so that the beams were flush with the sheathing;
- I cut out a counter-lattice above the frame and installed a homemade metal drainage gutter made from an end strip (not included in the delivery package for flexible roofing, but the consultant advised installing it).
Then, “without a second thought,” according to the instructions, I mounted the support corners on the frame at the indicated level V, stapled the insulation, fitted the frame, adjusted it to the level and screwed it on. According to the technology, the window block is installed into the frame twice - fitting for calibration and final installation of the attic window after assembling the thermal insulation and waterproofing circuit. Omitting the details of the “dancing with tambourines” associated with lifting a heavy structure, lack of scaffolding and technical nuances, we get.
vareniks FORUMHOUSE Member
The fitting of the window into the frame exhausted me so much that following the algorithm and installing it again seemed like an impossible feat. All further manipulations were performed without removing the block: inserted the side insulation, nailed the moisture barrier, screwed the OSB into place, applied mastic, laid the underlayment, filled the tiles to the lower level of the frame. Things are finally getting closer to installing the protective flashing. a huge disappointment awaited me - between the flashing and the frame there was a gap exactly the thickness of an OSB sheet.
The frame of this model of attic window should be attached specifically to the sheathing, and not to the slab base, and there were no clear instructions in this regard in the instructions. vareniks, due to inexperience, decided that there was no fundamental difference, and the salary could be adjusted, but he was mistaken. Expert advice based on the consultation - the window needs to be either completely reinstalled, or the frame needs to be raised and gaskets made from OSB. The second option was implemented with careful dismantling and new assembly of the window with your own hands using four gaskets for the supporting corners.
Result: taking into account the rework, the installation took 4 days and 1,600 rubles (I bought additional underlayment and a package of tiles). Despite all the nuances, vareniks considers its experience successful. The window in the attic was installed with high quality, the design was not damaged, and the best proof is a year and a half of “normal flight without complaints.” And this takes into account the St. Petersburg weather, which is generous with precipitation.
Kinds
Window-balcony
A symbiosis of a window block and an external structure on which you can place a table and light chairs for relaxation. Functions in two positions - open and closed. The first option provides the opportunity to organize an open area: the lower half is folded outward, and railings are placed on the sides. The top sash swings upward and forms a canopy against bad weather. In the second case, only the window block is used.
Window balconies in the attic can only be installed if the roof slope is 35-55 degrees. Such combined structures increase the area of the room, protect the room from precipitation and give an aesthetic appearance to the facade of the house. When operating in winter, it should be taken into account that the balcony area must be regularly cleared of snow, or use the system in the closed position - open only the window unit.
Deaf
A simple design that does not have a sash with an opening and closing mechanism. Installed as additional natural lighting. The base consists of a frame. On the outside there is a protrusion with a sealing strip on which the glass unit is pressed.
It is fixed with glazing beads, on one side there is a latch, and on the other there is a seal made of elastic polymer. The clamps securely secure the bag, but do not contribute to its destruction. Often, a blind structure is decorated with sprockets - weaves of metal material inside the glass.
Since there are no sashes and a set of fittings, the price for fixed windows in the attic is low. At the same time, they are characterized by high tightness and retain heat well. Such windows take up little space in the room because they do not require space for an open sash. The disadvantages include the inability to ventilate the room and the difficulty in independently washing windows located above the second floor.
Triangular
A triangle-shaped window can be installed as an element of a structural composition that complements the rectangular parts, or as an independent block. The doors can be moved in different directions. The opening method determines the shape of the triangle and the type of binding:
- Swing. Used for triangles with right angles, with the sash hung on the vertical of the frame.
- Folding. Used in windows with equal sides.
- Tilt-and-turn. Installed for rectangular models with a vertical side of the frame.
For all designs of triangular windows, a blind installation option is allowed when there is no sash.
Plastic
Windows with PVC profiles have proven themselves well, especially for use in rooms with high humidity - bathrooms and kitchens. In living rooms and bedrooms, plastic windows look harmonious due to the variety of colors and patterns that imitate natural wood.
PVC windows provide maximum tightness, so a ventilation valve is often installed in the model. This element not only allows air to circulate, but also prevents condensation from forming.
Functions
Installation of window structures in the attic is designed to solve the following problems:
- ensuring an influx of sunlight;
- increasing decorative appeal;
- smoke elimination;
- heat preservation;
- ventilation;
- reduction of heat loss.
Also, the presence of a window opening in the roof visually increases the space and increases the operating comfort of the room.
Advantages and disadvantages
The main role of skylights is the formation of natural lighting with a uniform distribution of light over the entire area of the room.
If we compare the light saturation from a window in the roof slope with vertical blocks in the wall of the house, it turns out that attic options cope with this task 40% better. This is due to the inclined location in the ceiling area. The advantages of windows installed in roof slopes include the following:
- The original decor of the house, which is provided by the windows in the attic.
- Full lighting during daylight hours.
- Possibility of expanding the space due to the balcony part of the window.
- Windows do not create additional load on the supporting structures; the weight of the roof with them is identical to the weight of a monolithic roof.
- The ability to organize ventilation and minimize excess moisture in the room.
The disadvantages include the high price of roof windows and the work involved in installing them. In order to avoid problems during operation, you need to purchase high-quality windows and entrust the correct installation of the blocks to professionals.
Conclusion
We have described in detail the main options for roof windows. You learned how their design differs, what materials the frames are made from, and what kind of glass they use. All that's left to do is choose what you like.
Dormer windows look original and stylish. But if you want to further emphasize the individuality of your home, we recommend choosing windows with stained glass units.
Such products are offered by Fakro. A colored translucent pattern made of acrylic resin is applied to the glass - it is resistant to external influences and environmentally friendly. Stained glass looks impressive - when light hits it, a colored pattern is projected onto the floor and walls.
And don’t forget about accessories for roof windows - we talked about them in the article “How to choose the right roof window?”
Manufacturers
Velux
The company was registered in Russia in 1991. Since then, the company has successfully produced various models of roof windows and produces a wide range of accessories for decorating and protecting rooms from sunlight. Velux offers tools for professional installation, as well as elements for manual and electrical control of the window opening process. Factories are located in 11 countries, with the head office in Denmark.
Fakro
The family company was founded 30 years ago, and over the years has grown into a corporation of international importance. Fakro is considered one of the leading manufacturers of attic stairs and roof windows, of which more than 8 million have been sold over the years of the company's existence. Thanks to the high quality of products and a wide dealer network, products are sold in 50 countries around the world.
Rehau
One of the leading corporations with more than 20,000 employees worldwide. The company has 7 of its own chemical laboratories to improve construction products. The headquarters is located in Germany. The average annual turnover is 3.5 billion euros. Rehay's motto is “By driving progress, we improve lives.”
Roto
In 1935, German engineer Wilhelm Frank founded the company, which grew from a workshop into the world's largest window manufacturing concern. In 1968, the first PVC roof windows were created at the plant. Over the years of its existence, Roto has received more than 2,500 patents for innovative inventions. The company has established itself in the global market as a major manufacturer of attic windows, roof hatches and attic stairs.
Preparatory work
Before installation, markings are carried out on the inside. After determining the space that the frame will occupy, the space is cleared of beams and other materials.
When cutting the waterproofing layer, leave a 20 cm margin. It will be needed to increase the insulation of the frame. You need to work with roofing material carefully, as it will be reused.
Sizes and prices of roof windows
The most suitable window width depends on the distance at which the rafters are located from each other:
- If installation on rafters is intended, then between them there should be 2-5 cm more than the width of the selected window.
- In the case where the distance between the rafters significantly exceeds the width of the window, additional sheathing is installed.
- When the width of the window exceeds the distance between the rafters, the supporting structure can be partially modified.
When choosing the height of the window, they are guided by the angle of inclination of the roof - the smaller it is, the higher the window is recommended to be installed. Standard finished windows for the attic have: length - from 78 to 180 cm, width - from 55 to 134 cm. The window block is placed at a height of 90-120 cm from the floor.
Dormer windows are more expensive than traditional vertical structures. Within the category, the price range between the basic model and the premium unit is tens of thousands of rubles. For example, a basic wooden window with a single-chamber double-glazed window costs 11,000 rubles, and the same model, but equipped with a built-in remote control system and a rain sensor, costs 55,000 rubles.
Where can you install roof windows?
Work on installing the selected windows is carried out in a certain sequence:
- preparing the hole for the window block;
- frame installation;
- creation of hydro- and thermal insulation;
- securing the window frame and drainage tray;
- installation of a block with double-glazed windows;
- finishing work around the perimeter of the window.
You can install dormer windows not only during the construction of a house, but also on ready-made roofs with any roof covering.
Soft roofing is a polymer coating that can be easily processed using ordinary tools.
To create a window opening, a sharp knife and saw are used, the support rails are mounted using a screwdriver and self-tapping screws. There is a solid base under the soft roof; its cutting must be done with high precision. Allowable gaps should not exceed 3-5 cm.
Installing a window into a roof made of metal tiles or corrugated sheets is not much different from installing it on a soft roof. The difference is that tin snips or a jigsaw are used to cut the outer covering. On a metal tile roof, complete tiles should be located under the bottom of the window unit.
Let's sum it up
When installing an attic, windows are installed on the roof - natural light is required in residential premises. Pediment windows are the simplest option, but they are usually not able to illuminate the entire room under the roof. Therefore, they are combined with other types of windows:
- Dormer windows . The best choice for efficiency and practicality. They give a lot of light, are comfortable, and are easier to install than other types of roof windows.
- Lucarne . Beautiful, unusual, but not very practical - the dormer windows that protrude forward poorly illuminate everything that is not directly opposite them.
- Anti-aircraft lights . Special windows for installation on flat roofs.
- Light tunnels . Special designs that reflect light from the roof into those rooms where roof windows cannot be installed.
The layout of the room and the location of windows must be thought out in advance, at the design stage.
Repair
Situations arise when owners discover leaks in the attic window. There are several reasons leading to this result:
- Incorrect installation of the window, resulting in the appearance of cracks.
- Loss of tightness during prolonged or erroneous operation - the sealing gasket dries out and loses its shape.
- The window block initially had an insufficient number of sealing contours.
The tightness can be restored by replacing the seal, and you should carefully monitor its even fit and reliable fastening. Be sure to check whether the window opening and closing mechanism is working properly.
Repair work resulting from improper installation or a mistake in choosing windows is always more expensive than the installation itself. For this reason, you should be very careful when choosing installers.
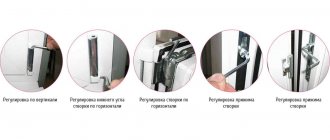
If you need to troubleshoot problems associated with incorrect installation, then the algorithm of actions is as follows:
- install thicker seals;
- adjust the fittings so that there are no gaps;
- remove the elements covering the joints and seal all existing gaps;
- check the correct installation of the slopes and, if necessary, provide additional insulation and vapor barrier.
There is another problem that should be eliminated when detected - condensation on the windows.
It occurs due to improper installation, and specifically, when the installation of the external flashing is violated. If moisture gets into the contact points between the roof and the frame, then mold appears on the window unit and corrosion of metal structures occurs.
Other causes of the problem are a violation of the technology for creating an assembly seam, improper installation of the roof and the absence of a heating battery near the window. The problem can be solved by partial or complete dismantling of the window unit, followed by checking the main components with a thermal imager in order to determine places of heat loss.
Mosquito net
The difference between mosquito nets for roof windows and ordinary ones is the presence of a strong frame and guides. The structure can be driven by rising up or falling down. In the upper position, it does not interfere with opening the window. Air passes through the mesh freely, providing ventilation to the room. The main structure of the mesh is made of anodized aluminum. The material does not rust and lasts a long time.
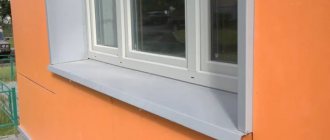
Waterproof apron
One of the important tasks is sealing the attic window. The opening is located in the roof and is installed at an angle, so if the sealing is poor, moisture will penetrate into the room and the glass will fog up. To prevent this from happening, do the following:
- A drainage gutter is installed above the opening, under which waterproofing is placed.
- To reliably protect the window from moisture, use a waterproof apron; it is sold along with the window or purchased separately. It is laid tightly around the frame and attached to the sheathing.
- Once the installation of the apron is completed, the roof is laid and the flashing begins to be installed.
When installing, remove the protective film from the waterproof apron and carefully glue it, smoothing out any wrinkles that form.
Recommendations for selection
When choosing skylights, the dimensions of the room should be taken into account first. It is recommended to take into account the climatic conditions of the region. In areas with high humidity, wooden frames will deteriorate faster.
The main material will be deformed, which will shorten its service life; repair work will be required after 2-3 years. Plastic must be additionally insulated in cold climates so that it does not warp. Metal-plastic structures are ideal for humid air.
It is recommended to pay attention to the shape of the frame - it should match the style of the main design inside the attic and the facade of the house. Before purchasing, you need to read reviews from those who have been using the chosen type for a long time in order to take into account the existing features and nuances.
Taking into account the design features for attic spaces, you can choose the best option for yourself. It must be remembered that this is a special area, which is located on the top floor, directly under the roof, so installation is carried out in the roof. This indicates the need to select frames with increased strength.