Often fabric products need repairs, hemming, etc. Thread stitching is not always appropriate, as it can spoil the appearance of the finished product and looks rough on light fabric. To perform such work, a glue web will help, which can easily correct the situation without being noticed. Before using it, you need to study the instructions for gluing it and take into account some tips.
What it is
Glue webs are strings of glue. Bonding of fabric surfaces occurs by heating the fabric, as a result of which the glue threads, melting, penetrate into the structure of the fabric and glue it together. They act as secret machines, which are designed for hidden fastening of fabric, but only the adhesive option is cheaper, since it does not require additional equipment.
Cobweb for fabric is produced in rolls. One such roll is enough for long-term use at home.
Curtain grouping options
For almost every design option for curtains, you can find your own ribbon, which will differ in both its unique design and the function it performs.
This allows the designer or housewife to have at her disposal an incredibly large number of options to emphasize the style of a particular decor.
Where is the web used?
Glue web for fabric is widely used in repairs and making clothing from fabric:
- Connecting parts of the collar and cuffs.
- Processing the bottom of the trousers.
- Connecting the bead and hem instead of shuttle stitching using a blind machine, since the model does not provide for the application of thread seams.
- Elimination of cuts in fabric material.
- Connecting a patch or appliqué to the surface of an item.
- Side seal.
Gossamer tape is not used on everyday clothes, as it is often washed, which adversely affects the quality of gluing, resulting in detachment of the joint.
View this post on Instagram
A post shared by Anya's FABRICS? (@be_be_chic) on Mar 1, 2022 at 8:40pm PST
What is a glue web and why is it needed?
Non-woven tape for clothing is necessary for gluing parts. Cobwebs are sold in rolls, the price is not at all high. One roll will last for a long time. In the 90s of the 20th century, they did not skimp on hidden seams and stitching overlocks. Gossamer does the same thing, just with glue, and is much cheaper.
What does the material look like?
Of course, instead of gossamer or overlock, you can make a regular shuttle stitch.
The advantage of gossamer tape for gluing fabric is that it is safe for health and does not contain chemicals or toxins.
The thinnest, 0.8 cm
It also does not accumulate static electricity and has a very low price. But it also has a number of disadvantages. Due to the fact that the material is very thin, it can be easily torn. Relatively short-lived during use. It quickly loses its functions, so you have to add additional tape.
Where is the web used?
Every woman should have adhesive tape for fabric in stock; it can come in handy in different situations. The most common uses: when it is necessary to hem the bottom of an item, but there is no way to hem it; if there is a cut on the material, and it is necessary to carefully glue it inside so that the fabric does not come apart; if you need to stick a small patch or decoration on an item; when it is necessary to compact the side; if you need to attach certain jewelry to clothes; You can easily shorten curtains without using a machine.
You may be interested in this Instructions for sewing a pareo with your own hands, as well as creating without sewing
Work process
Why duplicate parts of outerwear
The parts must be duplicated for the reliability of the fabric.
- To give shape to a product (jacket, sweater);
- Maintain shape when worn (jackets, sweaters);
- Protection against stretching;
- Giving durability to the material;
- Increase fabric elasticity.
What types of adhesive tape are there?
Adhesive tape is produced in two types:
- paper based;
- without paper backing.
The first option is a paper strip up to 2 centimeters wide, wound into a roll, with adhesive strips in the shape of a diamond applied on the side.
The second option is represented by a dry adhesive strip up to 2 centimeters wide, also wound into a roll.
Paperless base is difficult to use, as there is a possibility of inaccurate application.
There is no need to buy two options; to get a paperless option, just separate the glue from the paper by unscrewing the edge of the paper base.
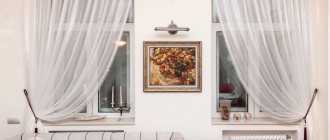
How to sew curtain tape to tulle diagonally: show in the instructions
Curtain tape sewn diagonally to the tulle.
Today's design delights are full of unexpected and unusual solutions. Curtains or tulle hanging diagonally are no exception. If you have a design idea in which the tulle will hang on a baguette in an unusual way, then you need to approach this idea accordingly.
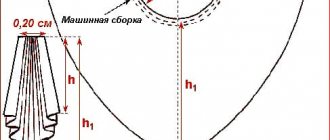
Having decided on the size and number of folds, you need to choose a curtain tape. For light tulle, a thin transparent braid is perfect. It’s easy to calculate the required amount of curtain tape:
- In the usual case, the length of the ribbon is equal to the length of the tulle.
- In our version, the number of meters of tape will be equal to the length of the tulle folded diagonally.
Curtain tape sewn to the tulle diagonally
. All other steps are the same as when the tape is sewn along the top edge. We show in detail in the instructions how to sew curtain tape to tulle diagonally:
- First, bends are made on all sides.
- Each fold is ironed and stitched using a sewing machine.
- When all four sides are ready, the tulle is folded diagonally, in the shape in which it will hang on the curtain rod.
- The tulle must be ironed at the fold location.
- Secure the fold with pins or make a mark along the entire length.
- Then apply the tape, stepping back a few millimeters from the edge.
- Secure the curtain tape to the tulle with pins.
- Sew the tape along the entire length of the tulle, from the top and bottom edges. Make sure that the stitching does not cross the ribbon cord.
- While sewing, keep the ribbon, like tulle, taut.
When the ribbon is already sewn, tighten it with cords, thereby forming folds. Next, hang the tulle on the cornice.
What glue is suitable
Not all adhesives are suitable for working with fabrics. In addition, you need to use them correctly. Several variants:
- When working with rubber-based glue, it must be applied on both sides, which increases the drying time and requires a weight for a tight connection.
- Nitrocellulose compositions are applied unilaterally, the parts are connected immediately, only dense elements are connected under pressure.
- PVA glue connects when applied on both sides; a weight is needed for adhesion.
- Rod silicone glue, which is applied with a special heating gun, since it requires heating, does not flow, and quickly polymerizes.
Examples of adhesives that are available in every store:
- Fabric glue “Secunda” has a transparent consistency of medium viscosity, no odor, no stains after drying, and ensures water resistance of the joint.
- “Liquid thread” - suitable for combining materials, gluing decorations, is transparent, dries quickly, and does not damage the fabric.
- JAVANA - made on a water basis, after drying it forms a transparent connection, does not spoil the fabric, does not leave marks, the clothing remains completely flexible at the place of gluing.
When purchasing adhesive mass, you need to take it into account:
- resistance to heat treatments;
- possibility of frequent washing of the processed product;
- seam elasticity;
- high-quality fastening;
- versatility;
- relatively quick setting, the ability to adjust the product.
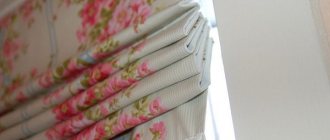
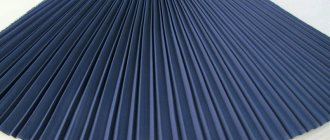
Types of drapery
Let's look at the most commonly used fold options:
- Pillar. The simplest, but no less elegant option. The folds are quite narrow and neat. The degree of drape depends on what material you use.
- Waffle. In this case, the drapery turns out to be uneven.
- Pencil. The implementation is described by the name itself. Narrow at the beginning and wide towards the end.
- Shot glass. The fold, which is similar to a kind of glass, tapers slightly at some stage of the drapery.
- Bow. Drapery, which, due to some flattening of the material, looks like a bow.
- Single-sided or double-sided.
- X-shaped. Drapery in which the middle of the fold is narrower than the rest of it.
- Fan. The fold resembles a woman's fan.
How to glue cobwebs onto fabric: detailed instructions
When gluing the tape to the material, you must follow the instructions:
- The clothing is ironed at the gluing site to ensure even distribution of the adhesive strips.
- The strip is applied to the back of the element and smoothed from above with a heated iron. When exposed to heat, the glue begins to melt. The iron is drawn to the end of the strip, the excess is cut off.
- After tightly gluing, the top paper layer is removed. A diamond adhesive pattern remains on the material.
- The element to be glued is placed on top of the glue, with the wrong side down. This is done with an iron in the same way as in the beginning. When heated, the glue melts and penetrates the structure of both fabrics, bonding them together.
If the glue diamonds do not attach well to the fabric, it is recommended to spray the material with a spray bottle and carry out the procedure again with an iron.
Useful video on the topic:
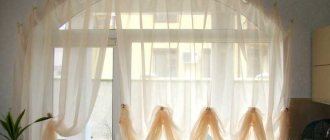
How to sew a wide curtain tape to tulle and make folds: instructions, photo
Curtain tape with which you can make folds
To change a boring interior a little, you don’t have to rush to the store for building materials and wallpaper. It will be enough to change the curtains on the windows. This step will not only save money and time, but will also add newness to the room. For example, buy new tulle and sew it to a wide curtain tape. Here are instructions on how to sew such a braid to tulle and make folds:
First you need to choose the right tape:
- For tulle, you need to take transparent braid, so it will not show through and will not spoil the look of the curtain.
The next step is to correctly calculate the required length of the tape:
- The length of the ribbon should be proportional to the length of the tulle.
- Calculation of the length of the tulle and, accordingly, the tape is made based on the size of the window opening plus 10-15 centimeters .
- For example, the length of a window is 1 meter , then it is recommended to take tulle in a ratio of 1/2 or 1/3 . Where 1 is the length of the window, and 2 or 3 is the length of the tulle, respectively.
- That is, for 1 meter of window length you need to take 2 or 3 meters of tulle.
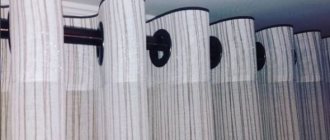
Curtain tape sewn to tulle
Next, let's look at the process of sewing tape to tulle:
- The first step is to sew the sides and bottom of the tulle.
- We turn the top edge 3 centimeters (no more) and iron the bend.
- Applying the ribbon to the wrong side, step back 1 centimeter from the top edge and secure the ribbon to the tulle. You can baste or use pins and needles.
- Once the ribbon is secured, stitch along the top and bottom edges. If the folds are supposed to be complex, you need to stitch the tape near each cord.
After the ribbon is sewn, you need to make folds by tightening the cords. When the folds are ready, hang the tulle on the curtain rod.
How to seal a hole
Often cuts appear on clothes; to correct the situation, you need to mask the hole with a patch or fix the fabric so that it does not come apart, but no traces are visible.
To fix a cut:
- the web is placed on the inside of the product, under the cut;
- the halves are aligned;
- the edges of the halves are cleaned of excess threads;
- A thin cloth is placed on top of the product to protect the surface from the iron;
- the cut is ironed.
Before starting repairs, you need to test the fabric for resistance to a hot iron, since not all materials can be heated.
Let's look at the material
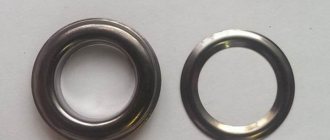
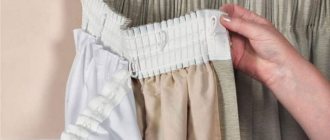
To process the top edge, you need to hem the curtain to the curtain tape with fasteners. Today there are quite a few varieties of them. In addition to the material of manufacture (transparent or white), the tape for hemming curtains has a number of characteristics:
- The width and number of rows for fastening (loops for hooks). This is convenient, since the fastening strips located in parallel, with a difference of several centimeters, make it possible to additionally adjust the length of the finished hemmed product.
- Depending on the number of gathering threads, a pattern of folds is formed in the upper part of the curtain, on the opposite side of the tape.
- Factor and type of assembly. Using ribbons, you can adjust the richness of the drapery, while the width of the curtain can be reduced from 1.5 to 3 times.
For dense, textured or patterned fabrics, a gathering factor of 1.5-2 times is quite enough: their surface attracts attention with decorative details; additional decoration with abundant drapery is not required for such curtains. But thin, solid materials will look richer and more elegant with rich and deep folds: for them, a gather factor of 2.5-3 times is used.
In the upper part of the curtain, with the help of tape, folds can be formed like an accordion, in a checkerboard pattern, there is a bow type of assembly, radial, etc.
Some tips
When working and using the product, you must adhere to the following tips:
- Do not subject clothes with cobwebs to frequent washing.
- When washing, water at elevated temperatures is not used.
- The tape compacts the material, which is taken into account before using it on thin materials.
- If the fabric is thin and the iron has an uneven surface, then heating is carried out through additional fabric.
- If the adhesion is poor, the fabric becomes wet.
- For tight joints, apply strong pressure with an iron; for thin joints, vice versa.
- The product is used after the gluing area has completely cooled.
We recommend videos on the topic:
Useful tips for hemming curtains
Regardless of the chosen method of folding the curtains, you first need to let them hang freely for several days. This will help the fabric take its natural shape vertically and horizontally. After completing the work of hemming the curtain, do not immediately cut off the excess material. It’s better not to be lazy and sew on the remaining fabric using a hidden seam. This trick will help you adjust the length of the curtains as accurately as possible after washing, since there is a risk that the material may shrink slightly.
Advice. Thin curtain material requires a special approach. It is better to fold it only with adhesive tape, so as not to spoil its presentable appearance. This method is available even to housewives who have no experience in sewing.
After washing, the curtains will finally take their shape, and the hemmed excess can be safely cut off. Professional seamstresses measure the required height from the cornice, securing the material with a basting stitch or using sewing pins. Next, the curtain is removed and the excess fabric strip is cut off from it. It is recommended to iron the seam area well, and only then proceed to hemming.
Trim the curtains yourself! With adhesive tape from Ikea it's easy!
Good day!
I wanted new curtains for the room, but the ceiling height turned out to be not the standard 2.20 m. Curtains in Ikea are either 2.50 m or 3.00 m.
Shortening in a workshop is expensive and troublesome. Luckily I found out about this tape! And that you can shorten the curtains yourself!
Place of purchase: IKEA.
The principle of operation is simple - the tape is a solid glue that melts under the influence of a hot iron and glues the fabric together.
Instructions:
Shrinkage : I tried to make a gap for shrinkage, but my curtain was still on the floor. I didn’t like it, and it’s not convenient to walk near the window. I decided, at my own peril and risk, to shorten it to length, without taking into account shrinkage.
We have a curtain that needs hemming, and two ways to do it without a sewing machine
The first method is suitable for heavy, opaque material, and today designers, using Velcro, offer not only to decorate attic curtains and gather the bottom of heavy curtains, but also to radically change the height of the curtain.
Many people know that in harsh climates it is good when the curtain is higher than the level of the radiator; this helps save energy and seriously increases the air temperature in the room. And almost everyone knows that when it’s hot and sunny, a thick curtain helps keep the room cool.
It is Velcro that helps adjust the height of the curtain from the floor level to the window sill level, and you shouldn’t think that this is a crazy idea. The Velcro fastener is not visible from the outside, and with the help of this tape you can assemble the curtains into a very beautiful window frame.
However, there are several problems with this tape:
- Self-adhesive bases constantly experience “tension stress”, and after a dozen washes the tape may fail.
- The open part of the belt will quickly become dusty, which will significantly reduce the adhesion properties of the belt.
- Cleaning this fastener is quite a labor-intensive operation.
Solving this problem is quite simple:
- Apply excess tape (it is sold in a roll and always with a reserve) to the free area. When you need it, “re-stick” (excuse the word) the excess onto the vacant section of the tape;
- To clean the dirty part of the tape, use ordinary office tape with a small width. It is enough to glue it, press it lightly with your finger, heat it a little (for example, with a hairdryer) and peel it off. After such an operation, Velcro will work like new;
- For heavy fabrics, a radical solution is needed - stitching. Here you need to understand that the total thickness of the Velcro fastener should be greater than the thickness of the curtain. Otherwise, the adhesive layer simply will not withstand the loads.
In other words, “Velcro” is a great way to decorate a window exactly the way you want, but it is worth considering that such Velcro is designed for a small pull-off force that is accessible to a child. And children are precisely the factor that can ruin any interior. But there is a second method, more labor-intensive, but more reliable.
Loggia or balcony: how to attach curtains with Velcro
Today it is customary to use a balcony or loggia as a living space, which often turns into another makeshift room. In addition to other fastening methods, loggia curtains can be installed with Velcro.
Velcro curtains are often used to cover windows on balconies and loggias.
However, their use requires compliance with additional conditions that will ensure the strength and reliability of the curtains.
Do-it-yourself Velcro curtains for the balcony have a certain difficulty in installation, since the windows installed here reach the very top, and they can be strengthened with great difficulty. It is impossible to install a cornice, curtains on nails are not aesthetically pleasing, and the most effective and aesthetic way would be to use Velcro.
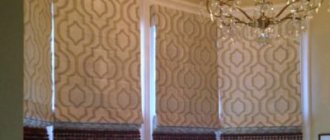
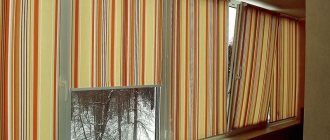
An excellent option is to use Roman blinds. They have a number of advantages:
- do not interfere with opening windows;
- do not flutter from gusts of wind;
- do not require significant material costs;
- used in various colors.
Attention! Do not forget that the design features of balconies and loggias require significant air movement, so heavy fabrics are inappropriate here.
The best choice for balcony curtains would be tulle, muslin, organza, silk, cambric, curtain fabric.
The fabric can be attached to a block with Velcro, then installed on the window frame and secured with fasteners.
Adhesive tape is attached to the wooden slats using glue or a stapler, and the slats are attached to the wall with self-tapping screws
Design options for balconies and loggias can be found on websites where color photos are posted.