The production of wooden windows consists of several stages - drying, manufacturing and profiling of timber, assembly of window structural elements, painting, fittings and glazing. Thanks to the use of fundamentally new technologies, a multi-stage manufacturing process and step-by-step quality control, the consumer ultimately receives a high-quality product. Modern models perfectly withstand the effects of moisture and temperature changes, maintain stability of shape throughout their entire service life and remain aesthetically attractive for a long time. This article contains information that will help you understand how wooden Euro windows are made today.
Stage one - drying of raw materials
Regardless of the type of wood, the raw materials from which eurobeams will then be made must be dried to a certain condition. This procedure is performed in a special chamber where lumber is placed. There, the wood is steamed under high pressure, subjected to vacuum treatment and dried at elevated temperatures. Currently, three drying modes are used:
- forced - accompanied by darkening of the wood and a decrease in its strength, which can decrease by 20%;
- standard (normal) - allows you to preserve all the main characteristics of the raw material, does not affect the strength of lumber, but provokes a slight change in the color of the wood;
- soft – the wood retains its color, properties and high strength unchanged.
Before and after the drying procedure, after which the wood moisture content is reduced to 8-10%, the lumber is stored in special warehouses. In such rooms, a climate regime is created and maintained, allowing the tree to maintain its characteristics. Before ordering windows, it is recommended to ask how the wood was dried. The best is soft, and the cheapest is forced.
In Russia, pine, oak or larch are most often used for the production of windows. Despite the different characteristics of these models, generally the same requirements are imposed on their drying.
The second stage is the production of timber
Despite the many advantages of natural wood, products made from it have always had some disadvantages - deformation and torsion, as well as the appearance of cracks in the most unexpected places.
This factor had a negative impact on the image of the material. Today, everything has changed in this regard - in order for the structure of a wooden window to remain stable throughout its entire service life, manufacturers began to use Euro-timber. These profiled elements have all the advantages of natural wood and at the same time are devoid of the main natural disadvantages. To obtain such material, the feedstock must go through several stages of processing:
- After the “procedures” in the drying chamber, the boards will be checked again for the presence of natural defects. During this event, all resin pockets, knots, rot, shells, cracks, etc. are removed;
- The remaining planks (plots), on which not a single flaw was found, are processed from the end edges using milling equipment and spliced together lengthwise;
- The lamellas obtained by splicing are given a uniform thickness on a planing machine - from 22 to 30 mm;
- After initial processing, the lamellas are glued together into a solid beam in such a way that the annual rings of two adjacent elements of one part diverge in different directions - this ensures high elasticity and allows for possible deformations to be compensated;
- In some situations, longitudinal lamellas are also glued to the side ends of an already spliced beam, which makes it possible to further improve the characteristics of the resulting workpieces;
- The resulting bars are processed on milling machines, due to which they take on the shape of a profile that is completely ready for cutting and assembling window structures;
- The final procedure is preliminary grinding of the profiled Euro timber.
Typically, 3 layers of lamellas are used to produce timber. However, for more expensive models with wide frames, it is possible to increase the number of layers to 5. Standard and premium models are made of timber, which has solid lamellas on the front sides.
Economy category wooden windows are made entirely from spliced lamellas. However, their aesthetics suffer only slightly from this (if you look closely, the connections of individual “plots” are noticeable), and their performance characteristics remain at a high level.
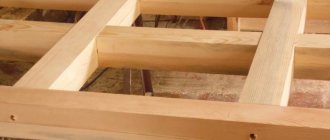
Assembly of window blocks
The assembly of window blocks consists of the following operations: assembling window sashes, transoms, vents using glue; exposure of glued sashes, transoms, vents; processing them around the perimeter; cleaning sags; cutting out a groove for low tide; cutting or selecting nests for hinges; window fits; hanging on hinges; installation of low tide, flashing; box assembly; fitting and hanging sashes and transoms into the frame.
The sashes, transoms, and vents are assembled on the work table. First, the bars are selected, carefully adjusting the corners and checking the tightness of the joints. The spikes and eyes are smeared with glue, after which the bars are connected into a frame (sash). In the corners of the joints, use a drill to select a hole into which a wooden dowel, previously coated with glue, is inserted.
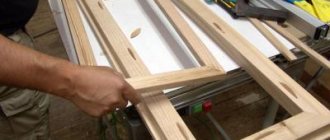
It is better to assemble window frames (see picture below) with frames fitted into them together. The tenons of the bars are lubricated with glue, assembled and crimped in an assembly machine designed by Erokhin.
The third stage – production of window blocks
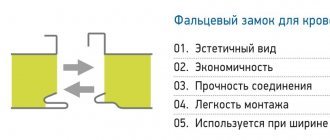
After undergoing the profiling procedure, the Euro timber is cut into parts of the required sizes and then polished. At the ends of the workpieces, shapes are cut out on a milling machine for a tongue-and-groove locking connection, which is considered the most reliable. After this procedure, you can begin assembling the component elements of the window frame:
- active valves;
- window;
- transom;
- window frames
Today, assembly is most often carried out in a special automatic mode, which ensures high strength of butt joints and correct geometry of the forms. After the assembly procedure, the elements are ground again. This is done twice - first by machine and then by hand.
Manufacturing of window blocks and balcony doors
Home / About windows / Manufacturing of window blocks
For the manufacture of window blocks and balcony doors, softwood boards with a thickness of 50 to 70 mm of grades 1, 2, 3 are used. The moisture content of the boards should be 12±3% for boxes and 9±3% for window leaves and transoms, ebbs, strips and glazing beads. Rot, wormholes, cross-layers and cracks are not allowed in the boards; knots and other defects must be sealed with wooden plugs and glue.
The technological process of manufacturing window blocks includes cutting boards into blanks, mechanical processing of blanks into the size and cross-sectional profile of the bars, cutting tenons and lugs, selecting nests and drilling holes in the bars, assembling frames and sashes (molds, transoms) and their technological holding for hardening glue.
| Window blocks (sections along the narthexes): a - with double-glazed windows for residential and public buildings (1 - upper block of the sash; 2 - upper block of the frame; 3 - hinge; 4 - glass unit; 5 - lower block of the sash; b - sealing gasket; 7 - bottom block of the box; 8 - middle horizontal bars of the sash); b—with double-glazed windows and glass for residential buildings (1 — hole for water drainage; 2 — lower bar of the outer sash; 3 — ebb; 4 — window glass; 5 — upper bar of the outer sash; b — upper bar of the inner frame; 7 — top bar of the outer frame; 8 — sealing gasket; 9 — support (spacer) and side gaskets; 10 — double-glazed window; 11 — bottom bar of the inner sash; 12 — bottom bar of the inner box; 13 — bottom bar of the outer box) |
The assembly of frames and sashes (window windows, transoms) is carried out using screw, pneumatic and hydraulic clamps. In the corners they are fastened with wooden or metal dowels. Wooden dowels are placed on glue. Metal dowels are driven in with a hammer or pneumatic gun.
When assembling boxes and sashes, you must ensure that there are no distortions. Correct assembly is checked using a ruler, square, templates and measuring diagonals using a rod or tape measure. Tenon joints must be tight, without gaps. The assembled boxes and sashes must have allowances in length and width of up to 4 mm for processing around their perimeter and in thickness of 1-1.5 mm for removing sagging. The sashes of double-leaf window sashes must have a width allowance of 10 mm for the folding of their rebate. Processing of frames and sashes is divided according to thickness to remove sag in the corners and ensure they have a rectangular shape, dimensions in length and width.
On the lower horizontal bar of the external sashes and transoms, select a groove for installing ebbs. The flashings and flashings are secured with studs or screws. Flashings are installed on internal and external sashes, flashings are installed on external sashes and transoms. The ebbs on the windows do not form one whole with the bars. Glazing beads are placed in the quarters of the sashes and secured with pins and nails.
The assembly of window blocks consists of fitting and hanging the sashes and transoms on the hinges to the frame, and the vents to the sashes. Check the correctness of the rebates so that they open freely, smoothly and do not spring back. The transoms are adjusted, then the outer and inner sashes. Blind transoms are placed tightly in the quarters of the boxes and secured to them with screws. Opening transoms are adjusted and hung on hinges with a gap of 2-3 mm for their free opening.
For hanging sashes, a variety of hinges are used: overhead PN, mortise PV and screw-in PVv. Overhead GOL, PN2 and PNZ are used for hanging sashes, transoms and door panels without overlap, hinges PN5 are used for hanging vents without overlap.
| Installation of devices in window blocks with paired sashes and in balcony blocks with paired sashes (view from the room): a - window block with unequal sashes; b—window block with vents; c - balcony door block; 1 - tightening screw; 2 - loop; 3 - clamp; 4 — wrapping; 5 - window handle; b - door latch |
To connect paired sashes, transoms and balcony door leaves without overhang, overhead hinges PN-6 and PN-7 are used, and with overhang, mortise hinges PV-3 are used. Sashes, transoms and balcony door leaves without overlap are secured using mortise hinges PV-1, PV-2 and PV-4. To hang sashes, transoms and balcony door leaves, screw-in hinges are used, which require less material, and the installation is mechanized.
To install overhead hinges, sockets are selected, narrow sockets are cut for mortise hinges, and holes are drilled for screw-in hinges. Overhead hinges are fastened with screws and self-tapping screws, mortise hinges are secured with pins, and screw-in hinges are screwed into holes. Overhead hinges are installed flush with the surface of frames and sashes.
The hinges are placed at a distance of 200 mm from the quarters of the horizontal bars of the boxes. Handles-brackets, handle-wraps, tie-wraps, latches, latches, and clamps are installed on the window blocks, which are supplied complete with the window blocks. Window units with paired sashes are supplied for construction with all installed devices.
The fourth stage - painting elements of window structures
Before directly applying the paint and varnish coating, all elements of window structures are impregnated with an antiseptic.
Additional treatment with fire-resistant compounds is also possible, which increases the fire safety class of windows. Then a primer is applied to the surface of the products on all sides, filling the pores in the wood structure. After these procedures, the window parts are ready for painting. Beforehand, all elements are carefully inspected again to ensure there are no defects. According to modern standards, a high-quality decorative coating must have UV protection. It is applied in several stages by uniformly spraying onto the surface of the wood. Nobody uses brushes anymore.
The best quality is achieved when painting in sealed chambers under high pressure or under artificially created vacuum conditions. The optimal thickness of the paint layer is 200 microns. To prevent smudges and roughness on the surface of the windows, the protective and decorative coating is applied in several stages. After each layer has completely dried, the sanding procedure is performed.
Fifth stage - integration of seals and fittings
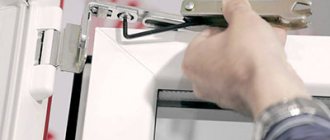
Usually, before installing the fittings, elastic sealing profiles are glued in. They are inserted into specially prepared grooves and pressed along the perimeter of the sashes, vents and transoms, as well as the perimeters of light openings. Then, on an automatic stand or manually using templates, the sashes are tied with fittings and the handles are screwed on. On the inside of the light openings, strikers, hinge group elements and microlifts are fixed to the frames. After completing these procedures, the active elements of window structures are ready for hanging on the frame.
Cutting out tenons and eyes
When cutting out tenons and eyes, the following operations are performed in strict sequence: mark the tenons and eyes, file them down, saw out the shoulders and hollow out the eyes.
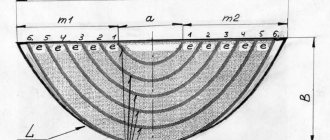
In accordance with the drawing, the dimensions of the connections are determined, after which they begin marking. Let's consider the procedure for marking the corner end connection on an open through single tenon for bars 42 mm thick and 65 mm wide.
For connection UK-1 S1 = 0.4 S0; S2 = 0.5 (S0 - S1), where S0 is the thickness of the block, equal to 42 mm. Hence the thickness of the spike S1 = 0.4 S0 = 0.4 • 42 = 16.8 (rounded to 16 mm). S2 = 0.5 (42-16) = 13 mm.
Marking the tenons and lugs of window parts
a - marking the height of the tenon with a ruler, b - marking the length of the tenon with a square and a pencil, c - marking the thickness of the tenon with a ruler, d - applying the mark with a thicknesser, e - marking the end connection, f - eye, g - tenon.
In accordance with these data, spikes are marked; You can mark the tenons and eyes using templates, with which marks are applied to the ends of the bar.
After marking, they begin to make spikes and eyes. Sawing is carried out with a bow saw, and the work must be done carefully, since a distortion of the tenon will lead to a distortion of the sash. If the tenon is thicker than the design size, then when seated in the eye it can split the block, and if it is thinner, the connection will be weak, since the tenon connection will not be a tight fit.
When sawing, make sure that the saw passes near the mark; only in this case will you get the exact size of the tenon or eye. When making tenons, you need to saw only from the outside of the marks, and the eyes from the inside.
When starting sawing, to quickly deepen the saw, place the saw on the edge at an angle of 15 - 20° and, having made several movements towards yourself, deepen the saw without pressure, after which they saw evenly without pressure or jerking. After the cut, the shoulders are cut off.
After the cuts, the eyelet is hollowed out with a chisel and a mallet.
Elements of the outer box and bindings are marked in the same way.
Stage six - installation of double-glazed windows
This is one of the most important stages in the manufacture of wooden windows.
Unlike plastic windows, when installing double-glazed windows in wooden models, not standard sealing contours are used, but transparent silicone sealant. It is applied around the perimeter to the inner surface of the frames and sashes and the outer side of the glass unit, which is then pressed with glazing beads. The tightness of structures is not reduced by the use of this technology. Today, manufacturers actively use several types of double-glazed windows to equip wooden windows.
| View | Basic properties |
| Energy efficient | They reduce total heat loss in winter by 38-40% and help save on air conditioning in summer. Recommended for use in residential, commercial and industrial buildings throughout the Russian Federation |
| Shockproof and armored | They have different levels of safety and are necessary for installation on the first and last floors, as well as in rooms where children regularly visit and live. |
| Electrically heated | They create a thermal curtain, melt the snow and prevent ice from forming. Used for glazing large areas and windows integrated into the roof |
| Stained glass | Decorate windows and reduce the intensity of natural light, as well as provide privacy |
| Stained glass | Made from reflective or tinted glass |
| Fire resistant | Depending on the configuration, they can withstand exposure to high temperatures and flames from 15 to 90 minutes |
| Standard | Currently, they are considered obsolete models and are used in facilities where high energy saving requirements are not imposed. |
Double-glazed windows can have from one to three air chambers or chambers filled with inert gas. Each additional chamber increases the weight of the structure by approximately 40%. The use of triplex also leads to weight, more details about which can be found in the review on OknaTrade.