A complete description of the technology for making plastic windows with your own hands can be found on the Internet or on our website, but here I want to talk about how our craftsmen set up mini-production not for the purpose of making money, but purely for their own needs.
In a small village under construction, where the developers are, as they say, “middle-level” people, several enthusiasts decided to save on glazing their houses. A team has been selected from those whose hands grow where they need to, and in their heads everything is as it should be.
It started with the fact that one of them, while trying to order windows for his mansion, accidentally saw the column “Cost of materials”.
As he said, it was a shock! The figure was almost half less than the cost of the entire order...... That's when the idea came up to purchase profiles and other materials at cost (well, almost...), and make plastic windows with your own hands.
Not far from the village (20-30 minutes drive) there is a regional center, where there are several dozen suppliers of PVC profiles, fittings, etc., etc.
We started searching on the Internet for a description of the process using the phrase: “Making plastic windows with your own hands,” and found it.
But the guys invented and assembled the equipment with their own hands! There were a lot of hand tools in the village, you know – drills, electric. jigsaws, hammer drills and much more.
The markings were made with a simple tape measure, an allowance was given for “welding” and the 45* angle was marked with a school square. We cut the PVC profile with a jigsaw, and the reinforcement with a turbine (grinder).
It turned out that it is quite possible to make plastic windows with your own hands even without branded machines. True, we had to buy a milling cutter for trimming the impost from the company where the profile was taken.
I was not able to see the milling machine itself, since it was assembled on the basis of some decommissioned milling machine and was located in another place - somewhere in a machine shop. They took several imposts, took them away, trimmed them and delivered them ready-made.
But I saw a welding device, and in action! This can be called a super device!
The workpieces for welding are mounted on peculiar arms, one of which can move along guide rails (in my opinion, from a lathe). The heating element is assembled from two burners from an electric stove, covered with Teflon fabric. Moreover, the heating is adjustable!
After heating, the workpieces are pressed against each other using a pneumatic cylinder from a jack. The stop system prevents the molten edges of the workpieces from being pressed into each other by more than 3-4 mm. Compressed air is pumped into the receiver (an old gas cylinder) by a car compressor (almost 4 kg/s).
After the seam has cooled, the procedure is repeated with the next pair. The clamping system allows you to attach almost all types of profiles.
The weld seam is cleaned with a wide chisel in the plane, and from the ends with a knife.
Milling of drainage holes is done with a drill - three holes, the outer ones are for attaching the cap, the middle one is the drainage itself.
It is impossible to make plastic windows without double-glazed windows - the guys have mastered this too. We started with blind windows for gables, garages, vestibules and other utility rooms. Then we mastered casement windows and interior doors.
The entrance ones, however, did not take risks - it was quite difficult. And when the neighbors found out about this, production expanded and it turned out that all their windows and doors had paid for themselves.
For obvious reasons, I won’t give the address, I just wanted to tell you that if you want, you can even master the production of plastic windows.
ATTENTION!!! Do you need an inexpensive “Window Calculation Software”? No problem - contact us and we will definitely help you
During the construction of his mansion, one acquaintance decided to buy windows, and it was impossible to ignore the column with the cost of the material.
The developer was slightly shocked! The price was almost two times lower than the cost of the entire order. It was then that the decision was made to purchase profiles and other materials at cost, and that plastic PVC windows would be made from them with their own hands.
The equipment necessary for the work was also assembled with our own hands. To obtain the required welding fixture, hand tools were used that were at hand - in the form of drills, electric jigsaws, hammer drills, and other necessary tools.
The cutter for trimming the impost was purchased at the same place where the profile was purchased.
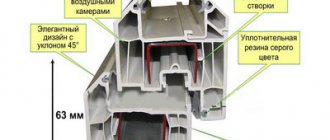
Since the profile is now available in a wide variety of shapes and designs, it is recommended to view the product catalog before ordering.
Before purchasing, you should also make sure that there is a steel frame inside the profile, which increases the rigidity of the window frame and prevents it from breaking.
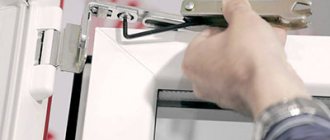
Soldering the window frame
To fasten workpieces for welding, unique arms are used - one such arm can move along guide rails.
To make the heating element, two burners from an electric stove were taken and covered with Teflon fabric. Heating can be adjusted. After heating the workpieces, you need to press them one against the other using a pneumatic cylinder from a jack. Thanks to the stop system, the molten edges of the workpieces are not pressed into one another by more than 3–4 mm. Compressed air is pumped into a receiver made from an old gas cylinder using a car compressor (up to 4 kg/s). When the seam has cooled, repeat the procedure with the next pair. Thanks to the clamping system, almost all types of profiles can be attached. To clean the weld seam in the plane, take a wide chisel and a knife from the ends. Before the windows are installed, you need to make sure that all corners are glued and fastened at 90 degrees. If at least one corner does not meet this indicator, the window should be considered defective.
Carrying out preparatory work
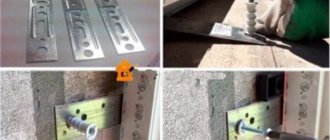
The anchors are inserted into the holes in the frame and screwed to the wall with an electric drill.
Materials and tools required to complete the work:
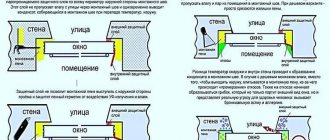
After your order has been delivered to you, you can begin work on preparing the surface of the opening. Clean the space near the window, cover the floor and heating appliances. If necessary, the sashes are removed from the window block and the blind double-glazed windows are pulled out. To pull out a double-glazed window, first remove the vertical beads. Then remove the lower and upper beads, to put them in place, be sure to make marks. If you tilt the frame, the glass unit should come out of it on its own; carefully set it aside.
To remove the sashes from the canopies, first remove the plugs, and then unscrew the clamping bolts, then release the upper part of the opening sashes and remove the hook from the lower canopy. After such operations you will be left with a bare frame. Make at least 3 holes on each side and 2 on top and bottom for anchors on the inside of the frame. For reliable fastening, anchors with a diameter of 8-10 mm will be sufficient.
If the window block is fastened to pre-installed fittings, then you just need to fasten it without disassembling the window; for this purpose, use special screws that are included in the kit.
Since no GOST standards stipulate that the stand profile should be filled with foam, most installers of plastic windows ignore this operation. To avoid the formation of a thermal bridge, it is necessary to fill the installation profile with foam; it is best to perform this operation one day before the installation of the window unit.
The old window must be removed on the day the new unit is installed. If you do not plan to continue using the old frame, then after removing the sashes, it is filed down and easily removed. After the window frame has been dismantled, it is necessary to remove the insulation and seal that is located under it to the surface of the wall, using a hammer drill it is necessary to remove part of the slopes, and the window sill is dismantled.
It is necessary to thoroughly clean the ends of the opening from dust and dirt; if the house is wooden, then a layer of waterproofing must be laid under the frame. After this, you need to take out all the garbage and you can consider that the dirty work stage is completed. At this point, the preparatory work stage is considered completed, and you can proceed directly to installation.
Return to contents
Double-glazed windows for PVC windows
We are done with the frame, next we need to insert a double-glazed window inside.
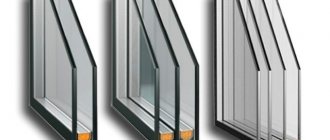
It consists of several layers of glass connected in a certain way. There can be a different number of them - for example, 2 or 4. The glasses that the glass cutter measures and cuts need to be placed one on top of the other and a special metal profile should be laid between them, and small balls should be poured into it, which will absorb excess moisture. When the metal profile is ready, we place it between the glasses and cover it with a special polymer, similar to a rubber mixture. In this way, a sealed space is obtained between the glasses, which operates on the same principle as in a thermos. There are simple and energy-saving glasses. The second type of window is different in that it reflects heat and retains it in the room. Such PVC windows are correspondingly more expensive. Before ordering, you need to decide on the type of glass unit. If winters are mild enough in your area, single-pane glass will suffice. But where severe frosts are commonplace, it is better to install a window with two or three glasses.
The double-glazed windows should dry well, then you can proceed to their installation. They are simply inserted into pre-made window frames. Typically, the profiles have so-called caps with rubber edging - this design does not allow air to pass through from the outside. We also cut these caps with a corner cutter to the size of the window frame, and then insert them into the frame profile.
Features of the work
Before you start installing plastic windows with your own hands, you need to familiarize yourself with the recommendations for carrying out this work, follow the stages and sequence of performing this work:
After taking measurements, and this must be done quite accurately, you need to contact a company you trust and order the production of windows according to the dimensions you specified.
One of the problems that may arise when installing plastic windows with your own hands may be that you will not be given a guarantee, since in most cases a guarantee is provided if all the work is carried out by the company’s employees.
For the specified type of windows there are no standards for size and shape; they can have a window unit of any size and shape and are made individually. Particular attention must be paid to taking measurements; if they are done incorrectly, the installation of PVC windows will be difficult; they may be larger or smaller than the window opening, which will lead to additional costs of time and money.
The installation of PVC windows has its own characteristics that must be observed, otherwise all the advantages that PVC windows have will be reduced to a minimum. But don’t be upset, if you follow the recommendations for installing windows, taking into account the individual parameters of a house or apartment, then you can install high-quality plastic windows yourself, without involving specialists.
It is worth noting that what encourages people to install PVC windows with their own hands is that some careless representatives of companies that install windows quite often neglect certain stages of installation, thus saving their time. Even if you constantly monitor their work, they may not listen to your wishes and comments, which is why many people decide to install PVC windows themselves.
Return to contents
Installation of plastic windows
You should trust only professionals in this matter.
You shouldn’t save money here either; it’s better to do it once and with high quality. After the windows are installed, it is recommended to check them several times - open and close. The design must work clearly, flawlessly, and quite easily. Polyurethane foam should be applied evenly and in the required quantity to ensure proper sealing. As a result, you will get user-friendly windows, energy savings, sound insulation, and a stylish interior and exterior of your home. Welding PVC profiles is one of the main operations in the production process of PVC windows. The quality of the welding process ensures the operational properties of the finished window, its aesthetic appearance and technical
Welding PVC profiles for windows is one of the main operations in the production process of PVC windows. The quality of the welding process ensures the operational properties of the finished window, its aesthetic appearance and technical characteristics.
In the window block, frame and sash profiles are welded at the corners. The profiles must fit snugly to the tsulagas, which completely repeat the profile configuration. The clamping pressure must be such as to exclude the possibility of their displacement and deformation during welding. Distortion of the plates is not allowed. To ensure high quality of the seam, and therefore its durability, it is necessary to withstand the welding conditions determined by the manufacturer of the given PVC profile.
Taking measurements
Let's consider how to measure windows without a quarter, what actions should be taken in the event of emergency situations.
If you are measuring a rectangular opening, then measure its width and height, do not forget to add the thickness of the window sill. When determining the width of the window, it is necessary to subtract the dimensions of the installation gaps from the result obtained, and when determining its height, the width of the gaps and the height of the installation profile. Measurements must be taken in at least 3 different places in the opening and focus on the most minimal result.
In order to determine the deviations of the opening in the vertical plane, a plumb line is used; in the horizontal plane, a water level is used. If they are significant, then everything must be recorded on paper, taking this into account the size of the window will be determined. If the width of the openings may differ in size, then the height of the windows must be the same; this condition must be met at least on one side of the house. The window should be installed at a distance that is 2/3 of the width of the wall. It can be positioned further only if you insulate the walls, which will lead to an increase in their thickness.
Welding machines
Welding machines are distinguished by the number of welded heads. The most popular welding machines are considered to be one-, two-, and four-headed. Multi-head in-line welding machines are used for simultaneous welding of contours and welding of mullions in one working cycle. This technology is not popular in the manufacture of PVC windows in our country. On a single-head machine, welding of one window contour is carried out in four cycles; on a two-head welding machine, two cycles are required; on a four-head machine, welding of all four corners occurs in one cycle in automatic mode. The most productive is a machine with four welding heads.
Necessary equipment
To make windows you will need:
- table saw with variable cutting angle (for cutting profiles);
- tsulagi for cutting glazing beads;
- a roller table for a saw, if you do not want to take measurements with a tape measure;
- grinder or saw designed for cutting reinforcing profiles;
- single-head, or even better, double-head welding machine;
- manual pneumatic machine - needed for cleaning corners from the outside (“dovetail”);
- desktop copy-milling machine;
- desktop machine necessary for processing the ends of the impost;
- manual pneumatic angle-cleaning machine for processing PVC profiles (“crocodile”);
- compressor;
- template for drilling holes in the frame for the impost;
- two templates for drilling holes for hinges (one for the frame and the other for the sash);
- templates for hanging frame and sash fittings;
- drills 3 mm, 5 mm, 10 mm;
- self-tapping screws: 10 mm (with a drill for reinforcement), 25 mm (for fastening fittings), 40 mm (for fastening hinges under the sash, 70 mm (for screwing the impost to the frame);
- chisel.
Welding process
The process of welding PVC profiles in window production requires strict adherence to the prescribed standards of welding technology, namely: heating of the welded surfaces of the PVC profile, duration of melting of the surfaces, welding temperature, sufficient cooling time of the welded profiles. It is also necessary to keep the working area clean, promptly clean the melting elements of the machine and the PVC profile itself for correct and reliable welding of the profile. The technical conditions for welding PVC profiles require strict adherence to the rules for quality control of the welded window contour, since the further strength of the finished product, that is, the PVC window, its operational longevity and safety depend on the quality of the weld.
During the welding process, it is necessary to strictly maintain the necessary welding conditions: Temperature of the welding knife 230 - 250 ° C. The surface of the knife must be clean. The Teflon coating of the knife is wiped with clean cotton or a paper towel every hour, “hot”, without using solvents. The seam heating time is 25 - 40 seconds. Seam welding time - 25 - 40 seconds.
Before installing a PVC profile on a welding machine, you must make sure that the surfaces being welded are clean, since grease, dust, and PVC profile or metal shavings sharply deteriorate the quality of corner welding. After the welding process is completed, a visual control of the quality of the welded seam of the metal-plastic window is carried out: the seam must be white (darkening is not acceptable, as it indicates that the heating temperature of the welding knife was too high or the heating time was too high). the seam should be uniform along its entire length.
The workpieces must be welded over the entire area of the surface to be welded. Monitoring the compliance of overall dimensions of products according to the order form. The Teflon film is changed after 300-400 welding operations. Heating temperature, heating time and holding time under pressure are specified for each batch of profiles.
Automation of the welding process
Automation of the welding process is carried out using the so-called welding process controller. The controller provides semi-automatic control of the welding process and maintenance of the specified heating temperature. Its main functions: — measurement and digital display of plate (knife) temperature; — starting and stopping the machine according to a given program; — automatic control of the plate temperature; — digital indication of the machine operation algorithm; — prompt setting of the required plate temperature; — prompt setting of the required duration of heating and welding. The average power consumption of the controller is about 20 W. Average service life is at least 10 years.
Based on materials from the Center for Modern Technologies "Universal", STK company
| Brand “Different Brands” in the Equipment Catalog >>> Brand “Different Brands” on the Equipment Exchange >>> Suppliers of the brand “Different Brands” in the Catalog of Companies >>> | |
Making plastic windows yourself is not easy, but, as practice shows, it is possible. Euro-windows have a number of advantages, but the price of the finished structure is often quite high. This is especially noticeable if you plan to install plastic windows in a house with window openings of non-standard sizes. In this regard, many people are thinking about making plastic windows with their own hands.
Self-production of plastic windows
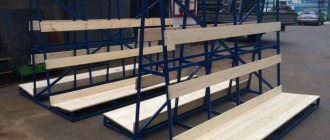
Firstly, you need a room to make windows. In the “home” production of plastic windows with your own hands, this room will be used for cutting blanks, assembling window structures and storing materials. The area of the room must be at least 35 square meters. m., with a long side of at least 7 meters, because The finished PVC profile for Euro-windows is sold in 6.5-meter lengths. To make plastic windows with your own hands, you will need a steel reinforcing profile, sealing, fittings and double-glazed windows. All workpieces must be stored on special racks. To cut the workpieces, a workbench is required; the Euro-window structure will also be assembled on it.
Secondly, in order for you to be able to assemble reliable plastic windows with your own hands, you need special equipment. The minimum required set includes tools for cutting the profile, a milling machine and a welding machine. You will also need a drill, a grinder, a hammer, a square, a tape measure and much more from the carpentry arsenal.
If there are no difficulties with the availability of conventional tools, then the selection of special equipment for the production of plastic windows becomes a separate task. To cut reinforcing parts and PVC profiles, you should purchase a pendulum saw, because... You will have to perform this operation many times. A special tool will allow you to cut workpieces quickly and safely.
A welding machine is often in the arsenal of those who are used to doing everything themselves. Do-it-yourself plastic windows are unlikely to justify its purchase in terms of financial costs. It is better to rent a welding machine for a while. You will also need a workbench with workholding fixtures and guide rails. This will allow for quality welds.
When making plastic windows, you will periodically need a milling machine. It is used to trim the impost. Unlike welding, this can be done at a third-party site where the equipment is available. Drainage holes and holes for the handle can be drilled with a regular electric drill.
After assembling the frame and installing the fittings, installation of the double-glazed window follows. The glass is installed on adjustment plates, which are installed in advance. When the double-glazed window is level in the frame, it is secured with glazing beads. Plastic windows must be sealed. To do this, a sealing contour is installed around the perimeter of the frame.
Having broken down the process of producing plastic windows into individual components, you will understand that this is a completely feasible task for those who are accustomed to relying on their own strength.
Do you want to make windows yourself? Let's try to figure out how to make plastic windows with our own hands.
The first step is to purchase the equipment necessary for the job. You will need several machines, somewhere around 4:
- for cutting PVC;
- for milling holes;
- for welding PVC;
- for milling the ends of the impost.
Hand tools you need to have:
- Electric drill;
- screwdriver;
- grinder, etc.
Materials for plastic windows:
- seals
- PVC profiles
- accessories
- double glazed windows
Attention
! The main material for making plastic windows with your own hands is a polymer (profile) with maximum resistance to external natural factors.
Stages of work:
Measuring. Initially, the profile is measured and marked, and its ends are milled for their further transverse alignment. The joints at the corners are cut with a miter box (corner cutter) at a certain angle.
Soldering and fastening. Certain parts of the profile are soldered and fastened together. To do this, the outer sides of the frame are placed on an iron (special device) and with its help both profiles are connected. The connections inside the profile are secured with special screws.
Installation of double-glazed windows. Pre-prepared glasses, on which measurements and cutting were made, are placed one on top of the other, and special balls are poured inside to make them resistant to moisture. The finished metal profile is placed between the glasses and lubricated with polymer. After a certain time, the plastic window will dry and is ready.
Stages of work
Profile cutting. For a square or rectangular window, cutting the profile should be done at a saw angle of 90˚. When cutting the profile, add a few millimeters for welding. On the profile, immediately label the horizontal and vertical lines with a marker, so that you don’t later get confused and solder the vertical to the vertical.
Reinforcement. Cut the reinforcement profile (iron) 90 mm smaller than the size of the frame profile - 2 pieces each (2 verticals, 2 horizontals). U-shaped iron is suitable for the frame. Insert the iron into the frame profile, making sure that the iron is strictly in the middle. Screw the iron to the profile from the back of the frame using 10 mm self-tapping screws and a drill. The distance between screws should be ≤ 200 mm.
Drilling external drains to release condensate. The procedure for drilling holes is performed only on the lower horizontal of the frame using a copy-milling machine. The recommended length of drains is 27 mm, and the interval between them is from 550 to 700 mm.
Welding frame corners. Before starting work, carefully study the functions of the welding machine and set the necessary parameters: welding and clamping pressure, welding temperature, welding time and cooling. After this, proceed to welding the frame corners.
Cleaning the frame. Using a manual pneumatic angle-cleaning machine, carefully clean the frame welds on both the front and back sides, setting the desired angle for cleaning. Then use a hand pneumatic sander to sand the outside corners of the frame. And finally, use a chisel to clean the welding seams located in the inner corners of the frame - in the gap under the sealing rubber.
Measure the location of the impost on the frame, then put on the template and drill through the plastic with a 10 mm drill so that the impost connector fits. Pierce the outer wall of the frame and the iron with a 5 mm drill.
Measuring and cutting out the impost. Measure the size of the impost along the frame (between the two glazing beads) and add a few millimeters. After sawing the impost to the desired size, process its ends on the machine.
Impost reinforcement. The reinforcement (iron) in the impost is rectangular in shape. The cut-off part of the iron is attached to the bottom wall of the impost using self-tapping screws.
Impost insertion. Install the impost connectors into the frame holes and secure on both sides with 70 mm self-tapping screws. Next, using a drill with a 5 mm drill bit, remove the walls between the frame and the impost in the pass for the sealing rubber (to roll the rubber in a circle). Start and finish rolling the rubber from the top of the frame.
Sash reinforcement. It is done in the same way as on the frame profile, but from the inside of the sash profile. It is unacceptable to screw a self-tapping screw into the middle of the sash profile.
Drains in the sash. Performed as in a frame using a drill with a 5 mm drill bit.
Holes for handle. Drill a 10 mm drill, exactly in the middle of the profile stick.
Welding and cleaning the sash. Do the same as on the frame, only completely clean the outer corners with a dovetail.
Rolling up the sealing rubber. Hang fittings on both sides of the sash and on the frame. Drill holes on the frame for the top and bottom hinges, and then drill holes on the sash for the bottom hinge. Secure the sash to the frame and close. Next, install the double-glazed windows and secure with glazing beads. The window is ready!
Nowadays, you won’t surprise anyone with plastic windows, presented in a large assortment on the market. Not so long ago, this was a novelty for many, but now it is commonplace. If suddenly you are faced with a choice of which PVC windows to choose, then you need to know that there is simply no 100 percent standard. In this article we will look at window manufacturing technology, with all the little things that will be useful to you when choosing this product.
“Profile” comes in various shapes and designs; usually, before ordering windows, it is best to look through the catalog of profile shapes. The brand and quality of the profile may not always coincide with the original appearance.