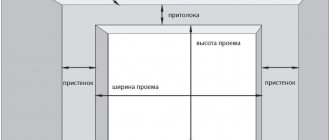
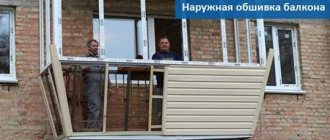
Do-it-yourself outer cladding of the balcony.
Covering a balcony from the outside is one of the most important stages in the whole complex of arrangement works, thanks to which it will have an attractive and finished appearance. To create an aesthetically attractive and harmonious appearance is not the main goal when decorating a balcony.
Thanks to this operation, you can further insulate your balcony, as well as protect it from external influences, including temperature changes, exposure to rain, ultraviolet radiation, snow, wind and others.
Why do you need external finishing of a balcony?
External finishing provides insulation, sealing of the room, protects against temperature changes, leakage of the ceiling and walls.
External finishing of the balcony is performed not only for the aesthetic appearance of the building. It provides insulation, sealing of the room, protects against temperature changes, leakage of the ceiling and walls.
The equipped stove is reliably protected from atmospheric influences, therefore, its service life lasts for decades.
If the balcony is being removed, external finishing work is necessary to complete the repair work.
Before carrying out work on the external cladding of the balcony, we repair the walls and base of the balcony. We treat all irregularities, cracks and chips with cement mortar, sealant, and blow out with foam. Simultaneously with the finishing work, we carry out sealing and insulation. For external installation of thermal insulation, mineral wool and expanded polystyrene are used.
You can do the finishing on the outside of the balcony yourself, but you must follow safety precautions
External cladding of a balcony refers to work at height. There are many companies offering such services. The cost of these works is quite high due to their complexity and the need to install additional lifting devices.
Having experience in construction work, you can finish the outside of your balcony yourself. In this case, it is necessary to follow safety precautions and use safety belts. To perform this procedure, you will need an assistant who will provide backup, hold the ladder and provide tools.
Exterior finishing, in addition to finishing with plastic, can also be done using siding and corrugated sheets. It includes installation of railings, balcony frame, roof and canopy.
Before starting work at height, it is necessary to fence off the construction site using warning tape or a rope with red rags tied to it. This is done so that people passing below are warned about the work and avoid the fenced area.
The issue of safety at heights
If the balcony is located on the first floors of the building, their owners can easily carry out all repair and finishing work without resorting to professional high-rise equipment. But what should those who live above the third floor do and do not have the opportunity to hire trained workers for these purposes?
The first thing you need to take care of is to fence off the area under the balcony and hang warning signs. If some part of the materials or tools falls from a great height, and at that moment passers-by are walking under the balcony, dire consequences cannot be avoided.
Next, you should think about ensuring safety for yourself and your assistant (it is strictly forbidden to carry out such work alone; you always need backup). A strong frame, a parapet, a platform with a fence, climbing equipment - the more different safety factors, the better.
Preparatory work
Prepare a complete set of tools
Before starting finishing work on the balcony, we calculate the materials and prepare the necessary set of tools:
- building level, tape measure, stapler, hammer;
- jigsaw, grinder, drill, hammer drill, screwdriver;
- hacksaw for wood and metal.
The second step is to prepare the surface:
Remove the old covering from the balcony slab
We remove the old covering from the balcony slab, inspect it for cracks and peeling concrete. We carry out repair work: we concrete all cracks and joints, prime them and coat them with sealant.- If necessary, we replace metal railings with new products. If we leave the old partition, then it is first necessary to clean it of rust and treat it with an anti-corrosion protective compound.
- We decide what material we will use for finishing.
You can't go anywhere without a tool
The material has been selected, which means it’s time to prepare the necessary tools. Regardless of the type of cladding used on the balcony, any craftsman will find the following useful:
- building level;
- electric drill or hammer drill;
- jigsaw or hacksaw;
- hammer;
- screwdriver;
- metal scissors (if the work will be carried out with corrugated sheets);
- tape measure and pencil.
If there is no tool listed on the list, then do not despair. For example, a screwdriver can be replaced with screwdrivers, although the work will be done a little slower. To do everything quickly and with maximum quality, you should go to the nearest store, where you can fill in the gaps in the “tool park”.
Exterior materials
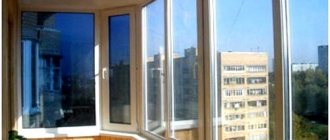
Siding is great for finishing a balcony
When choosing a material for finishing a balcony, you must take into account that the material will be affected by temperature changes, strong winds, ultraviolet radiation and sudden changes in temperature.
Exterior finishing is usually done before glazing or simultaneously with it.
Suitable for exterior decoration:
- plastic lining made of polyvinyl chloride;
- aluminum or vinyl siding;
- profiled flooring.
Features of panels
Plastic panels are a modern finishing material for covering walls and ceilings. It is made from polyvinyl chloride using the extrusion method - pressing the molten mass through special molds.
For production, high-quality PVC with various modifying additives is used. They improve the properties of plastic, in particular increasing resistance to UV radiation. After cooling, decorative finishing is applied to the blanks, then they are cut to size and packaged in packs. Sold both in packs and individually.
During molding, cavities are formed in the structure of plastic plates, separated by partitions. The air gap reduces the thermal conductivity of the material, and the stiffening ribs increase strength.
Plastic lining
Plastic lining is an inexpensive and popular material for exterior finishing of a balcony.
An inexpensive option is to cover the outside of the balcony with plastic panels, which are installed on a sheathing made of a metal profile or wooden beam.
Advantages of plastic panels:
- you can choose the desired color, the panels are available with a glossy, matte surface, with a pattern, or plain;
- easy and quick installation: the material is easy to cut, process, and has a reliable tongue-and-groove connection;
- moderate cost.
Flaws:
- plastic lining is fragile; strong winds can tear panels out of their fastenings;
- weakness to ultraviolet radiation (over time, the surface begins to gradually fade).
During the finishing work, measures are taken to waterproof and insulate the premises.
Installation of plastic lining
First of all, install a sheathing made of wooden beams or metal.
The first step is to prepare the surface: we seal all the cracks, seal the joints. Plastic strips can be easily cut with a utility knife or hacksaw.
Stages:
- We install the sheathing from a wooden beam or a metal profile.
- We fix it using self-tapping screws (or staples), strictly according to the level of the guide starting strip.
- The first strip is inserted from below into the starting profile, then the remaining strips are attached in turn to the tongue-and-groove connection;
- We install corner pads to hide all the unevenness.
The overall appearance of the finish will depend on how correctly and evenly the first strip is attached.
Selection of sheathing elements
To lay PVC panels, choose one of the following methods:
- frameless mount ― an inexpensive method, but suitable only for very smooth walls with right angles. Various solvent-free adhesives are used for fastening. Before laying the panels, the surface is cleaned and primed;
- frame mount - very smooth walls and corners are not required. Laying is done on the frame in the form of a sheathing, which is fixed perpendicular to the panels. With simple installation, the sheathing elements are evenly distributed over the entire surface in increments of up to 500 mm. When using combined installation, sheathing elements must be located at all panel joints.
The frameless method has a significant drawback that limits its use. With this type of fastening, it is impossible to replace a damaged panel. In addition, in this case it is impossible to lay insulation, which is necessary for covering the balcony.
In this regard, balconies are usually sheathed with PVC panels using a frame method. With this method, the sheathing is mounted from various materials:
- wooden slats are an inexpensive and easily processed material. In the case of special impregnation, the material does not rot or burn. A significant drawback is deformation upon drying;
- metal profiles - have increased strength and durability. A significant disadvantage is the high price;
- plastic profiles - resistant to moisture. Significant disadvantages are high cost and ability to withstand light loads. Most often, such profiles are used for ceiling cladding.
For cladding balconies, lathing made of wooden slats is mainly used. If the balcony is well waterproofed, they do not get wet and therefore do not deform after drying.
For the sheathing you need slats measuring 40x20 mm. Their number is calculated in the following way:
- The length of each wall and the distance to the ceiling are measured. The interval between the slats is selected up to 50 cm. After this, the distance to the ceiling is divided by 50 and multiplied by the length of all walls. The resulting number is rounded;
- The lengths of door and window openings are measured. The resulting lengths of the slats are rounded and added to the resulting length for the walls;
- In addition, two slats are mounted on each wall up to the ceiling. Their total length is added to the value obtained earlier;
- To the resulting total length of the slats, 5% of the length is added, which will be in demand when trimming.
Profile flooring
Profile decking is made from galvanized steel sheet by hot-dip galvanizing. A profiled sheet is a sheet of steel with a thickness of 0.7 mm to 1.5 mm, onto which a profile is applied with a certain pitch and height. Waves and corrugations are stiffening ribs and are available in various variations. The surface of the profile flooring sheet can be galvanized or coated with a polymer coating.
Watch the technology for exterior finishing of a balcony in this video:
Advantages:
- durable, hard and fairly light material;
- has a service life of 30-50 years;
- beautiful appearance, does not fade, does not require additional painting;
- fairly inexpensive cost;
- simplicity and high speed of installation;
- environmentally friendly material: safe for humans, animals and the environment;
- has a wide range of colors: you can choose the color of the sheet to suit any interior.
Installation of profile flooring
Follow the sequence of actions
When installing profile decking, follow the sequence of actions:
- A metal or wooden frame is attached along the outer perimeter of the balcony. Before installation work begins, all metal and wooden parts of the frame are treated with protective agents.
- The profile flooring is attached using self-tapping screws with rubber pads. Installation begins from the corner, the sheets are attached overlapping on one wave.
- The corners are closed with end caps.
Insulated sandwich panels
Sandwich panels are named after the English sandwich. They consist of 2 layers of plastic with insulation between them. As a rule, inside there is extruded polystyrene foam or polystyrene foam, which have very low thermal conductivity.
Using sandwich panels you can not only create a beautiful finish, but also increase the thermal insulation and sound insulation properties of walls or ceilings. With a small thickness from 10 to 32 mm, heat loss is reduced by up to 70%.
The surface of the sandwiches is covered with a protective film, which is removed during installation. The standard sheet sizes are quite large - 3000x1500 mm, so they are more difficult to transport and install than more compact narrow planks.
Aluminum siding
Aluminum siding with a polymer coating is optimal for exterior decoration of balconies. It is attached to the sheathing, made perpendicular to the location of the panels. Additionally, insulation is carried out.
Advantages:
- the polymer coating does not fade, has a service life of up to 40-50 years, is not afraid of temperature changes, and is frost-resistant;
- does not burn and does not support combustion;
- is an unfavorable environment for the development of microorganisms and fungi;
- not subject to destruction when exposed to humidity and water.
How to cover a balcony with your own hands: installation methods
PVC panels have a tongue and groove on the edges, with which they are connected in series, similar to wooden lining. The elements can be fastened in two ways - to a special frame (sheathing) or directly to the wall using glue.
Scheme of finishing a balcony with PVC panels
Along the sheathing
Using this installation method, you can hide even large flaws in the base surface. Since the sheathing is lightweight, installation of a powerful frame is not required. Wooden or plastic slats and galvanized profiles are used. The wood must first be treated to prevent rotting.
The panels can be mounted vertically, horizontally or diagonally. Moreover, the sheathing should be located perpendicular to the finish. For fastening to the base surface, fasteners corresponding to the base material are used. The minimum cross-section of the bar is 20x20 mm. The maximum pitch of the slats is 50 cm. All frame elements are leveled or plumb.
The lathing must be installed near the ceiling, floor, as well as near external and internal corners. In places where shelves, cabinets or equipment are expected to be hung, backing boards and pieces of plywood must be secured to the walls or ceilings.
The panels are connected using a tongue-and-groove lock. Each is attached to the sheathing using clamps, staples or nails. You can further insulate the surface by laying thermal insulation between the slats in advance.
Gluing
For this option, the walls and ceilings must be perfectly smooth. Liquid nails based on organic solvents or acrylic are used as glue. This universal product is suitable for plastic, wood, concrete, brick and glass, but you must remember that the acrylic mixture is sensitive to low temperatures. It is recommended to use glue marked “waterproof”, since condensation occurs in the structures of balconies or loggias as a result of temperature fluctuations.
The surface must first be dust free and degreased. The cracks are cut in advance, puttied and leveled. Loose walls are primed and then dried. Priming increases the adhesion of materials and provides reliable adhesion for a long time.
The adhesive is applied around the perimeter of the panel or in a zigzag pattern along its length. The cladding needs to be pressed against the wall for a few seconds; usually manufacturers indicate the curing period in the instructions. After the glue has completely dried, the materials are firmly attached to each other.
Vinyl siding
Most often, vinyl siding is used for finishing balconies.
Vinyl siding for finishing balconies is suitable for use on the street side.
Advantages:
- does not absorb dust and dirt;
- resistant to weathering, temperature changes, ultraviolet radiation;
- made from environmentally friendly ingredients;
- does not support combustion.
Finishing balconies with siding is carried out most often and has an optimal price-quality ratio.
How to choose material
Before purchasing, you need to inspect the product for external defects. Any scratches, chips or damage to the decorative layer indicate its low quality and instability to mechanical stress.
Types of lining
You should pay attention to the thickness of the plastic and the number of stiffeners. They determine the strength of the panels. If, when squeezing the edge, an inelastic dent is formed, it is better not to buy this material.
Deviations from geometry, swelling, cracks and other defects indicate a violation of the technology. High-quality panels are even, smooth, with a uniform coating and without a strong odor. Their price cannot be too cheap.
Installation of vinyl and aluminum siding
Exterior finishing of a balcony with siding is quite simple; if you have the skill to perform such work, you can do the installation yourself. When calculating the required material, do not forget to purchase a starting guide, a window sill strip (installed under the balcony window and ensures tight connections), external corner fittings and end caps.
Watch this video and you can start installing siding on the balcony:
Installation steps:
- We install the sheathing from wooden beams or metal profiles.
- The first panel is attached with self-tapping screws to the sheathing and is located at the bottom of the structure. Self-tapping screws are screwed into the middle of the perforated holes.
- We attach the following panels to the joint of the starting strip, starting from the bottom edge. At the joints we leave a gap to expand and narrow the profile by 0.5 mm.
The sheathing should be installed perpendicular to the location of the siding panels. Siding is attached from bottom to top. We set the guide starting strip strictly according to the level.
Step-by-step arrangement of a balcony
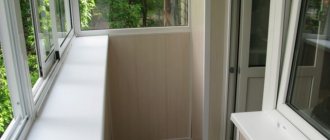
After calculating everything by position, I chose the most acceptable, in my opinion, option:
- Plastic panels for finishing inside the balcony;
- Metal profiled sheet outside;
- Foam insulation with PSB-S25 boards.
But all these materials must be attached to something, so you still need to decide what you will assemble the load-bearing sheathing from. There are only 2 options: wooden blocks and metal profiles, the same as for drywall. I chose wooden blocks; a wooden frame is easier to assemble and it is easier to attach the cladding to it.
Option for installing wooden sheathing for insulating a balcony.
As for the tool, nothing extraordinary is required for such work. The standard set includes a hammer drill, grinder, screwdriver, level, plumb bob, stapler and hammer.
To strengthen the metal balcony parapet, you may also need a welding machine. If it is not there, then the connections will have to be made with bolts.
Strengthening the parapet and constructing a frame based on it
One of the balcony arrangement schemes.
So, how to arrange your own balcony. The whole process is divided into several stages:
- Strengthening the parapet and constructing a frame based on it;
- Exterior decoration;
- Glazing and interior fittings.
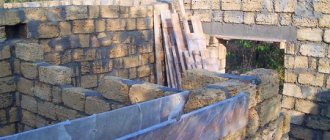
If your balcony already has any finishing, it will need to be completely dismantled. You won't need anything else other than a metal parapet.
The balcony was completely cleared, only the metal parapet remained.
Previously, glazing of balconies in old houses was made using wooden frames. So, before dismantling these frames, you will need to remove all the glass from them. This is important, because if such glass falls down during disassembly, it can cause many troubles.
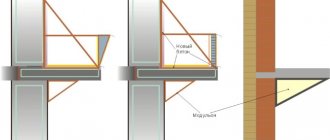
- To install modern plastic frames with double-glazed windows, the width of the base platform must be at least 50 mm. If your parapet is in excellent condition and has a flat and wide strip welded on top, then consider yourself lucky. But as far as I know, such cases are very rare. Therefore, the first thing to start with is installing a support platform. I used the fiftieth corner for these purposes. Ideally, of course, it is better to weld it level. But if you don’t have a welder, you’ll have to screw it in. Moreover, the bolts must be selected with countersunk heads so that they do not stick out above the corner;
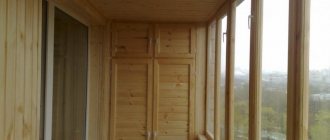
Wooden sheathing inside the balcony.
- As you know, the square footage of balconies in most domestic apartments is quite modest and often does not exceed 3 m². In order not to take up the already scarce usable space, I decided to install the insulation on the outside of the parapet. For this I used 50mm thick foam boards. Therefore, for the outer sheathing I took 50x50 mm wooden blocks;
- But before that, I used a grinder to cut off all the unused rods of the old metal parapet. I still had the vertical supporting rods on which the upper platform was based, and for stability I also left a horizontal bandage;
- I did not drill into the already thin bars of the old parapet. For the outer sheathing, as I already said, 50x50 mm bars were used. For the inside I chose a 30x40 mm block. And to secure them, I placed them on both sides of the metal parapet and pulled them together, driving through screws into them. At the same time, I pre-drilled holes in the internal sheathing bar according to the diameter of the screws, so that they fit practically without clinging to this bar. I drove the screws in increments of 300 mm. As a result, I got a kind of clamp - a metal parapet was clamped between two planks;
Scheme of installation of internal and external lathing on a metal balcony parapet, top view.
- I made 3 such continuous horizontal dressings: one at the top point, one at the bottom, and one at knee level;
- To prevent the wood from deteriorating, I pre-treated all the bars with universal impregnation 3 times. But concerns remained about the bottom bar of the outer sheathing, because part of this bar looked beyond the edge of the balcony slab. To protect it, I attached a wide metal ebb to the “Quick Installation” dowels on the bottom of the balcony slab even before fixing the sheathing. These ebbs are sold together with the corrugated sheet. In this way, I provided reliable protection to the bottom strip of the wooden frame and the edge of the balcony slab;
- The balcony has 3 open sides, so we have 2 external corners. I strengthened both of these corners by inserting 50x50 mm vertical bars into them; they fit perfectly between the edges of the horizontal guides. I screwed the vertical corner bars themselves with furniture corners to the horizontal guides. Near the walls, I also inserted vertical ones between the horizontal bars and connected them both to each other with furniture corners and additionally screwed them to the wall using “Quick Installation” dowels. Thus, we got a wooden frame supported by a balcony slab.
Diagram of a wooden balcony frame, side view.
Installation of external cladding and insulation
For the outer cladding I chose corrugated sheets. The thickness of such sheets varies around 0.5 mm, plus they are coated with zinc coating and additionally painted with polymer paints that do not fade in the sun. The result is a beautiful, durable and long-lasting exterior finish.
To secure the corrugated sheet to the wooden frame bars, I used special self-tapping screws with a press washer. The heads of these screws are made in the form of a hexagon and painted to match the color of the corrugated sheet.
Against the general background of the cladding, such elements are almost invisible
Having cut the sheets to size, I applied them to the outer part of the sheathing and first screwed a row of screws into the top bar. Then, bending over the parapet, he attached the corrugated sheet to the middle and lower belt of the sheathing.
In order for the outer corners to look decent and not allow water to flow into them, they are covered with a special corner on top, which is also screwed to the frame with self-tapping screws.
Options for fittings for external cladding of a balcony with corrugated sheets.
Such accessories can be purchased together with a profiled sheet; as a rule, they come in a set. All cracks and gaps in the area where the outer corners are attached are filled with transparent silicone sealant.
An option for attaching a wooden outer sheathing to a metal balcony parapet.
When attaching exterior cladding to upper floors, be sure to use safety nets. Tie yourself and your screwdriver to a secure base, I attached a safety rope to the hanger of the heating radiator in the room. Remember that you are working at height, and if you suddenly feel dizzy or the screwdriver accidentally slips out of your hand, such a precaution will not be superfluous.
It is better to attach the outer cladding before installing the glazing. Even if all the sections on a plastic window frame open, you can bend over the frame to move it. After all, such frames are installed on metal hangers and are not designed for strong lateral pressure.
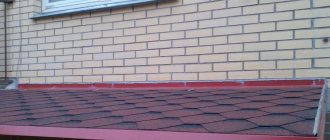
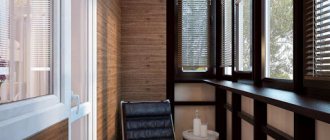
Balcony sheathed on the outside with corrugated sheets.
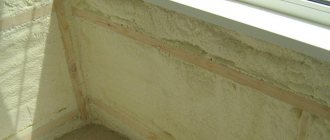
Before gluing the foam boards, you should blow out all the cracks and gaps from the inside with foam, wait until it dries and cut off the excess. After this, cut out the foam slabs exactly according to the dimensions of the niches and insert them between the frame guides.
Foam plastic to the outer cladding can be glued to liquid nails or to the same mounting foam. Personally, I didn’t spend money on liquid nails and installed the foam on the foam.
Insulation of the balcony with polystyrene foam outside the parapet.
To do this, an arbitrary pattern of strips of polyurethane foam is applied to the back of the sheet, and the sheet is applied to the base. Keep in mind that you will have to press the foam sheet against the base several times until the foam finishes expanding.
No matter how hard you try, you most likely will not be able to tightly insert the foam sheets between the sheathing guides; there will be gaps, and these gaps are also filled with polyurethane foam.
This instruction allows you to make the same sandwich panels with an outer covering of corrugated sheets. We just assembled them with our own hands, and most importantly, they cost us about 3 times less.
A few words about glazing
If you want to get a truly warm and beautiful balcony without cracks, drafts and distortions, then forget about wooden frames made to order in the nearest carpentry workshop, believe me, this is the last century.
Glazing must be ordered only plastic with double-glazed windows. You shouldn’t buy too expensive models, this is not a living room. Plus, don’t skimp on opening sections of windows; think about how you will clean the blind windows later.
Plastic double-glazed windows on a standard balcony in Khrushchev.
When the surveyor comes to your home, do not hesitate to ask in detail about everything that he will do. And check the accuracy of the recorded data yourself. I know from experience that they don’t always send a truly high-quality professional to take measurements. If errors are made in the dimensions, the frame will, of course, be redone, but you will waste time.
Interior decoration
Now let's talk about how to decorate a balcony with plastic panels. Don’t be alarmed; decorating a balcony with plastic panels with your own hands is not a difficult task. Personally, I immediately grasped this science without any preparation.
Consequences of facing with defective goods.
So, we bought plastic panels and accessories for them, now we can move on to the process of cladding the balcony. The panels can be mounted on the lathing or glued to the wall. I used both methods on my balcony:
- I mounted the three outer walls under the windows and the ceiling on lathing;
- I covered the facade wall.
Gluing plastic to construction adhesive.
Any panels connected according to the tongue-and-groove principle, lining, MDF, plastic, are mounted perpendicular to the sheathing guides.
In our case, these guides are installed horizontally, which means we will mount the cladding vertically.
Fixing the profile for vertical installation of panels
If a frame made of metal profiles is installed, then the fittings and the panels themselves are attached to it using small metal screws. We have installed a wooden sheathing, and all such material can be attached to it with a stapler, which you will agree is much faster and easier.
Accessories for plastic finishing and points for its placement.
U-shaped guides are installed first along the perimeter of the sector to be finished. Then you will need to cut the panel to size, insert it into these guides and slide it all the way to the left. By the way, the cladding is done from left to right, from the corner.
Ceiling plastic fillet with mounting groove.
The plate itself is inserted with a tenon into the corner. On the other hand, it is fixed with a stapler to the guide bar by the lower edge of the groove; it will protrude slightly. The next plate is inserted and fixed in exactly the same way. The tenon fits into the groove, and the strip is fixed at the back with a stapler.
As a rule, the bar at the end of the row has to be cut to fit. So, when trimming, leave a gap of 5 - 7 mm. The edges of the U-shaped starting profile have a size of at least 10 - 15 mm, so the small gap between the profile and the bar will not be visible.
Winding up the outermost trimmed bar is easy, but for this it is advisable to call an assistant:
- Take a metal spatula, use its blade to slightly bend the guide profile in the corner and insert the outermost bar into it from below;
- After this, also insert the bar into the profile from above and push it all the way. When the bar takes its place in the guides, it needs to be moved to the left so that the tenon fits into the groove.
Fixing guide plastic profiles on wooden sheathing with a stapler.
If the neighbors above have already insulated their balcony, then the plastic panels can simply be glued to the concrete ceiling slab. Otherwise, you will have to anchor a 50x50 mm wooden block crate to the ceiling. Glue foam boards to the ceiling between the bars and sew them up with panels.
Insulation of the balcony ceiling with polystyrene foam.
As for gluing, panels can only be glued to a flat surface. If the curvature along the plane exceeds 5 mm, then you will also have to attach guides to the load-bearing facade wall and cover the surface with plastic along them. True, in this case it is better to take thin guides.
Now there are plastic guides with movable clamps. They are produced specifically for working with plastic panels, but such fittings are more expensive than wooden planks.
Plastic guides for mounting PVC panels on clamps.
Plastic can be glued to a flat surface using liquid nails or adhesive building mixtures, whatever you want. Personally, I glued the panels to wide double-sided foam tape. I pasted strips of adhesive tape in places where the profiles were fixed along the perimeter of the wall and on the wall itself in increments of about 300 mm. It turned out fast, simple and clean.
Double-sided foam tape onto which panels can be glued.
Features of finishing a closed balcony
In a closed balcony, before starting finishing work, we strengthen the floors, make a frame from metal corners, attach it to the walls and the balcony base, and at the same time install a fence. The metal frame removes part of the load from the slab and transfers it to the walls.
If there is a living room on the balcony, but it is necessary to carefully insulate it
If the finishing is done with siding, sheathing is placed on the metal frame. It is permissible to install profile sheets without sheathing.
After finishing and insulating the parapet, we install the balcony frame.
If a living room is to be installed on the balcony, exterior finishing should be done to increase the thermal insulation of the room.
Work begins with dismantling
Before covering the balcony with siding from the outside, you need to remove all interfering elements. Any materials located on the parapet, as well as objects that could interfere with work, must be dismantled. As a result, there should be nothing left on the balcony except a metal frame, which is a fence.
Next, you should carefully inspect the concrete slab and parapet. If cracks, shedding or rust are noticed, they must be eliminated so as not to weaken the future structure in the future. The old metal parapet needs to be strengthened. A galvanized strip is perfect for this; it can be used to strengthen the connection between the concrete slab and the old fence.
Afterwards you will need to coat the metal with a primer, having previously cleared it of any existing paint. Concrete should also be covered with an anti-corrosion compound to prevent any destructive processes. Once these steps are completed, you can move on to the next stage of work.
How to calculate the number of panels
In order to correctly calculate the required amount of material, you first need to accurately determine the area planned for the surface covering. To do this, the first step is to take accurate measurements of the room, and then multiply the width by the height. The resulting digital value excludes the area of window and door openings, as well as any other surfaces not used for cladding.
After this, the resulting figure must be divided by the area of one panel, while it must be taken into account that all plastic products vary quite greatly in both length and width. Therefore, when purchasing material, be sure to check the dimensions of the purchased product.
It is necessary to add at least another 5–10% to the resulting calculations, since accidental breakdowns may occur during installation or transportation of plastic products, and material from different batches may differ significantly in both shade and some other decorative parameters.
Installation of panels on mounting strips and clamps
Installing a plastic coating using clamps and mounting strips has certain nuances, but in general it is not as complicated as it might seem at first glance. Having carefully studied the step-by-step guide and having the necessary consumables available, you can carry out the installation yourself without any problems.
Installation technology:
- At the very beginning, control measurements are taken over the entire surface to be coated.
- The second step is cutting the material to the required size. To cut plastic, you can use either a hacksaw or an electric jigsaw.
- The first panel is fixed with a “spike” in one of the most difficult corners of the room.
- The next one is carefully mounted into the groove of the previous one, after which they are both secured to the frame using a clamping clip and self-tapping screws.
- Installing the last panel can be a bit tricky. If it is not possible to fix it with a clamp, then it is possible to attach the last final element with glue.
Fastening the panels to clamps is carried out quite quickly. The main advantage of this installation method is that it almost completely eliminates the possibility of damage to the plastic during its installation.
Covering the balcony with plastic panels on the outside
Some owners of apartments or houses line their balconies with plastic not only from the inside, but also from the outside. This is quite logical, but you need to take into account the instability of PVC products to ultraviolet radiation.
It is recommended to use special facade panels for exterior decoration. They are not afraid of sunlight, have sufficient mechanical strength and frost resistance.