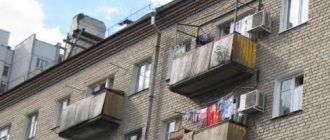
More and more people are deciding to use a balcony as additional living space. This is especially true for Khrushchev houses, since in such houses the rooms have a rather small area. In this article we will tell you how to insulate a balcony in a Khrushchev-era building in order to use this space as a full-fledged part of the living space.
Balcony in Khrushchev with your own hands. Step-by-step instruction
The complex of repair work includes: reconstruction of the slab, installation of the frame, cladding, insulation, glazing, finishing and arrangement.
Before you start work, you need to take care of the tool. To make a balcony in Khrushchev, you will need:
Step 1. Dismantling and strengthening the slab
Clear the balcony of things and old cladding and examine the slab. In some cases, the problems can be serious and the slab must be dismantled, for which you will have to contact specialists.
Step 2. Construction of the frame
If the railings are reliable, they are used for subsequent cladding and installation of windows.
Mounting the new frame is possible to the level of the previous railings or completely to the entire height of the balcony if you plan to glaze it. You can make a frame from wood or metal, securing it around the entire perimeter. Metal is more durable, but you need to use lightweight structures and have welding skills.
Step 3. External skin
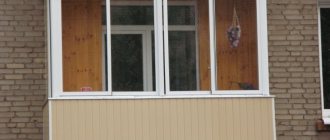
How to sheathe a balcony in a Khrushchev-era building with your own hands from the outside? We suggest doing this with clapboard or siding, which is more preferable due to its high quality and long service life. Siding can be steel, aluminum, vinyl, wood. We advise you to choose vinyl, it is lightweight and has excellent performance characteristics.
Step 3. Glazing
There are 3 options for glazing a small balcony:
Wooden frames are an affordable but short-lived option. They are easy to install yourself, but deformation and drying out of such frames will cause you a lot of trouble.
Step 4. Insulation
The process of insulating a balcony in a Khrushchev-era building with your own hands is carried out using the materials you have chosen. This can be mineral wool, polystyrene foam, extruded polystyrene foam or penofol. All materials are light and harmless.
How to insulate a balcony in a Khrushchev-era building from the inside with your own hands:
- make waterproofing based on foil (for mineral wool) or a special composition based on cement (for polystyrene foam);
- install metal or wood sheathing in increments of about 50 cm;
- fill the cells with material, having previously placed it on glue.
You can insulate a balcony in a Khrushchev-era building using polystyrene foam without installing sheathing. It is simply treated with a waterproofing compound and glued to the surface.
Remember, in order to properly insulate a balcony in a Khrushchev-era building, you need to install the material on all surfaces - floor, ceiling and walls. We recommend additionally laying chipboard or boards on top of the floor.
It is also important to carefully seal all joints, this will retain heat as much as possible.
Step 5. Interior decoration
How to decorate a balcony in a Khrushchev building with your own hands in order to take into account the wishes of loved ones and get an excellent result - depends on your preferences
When choosing materials, it is important to consider their fire safety, moisture resistance and durability
The floor on a balcony in a Khrushchev-era building can be made with your own hands from plywood, laminate or linoleum, laid on an insulated base.
For the ceiling use plastic, wallpaper or paint.
The interior decoration of the walls of a balcony in a Khrushchev-era building can be done with your own hands using wooden lining or plastic panels. Install them on an existing and insulated frame, taking into account careful joining of the panels to each other.
If you decide to finish the walls using decorative plaster or wallpaper, then you first need to attach sheets of drywall to the frame and cover them with several layers of plaster.
Step 6. Arrangement
Arranging a balcony in a Khrushchev building with your own hands is a great chance to make your desires and dreams come true.
Before starting the renovation, did you imagine an office on a small balcony? Place a small table, a folding chair and shelves for books there.
For a relaxation area, a wicker chair and a folding table or many soft pillows on the floor are suitable.
A great option is a greenhouse with your favorite flowers.
The play space will delight children and free the room from toys.
And an easel installed there will allow you to paint sunsets and sunrises without going outside.
Share this article:
Common Mistakes
- Permissive attitude towards work. There is an opinion that it is enough to install plastic windows and foam the cracks so that the heat stops leaving the balcony. Maybe also install a radiator. In fact, thermal insulation consists of completely enclosing the balcony from the environment. Otherwise, it will not be possible to interrupt the heat exchange between the room and the street.
- Saving. Buying cheap material is a very risky business. Unnamed manufacturers often suffer from the fact that their product only looks like a real one, and its characteristics do not even closely correspond to those declared. Moreover, the difference in price is not so huge.
- Chaotic work. Many people act without a plan, but on a whim. Because of this, many people confuse the layers, make mistakes during installation, forget to put in a hydro-vapor barrier, but this should not be allowed.
Oils for interior and exterior work with wood: what is the difference
What is an infrared heater? The principle of its operation, types of heaters. Making the right choice, what to pay attention to first
Recommendations
- side window structures can be replaced with sandwich panels;
- exposed reinforcement must be insulated before laying insulation, otherwise this may lead to corrosion;
- It is not recommended to use foam blocks to insulate the subfloor. The building material is quite fragile
- regular walking will lead to its rapid abrasion;
- if the walls are insulated with thick heat-insulating material, then when constructing the sheathing it is necessary to use additional support blocks;
- ideal insulation sequence: floor, ceiling, walls.
Ceiling insulation
While performing this part of the work, they simultaneously decide on the location of the lamps (laying electrical wires).
Today, roll insulation called penofol is especially popular.
It is most often used to insulate rooms such as balconies and attics. High technical characteristics of the material make it possible to effectively solve the problem of thermal insulation of rooms. So, let's study the technology of insulating a loggia with penofol.
High-quality thermal insulation of a surface can only be ensured if the insulation is laid on a previously prepared surface.
There are three ways to fix foil material:
- using adhesive solution
- gluing onto polyurethane foam
- fastening with self-tapping screws.
In the first case, the ceiling is coated with PVA glue and penofol is glued, after which the surface must be rolled with a paint roller (to expel air bubbles).
In the second case, polyurethane foam is applied to the ceiling and the insulation is fixed with it.
The third option involves using fasteners to fix penofol, namely self-tapping screws with wide hats. A metal or wooden frame is built on top of the insulation for finishing.
Thermal insulation
Not only the air temperature and comfort in the apartment, but also the ability to effectively use its area in the winter season depend on how well the balcony is insulated.
The first stage is laying a waterproofing layer on the concrete base of the balcony. If the balcony is already glazed, plastic film is quite suitable.
We install logs on top of the film. They must be leveled using support bars. Control the process at the construction level. Next, insulation is laid between the joists. It must be cut in such a way that there are no gaps between the pieces of the material itself, as well as between it and the joists.
The insulation is covered with a vapor barrier membrane, and then a subfloor is built from OSB panels or plywood. The rough coating is attached to the joists using self-tapping screws.
Before laying the final flooring begins, complete all work on insulation and finishing of the walls and ceiling of the balcony, otherwise you risk severely staining or even damaging the finished floor.
Ceiling
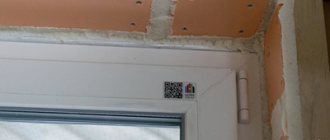
The balcony ceiling must first be cleaned of old paint, plaster and other finishing materials, primed with an antifungal compound and thoroughly dried. Only after this can you start gluing foil penofol on it. This is done using PVA glue or polyurethane foam. Sometimes they do without glue at all: they attach penofol to self-tapping screws with large heads.
The sheathing beams are mounted on top of the penofol. Before laying the finishing material, take care of installing electrical wiring for lamps and other communications that will run along the ceiling.
Walls
Insulating balcony walls is the most labor-intensive process. First, we attach a lathing made of 40x40 mm or 50x50 mm timber to the walls. If the thickness of the insulation is greater than that of the timber, installation over the sheathing of the support blocks is allowed. The step between the vertical elements of the sheathing is no more than a meter, and between the horizontal ones – about 50 cm. When choosing the level of installation of horizontal beams, you can focus on your own knee, waist and shoulder. It is at these levels, according to statistics, that most often the internal lining of the balcony is pushed through.
Next, we glue foam plastic in the niches of the sheathing, tightly adjusting it to size. We use polystyrene foam glue or foam glue in cans.
The foam plastic must be covered with a vapor barrier film, which will protect the insulation from waterlogging with condensate.
How to insulate a balcony with mineral wool.
It is best to start insulating a balcony from the ceiling and move from top to bottom. If the ceiling of your loggia is the floor of your neighbors’ insulated balcony, then in this case you can save on insulation and install insulation of small thickness.
Before working with mineral wool, you need to take precautions. Protect your eyes with deaf glasses and your respiratory organs with a special mask.
To protect the balcony from the cold, it is recommended to perform work in the following sequence:
We lay out a vapor-permeable membrane on the ceiling, walls and floor of the balcony. This membrane will release excess steam from the insulation and will protect against water leaks from the street. We glue the individual parts of the vapor-permeable membrane with tape.
We attach wooden blocks on top of the vapor-permeable membrane. With their help we create a wooden lattice. The height of the bars should be equal to the thickness of the insulation.
We lay mineral wool mats between wooden blocks.
The wall is insulated with mineral wool.
We lay a vapor barrier film on top of the insulation. This film will prevent the penetration of water vapor from warm air into the insulation. Ordinary polyethylene can be used as a vapor barrier film
It is very important to connect the film well at its joints. Therefore, we use regular tape to glue the joints of the film.
We cover the insulation with decorative trim. This could be drywall followed by wallpapering, plastic panels or lining.
Materials and tools required for work
There are several approaches to how to insulate a balcony in a Khrushchev-era building faster, more efficiently and cheaper with your own hands. Here is the set of devices and materials we propose to use:
- mineral wool for floor insulation;
- penofol for finishing the ceiling;
- foam plastic 75-100 mm thick for walls;
- wooden beam or metal profile for sheathing;
- wooden floor joists;
- plywood with a thickness of 10 mm or more or OSB boards for arranging the subfloor;
- material for finishing walls and ceilings (of your choice);
- perforator;
- screwdriver;
- hacksaw;
- gun for applying polyurethane foam;
- foam knife;
- roulette;
- building level;
- construction stapler;
- mounting hardware.
Roof replacement
When completely reconstructing a balcony, it is worth re-covering the roof with lathing for insulation. This step will subsequently protect you from leaks and damage to fresh repairs. The standard option is a roof made of metal tiles, rafters made of wood, or less often steel. All bases and guides must be securely attached to the wall. For better sound insulation, you can install foam sheets between the rafters and foam the seams with polyurethane foam.
Design options
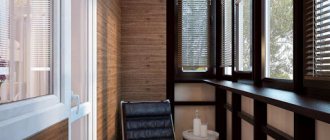
You can decorate the Khrushchev balcony in different ways. The most correct solution would be to tie it to a specific interior style. As a rule, this is the same style in which the entire apartment is designed. Considering that the area is limited, this can be minimalism and stylistic solutions striving for simplicity. Methods of interior design can vary radically: in some places it is a stylized football field, in other cases it is a strict interior without any frills or decorative elements.
Modern ideas of a rational approach to organizing design make it possible to create a comfortable corner from the balcony where you can read a book, relax with a cup of tea, or relax on a banquette or bench with soft upholstery. A chic solution would be to create a sleeping podium where you can spend summer evenings. Someone would like to bring to life the idea of creating a small hookah bar on the balcony.
Ideas for using a small balcony with proper organization of the interior may be different. For example, here you can place a relaxation area, a miniature office, a mini-greenhouse, or a home library. Landscaping is considered one of the most successful techniques, and it can be implemented not only on a closed, but also on an open balcony.
In the combined version of the project, it is quite appropriate to use the space for placing a bar, making the window sill part of the partition between the balcony and the adjacent room as a bar counter. Women can organize their own work area on the balcony for doing handicrafts. There is simply not enough space for a man to set up a workshop here, just as it would not be possible to create a sports corner (sports exercises require space for swings).
It is easier to arrange a balcony with a take-out as a flower garden, using the window sill to place flowers or living greenery. In addition, the takeout can replace shelves; you can put a table lamp on it or put books on it. It can also be used as an impromptu table for eating or working on a laptop. To make the interior seem light, you can purchase a compact shelving that reaches the height of the window sill, putting away the most necessary things on it. Here you can also use a narrow bench-table with a soft back.
Khrushchev's houses. Main characteristics
In block houses, the ceiling height is 2.48 m (in some series - 2.7 m), there was no elevator, there was a shared bathroom, and the sound insulation of the internal walls left much to be desired.
At that time, most of the Khrushchev buildings belonged to the “demolished” series of buildings - houses that were erected to temporarily solve the housing problems of the population.
It was assumed that their service life would not exceed 25 years, but many of them are still in use. For some time it was believed that the service life of buildings of this type was no more than 50 years, but studies have proven that Khrushchev buildings can easily stand for another 150 years.
Frame and frameless glazing
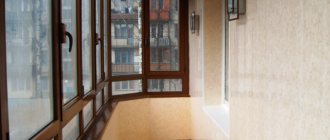
There are other methods - framed and frameless. For balconies in Khrushchev-era buildings, it is better to choose a frameless method, since the structure in this case will have little weight.
This design looks like this: guide profiles are installed at the top and bottom of the balcony, into which special glass with rollers is inserted.
The windows open and close like an accordion. If necessary, the glass moves to one side, freeing the other. Do-it-yourself frame glazing has no such drawback. It can be used even if the surface is far from ideal. In addition, frames are much easier to install than a frameless option.
Carrying out calculations and measurements
Any, even the simplest balcony design has errors in measurements. In panel houses, for example, these errors can be up to 10 cm, which can affect the installed frame. Keep in mind the pattern - the larger the balcony, the greater the error.
Therefore, it is better to use not standard measurements when making calculations, but make them yourself. To do this, measure the width and height of the balcony in several places and find the smallest value.
To measure the height of the planned glazing, use the following rules:
- the measured distance starts from the edge of the railing and ends with the roof of the balcony;
- the tape measure must be positioned strictly vertically;
- with a wide balcony, height measurements must be taken every linear meter.
- The length of the planned glazing is calculated based on measurements from one edge of the railing to the other.
- Make sure that this line is strictly horizontal.
- Having found the smallest distance, subtract 6 cm from it when installing plastic windows, and 4 cm when installing an aluminum structure.
- Seal the remaining gap with foam.
Strengthening slabs before glazing
It is strictly forbidden to glaze a balcony if the floor slab is of poor quality.
Even if there are chips and cracks, the base must be strengthened. In addition, it is worth considering the additional load on the slab during glazing, due to which an unsupported balcony may collapse.
The most common types of slab reinforcement are:
- installation of fittings,
- installation of cement screed,
- sealing seams from the inside.
Installation of fittings
Installation of reinforcement is necessary in case of serious damage and weakening of the load-bearing functions of the slab. The so-called reinforcing mesh made of steel wire with a diameter of 5 mm is used as reinforcement.
The base must be thoroughly cleaned before installing the mesh. It is better to assemble the net outside the balcony for convenience. The balcony must completely cover the reinforcement.
If the foundation is severely damaged, it is better to use the help of professionals. The cost of the work will depend on its complexity.
Cement strainer
If the destruction of the slab is insignificant (small cracks and chips), then a cement screed can be used.
It is done as follows:
clean the slab from debris and dust and level it with cement mortar;
lay another layer of mortar on top with a slope of 1.5;
iron the coating with dry cement;
level the screed with a trowel;
let the slab dry for several days.
Options for interior finishing of the balcony
There are a number of basic requirements for the interior decoration of a balcony in a Khrushchev building.
- It should be made of lightweight materials so as not to add unnecessary load.
- The material must be durable and withstand temperature changes. Even on a well-insulated balcony, temperature fluctuations cannot be avoided when the seasons change.
- The selected material should easily withstand ultraviolet light and not fade in the sun for as long as possible.
- It is advisable that the chosen finish does not become damp. Otherwise, you will have to make repairs very often or take care of additional heating and maintaining the same air humidity all year round.
- Does not require frequent or complex care. Although one of the current and fashionable solutions is wood finishing, which needs to be regularly varnished. If you are ready to sacrifice time, then here you are free to choose what you want and what will bring your design idea to life.
All these requirements apply not only to the selected finishing materials, but also to furniture. Changing the latter every couple of years, or even more often, is a very expensive pleasure.
For walls
Light and durable materials are suitable for finishing the walls of a balcony in a Khrushchev-era building. Although complex, heavy elements are also suitable for the interior wall. The decoration of this wall does not overload the balcony wall in any way. But you should be careful that the wall decoration is not excessive, thereby overloading the space of an already small room.
The following are often used as wall decoration:
eurolining;
PVC;
MDF;
cork covering;
- wallpaper;
- decorative plaster and brick;
coloring.
Eurolining is one of the most common. It looks organically in many design solutions and meets all requirements. It is very easy to install, so you can do this interior decoration of the balcony yourself. Especially in the “Khrushchev” where there is not much space.
Cork is the most expensive, but also the most environmentally friendly. In addition, it is hypoallergenic and has sound and heat insulation. The downside is the high price of preparation for installation.
Decorative plaster, wallpaper, covering the walls with putty and further painting can also be used as finishing. When choosing the last two options, you can save money on materials and do most of it yourself. But you will have to update the repairs quite often.
For floor
The interior floor finishing is made from:
- laminate;
- linoleum;
- carpet;
- parquet
It is important not to overload the floor with heavy materials. All of the above types of finishing are light and do not greatly affect the strength of the balcony slab
Each of them can be safely used.
For the ceiling
The finishing of the ceiling in the “Khrushchev” is made mainly from the same materials as the walls: PVC, MDF, foam blocks, cork. You can use drywall to level the ceiling. But its installation makes the ceiling lower, so it is only suitable for high balconies.
A suspended ceiling is sometimes used as a ceiling decoration. This makes sense in some designs. But its installation is quite complicated. It will be extremely difficult for a non-professional to do it on his own.
External cladding
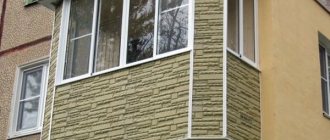
After completing the work with the frame and roof, the next stage begins - cladding the balcony from the outside. Popular materials are lining, siding or corrugated metal sheets. The first option is much cheaper, but its service life is very limited. Siding is a more durable, but at the same time expensive material. This finishing material is divided into:
- wood siding;
- aluminum;
- steel;
- metal under timber;
- vinyl.
Vinyl siding is most widely used in balcony decoration. It is lightweight and has good performance. This finishing material can be attached to either a metal or wooden frame. Self-tapping screws will be needed for fastening.
According to experts and home craftsmen, it is best to choose siding for the exterior decoration of a balcony with your own hands.
Here are some of its advantages:
- Thoughtful fastening in the form of locks at the joint ensures long-lasting service, reliably protecting against adverse weather conditions. In addition, these locks are easy to join; no additional equipment is required;
- installing this material is easy and convenient; any base is suitable for this;
- tolerates significant temperature changes well.
- not fussy to care for. If desired, you can wipe with a damp cloth to remove dust and dirt;
- not exposed to UV rays, does not fade or deform;
- Siding installation can be carried out under any conditions, regardless of temperature.
Expert opinion
Konstantin Alexandrovich
Important! You only need to buy certified material with a UV resistance mark.
Types of glazing depending on material
Depending on the purpose of the room and financial capabilities, a distinction is made between warm and cold glazing. In the first case, PVC structures are used, in the second - aluminum
The owner’s wishes, of course, come first, but you also need to take into account the age of the apartment, pay attention to the maximum load on the slab. When choosing a plastic profile, it is advisable to install additional supports or completely replace the structure
According to SNiP, no more than 100 kilograms of weight are allowed to affect 1 square meter, but it is still not recommended that the figure be higher than 65 kg.
It is better to glaze with a PVC profile if you plan to expand the room adjacent to the loggia. Here you can equip an office or increase the area of the room. However, this glazing option is considered warm and is characterized by large weight loads. Therefore, it is not possible to glaze the windows in Khrushchev-era buildings on the loggia yourself. We recommend entrusting the glazing to craftsmen who will take into account the properties of the structure. They will also make a decision on the appropriateness of using materials.
A more gentle method in this case would be cold aluminum glazing. The load of this material is small, but aluminum is known as a material that does not provide the necessary heat conservation. However, if you do not plan to equip the loggia as a living space, the cold option is quite sufficient. By the way, it costs much less.
Finish plating
Here everything depends only on your imagination and, of course, financial capabilities. If you use lining, then it should be mounted on nails or using a construction stapler. If you prefer plastic panels, attach them with “liquid nails.” MDF panels are also a good choice, but keep in mind: they absorb moisture very strongly! MDF panels are mounted to the sheathing using special clamping plates.
And only at the very end is the installation of window sills, trim and other decorative elements carried out. As a result, we get a spacious, beautiful, cozy, and most importantly, warm balcony!
Work progress
The proposed procedure is not universal: in some cases the nature of the work can be changed. However, our sequence seems to be the most convenient. Especially if you are not just finishing the design, but subjecting it to a complete redevelopment.
Glazing
- cold - based on an aluminum frame;
- warm - based on a wooden or polyvinyl chloride frame.
The first becomes relevant only for regions with warm climates. If you are planning to insulate a balcony, then it is simply unreasonable to install such a frame: heat will still leave the space, and the desired feeling of comfort will not appear.
The second is more interesting and effective, but there are nuances: the balcony structure must first be strengthened so that it can withstand the considerable weight of the PVC frame. But if you do everything according to the rules, it will always be cozy and warm on the balcony.
Floor insulation
Your first step is to waterproof the floor. This will allow the insulation itself to remain dry and not absorb moisture. For this, an ordinary plastic film, which is placed on a concrete base, will do.
After this, the sheathing of wooden logs is already installed.
The insulation you choose is located in the resulting empty sectors. You need to hammer it tightly so that there are no gaps, otherwise precious heat will be lost.
Lay vapor insulation on top (not required if you use polyurethane foam) and install the so-called subfloor: attach plywood sheets with self-tapping screws to wooden joists.
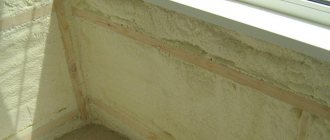
An example with pressed mineral wool as floor insulation.
Ceiling finishing
Carefully prime the surface that has been previously cleared of debris. The best insulation for the ceiling is penofol. It is placed with a foam base to the surface and securely fixed to it with mounting foam or PVA glue. The reverse part of the material - the foil - thus remains in the visible zone.
You can also use extruded polystyrene foam - penoplex.
After this, you can run all the necessary wires to organize a clearly regulated lighting scenario on the balcony.
Wall cladding
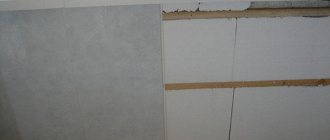
The most difficult in all finishing, because the final success of your enterprise largely depends on it. The most commonly used material for thermal wall cladding is penoplex or expanded polystyrene.
If you have chosen this option, then you need to sequentially apply the fragments to the walls and cut off unnecessary centimeters with a construction cutter.
It should be mounted using mounting foam and plastic dowels: simply apply foam along the edges of the fragment, apply this side to the wall, and then add dowels to be sure. All joints between sheets of penoplex or expanded polystyrene are treated with the same mounting foam.
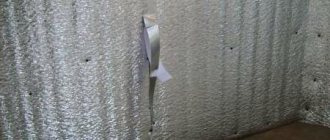
The next stage is laying penofol to create a pronounced vapor barrier effect. It is attached with an overlap, and the joints are fixed with a construction stapler.
After that, all that remains is to form the sheathing from wooden logs and begin finishing the walls.
If you use mineral wool, then the order of work changes somewhat: you must first form a frame of wooden beams with a distance of about a meter between the vertical ones, and about 0.5 meters between the horizontal ones.
Mineral wool is placed in the formed empty cavities, and then the grate is covered with a vapor barrier membrane.
If your budget allows you to use polyurethane foam, then everything is much simpler. Using special equipment, it is evenly distributed over the entire area of the balcony and forms a durable coating of hardened foam.
Finishing
The choice of final finishing remains a matter of taste for the owners. In any case, regardless of the insulation you choose, contact with this or that material will be ideal.
An example of clean wall finishing with chipboard slabs. Specifically in the photo is the Newport grade 33 stamp.
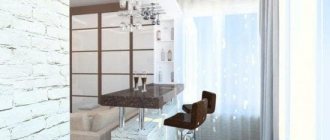
And this is an artificial stone. Extremely light and convenient material for cladding. The base for it is most often decorative plaster.
In order to use tiles, you first need to properly strengthen the structure.
The only thing that is important: finish the floor only after completing the rest of the work. To prevent dirt and construction debris from settling on the final finish and shortening the service life of your chosen material
And if, as you think, the heat level on the balcony is still not sufficient, you can always increase it after installing an electric heater like this.
Control is carried out through a thermostat located on the wall.
Construction of a new frame
Independent insulation and improvement of a Khrushchev balcony must begin with the process of erecting a new parapet. First of all, dismantle all elements of the old frame. Only the concrete base of the balcony should remain intact.
Outrigger beams
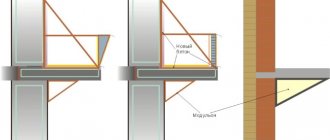
If you want to expand the balcony, this is done using external beams. As such, as a rule, heavy-duty metal channels act as such. The frame is welded from metal corners and securely fastened with dowels to the base of the balcony and the wall of the building. This approach allows you to increase the perimeter of the balcony by 40 cm on each of the three protruding sides.
Balcony on external beams.
However, please note that an expansion exceeding 30 cm is already considered as a redevelopment, and therefore will require approval from the relevant government agencies. And if, at the same time as glazing and insulating the balcony, you want to move the central heating radiators, you will need to obtain additional permits.
Roof
A new frame also requires a new roof. It is usually built from metal tiles or corrugated sheets, which are attached to a metal frame. The frame, in turn, is mounted with reinforced dowels to the wall of the house. Raindrops falling on metal can create a lot of noise, so make sure your roof is properly soundproofed.