Balcony repair, photo examples will demonstrate the entire process step by step, and involves many technological features. And if in new houses it is enough to insulate, waterproof, glaze and decorate the inside of the premises, then in the old building, balconies are often in disrepair and pose a danger not only to the owners, but also to passers-by, so major repairs are required.
To avoid falling out of pieces of concrete or collapse of the structure, it is necessary to reinforce, strengthen, correct the tilt, seal the cracks or restore the slab again. Next, we will provide detailed instructions on how to conduct an examination, we will tell you at whose expense the examination and restoration work is being done, and we will examine in detail the question of how to repair a balcony with your own hands.
Invalid Displayed Gallery
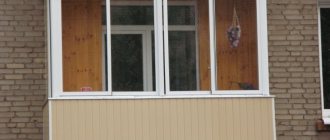
Same type balconies in Khrushchev buildings, sizes
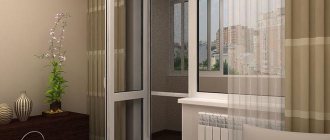
As you may remember, 20 years ago such balconies or loggias were almost not glazed, so it was not often possible to see a glazed balcony even in a big city. Today the situation has changed and glazed balconies or loggias have become not uncommon, be it a new house or Soviet buildings.
Naturally, things are much simpler in new buildings compared to Khrushchev buildings. This is due to worn-out materials and dilapidated structures, which requires strengthening the balcony slab, etc.
Even the size of such balconies can limit glazing options.
It doesn't matter what the layout of your home is, since all houses have the same height from floor to ceiling, usually 260 centimeters. There may be a slight difference, but it is not significant.
As for the sizes, everything here is also standard:
- length - 2.8-3.1 m;
- width - 0.65-0.8 m;
- parapet, height - 1.0 m.
While professionals are busy making new windows for the loggia, there is time to start restoring the concrete slab. If it is strong, without serious defects, then its repair can be reduced to a simple step of treating with cement mortar with the addition of a plasticizer. In case of more serious damage, you will have to resort to strengthening with reinforcement mesh or screed.
If, perhaps, there should be no difficulties with glazing, then it is worth talking about strengthening the fence in more detail. So, to make movement on the “Khrushchev” balcony safer, especially for children, it is important to focus on the restoration of the parapets.
Additional reinforcement will include blocks made of different materials and brackets made of durable steel. But still, it is better to entrust the strengthening of loggias in Khrushchev-era buildings to professional builders, because the strength and safety of the structure will depend on the quality of the work at this stage.
Work progress
The proposed procedure is not universal: in some cases the nature of the work can be changed. However, our sequence seems to be the most convenient. Especially if you are not just finishing the design, but subjecting it to a complete redevelopment.
Glazing
- cold - based on an aluminum frame;
- warm - based on a wooden or polyvinyl chloride frame.
The first becomes relevant only for regions with warm climates. If you are planning to insulate a balcony, then it is simply unreasonable to install such a frame: heat will still leave the space, and the desired feeling of comfort will not appear.
The second is more interesting and effective, but there are nuances: the balcony structure must first be strengthened so that it can withstand the considerable weight of the PVC frame. But if you do everything according to the rules, it will always be cozy and warm on the balcony.
Floor insulation
Your first step is to waterproof the floor. This will allow the insulation itself to remain dry and not absorb moisture. For this, an ordinary plastic film, which is placed on a concrete base, will do.
After this, the sheathing of wooden logs is already installed.
The insulation you choose is located in the resulting empty sectors. You need to hammer it tightly so that there are no gaps, otherwise precious heat will be lost.
Lay vapor insulation on top (not required if you use polyurethane foam) and install the so-called subfloor: attach plywood sheets with self-tapping screws to wooden joists.
An example with pressed mineral wool as floor insulation.
Ceiling finishing
Carefully prime the surface that has been previously cleared of debris. The best insulation for the ceiling is penofol. It is placed with a foam base to the surface and securely fixed to it with mounting foam or PVA glue. The reverse part of the material - the foil - thus remains in the visible zone.
You can also use extruded polystyrene foam - penoplex.
After this, you can run all the necessary wires to organize a clearly regulated lighting scenario on the balcony.
Wall cladding
The most difficult in all finishing, because the final success of your enterprise largely depends on it. The most commonly used material for thermal wall cladding is penoplex or expanded polystyrene.
If you have chosen this option, then you need to sequentially apply the fragments to the walls and cut off unnecessary centimeters with a construction cutter.
It should be mounted using mounting foam and plastic dowels: simply apply foam along the edges of the fragment, apply this side to the wall, and then add dowels to be sure. All joints between sheets of penoplex or expanded polystyrene are treated with the same mounting foam.
The next stage is laying penofol to create a pronounced vapor barrier effect. It is attached with an overlap, and the joints are fixed with a construction stapler.
After that, all that remains is to form the sheathing from wooden logs and begin finishing the walls.
If you use mineral wool, then the order of work changes somewhat: you must first form a frame of wooden beams with a distance of about a meter between the vertical ones, and about 0.5 meters between the horizontal ones.
Mineral wool is placed in the formed empty cavities, and then the grate is covered with a vapor barrier membrane.
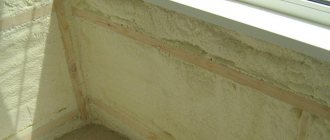
If your budget allows you to use polyurethane foam, then everything is much simpler. Using special equipment, it is evenly distributed over the entire area of the balcony and forms a durable coating of hardened foam.
Finishing
The choice of final finishing remains a matter of taste for the owners. In any case, regardless of the insulation you choose, contact with this or that material will be ideal.
An example of clean wall finishing with chipboard slabs. Specifically in the photo is the Newport grade 33 stamp.
And this is an artificial stone. Extremely light and convenient material for cladding. The base for it is most often decorative plaster.
In order to use tiles, you first need to properly strengthen the structure.
The only thing that is important: finish the floor only after completing the rest of the work. To prevent dirt and construction debris from settling on the final finish and shortening the service life of your chosen material
And if, as you think, the heat level on the balcony is still not sufficient, you can always increase it after installing an electric heater like this.
Control is carried out through a thermostat located on the wall.
How to strengthen with metal?
Metal reinforcement can be either a reinforcement of the old parapet or a complete replacement. If the old fence remains, then several reinforcement bars should be welded to it for greater strength.
Another option is to build a special metal structure . It will be a kind of “strap” of the old fence, and will be attached to the wall of the house. This metal form will partly hold onto the house, which will reduce the load on the balcony slab. At the glazing stage, it will be possible to verify how appropriate this option is - only part of the load will be imposed on the slab itself. Thus, almost any balcony can withstand the weight of double-glazed windows. In addition to balconies, parapets can also be strengthened in loggias.
The metal must be stainless, as it has protection against corrosion, and in addition to this, it often also has increased strength. Forged metal is an excellent choice.
One of the main advantages of this material is that after the balcony is strengthened, it will not need to be additionally sheathed on the outside. It will look great against the background of slightly outdated brick houses, in contrast to the same foam blocks.
Strengthening the balcony before glazing it is an important step that needs to be taken seriously. The material for strengthening can be either metal or foam blocks. At the same time, it is important to reasonably assess your repair abilities, as well as the general condition of the balcony.
For strengthening the balcony before glazing, see the video below.
Strengthening Tips
It is necessary to take a decision from the relevant authorities. All independent work related to changing the appearance of the house entails administrative responsibility. It is worth knowing that if the fastenings are chosen incorrectly, the structure may collapse.
Once you have decided on the type of house, you can get to work.
It is very important to follow several rules that will give effective results. For example, when glazing the balcony part receives additional load, so it is important to strengthen it. This can be done in different ways
First of all, we need to create new support points:
- The first option involves installing supports from below. However, this method is suitable when the balcony is not high. To do this, you need to agree with your neighbors so that they do not complain about you when a similar structure is located in front of their windows. With this method of strengthening, 2 supporting metal structures are used in the lower part, which are concreted in the ground and support the balcony like columns. The supports are best secured using special brackets or screws.
The second method is fixation from above, much more convenient than the first. To do this, you need to drill 2 holes through the wall above the balcony (on both sides) and install strong metal rods (anchors, bolts) or special hooks. If they have threads, then they are secured with nuts and small plates, otherwise they must be concreted on both sides. The part protruding outwards serves to support balconies, which are suspended, for example, with chains.
If the additional structure is outdated, its parapet needs to be strengthened. Metal structures are the best help in this matter. You need to weld a triangular frame, which needs to be attached as rigidly as possible to the wall of the apartment. This option is universal for all loggias, even the oldest.
By using a foam block, you can not only strengthen it, but also insulate the room, but this increases the weight of the structure, which will put pressure on the base of the balcony. Because of this, the method is not suitable for old and narrow balconies.
There is another option for fastening using T-beams. It is very suitable for updating old premises that are in danger of demolition, but you must know exactly the height of the ceiling:
- First you need to cut off the old slab.
- Drill out 1 m long recesses in the floor at 1.5-2 tee heights, if the ceiling allows. Don't forget that there are neighbors below you, and they need a ceiling. It is necessary to make 3-4 such grooves.
- Next, holes are knocked out in the wall.
- Metal rails (brands) 3 m long are passed through them. 1 m remains in the apartment, and the remaining 2 in the outer part.
- Build formwork on the floor and on the protruding part of the rails and fill it with concrete mixture. The level of the slab and the load-bearing covering of the house must completely match.
- Then the frame of the fence is welded from the corners.
- You can build a loggia, decorate and insulate it using special materials.
It is important to know how to properly strengthen it so as not to compromise the integrity of the building and not endanger those who go out onto the balcony. If you realize that you are unable to carry out repairs yourself, contact the experts for help.
Who should repair the balcony?
According to paragraph “2c” of the document of the Russian Federation: “Rules for the maintenance of common property in an apartment building,” the balcony slab and railing are considered public property, for which, depending on the method of managing public utilities, the housing ownership partnership (HOA), housing construction cooperative (HCS) or other management organization. Therefore, for the restoration of balcony structures, it is necessary to contact only the organization that is directly responsible for the common property of the house. According to paragraph 12 of the above document, apartment owners are not prohibited from repairing public property on their own.
What should you remember about loggias in 5-story buildings?
Of course, many would like to completely break the awkward design of the Khrushchev balcony, decorating it with bright decor, forged elements, and glazing it with modern windows... However, before embarking on global changes in the apartment, it is worth remembering: a balcony in the Khrushchev building is not only an ugly design, but often unreliable.
Usually it is an ordinary concrete slab of a small area, surrounded by a metal fence. Therefore, you cannot neglect basic safety rules when deciding to repair balconies in Khrushchev-era buildings.
Balcony in Khrushchev with your own hands. Step-by-step instruction
The complex of repair work includes: reconstruction of the slab, installation of the frame, cladding, insulation, glazing, finishing and arrangement.
Before you start work, you need to take care of the tool. To make a balcony in Khrushchev, you will need:
- roulette;
- level;
- nails and hammer;
- screwdriver;
- electric drill or hammer drill;
- hacksaw;
- brushes and paint roller for painting;
- sealants;
- stapler and staples;
- polyurethane foam with a gun.
Step 1. Dismantling and strengthening the slab
Clear the balcony of things and old cladding and examine the slab. In some cases, the problems can be serious and the slab must be dismantled, for which you will have to contact specialists.
Strengthening the balcony slab can be done independently. For ground floor balconies, it is enough to support it from below with concreted metal supports. They are attached to the balcony panel with large screws. For upper floors, the slab and the inside of the wall are secured with metal rods. In this case, a hole in the wall must be drilled through.
In most cases, it is enough to seal the cracks in the balcony slab with cement mortar and level its surface.
Step 2. Construction of the frame
If the railings are reliable, they are used for subsequent cladding and installation of windows.
Mounting the new frame is possible to the level of the previous railings or completely to the entire height of the balcony if you plan to glaze it. You can make a frame from wood or metal, securing it around the entire perimeter. Metal is more durable, but you need to use lightweight structures and have welding skills.
Ceiling insulation
While performing this part of the work, they simultaneously decide on the location of the lamps (laying electrical wires).
Today, roll insulation called penofol is especially popular.
It is most often used to insulate rooms such as balconies and attics. High technical characteristics of the material make it possible to effectively solve the problem of thermal insulation of rooms. So, let's study the technology of insulating a loggia with penofol.
High-quality thermal insulation of a surface can only be ensured if the insulation is laid on a previously prepared surface.
There are three ways to fix foil material:
- using adhesive solution
- gluing onto polyurethane foam
- fastening with self-tapping screws.
In the first case, the ceiling is coated with PVA glue and penofol is glued, after which the surface must be rolled with a paint roller (to expel air bubbles).
In the second case, polyurethane foam is applied to the ceiling and the insulation is fixed with it.
The third option involves using fasteners to fix penofol, namely self-tapping screws with wide hats. A metal or wooden frame is built on top of the insulation for finishing.
Parapet repair
If the parapet is dilapidated, and especially in front of the balcony glazing, it needs to be strengthened. As a rule, this is done using an equilateral metal angle:
- scald around the perimeter of the stove;
- attach several vertical posts to the bottom frame - be sure to secure 2 on the sides with anchors to the wall, and 2 on the outer corners of the slab;
- scald the top of the vertical posts with the railings from the corner.
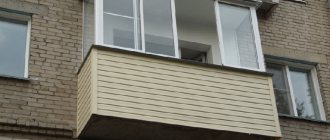
Balcony repair, option of parapet reconstruction with subsequent removal of glazing
To expand the balcony, the racks are welded not vertically, but at an angle. For glazing, it is recommended to make the top railings 100 mm or more wide. Below are instructions on how to repair a balcony; the video will help you understand the technology of strengthening the parapet.
Mineral wool
– an effective material for insulating balconies. The low cost and harmlessness of such insulation makes it the most common material. Stages of thermal insulation:
- Mineral wool does not accept moisture and therefore at the first stage it is necessary to take care of waterproofing. Any foil-based material is used for it.
- At the next stage, a wooden or metal sheathing is constructed.
- Mineral wool is installed inside the sheathing. To do this, it is cut into pieces of suitable size and placed on glue.
Balcony insulation with mineral wool
Repair of a balcony in Khrushchev: phased implementation
The balcony in the Khrushchev building, which has retained its original appearance, is, by modern standards, a rather depressing sight. And only proper repairs can bring it into a decent and attractive appearance and into a functional state.
Balconies in Khrushchev buildings are simple structures. Most often they are open type with metal fencing elements. However, the simplicity of the design also carries with it some danger of making any changes. Therefore, each stage of repair work must be approached thoughtfully with due care and precision.
A complete reconstruction of a balcony in a Khrushchev-era building begins with a complete clearing of the site, removal of interior and exterior decoration, old frames and glass (if any), that is, everything that could interfere in any way. In practice, only the original parapet should remain.
Features of glazing of Khrushchev-era balconies
Today it is simply unthinkable to talk about repairing the Khrushchev balcony and ignore such an event as its glazing. To ensure safe operation of such a structure, its installation requires compliance with specific design features:
- strengthen the existing balcony structure;
- Given the unreliability of the old railings and the existing iron frame, it is necessary to use a new support element and frame.
The Khrushchev-era balcony, like the house itself, was once built from low-quality concrete, so it is not surprising that the balcony slab may already be crumbling. To begin such an important undertaking as glazing, reinforcement of the concrete slab and accurate calculation of the load of the new window system are required.
If there is any defect in the future caracas (it is thin or rusty), it is replaced or secured with a thicker metal profile. In this case, welding work is required. In addition to greater reliability, the metal frame also allows for the following changes:
- extending the balcony by about 30 cm, increasing the area of the balcony, as well as
- take out an additional window sill and save an already small area.
Thermal protection of concrete floor
To properly insulate a concrete floor, you can use joist installation. At the beginning of the process, waterproofing is installed, and the logs are placed directly on it. An insulator is laid between the frame elements, and a vapor barrier is placed on top of it. At the very end, cladding is performed.
So, the instructions for insulating a loggia include the following processes: installation of a window unit, preparation, installation of thermal insulators and finishing. The last step is to introduce a heating source and lighting fixtures.
The simplest insulation of balconies and loggias converted into living rooms is the installation of a heating device powered by electricity. But it is not economical. It is much more expedient to use, for example, a heated floor system.
The only case where it is not recommended to install an additional thermal insulation system on the floor is heating mats.
If there is insulation, the solution covering the products has every chance of cracking.
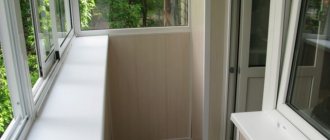
Fencing and glazing
Before erecting the parapet on the newly created frame extension area, you need to make a subfloor, taking away the openings between the beams with a block at least 5 cm thick. After this, you can install sandwich panels around the perimeter of the parapet or completely cover the sides of the balcony with them, leaving an opening for glazing only along the façade parts. The parapet can also be laid out from foam blocks, connecting them with cement mortar, or use boards for this purpose, between which a layer of insulation is laid. Any design will be quite light, durable and warm.
If necessary, the parapet is additionally insulated from the outside or inside by laying thermal insulation materials under the cladding. It is important to properly seal the joints of the slab material in the corners and places adjacent to the wall of the building. If you do not insulate the cracks, there will be drafts in the room.
It is best to order glazing of balconies in Khrushchev from a company that will produce frames according to the customer’s dimensions. The service may be included in the general price list or ordered separately, but installing glazing yourself is quite labor-intensive, and the savings from it are minimal. Experienced specialists will perform all operations faster and better than an amateur builder and will provide a guarantee for the operation of the products.
Recommendations
- side window structures can be replaced with sandwich panels;
- exposed reinforcement must be insulated before laying insulation, otherwise this may lead to corrosion;
- It is not recommended to use foam blocks to insulate the subfloor. The building material is quite fragile
- regular walking will lead to its rapid abrasion;
- if the walls are insulated with thick heat-insulating material, then when constructing the sheathing it is necessary to use additional support blocks;
- ideal insulation sequence: floor, ceiling, walls.
Parapet repair
The need for repairs arises before the planned glazing of the balcony, when replacing an old dilapidated parapet, after restoring a destroyed slab or part of its reinforcing frame. A metal corner or a profile pipe of square (rectangular) cross-section is suitable for the job. The bottom trim is made around the perimeter of the slab. Vertical posts are welded (attached) to it, which are welded to the reinforcement, and the side posts are also attached to the wall with anchors. Railings are welded along the upper level of the racks. If the balcony is remote, the racks are installed at an angle from the wall. For further glazing, it is recommended to make wide railings.
Extruded polystyrene foam
- has the best qualities. In addition, its installation is easy since it does not require the construction of a frame. Therefore, this material is preferred not only by craftsmen, but also by those who do repair work with their own hands. Stages of thermal insulation:
- The surface is pre-cleaned, leveled and covered with a waterproofing compound.
- Extruded polystyrene foam is glued to the surface, and the joints between them are covered with cement mortar.
Expanded polystyrene for insulating the internal surfaces of the balcony
Major renovation of a balcony in Khrushchev
It is necessary to take measures to strengthen the balcony frame; a new element is needed on which the structure and frame will rest. Low quality concrete was used for such houses; concrete slabs crumble relatively easily. When glazing it, you need to calculate the load on the structure with windows and reinforce the slab. It is important that there are no even small defects on the new frame; if there are any, they are replaced with thicker profiles and welding is used.
Parapet removal
A metal frame makes it possible to move the balcony and window sill a few tens of centimeters forward, this will increase the area. The number of profiles and the weight that it must bear are calculated in advance. The old parapet is removed. A new frame is made by welding and secured to the base and walls. Parts with stem supports are also welded at an angle of 45 degrees. The roof is extended with a profile, which ensures even installation of window frames. The advantage of a closed balcony is protection from noise, precipitation, thermal insulation and a pleasant appearance.
Strengthening the parapet
For such a balcony, it is very good to use foam blocks made of cellular concrete, which are laid with special glue. It retains heat well. The absence of seams will eliminate the formation of “cold bridges”; blocks can be ordered in the required thickness. They are lightweight, but at the same time very durable.
Glazing features
Wooden, plastic, aluminum frames are used for glazing. Wood retains heat better and has a good appearance, but it is deformed. Plastic is better because it does not deform and there are no cracks; it is very reliable and durable. But the weight of the plastic structure is very large, the balcony may not support it.
Therefore, the best option is aluminum frames: they are durable and weigh less. They also have a small thickness, which is very important when saving space and allows for the possibility of installing sashes that slide apart. Now very practical aluminum profiles are produced with insulating inserts inside, which makes thermal insulation at a high level.
Insulation of a balcony in Khrushchev
Before completing the glazing work, you need to insulate the balcony. To do this, install a frame consisting of wooden slats or metal guides. This is the basis for finishing. The insulation material is placed under the mounted frame or in the space between the slats; several layers are recommended. Next, the finishing material is laid. They also insulate the floor and balcony inside; this can be done with foam plastic, mineral wool, polystyrene, or fiberglass.
Finishing work
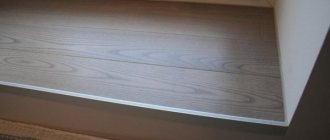
Finishing material should be selected taking into account its weight and functionality. Laminate, linoleum, and also wooden boards are suitable for the balcony floor. Heavy materials such as porcelain stoneware or tiles should not be used. In addition to lighter weight, laminate and linoleum have other advantages: it is easy to put insulation underneath them.
The walls and parapet are finished with textured plaster, lining, wallpaper, decorative, plastic panels, cork panels, and finally, paint. You also need to finish the ceiling, this is necessary to preserve heat and protect against moisture. Here you can use plastic panels and wallpaper. If you decide not to insulate or insulate the ceiling, then you can simply paint it.
Lightness of materials is the main rule when repairing such structures. When carrying out work, it is imperative to adhere to safety standards, since the balcony has a very limited area, and the material from which it consists is, as a rule, old concrete of not very good strength, especially on open balconies with dilapidated fencing.
Design options
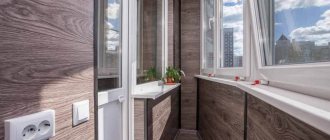
You can decorate the Khrushchev balcony in different ways. The most correct solution would be to tie it to a specific interior style. As a rule, this is the same style in which the entire apartment is designed. Considering that the area is limited, this can be minimalism and stylistic solutions striving for simplicity. Methods of interior design can vary radically: in some places it is a stylized football field, in other cases it is a strict interior without any frills or decorative elements.
Modern ideas of a rational approach to organizing design make it possible to create a comfortable corner from the balcony where you can read a book, relax with a cup of tea, or relax on a banquette or bench with soft upholstery. A chic solution would be to create a sleeping podium where you can spend summer evenings. Someone would like to bring to life the idea of creating a small hookah bar on the balcony.
Ideas for using a small balcony with proper organization of the interior may be different. For example, here you can place a relaxation area, a miniature office, a mini-greenhouse, or a home library. Landscaping is considered one of the most successful techniques, and it can be implemented not only on a closed, but also on an open balcony.
In the combined version of the project, it is quite appropriate to use the space for placing a bar, making the window sill part of the partition between the balcony and the adjacent room as a bar counter. Women can organize their own work area on the balcony for doing handicrafts. There is simply not enough space for a man to set up a workshop here, just as it would not be possible to create a sports corner (sports exercises require space for swings).
It is easier to arrange a balcony with a take-out as a flower garden, using the window sill to place flowers or living greenery. In addition, the takeout can replace shelves; you can put a table lamp on it or put books on it. It can also be used as an impromptu table for eating or working on a laptop. To make the interior seem light, you can purchase a compact shelving that reaches the height of the window sill, putting away the most necessary things on it. Here you can also use a narrow bench-table with a soft back.
Legality
To glaze a balcony or attach it to a room, you must comply with the law and obtain permission for redevelopment and construction work. This is necessary for the safety of apartment owners and neighbors. The rights and obligations of all parties are fixed in the Housing Code.
Basic rules to follow:
- Do not violate the integrity of the supporting structures of the house.
- Do not load the slab; it has the ultimate strength.
- The removal of the structure beyond the perimeter of the slab must also be agreed upon with the authorized bodies.
- All fire safety regulations must be followed
In case of failure to comply with the norms of the Housing Code and in the absence of permission for repairs, a fine may be imposed on the apartment owners. And the entire illegal structure will have to be demolished or remodeled in accordance with established standards.
Selecting materials
Today, the most modern materials and designs are used for glazing and finishing the Khrushchev balcony. Let's take a closer look at them.
Plastic profiles
They have the following advantages:
- Excellent quality and durability;
- Virtually unlimited service life;
- Unpretentiousness and easy care;
- High thermal insulation performance;
- Relatively low price.
But in any case, such a frame has quite a lot of weight, so old balconies cannot always support the weight of the structure. This also applies to the parapet, which creates additional load on the panel and also reduces the already small area.
Wooden frame
Today, in the era of plastic, wood has not lost its uniqueness and remains one of the most popular glazing methods.
Advantages of a wooden frame:
- Completely environmentally friendly material that does not pose a danger to humans;
- Attractive appearance;
- Wood fits perfectly into any interior;
- Excellent sound insulation performance;
- Relatively light weight;
- Easy installation, allowing you to do this work yourself.
Modern mixtures with which wood for frames are impregnated allows the frame to be used for up to 50 years. The weight makes it possible to install such a structure in Khrushchev-era buildings. Most often, experts advise choosing a frame made of ash, oak or pine needles.
But wood also has disadvantages:
- Wood needs periodic painting;
- It can dry out, causing the windows to close poorly.
Aluminum profiles
This option is also quite popular due to its advantages:
- Strength;
- Light weight;
- Aluminum does not burn;
- Affordable prices.
Today, aluminum profiles are equipped with special insulating inserts. Although the weight becomes a little more, the frame acquires high thermal insulation values.