In the absence of a garage or cellar near your home, storing vegetables becomes a real problem. It’s especially disappointing if in the fall, due to lack of space, you have to give away or throw away your own harvest, and later buy the same products at a high price. Some people completely abandon the idea of storing supplies for the winter, while others decide to build a balcony cellar for storing vegetables (a cabinet/box with thermal protection). The idea is simple at first glance, but how to implement it so that the cellar on the balcony is effective?
Thermal container for food storage
A thermal container is a special box in which all the conditions inherent in a real cellar are created.
Such a box can be mobile, that is, it can be moved to a convenient place on the balcony, or maybe stationary, built between the walls.
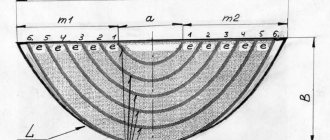
Both options are made according to the same principle, and the diagram of such a box looks like this:
Scheme of an insulated container for vegetables
1 - This is the body of the box. It can be made of plywood, chipboard or boards.
2 - The second layer is insulation - it is used as polystyrene foam or foil-coated polyethylene foam, laid in several layers.
3 - Additional insulation will be provided by the air gap between the insulation and the inner box.
4 - Drawer for vegetables with ventilation holes.
5 - A safe, well-insulated heater is installed between the inner drawer and the bottom of the cabinet.
This thermal container is intended mainly for potatoes or other root vegetables. The optimal temperature for storing them is from 3 to 7 degrees Celsius, which is impossible to achieve in Russian winters on an unheated balcony without additional heating of the storage, which is why a heater with moderate power is installed.
In the summer heat, the insulation, on the contrary, will maintain a cool temperature inside the box. If necessary, you can even lower it by placing ice inside in an airtight container or package.
There is nothing complicated in installing such a cellar, and if you have the tools and materials for its manufacture at home, then it can be assembled in one day.
Tools and materials
To make such a balcony thermal container-cellar, depending on the chosen design and size, you will need the following materials:
- Thick plywood or chipboard for the outer shell. If the cellar is stationary, then this material will be needed for the front wall and top cover of the product.
- For the inner box, you can use thin boards or plywood.
- Wooden blocks for the construction of the frame on which the sheathing material will be attached.
- Insulation - polystyrene foam, polyethylene foam or other dense materials.
- Electric heater. It is quite possible to use infrared film as it, since its power will be quite sufficient to achieve the desired temperature. For a small container volume, even a regular 40 or 60 W light bulb may be suitable, but in this case it is advisable to install an incandescent regulator.
- Thermometer for monitoring the temperature in the cellar.
- To assemble all the materials into a common structure, you need to purchase self-tapping screws, hinges for securing the lid, nails, anchors for a stationary building, and you may need metal corners.
- Polyurethane foam for fastening foam sheets together. It can also serve as insulation if you fill the space between two layers of plywood with it, thus making a homemade sandwich panel.
- Among the tools you need to have on hand is a jigsaw or hacksaw, pliers, screwdriver, screwdriver, hammer, drill and drills of different sizes for wood and, if necessary, for concrete.
What can be stored
Balcony cellars TGB with a volume of 100, 180 and 300 liters are suitable for storing almost any vegetables and fruits in bags, nets, boxes or boxes. There is a pocket on the front wall for packaging material. In addition to fresh vegetables and fruits, pickles and preserves, juices, wine and other strong drinks are perfectly stored in thermal containers.
A flexible thermal container is an affordable analogue of a real cellar or a refrigerator “in reverse”. The ability to regulate the temperature in the range of 0 to +7 °C allows you to store most products and preparations for the winter in it.
Cellar in the underground balcony
Many residents, having received an apartment with a small balcony, are upset that it is impossible to arrange an additional insulated room on it. However, some particularly inventive owners of such apartments manage to use even this small space, arranging on it not only cabinets and a greenhouse, but also an underground cellar for canned goods.
Even on the smallest balcony you can arrange a small cellar
Naturally, this will require a lot of work, but this option can be implemented on the balcony of any floor.
- Before you start work, you must make an accurate calculation of the height to which it is possible to raise the floor. Of course, it is unlikely that it will be possible to place three-liter bottles under the floor on the balcony, since the flooring will have to be raised too high, but liter and half-liter bottles, or even one and a half liter bottles, will fit perfectly.
The balcony floor will require additional insulation - The first step is insulating the concrete base of the balcony. In this case, thick insulation will not work, since you will have to count every millimeter of height. Therefore, you can use foiled polyethylene foam, on top of which an infrared film is installed. If the balcony of the lower neighbors is insulated, then you can get by only with insulating material.
- If the balcony is not wide, then the flooring can be done on bars fixed to the walls. If the width is large, you will have to install bars between the walls, raised on metal studs to the required height. Usually the flooring is made at the level of the threshold of the balcony door, and in most cases this height is about 200 mm.
Raising the floor level with adjustable stands - If jars of homemade preserves are hidden under the floor, then the flooring must be rigid and not sag, so boards 1.5 - 20 mm thick are most often used to construct the floor.
- The hatch through which cans will be loaded and removed from the underground can be sliding or folding.
- In addition to the cellar under the floor, you can make built-in wardrobes with shelves under the windows on the balcony. In this case, it is better to arrange the doors as sliding ones, then it will be convenient to open them.
- If the balcony is narrow and long, then on one side under the floor you can build a built-in wardrobe in addition to the cellar. It can also serve well in storing fresh and canned vegetables.
Cellar under the balcony
Owners of apartments located on the first floors of multi-storey buildings have an advantage over the higher floors. They can make a cellar under the balcony. As a rule, permission to carry out such changes is given by the relevant organizations (housing office) without obstacles, except in cases where the balcony faces the main street, and its transformation will affect the appearance of the facade.
How to make a cellar under the first floor balcony with your own hands:
- A hole is cut in the balcony slab to allow an adult to pass freely. First, the contours of the hole are cut out with a grinder, and then a layer of concrete is knocked out. The reinforcement bars are also cut with a grinder;
- A pit is dug under the balcony, the width and length of which corresponds to the dimensions of the balcony slab. Its depth should be such that you can stand in the hole without resting your head on the slab. The higher the ground part of the base of the house, the shallower the depth the hole is dug;
- The floor and walls are covered with inexpensive waterproofing, preferably roofing felt. The strips are overlapped and soldered using a gas torch;
- The bottom is covered with a layer of sand and crushed stone, reinforced with steel mesh or rod, and filled with cement screed;
- The walls are laid half a brick thick, from the floor to the balcony slab. A ventilation pipe is installed at the ground level, or a hole is left in the wall, which is subsequently closed with a grate;
- The walls are lined from the inside with one of the insulating materials: mineral wool, polyurethane foam and others. On an unheated balcony, you also need to insulate the floor slab. The type of insulation and layer thickness depend on the climatic conditions of the area;
- A staircase with wide steps and a hatch are installed. It is better to make the lid and stairs wooden, since wood has low thermal conductivity. The inside of the hatch is also insulated.
On the outside of the cellar, a blind area is built around the brick wall. First, a cushion of sand and crushed stone is created, after which a cement screed is poured. The blind area should have a slight slope from the wall to prevent water accumulation. The screed will last longer if it is covered with ceramic tiles for outdoor use.
The internal filling of such a cellar is carried out in accordance with the needs of the apartment owners. You can make a bin for potatoes, hang shelves for cans of preserves and boxes of vegetables.
Do-it-yourself heating cabinet
Just a few years ago it was very difficult to buy a ready-made heating cabinet. Therefore, many homeowners, having no alternative to a traditional cellar, tried to make containers for storing food with their own hands.
There was nothing tricky about constructing such a container: the simplest wooden box was taken (made of chipboard, plywood, fiberboard, etc.), and slats were stuffed onto it on all sides. Then another layer of plywood (or chipboard, lining, etc.) was fixed on top, resulting in a kind of multi-layer wooden structure consisting of two boxes that were inserted into each other.
Of course, such a box itself, even a two-layer one, could not ensure maintaining the optimal temperature. Therefore, thermal insulation material was inserted into the free space between the walls. As a rule, traditional insulation materials were used: sawdust, mineral wool, polystyrene foam, foam rubber, etc.
The lid for the box was made in exactly the same way - in two layers and with a heat-insulating gasket. To be completely sure of the safety of the vegetables, the inside of the container was additionally sealed with foil. In addition, the lid was covered with oilcloth, which protected the box from precipitation (if, for example, the balcony was not glazed), as well as from condensation.
Electric heating for mini storage
Thermostat. Click to enlarge.
If the oven is made correctly, it will be able to store food in the fall without any problems. But what to do when serious cold comes? To resolve the issue, you will need to use two light bulbs (40 V power). Light bulbs are attached to the wall or lid of the box. The thermal energy from the light bulbs, oddly enough, is quite enough to maintain zero temperature in the container even in severe frosts.
When storing food, you need to take into account the fact that potatoes will turn green with constant exposure to light. Therefore, it is recommended to additionally protect the light bulbs from contact with vegetables, which will also ensure their (the light bulbs) integrity for a long time. If desired, you can take a thermostat from an old and unnecessary refrigerator, which will make it easier to control the temperature.
To install ventilation in the container, you can take a regular computer cooler and install it in the side wall of the heating cabinet. If you cannot do this, then simply drill several holes in the walls and bottom of the box to ensure air circulation.
It is convenient to use old bedside tables or broken freezers to create a heating cabinet. In this case, the work is significantly simplified.
A homemade heating cabinet can use different heating elements. Their choice will depend on the capabilities and skills of the owner. It should be noted that additional consideration should be given to the safety of operating the heating cabinet, because certain risks may arise due to the use of electrical appliances. It is necessary to provide protection against short circuits, and also to decorate the box with fireproof materials, which are available in abundance on the modern market.
If you don’t want to spend so much time and effort, and also worry about safety, you can always purchase a ready-made solution, for example, a “Cellar” heating cabinet. Similar containers for storing vegetables are presented in a wide variety today. They can be of different shapes, volumes (100, 160, 200 l), and also have different characteristics.
Mini storage for vegetables
Ready-made cellars are available in two types: hard and soft. They come in different sizes and models, and are designed for use on an unheated balcony or loggia. Since different models have technical differences, it is better to find out details of operating conditions from the product instructions.
Hard cellar
A cellar with a rigid body is a plastic, metal, painted or chrome-plated container, from the appearance of which you cannot guess that vegetables are stored inside. Cellars with a capacity of 100, 200 or more liters are produced, and you can choose a product for a small or large balcony, for a family of 1, 2 or more people.
The cellars are equipped with built-in thermostats that maintain a constant temperature in the heating cabinet, and most models provide forced ventilation. The ventilation system eliminates the formation of condensation inside the container, which means that vegetables do not spoil due to excessive humidity and stagnant air. Products can be stored in hard cellars both in winter and summer.
The cellars operate from a 220 V electrical network, power consumption is economical and safe. During a temporary power outage, most devices maintain the temperature inside the storage unit for some time.
Flexible cellar
Flexible cellars are similar in appearance to a spacious bag. Their main advantage is mobility: at the end of the season, the storage can be easily rolled up and put on a shelf. The cellar is made from waterproof fabric and soft insulation, mainly padding polyester. Thin heating electrodes are built into the fabric, which, when heated, increase the temperature inside the vegetable storage device.
The flexible cellar is powered from the mains and, according to manufacturers, can be used on an unheated balcony at temperatures down to -40C. Some models have a screen outside that informs about the temperature inside the storage. When it drops below the programmed limit, the heating turns on automatically, and when the upper temperature limit is reached, the heating system turns off.
The disadvantage of flexible containers is that, unlike their rigid counterparts, they are not intended for storing vegetables in the summer.
Which cellar to choose for a balcony
A purchased cellar for a balcony always looks compact and aesthetically pleasing; rigid devices are especially convenient. But a homemade container, even of the most complex design, is always cheaper. It can be made from scrap materials by purchasing only insulation and fasteners in the store. To build a homemade cellar, you can also adapt the body of an old refrigerator or other suitable container.
Whatever cellar you choose, it will in any case eliminate many of the problems associated with storing your own harvest or vegetables purchased at the market. A spacious container, divided inside by partitions, will also allow you to store cans of preserves. Even if you have a cellar in the garage or at the dacha, it is always easier to go out onto the balcony and get the necessary products from the storage at any time.
A short video on how to make a box for storing vegetables:
Is it possible to make such a cellar yourself?
If you have certain skills and free time, then you can arrange a cellar for storing vegetables on the balcony yourself. Let us note the traditional way of constructing a container of this type:
- To assemble a mini-cellar structure, you need to find a small cabinet or an unnecessary (for example, non-working) refrigerator. Naturally, the frame can be made from boards and plywood, as well as from boxes and pallets.
- A home mini-cellar must have double walls and a bottom, so it is additionally necessary to sew slats onto the prepared frame, on which the second layer of cladding will be installed.
- Any heat-insulating material must be laid in the free space formed between the two layers of sheathing. Many experts recommend using polystyrene foam, mineral wool or sawdust as insulation. All free space in the lining of the mini-cellar must be filled with insulation. It is important that there are no gaps or unfilled areas.
- A balcony cellar must have a hinged lid. If it is not possible to install such a cover, then you can consider the option with a simple removable top.
- We must not forget about the ventilation system for a mini-cellar. Of course, there is no need to install a pipe here, because several small-diameter ventilation holes are sufficient. In addition, to ensure normal ventilation, you can make a cover on the grooves, which will need to be moved periodically, allowing warm air to escape.
- Reviews about the construction of balcony cellars also indicate that it is necessary to install an incandescent light bulb inside the container, which will ensure heating of the air inside the cellar (if the volume of the cellar does not exceed 1 cubic meter, then one light bulb will be enough).
- If desired, a thermostat is installed inside the container (they can be found in old refrigerators and irons). In addition, the installed heating lamp is usually covered with a metal screen so that the bright light does not fall on the food. Due to constant exposure to light, for example, potatoes begin to turn green and onions begin to sprout.
An example of a balcony vegetable storage device.