- Date: 04/07/2015 Comments: Rating: 43
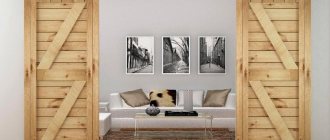
Curtains that cover a window or doorway are usually made of fabric. Beautiful and expensive curtains definitely give the room solidity, but if imagination and the need to decorate the house with your own hands requires a change in the boring environment, you can devote part of your free time to diversify it. Making wooden curtains with your own hands is not difficult; this exciting activity will certainly interest other family members, allowing you to spend your evenings doing a fun and interesting activity.
Curtains with wooden elements are suitable for interior design in a rustic, oriental or African style.
Curtains made of wooden elements complement any interior well with their appearance.
This design technique is especially appropriate when decorating an apartment in a rustic, oriental or African style. This combines two fashion trends at once - the use of natural materials and the idea of hand-made, that is, making things with your own hands. The original decoration of the house makes its atmosphere cozy and original, and gives the owner the opportunity to express herself in this creative activity.
Wooden curtains can be made from a wide variety of elements. To do this, use beads, rings or other small wood objects. If one of the family members has experience cutting wood with a jigsaw, then his contribution to the curtain making process will be invaluable.
Thanks to this tool, the components will become much more diverse and elegant. The curtain will become completely unique, impressing guests with flowers, stars or other wooden figures hanging on threads, well sanded and varnished. Curtains made from bamboo sticks, which are also considered a wood material, look good.
Making wooden curtains with your own hands
To make wooden curtains you will need wooden beads.
Everything necessary for the work must be prepared in advance, and the tools you will need are very simple, available on everyone’s farm:
- a plank or strip made of wood; a drill for drilling holes; a thick nylon line or cord; a needle with a large eye; wooden elements for stringing; scissors; crimps.
First, you will need to think about what elements the curtain will be assembled from and the exact layout of their location on the threads.
The basis for the assembly will be a wooden plank, the size of which should be slightly larger than the width of the door or window opening. Holes are made in it to secure vertical threads, the number of which is calculated according to a pre-created sketch.
Usually the parts are strung on a thick nylon fishing line, but depending on the idea being embodied, it may be appropriate to use a bright ribbon or colored rope. If the design of the curtain requires free gaps between the parts, special clamps are used for fastening, which do not allow the elements to move. They are called “crimps” and are clamped in the right places using pliers.
It is better to secure the collected threads using another fishing line along the bottom of the curtain to prevent the possibility of them getting tangled.
You can care for wooden curtains using a vacuum cleaner or a soft bristle brush. Sometimes you can wipe the parts with a damp sponge, but it is not recommended to use large amounts of water for cleaning. The impression of wooden curtains can be complemented by additionally made pendants placed on the lampshade of a chandelier or sconce, wooden figurines, boxes or other interior items.
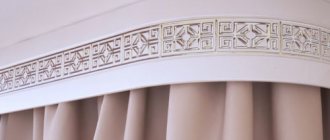
Today, beautiful wooden cornices are gaining popularity.
With the help of curtain rods we attach curtains to the walls or ceiling.
This is the main method of fastening and the most convenient. This method was used in ancient times in Egypt, which is why cornices similar to ancient Egyptian ones are now highly valued. Convenient because with the help of rings threaded into the rod, you can easily move aside tulle or curtains.
There is no need at all, like in the good old days, to pull them with all your might so that they come off. It is important that it matches your interior more in style than in color. First, let's look at their types: profile, baguette, round, forged and string.
Making a ceiling version
To assemble a ceiling curtain rod with your own hands, you will need the following kit:
- rectangular wooden beam of rectangular type;
- furniture corners;
- screws and varnish;
- electric drill;
- hacksaw and devices for marking;
- metal type guides (it is best to buy them).
Work begins with wood processing. As for the dimensions of this element, it is best to use it with a section of 100x10 or 100x20 mm. Its length should also exceed the length of the window opening, but by 20-25 cm on each side. The bars are connected in such a way that in cross-section they form the letter “G”. For assembly, self-tapping screws are used, which are screwed along the entire length of the joint of the products, and here it is also worth using furniture corners, as they will increase strength. The finished structure is varnished or painted. You can do both. After this, you need to screw the metal guides on the inside using self-tapping screws.
As you can see, assembling and fastening a ceiling cornice is much simpler than a wall cornice, although it has a better design.
Wall-mounted wooden curtain rods: selection criteria
The most popular type are wall cornices.
As a rule, rods of this type are made from coniferous and deciduous trees, but exotic species, such as mahogany or rosewood and others, are considered the most expensive. It cannot be said that any type of wood is the most durable. Everyone has different density, color, sensitivity to weather conditions.
It is better to choose according to the criteria that are most sensitive to your home. Such cornices have a practical and decorative function. The practical one is a clamp on a wooden sword. In this case, you will have to focus specifically on the curtains. The decorative factor includes decorations on the tips of swords.
By the way, the buyer can choose the shape of the tip himself. Most often they are universal, for example, plants, animal figures, sculptures or something according to your sketch. All this is thanks to wood carving, since wood is the most convenient material for such work. This is a very powerful fastening, because it can withstand even the heaviest fabrics.
Increasing the length of the cornice
The piece cut from the laminated chipboard for extending the cornice is ready and you can begin further work. Since the ends of the cornice do not bear any load, I decided to make the connection using PVA glue and metal brackets. I walked over the surfaces to be joined with sandpaper, generously smeared it with thick PVA, pressed the surfaces tightly and secured them on both sides using a furniture stapler with staples.
A day later, when the glue had completely dried, using a small hammer on the front side of the cornice, I buried the brackets in the laminated chipboard so that they would not protrude. I filled the junction of the cornice parts with putty to seal wood defects. I removed the roughness with sandpaper. The result was an almost smooth surface.
The result is a cornice 265 cm long. Since the color of the decorative coating on the materials is different and the shade is not suitable, it will be necessary to cover the cornice with self-adhesive decorative film to give it a beautiful look.
Ceiling cornices made of wood: what to look for
Such cornices have more of a decorative function than a practical one, since they are much more noticeable than wall ones. This element of decor can no longer be hidden, and indeed it is not necessary. With the right choice of wood and color, it will complement the curtains perfectly.
For this type of carving, wavy lines are considered universal carvings. They are often confused with profiles. Unlike wall cornices, functional mechanisms are completely hidden in ceiling cornices.
There are also other advantages over wall-mounted ones, for example, the following: fasteners can be three-row, the choice of design for such fastenings is huge. However, they can hardly be called budget.
The high cost is due to the exquisite carving and massive material. This design is most likely suitable for draped curtains, as well as heavy dark fabrics. If you want to emphasize your high income, then it is better to choose mahogany ceiling cornices.
Products made from oak are considered more restrained. If, on the contrary, you need to save money, then it is better to choose products made from pine or alder. In some cases, they even emit a pleasant forest smell.
Features of choice
When choosing a cornice, it is important to consider the following nuances:
- Its shade should be harmoniously combined with furniture, wall decoration and curtain color. To emphasize interesting curtains, it is allowed to use a contrasting cornice.
- Light-colored products are appropriate in small rooms. In a large one, you can hang massive cornices, decorated with carvings, forging or decorated with metal parts.
- In order for the curtains to protect the room from the penetration of cold air from the street, it is worth choosing rounded models that have an original appearance.
- Carved cornices and curtains must match each other. Having chosen a massive composition made of dense, heavy fabric, you need to choose a large curtain. And vice versa.
When choosing, keep in mind that the curtains with the cornice should be harmoniously combined.
Tips for choosing carved wood cornices
When choosing carved wooden cornices, you should pay attention not only to the design and design of the accessory itself, but also not to forget about the overall design of the room: it is not quite easy to choose a wooden cornice for every interior style.
Here are some tips for choosing carved cornices:
Cornices must necessarily match the overall design of the room.
There is no need to buy an expensive, luxurious cornice for a modest room. It will look stupid. Or the choice will be considered unsuccessful when the room has a modern style, and cornices with exquisite carvings made of dark wood, which are suitable only for the Baroque style. The weight of the fabric is of great importance.
When purchasing, it is better to check the durability of the fabric in advance, since now it is more fashionable to choose heavy, opaque fabrics. If you miss this nuance, then the cornice may simply collapse and break, sometimes without even a chance of repair. It is best to choose double rows. You will hang tulle on the first row, and a curtain on the second.
There is no need to hang both fabrics on the same row, because of this the textiles often tear and the elements of its fastening break off. In addition, it will be inconvenient to open and close the curtains. If you don’t like the fact that you have a small window, then you can choose long rods that will cover part of the partitions. This visually enlarges the windows.
You can also hang ceiling cornices, they also enlarge the window. With such methods, your guests most likely will not notice this secret. If there are a lot of elements on the cornice, then it is better to play it safe and buy a lot of fasteners. A small number of fasteners may cause you to accidentally injure yourself.
Guided by simple criteria and selection tips, you can choose a worthy accessory for the interior of your room.
DIY wooden cornice: do it step by step
For a capricious owner, it is best when he makes the cornice himself with his own hands. Especially if you have not only an idea, but also good materials, and most importantly a little patience.
On the Internet you can look at photos from which you will build. To create a practical cornice you will need less materials and physical effort. For a practical frame, you only need a barbell, rings, fasteners and tips.
Below are the approximate stages of creating a decorative wooden cornice, but they are individual for everyone:
- Make the sidewalls of any shape you like; Drill holes in the sidewalls; Attach hangers (it is best to take metal ones); Use a jigsaw to cut out the bottom shape to your liking; Sand the remaining parts of the cornice; Coat with varnish in the color you like (if the wood has an uneven color, or you can coat it with a product to protect the wood); It is best to leave everything to dry well in the sun for 24 hours; First, fix the decorative parts; Then attach them to the ceiling or wall using self-tapping screws.
If you want to hide the fasteners, paint them over or attach a decorative piece.
Barbell
- Take a board, as for the bracket.
- sawn into square slats 25x25 mm, the edges are rounded on the milling table, a round base is obtained.
- the edges of the rod at a distance of 10 cm are reduced in diameter, equating to the size of the holes on the brackets, sanded and painted.
- Everything is varnished.
- The cornice is being installed and the curtains are being hung.
As you can see, it is possible to make wooden cornices at home, but this requires skills and tools. Therefore, it is easier to purchase in a store.
Design of wooden curtain rods (interior photo)
Since ancient times, curtains in the interior have been used not only as decoration for windows, but also for doors. The style and patterns of curtains have changed over time. In addition, many of their types known to us today were named after the countries in which they appeared: Roman, French, Japanese and Austrian. Their functionality depends on the purpose of use.
Do you like exclusive curtains? Do you want to save money on this? In this case, we suggest you make them yourself. From this article you will learn how to make a curtain for a door with your own hands.
The best manufacturers
To be sure that you are buying not only a beautiful, but also a high-quality cornice, you need to pay attention to the manufacturer. The best models are made:
- Cessot is a French brand that produces products from environmentally friendly, high-quality materials.
- DecorHome is one of the largest manufacturers in Russia. If desired, the buyer can make an individual order (with ornaments, for painting).
- Olexdeco is a manufacturer that works only with high-quality materials. The company offers a wide selection of original cornices at an affordable price.
- Legrand, in addition to curtain rods, has launched the production of sun protection systems for windows. All products are of high quality, attractive design and low prices.
The range of curtain rods from various manufacturers is more than wide.
Pros and cons
Before making a curtain for the door, we suggest you familiarize yourself with some of the advantages of such a solution:
Using curtains, you can visually adjust the size of the room - reduce or enlarge it. You can achieve this effect using the appropriate color of the product. Possibility of using different materials.
It can be textiles, wood or threads. Curtains bring a certain lightness to the interior. Saving usable space, which is especially important in small apartments. On average, a swing door requires 1 m2 of space, and when installing curtains, this problem is eliminated. Save money on purchasing a high-quality interior door. Even the most expensive curtains are cheaper than doors.
Like everything else, curtains installed on a doorway have their drawbacks. Among them, it is especially worth noting the insufficient heat and sound insulation. In view of this, the choice is between beauty and practicality.
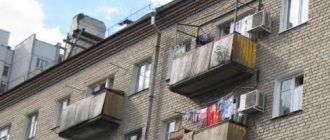
Some people install a door, on the opening of which they then hang curtains. Some designers fully justify this option, especially in cases where the room has an old door that is not in harmony with the overall concept of the interior. This combination is quite logical when arranging a balcony doorway.
Materials
Double chrome curtain rod for bathroom curtains
Corner curtain rods for bathroom curtains can be made from different materials at different prices. Durability of use and convenience depend on the choice of one or the other. Today you can buy products from:
Plastic. Such models are lightweight and the curtains do not make noise when opening/closing. But that's all the advantages. After all, over time, the once bright color fades, the cornice begins to sag. These often crack and break. Manufacturers are working to improve the quality of these budget curtain rods; they are increasingly being made from polymer metal masses. They are more durable and stronger.
Plastic curtain rod IKEA
Plastic cornice with imitation wood
Plastic cornices are easy to assemble and install
Metal cornices. They can be aluminum or stainless steel. The former are resistant to temperature changes, which are often observed in the bathroom. Corrosion will not affect them. But due to their lightness, they do not have the necessary strength, which leads to sagging. Pressure occurs when the curtain gets wet. The price of aluminum is higher than plastic. Another disadvantage is the dull shade, which cannot always be successfully integrated into the interior. Stainless steel cornice will last the longest. The color scheme is metallic and gray shades. From this metal you can create any shape of a barbell. The disadvantage is noise when opening and closing the curtains.
Aufollien bathtub cornice made of duralumin
An oval cornice with a chic curtain will be a wonderful element of your bathroom decor
Cornices with a chrome surface look very stylish
Combined. These are some of the most popular today, as evidenced by numerous photos in catalogues, because they combine the advantages of plastic and metal curtain rods - they are strong and durable, but do not make any noise.
Strength and durability are the main advantages of combined curtain rods
Varieties
Curtains are divided into types depending on their purpose:
- Curtains with a door - perform decorative functions and protect the room from excess light, giving it a certain charm. Curtains instead of a door - are attached to the doorway, they are a replacement for the door.
Types of curtains depending on the material used:
Textile curtains are made from different types of fabric.
It can be silk, chintz, satin, satin, velvet, tweed, linen, etc. Rope or thread curtains are a continuous airy veil made of threads. It delimits rooms without interfering with air circulation.
Curtains should be chosen depending on the style of the interior.
For example, if it is made in a classic style, then it is better to give preference to a textile curtain. For hi-tech and minimalism style, it is better to make curtains with eyelets. Wooden curtains will fit perfectly into the country style, while thread curtains harmonize best with the oriental style.
Requirements for cornices
Despite the small list of functions performed and the seemingly insignificant role in the interior, the basic requirements for curtain rod devices are quite serious:
- strength - destruction of the device can cause injury to a person or (if it falls on a heating device) a fire from the curtains catching fire;
- safety – absence of harmful emissions;
- aesthetics - due to the visual accessibility of the location of the accessory.
When assembling the accessory yourself, it is necessary to take these requirements into account, as do curtain rod manufacturers who manufacture products industrially.
Mounting methods
Attaching the curtain depends on whether there is a door or not, as well as on the shape of the opening.
So, there are these types of fastenings: Installation on trims - suitable for hanging curtains. Curtains are installed on the door leaf in cases where they want to hide from the sun or prying eyes. Roman blinds are usually installed on such a mount. The curtain rod is installed above the passage on the wall. In this case, the curtain is fixed with loops, rings, and a drawstring. It is worth noting that the latter option is only appropriate if the structure is stationary.
Soft rings form soft folds. Curtains can be decorated with tassels, lambrequins, and eyelets. If you want the curtain to drape, then sew curtain braid to its upper edge. Each detail must correspond to the general concept of the interior style in color, shape and texture. Choose materials that are in harmony with the design of the room.
Heating system diagrams
Select the optimal pipe layout for self-installation of polypropylene heating. In the future, you will receive recommendations for connecting individual elements and place them in accordance with the chosen plan.
Single-pipe scheme
The simplest method of arranging a heating system. In accordance with this wiring method, each battery installed further from the heating unit will heat up to a lower temperature compared to the previously installed battery.
This method makes it possible to reduce the consumption of materials for the arrangement of the heating system. However, the heating efficiency will be low, because The temperature distribution with such pipe routing is uneven.
In view of this, you should try to refrain from a single-pipe pipe routing scheme.
Collector circuit
To equip a heating system according to this scheme, you will have to spend more materials, however, the basic operational properties of such heating will be much higher.
Heat distribution throughout the rooms will be fairly uniform and high quality.
Two-pipe system
The most optimal method of arranging a heating system. The pipes are laid into the floor or into the walls of the house around the perimeter. Two-pipe heating is best suited for heating a home. Therefore, experts recommend giving preference to this particular pipe routing option.
Manufacturing of textile curtains
You shouldn’t have any particular difficulties when sewing curtains, because the technology is practically no different from making curtains for windows.
So, you will need: Fabric. Curtain rod. Sewing machine. Chalk for markings. Scissors. Pins. Threads. Before starting work, take measurements of the opening, you will need its width, curtain height and mounting points. Decide on the fabric. Add 3 cm to the total width of the curtain to process allowances, and for fastening to the cornice - 5-10 cm. In order for the fabric to shrink before cutting, it must be soaked in hot water, dried and thoroughly ironed.
Cutting is carried out in accordance with the measurements. If you wish, you can decorate the edges, for example, with fringe, frill or beads. It depends on the style of the interior. After sewing the curtain, all that remains is to hang it on the cornice.
What is required for assembly
In order to assemble a cornice specifically for Roman blinds with your own hands, you will need the following set of materials and tools:
- You will need a board with a width of 4 cm and a thickness of at least 2 cm. As for the length, it must correspond to the selected width of the curtain. However, if we are talking about mounting inside a window opening, then it is better to take a board that is narrower and thinner.
- You need a piece of fabric that will match the color of the curtain or its lining. The width of the piece of fabric should be enough to wrap the cornice + 2.5 cm. The length should be equal to the length of the board + 7.5 cm.
- To attach the cornice to the wall, you must have metal corners.
In addition to the basic elements listed, you will also need screws, dowels, and a construction stapler. If this type of stapler is not available on the farm, you can replace it with very small nails. If the curtain is heavy enough, then it is better to nail it directly to the cornice.
Classic style
Not long ago, such a concept as modern classics appeared. For its design, strict draperies with luxurious outlines are used.
These can be straight curtains with large vertical folds. To do this, you can purchase thick textured or smooth fabric. If you want your doorway to look more elegant, then complement the curtain with a light translucent curtain. Often lambrequins with folds are used to decorate the cornice.
The process of sewing such curtains is no different from the technology described above. To make curtains in a modern classic style, use only natural textiles. The lower part of the curtains should not reach the floor by 2-3 cm. Fabrics that shimmer with silver or gold are ideal for making curtains over the opening. If you consider this combination too pretentious, then it is better to make curtains from a plain dense fabric.
Roman curtains
You should start by attaching the curtain rod for Roman blinds with your own hands. There are three options - installation on the wall above the window, under the ceiling or in the opening itself.
- If we talk about mounting it under the ceiling above a window, then one of the advantages is the visual increase in the height of the opening. Most often, this option is chosen if the room itself is not too high. In addition, the curtain will cover the part of the wall that goes above the opening, which can also serve as a decorative solution.
- As for installation inside the opening, in this case it will be possible to maintain constant access to the window sill. This option is also considered very convenient if you need to use Roman curtains with regular curtains in pairs.
- Wall mounting is possible in two ways. The first option is installation perpendicular to the wall, that is, on the edge. Metal corners are usually used for this. In this case, the curtains will be located a short distance from the window.
- The second mounting option is parallel. In this case, a wooden curtain rod is attached flat to the wall with your own hands. The curtain will not be located at a distance from the window sill, which is beneficial if it is narrow enough.
Romantic style
Light, airy chintz curtains are an excellent solution for decorating a romantic summer style.
If you combine them with transparent curtains, the effect will be truly delicate. Chintz transmits light well, but at the same time softens it. To make a chintz curtain, you will need 3 times more fabric than the size of the opening. This way, you will get beautiful and large folds. To prevent the curtain from fraying at the edges, it needs to be hemmed.
The cornice is a wooden or metal pipe onto which large rings are placed. Otherwise, the technology for making chintz curtains does not differ from the technology for making any fabric curtains. The cornice is usually screwed 5-10 cm higher from the top edge of the opening. If desired, you can install clamps on the walls that allow you to open the curtains slightly, thus letting the coolness of the night into the house.
Homemade decorative cornices
Those products that are made by professional woodcarvers or blacksmiths can also be called self-made, that is, accessories of high class artistic performance, but made by hand. The cost of such cornices is often several times higher than the price of highly decorative models of industrial production, but at the same time mass-produced. We will consider technologies that do not require professional skills and expensive materials, but allow us to assemble a product of a sufficient level of aesthetics.
Cornice moldings made of metal pipes or rods
The most readily available metal suitable for making cornices in everyday life is water pipes with a diameter of ½ and ¾ inches, both galvanized and black. Most paints adhere even better to zinc coating.
First of all, depending on the size of the span, choose the diameter of the pipe and the number of brackets. For a cornice for a narrow window or door (less than 0.8 m), you can use a half-inch pipe; for a larger span, it is better to take material with a diameter of ¾. If the width of the window opening is more than 1.5 m, then the curtain rod device must be mounted on 3 brackets - at the edges and in the middle.
Cornices made of steel water pipes with connecting fittings
Having retreated 15-20 cm to the sides from the side slopes of the window opening, the total length of the cornice is obtained and the required piece of pipe is cut off. If there are 3 fasteners, then the cut fragment is cut in half. Then, at all ends of the two resulting pieces, threads are cut with a tool (3-4 turns), having first chamfered their outer edges and lubricated with grease.
From the same pipe, pipes 10-15 cm long are cut according to the number of fasteners, and a thread is also cut on one side of each. Then you need to purchase or cut yourself with a grinder from sheet steel 3-5 mm thick, supporting “spots” according to the number of pipes and drill holes in them with a countersink for self-tapping screws. Branch pipes are welded to the snouts strictly perpendicular to their plane - at the end without threads, the welding seam is polished with a grinder, and the cornice can be completely assembled using threaded connections: 2 pipes are connected to the rod with pipe bends of the appropriate diameter, and the third - with a tee.
Option for a homemade cornice made of steel pipes and bends
Important! If a pipe without zinc coating is used to make a cornice, then once the components are ready (before assembly), one of the ways can be to bluing them (blackening), which will give the surface a dark tint and protect it from corrosion.
As a finishing touch, you can use painting in a suitable color - nitro paint from a can or auto enamel using a brush. It is not advisable to use oil paint - the rings do not glide well on such a paint layer.
Watch this video to help describe it:
To make a small span cornice (up to 1.5 m), you can also use a steel rod with a square section of 12x12 mm, which is quite suitable as a cornice rod. To make a barbell decorative, a rod cut to size is marked along the length into several sections, after which, on a lathe or using hand-held mechanical devices, they are twisted through one by an equal number of revolutions. The hexagon rod can also be twisted around its axis, both in sections and over its entire length.
Manual mechanical devices for twisting metal rods
The rod for the cornice can also be made from a round steel rod with a diameter of 15-20 mm. If such an element is subjected to hot forging along its entire length, followed by bluing, then the accessory takes on the appearance of an antique interior element. If the ends of the rod are spilled, they become limiters for the rings, but they can also be decorated with wooden decorative knobs.
Site-mounted curtain rods on wood and metal brackets
For both types of rods, it is not difficult to make brackets - they can be made of wood or metal - forged, bent, turned. You can also find ready-made components of simple designs on sale.
Metal bracket options
There are no questions about fastening the brackets - they are usually mounted with self-tapping screws in holes sealed with nylon holes at the same height from the floor.
Cornices made of polypropylene tubes
PP pipes can also be used to make homemade curtain rod fixtures. The design of the finished baguette will differ from an accessory made from metal pipes only in the assembly method, strength and weight.
The product is assembled from the same components as in the case of metal pipes - a PP pipe with a diameter of 3/4 inch, identical bends and a tee, and support blocks.
Components and components of a homemade cornice made of PP pipes
The assembly of elements is carried out using a special device - an iron, the skills of working with which are acquired after two or three trial connections.
After assembly, the cornice is painted with paint from a spray bottle or can.
Red copper and brass painted PP pipe cornices
The products are durable, resistant to most types of household impact, but due to the flexibility of polypropylene, they are not suitable for placing heavy curtains, and even for light curtains, the distance between the brackets should not be more than 1 m.
Wooden curtain rod devices
Cornice moldings made of wood, like metal ones, are available in various types.
If we consider rod-type devices, their design is no different from metal ones - the same rod with brackets, only made of wood. The rod is turned on a lathe from a block of the required length. The wood can be of any common type, but without knots. After finishing the turning work, the crossbar is sanded with sandpaper, varnished and installed on the wall or ceiling using brackets.
Various designs of wooden curtain rods
The second type of wooden cornice - with a decorative strip - can also be made with your own hands, and it is not necessary to master the art of artistic carving. You need to familiarize yourself with the design of such cornices and make a copy of the accessory, but to decorate the decorative strip, use ready-made carved decor, available for sale in furniture fittings stores.
Important! To decorate the cornice strip, instead of wooden elements of carved decor, you can use a ceiling plinth made of polystyrene, which is glued to the base and decorated in an artistic way - with water-based paints.
A smoothly planed board with processed edges 2-2.5 cm thick is taken, and brackets are mounted to it. Carved decorative elements are attached to the front side of the plank using PVA glue, after which they wait for the adhesive to dry and decorate the decorative strip in an artistic way - cover it with stain and varnish.
A cornice with a decorative strip can have a hidden rod or string-cable for fastening rings in its design.
The second version of this accessory is a design one - installing a strip with brackets (or without them) on the base on top of a string-type cornice device pre-installed there.
Wooden cornices: on the left - with guides in the structure, on the right - overhead placement, without a rod
Bamboo rod curtain rods
Bamboo does not grow in Russia, but currently not only furniture and crafts made from it are imported from China, but also bamboo trunks and rods themselves, both fresh and dry. An original cornice can also be made from an old bamboo shelf or wall shelf, if the length and diameter of the rods allows.
Bamboo stems for curtain rod: fresh and dry annealed
Important! The bending strength of a bamboo rod can be increased if the top layer of bark containing the cambium, a membrane that gives flexibility to the trunk, is removed from the rod.
If you plan to use rings to place curtains, then the transverse thickenings on the bamboo rod are processed with a file, making them streamlined, but it is important not to grind off the excess, so as not to weaken the rod significantly in this place.
Homemade bamboo cornices: double-row and single-row
If, instead of rings, loops made of braid are used that do not move along the bar, then the transverse ring thickenings on the bamboo can be left unchanged and even made more prominent using automotive putty, and then the crossbar can be painted the color of a living trunk - juicy green.
To decorate the rod of bamboo curtain rods, you can also anneal it with a blowtorch and then coat it with colorless varnish.
Homemade rod curtain rods made from dry annealed and painted bamboo
There can be many options for additional decoration of bamboo cornices, depending on the status of the room and the class of its finishing.
Cornice devices made from tree branches
To place curtains, you can also use a natural fragment of a branch that has the required dimensions and original shape. It is only necessary that the wood is dead and does not contain parasitic insects.
The selected branch is cut to size and everything that is peeling and damaged is removed from it. Then the workpiece is dried, protruding knots are removed from it, treated with sandpaper and coated with varnish - preferably semi-matte, which preserves the naturalness of the product.
Depending on the configuration of the accessory, brackets are selected for it and secured in place, after which the curtains are placed on the branch - on rings or loops made of braid.
Homemade cornices from natural tree branches
Important! In wooden houses, it is especially important to treat the branch with an antiseptic against insect-boring insects, for example, “Antizhuk”, which will protect the structure from infestation.
Rope curtain rods
Original devices for placing curtains can be made from high-quality rope, but it should not be impregnated, such as hemp, otherwise there will be an oil smell in the room.
Such a cornice does not have a universal design and can be decorated in a wide variety of ways, but at its ends, naturally, there must be brackets for fastening to the wall or ceiling.
Curtain rods
If desired, you can weave decorative elements into the rope, or paint it in a brighter color.
Combinations of sports equipment
To place curtains, you can use an oar or old golf or hockey sticks, but restored and covered with a protective layer of paint or varnish. This version of cornices is especially appropriate for decorating rooms intended for teenage children.
Rowing oar as a curtain rod
The paddle can be additionally decorated with artificial seaweed. The brackets are made, naturally, in relation to the accessory used.
Cornices made of paired clubs: for golf and hockey
Such a device is distinguished not only by its originality, but also by its durability, moreover, it can be mounted on the wall without damaging equipment, and subsequently dismantled and used for its intended purpose.
If the room has expensive finishing, and the interior is designed in a certain style, then unless you are a master in making cornices, it is unlikely that you will be able to do something worthy. But you can safely try yourself in this role, for example, at the dacha, since it is quite possible to make a decent curtain rod for a room without any special frills.
Products made from threads
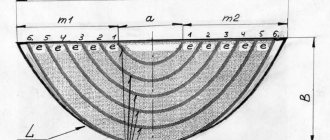
Most often, colored threads or fishing line are used for the base of such curtains, on which glass balls, wooden tubes or beads are strung. First think about how the finished product should look and what cornice to use for it. To make curtains in an oriental style you will need: Fishing line or threads. Beads, wooden tubes or glass balls for decoration. Needle for attaching beads. Glue. Self-tapping screws. Screwdriver /drill.So, let's start the workflow.
We mark the doorway for the cornice. This design is best secured 5 cm above the edge of the doorway. As fasteners, you can use a wooden strip, which should first be painted in the color of the curtain. On this bar you need to mark in advance the points through which you will pull the threads. Their number depends only on your ideas about beauty.
Depending on the thickness of the threads, the curtain will be either thick or translucent. Then you need to string the beads onto a thread and attach them to the cornice. Calculation of the height of the threads: measure the distance from the cornice to the floor (or other desired height from the floor level), add to this figure 5 cm for fasteners and multiply the resulting amount by 2. This length necessary in order to string beads with a crossover.
In this case, it is important to draw up a diagram first or use a ready-made one. To make the fastening of the threads more reliable, use a loop, and not just knots. To prevent curtains from fluttering in a draft, weight the curtains at the bottom with large, heavy beads that are secured with a loop and knot. To make the fixation more reliable, glue the bottom bead with polymer glue.
Completion of work
The last part to be made is the “mortar”. The element is quite complex. It must ensure the entry of a fastening beam with a diameter of at least 5 cm. To do this, you will have to make a hole in the element, but not through, with a diameter equal to the diameter of the beam. After this work, the “mortar” is immediately varnished. After this part has dried, an anchor is screwed into the bottom of the hole, which should go right through. The hole itself cannot be varnished.
Made of wood
To make curtains from wooden elements, you will need to purchase them from a specialized store.
They can be of different shapes: diamonds, circles, squares or leaves. You can also use plastic that imitates wood. You will need: a strong thread/line; a cornice with rings; special clips for holding the decor, called crimps. Making such a curtain is practically no different from its counterpart made of beads. You need to prepare sections of thread, string the decor, while securing each element with crimps or simple knots.
Attach it to the cornice and install it above the opening. Using curtains on or above the door, you can beautifully complement the interior in the opening. Thus, the room can be decorated in a classic style, retro, modern, Provence, minimalism and hi-tech. It is quite possible to make interior curtains yourself, and for this you will have enough information described in this article. If you have experience in making such curtains, then share it with our readers in the comments to the article.
How to make a product special
Using wallpaper and paint, you can achieve a variety of decorative effects and make the most ordinary design original and beautiful. This hand-made cornice will harmonize perfectly
with the decoration of the room. There can be many decor options. The simplest is to paint the product in the color of the walls or curtains. Interesting color effects can be obtained when applying paint with a rag swab or sponge. You can also use special adhesive paints of several colors.
The cornice can be decorated with stripes or left plain and individual elements painted: fleurons, brackets or rings. An original product will be obtained by covering the bar with wallpaper that harmonizes with the curtains. Drawing lovers can cover the design with hand painting
. It is very important to choose the right paints. Vinyl or silk emulsions and water-based compositions are suitable for wooden cornices. For metal rods, it is best to use enamel, spray or special metal paint. The finished decor is varnished.
Even a novice home craftsman can make a cornice with his own hands. Accuracy and patience will help you make a good, practical thing. And if you show your imagination and decorate your product in an original way, you will get an exclusive masterpiece. You can come up with the design of the cornice yourself, but it is better to look for interesting decor ideas and choose the best. A lot of interesting design solutions are collected on the WESTWING website; it’s definitely worth a look. Develop a project for an original cornice
and bring your idea to life. Your home should be the most beautiful, make it that way!
Advantages of plastic curtain rods
Perhaps the described products cannot be considered exclusive elements of interior design with artistic value, but they have several important advantages, including:
Resistance to moisture, aggressive substances, temperature changes, which allows them to be used both in any room at home and outdoors; Low price, thanks to which you can save a lot
In addition, when installing curtain rods hidden in a ceiling niche or behind a baguette, it does not matter at all what it looks like, and there is no point in overpaying; The ability not to change curtains after renovation or changing the interior - it is enough to replace the decorative facade strip - hood; Light weight and easy to install. The package contains detailed instructions and all necessary fasteners.
Plastic curtain holders - a practical and universal solution
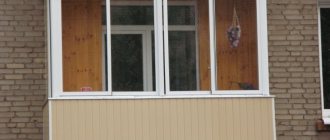
Options for large and small windows
Wooden houses, the rooms inside of which are lined with profiled timber, can have both large and small window openings. Each of them has its own nuances for decorating curtains.
When decorating a window almost one floor high, you can use tulle with a lifting mechanism or roller blinds. Long curtains with good density can be hung on cornices as functional textiles. Such models are secured at the slopes with ribbons or chic voluminous bows.
Square-shaped windows are often hidden behind translucent tulle. It is hung on wall curtains, forming voluminous vertical waves. To close such openings at night, you can use curtains with a dense texture. Such models are fixed strictly on one side of the window, thus forming a lambrequin.
They try to decorate panoramic windows in a wooden house or openings that are located around the room with long light tulle. Together with night curtains, it can be hung on wall curtain rods. If the room is lined with light-colored wood, then they try to choose curtains with a pattern on a floral theme.
Chic curtains for large bedrooms with retaining rings differ in texture, design and fabric density. If the window in such a room is triangular, then a separate lambrequin is arranged for its upper corner, attached to an individual curtain. They try to use both textiles in the same style.
On a note! Triangular windows are very unusual, so choosing curtains for them can be difficult. A convenient option is to use beveled tulles and veils.
If the room, in addition to panoramic windows, also has narrow ones, then roller blinds or Roman blinds in the same design as night curtains are used for the latter. Tulle or blinds are used as a daytime decor option.
Optimal size
It is often difficult for non-professional craftsmen to determine what size cornice to make. This is indeed a very important design decision, because if it is too small, then melt or rain water from the slope will fall on the lining of the external walls, on the foundation blind area, leading to destruction and also damage to the appearance of the structure. When choosing the length of the cornice, the following factors are taken into account:
- Climatic conditions. The optimal size of the roof eaves depends on the amount of precipitation falling in winter and summer. In snowier regions, roofs with wide eaves are traditionally used to protect the walls and foundation from snow. For example, alpine chalets located in the mountains usually have eaves overhangs at least 1 meter wide.
- Roof slope. The greater the angle of inclination of the roof slopes, the smaller the cornice can be made. This is explained by the fact that with a flat roof shape, the trajectory of falling snow and water goes far from the outer walls of the house. If the slopes are steep enough, then it is better to make the cornices wider to protect the structure from splashes of water that can reach the wall during intense snowmelt or rainfall.
- Proportions of the house. A wide cornice with a flat roof makes the building visually lower, squat, distorting the optimal proportions. A narrow overhang with a high, steep roof, on the contrary, elongates the silhouette of the house.
Important! The minimum permissible width of cornices is 45-50 cm, but this is clearly not enough for regions with high snow loads. If necessary, the size of this structural element is increased to 1 m.