Home → Useful information
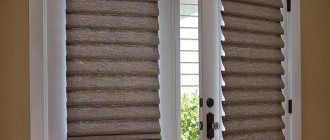
If you have decided to buy a cornice for a corner bathtub or are still in the process of ordering, then you should know that the only reliable cornice is the one that is attached to the walls with screws. Some people are put off by this fact. The reasons are different: it’s a pity to drill tiles in the bathroom, I can’t install it myself, I don’t have the necessary tools, etc.
But we hasten to console you - a good cornice is bought once and for all (we told you how to choose a good cornice earlier). Therefore, holes in the tiles will not be a problem, because, for example, a mirror is installed in the bathtub? Or shelves, shower head holders, wall-mounted soap dishes, etc. - the tiles were drilled for all of this, but it’s a pity to drill tiles for a reliable cornice?)
The tiles are drilled using special feathers, and the fastenings are covered with decorative caps so that they are not even visible. Installing a curtain rod in a bathroom is generally quite simple. For a person who has accuracy and basic skills in working with a hammer drill, it will not be difficult to install a barbell with your own hands. If you have the necessary skills, then most likely the instructions for installing the bar will be sufficient for you. If more detailed instructions are required, the process is described below.
We also remind you that in Moscow and St. Petersburg you can entrust the work of installing rods in bathrooms to trusted specialists. If installation is required by installers proven by many years of experience, please indicate this when placing an order. We will forward your request to the installer, and he will contact you to agree on the day and time of installation. Details in the " How to install " section.
Since we offer a range of cornice models for corner baths, and not just one single cornice, in theory, instructions are required for each model. But we will not dwell on the nuances of installing each of them, because... The process as a whole for all models is similar with the exception of small details (but we will mark small details that still need to be paid attention to with the bold word Important! ).
We consider the installation process using the example of a corner semicircular cornice of the Great for an asymmetrical bathtub . For L-shaped, symmetrical corner, straight, etc. cornices, the installation process is the same.
Types of construction
On sale you can find many types of curtain rods for the bathroom with different operating conditions, shapes, etc.
However, for the most part, these designs will differ in a key parameter - the method of attaching the curtain itself. And this, in turn, determines its appearance. After all, the curtain itself performs several functions, and decorative is not the most important of them.
When choosing an accessory, you need to focus on the functionality parameter, i.e. consider how much the curtain will protect the bathroom and objects in it from flying splashes of water. To make the right choice, it is advisable to consider all types of cornice designs.
What are they like?
To know exactly what needs to be built, you need to find out what types of similar structures are offered on the market and which of them will need to be assembled. The main differences relate not even to the material of manufacture, but to the type of fasteners used. There are two systems:
Sometimes you can find structures equipped only with ceiling fasteners, but they are quite rare. There is little practical benefit from this installation method - it is only necessary in cases where it is impossible to use walls for installation, and this is extremely rare, or for flexible aluminum ceiling structures. Otherwise, there is no need for such fixation of the cornice.
Straight design type
This model is simple to implement, does not require much effort in installation, is durable and very reliable. During installation, the curtain rod is attached to opposite walls in the bathroom.
This option will optimally fit into a room with a standard layout, where a bathtub with a regular bowl is installed, without any specific design solutions in shape.
Geometric cornice
When installing a bathtub in a corner area, in the center of the room, or using bowls of a non-standard type, the optimal choice would be an L-shaped cornice or a U-shaped design.
The asymmetrical type of bars looks no less attractive, but here the choice is made based on the specific planning conditions, the design features of the bathtub and the room itself. Both oval and rectangular models will decorate the interior.
Sliding model
Telescopic curtain rod - this sliding type of design allows you to adapt the rod to the specific length of the bathroom. It is enough to take the barbell from one end and start moving it in the opposite direction.
Note!
- Automatic electric window blinds: review of the best models with photos and descriptions
- Double-row curtain rod, all types: wall, ceiling, metal, plastic. Assembly and installation instructions
Ceiling hidden curtain rod - do-it-yourself installation and installation rules (110 design photos)
Fixation to the walls is done using a spring. Therefore, the manufacturer installed special protective rubber gaskets at the mounting points. They protect the surface of the walls from damage.
A big plus for buyers is the variety of choice and wide range of prices.
Rod mounting options
I already talked about how to install a telescopic curtain rod at the beginning. The only thing I can add from my own experience is to pre-glue squares of double-sided tape to the rod stop points on the opposite walls. Such a rod will hold especially firmly if your walls are tiled.
Often, all tubular rods, no matter what configuration they have, come with instructions. There is no point in describing it in detail in this article; as a rule, everything is clear and understandable there.
The support washer, on which the cornice itself is attached, must be screwed to the wall. To do this, drill 4 holes and screw the structure using the dowels included in the kit. If you are dealing with drywall, then instead of dowels with self-tapping screws, you will have to separately buy special “molly” fasteners.
Bar mounting diagram.
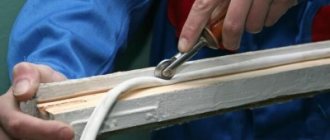
If the wall is tiled, then to prevent it from bursting when you try to drill through it, the top layer of glaze must be carefully chipped away. I use a regular plumbing core for this.
The height of the rod fixation is determined individually. If you do not take into account the ceiling mount, then usually the cornice is installed 100 mm, below the fixation point of the shower hanger. Often this is enough for the curtain to reliably hold back splashes.
The asymmetrical version of the rod often involves fastening not only to walls, but also to the ceiling. Here you need to look at what your ceiling is covered with. For example, there may be problems with lining, but suspended polymer ceilings cannot be touched at all. Essentially, the top bracket can only be securely fixed to concrete and in some cases suspended plasterboard ceilings.
Fan cornices
A special feature of the model is the method of assembly/disassembly. This happens according to the principle of a fan, which gives the entire structure a unique appearance and decorates the interior of the bathroom.
With the help of a fan cornice you can significantly save space, but the price of the model is usually quite high.
String ceiling model
Along with high functionality, this design also has an original appearance that can decorate any interior, fitting into the existing design.
In addition, this is a durable and strong type of curtain rod, allowing you to save space, especially in small bathrooms. And in terms of cost, string models can compete with other options - they are chosen for installation in both apartments and country houses.
True, you should strictly follow the instructions, because increased load will lead to the “string” breaking. But replacing it won't be difficult.
Plastic
Structures made of plastic have one main advantage - they are cheap, although they are also less susceptible to contamination and require little maintenance.
Note!
Plastic curtain rods: ceiling, wall, with hood. Description of all options, as well as photos of new designs
Metal curtain rod: ceiling, double, single-row, double-row. 100 photos in the interior
Wall curtain rods: how to choose the best option. 70 photos of new designs
However, they are not durable and reliable and can quickly sag even when using curtains made of lightweight materials. And some low-quality models quickly turn yellow over time.
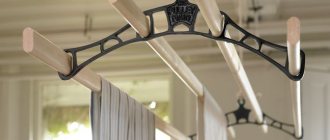
We will make a corner for curtains in the country from a pipe
We use 20 mm PVC pipe for homemade work. Also some tees and corners. Budget for 50 rubles. Saving about 2000 rubles. We look and remember how to do useful things. We cut a pipe of a certain length, turn on our imagination, soldering iron and begin to connect the workpieces. The soldering iron is ordinary, without any bells and whistles. Having combined the necessary blanks, we finish them.
Everyone will have individual sizes, so the author of the video did not name the dimensions of the product. All that remains is to cut off one more piece of pipe and something useful in a country house is almost ready. We try to make it as smooth as possible. It will look more beautiful this way. The device is ready. Let's drill a hole and go fasten it. Curtains are not inferior in strength and rigidity to purchased ones. Some may not find this product very beautiful. Those who value functionality, reliability, and budget will have no doubts about homemade products. And it actually doesn’t look that scary.
Hardware
The shortcomings of plastic models are compensated by metal structures, as can be seen in the photo of the bathroom curtain rod. The simplest option is aluminum products, the durability of which depends on the quality of workmanship.
Often such rods are covered with a yellow coating and do not have high technical parameters in operation. To extend the period of use, manufacturers in more expensive models cover the rod with a protective layer against corrosion.
You can also choose other options:
- Stainless steel is a more expensive, but high-quality material that is resistant to water and can withstand increased loads. Such a cornice is suitable for a corner bath, for example. If you follow the rules of operation and maintenance, the model can last for a long time.
- Shiny steel with chrome plated finish.
- Bronze coating.
- Brass, however, is prone to quickly developing a natural patina.
- Shiny fiery copper with a unique appearance.
- Blackened metal.
But wooden structures, despite their noble appearance, are not suitable for the bathroom. Even high-quality impregnation against moisture will not be able to protect such cornices from destruction and damage.
Features of installation on different surfaces
On concrete walls lined with tiles
To secure the rod to the tile, you first need to make sure that the cladding is strong. If the tiles are weak, the seams are crumbling, traces of fungus are visible on the surface, you cannot attach anything to the wall. First you will have to dismantle poorly secured elements, remove any remaining glue, clean out the seams and re-face everything.
Removing tiles
Laying new tiles on the wall
If the tiles hold up perfectly and there are no defects, you can immediately begin the installation process. You should immediately take into account that the hammer drill mode is not suitable for tiles; they may become covered with cracks. You also need to take a different drill - with a spear-shaped tip, which will allow you to make very neat holes.
Tile drill bit with spear tip
Operating procedure:
- In the designated places, stick a small piece of masking tape onto the tile. Then the points for drilling are placed directly on the tape;
- A spear-shaped drill is inserted into the drill and holes are made at low speeds to the concrete base. From time to time, the tip of the drill is dipped in cold water to avoid overheating;
Be sure to turn off the impact mode of the drill and select the mode with the lowest speedHow to drill tiles in the bathroom
- when the tile is drilled, change the drill and continue to go deeper into the wall to the desired mark;
- squeeze a little silicone into the hole, insert a dowel and fasten the bracket.
Everything else is done according to the technology described above.
On drywall under tiles
As a rule, walls and partitions made of plasterboard adjacent to the bathtub are tiled. Paint and waterproof plaster under direct exposure to water cannot provide reliable protection to such material, unlike tiles. But this design makes it a little more difficult to attach accessories, as it requires special care.
To drill the cladding, it is recommended to use a diamond drill, which makes it possible to make a hole without strong pressure on the surface.
Diamond drill
Instead of standard dowels, butterfly dowels are used.
Dowel
If the rod is large and heavy, the fasteners in the drywall will not withstand the load and will become loose over time, which means that you need to drill deeper - to the concrete base. In this case, the fasteners also need a large length, taking into account the thickness of the drywall, tiles and the gap between the gypsum board and the wall. The kit usually includes self-tapping screws measuring 5x40 mm, so you will need to purchase separately self-tapping screws of the same diameter, but 80-100 mm long. The dowels, accordingly, should have a diameter of 6-8 mm and a length of 80-100 mm.
The marking is carried out as standard, as on other surfaces. A drill should be at least 10 cm long and must be sharply sharpened. You need to drill at low speeds (1000 rpm), holding the tool firmly and preventing it from slipping. Having drilled through ceramics and drywall, the drill is changed to a Pobedit one and continues to go deeper into the concrete. After this, the rod is mounted on the dowels.
We make a hole in the gypsum board, insert a dowel, and fasten the product with wood screws
The diameter of the hole must be selected in such a way that the dowel fits in tightly and does not turn itself when tightening the screw.
After tightening the self-tapping screw, you get this kind of stop on the back side
On plastic panels
Installing the rod on plastic-lined walls is quite simple. Plastic is not afraid of vibrations and is easy to drill. Here, too, you need to use long dowels, since you cannot attach the rod to the plastic itself - it simply will not withstand the load from the cornice and curtain, and the fasteners will tear out of the sheathing. So, take a regular drill and make neat holes in the plastic at high speeds. Then the concrete is drilled using a Pobedit drill in hammer drill mode. When fixing the product with self-tapping screws, it is very important not to overtighten them, otherwise the plastic will be deformed and may subsequently crack.
Installing a dowel on a wall covered with plastic panels
If you plan to install the rod in a spacer, keep in mind that thin plastic will bend and be pressed under such influence. It is best to prepare a stop for the rod at the stage of wall covering: at the location of the rod, fix two strong boards on the wall to the thickness of the sheathing. Otherwise, to avoid pushing through the plastic, the rod will have to be mounted on dowels.
The bar is installed in a bathroom lined with plastic panels
Some tips when choosing
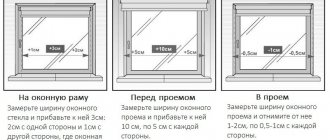
When buying a curtain rod for a bathroom, you should definitely take into account the layout of the room and the features of the interior design. However, the following parameters will be no less important:
- the area of the bathroom, based on which the type of construction is selected, for example, a straight or corner model;
- features of placement of a bathtub, sink, shower stall, etc.;
- the type of material used to decorate the ceiling and walls, which will facilitate installation or make adjustments;
- selection of a model by design or color scheme.
When purchasing curtain rods, you should carefully study the models offered by manufacturers and choose the most preferable ones.
Here you can focus on ratings. For example, among the straight models, the telescopic curtain rod Milardo 010A200M14, the IDDIS model in matte chrome 020A200/14, 150 MrKARNIZ, VERRAN 105-190 cm, Aquanet straight 150 cm, stand out.
Among the corner models, the Vanstore, VERRAN, RIDDER 59000, BACCHETTA 80x170 chrome, Violet corner 240 cm lines are popular. Arc designs are in demand - Ridder 59400 90x90 cm, Triton Sabina, GoGo Lux 90x90 P1.
In order to save space, if the type of ceiling decoration allows, you can install ceiling structures - IDDIS A200I14, RIDDER 52500, VERRAN, 100x100 cm Universal.
Video
For clarity, we suggest watching a video lesson that will help you answer the question of how to hang a curtain rod.
How to properly hang a curtain rod 3D panorama.
Installation of ceiling cornice for curtains. 3D panorama.
How to install a plastic curtain rod on the ceiling
Home / Installation, repair, maintenance / Do-it-yourself corner cornice for the bathroom
Quite often there are situations in which it is necessary to install not a straight, but a curved hanger for a shower curtain.
It would seem like a simple steel tube, bent at the right angle and a pair of fasteners, but such a product can cost a lot. In addition, it is very difficult to select a model of the required length without errors. To avoid all these problems, you can make a corner bathtub cornice with your own hands.