Shrinkage
But the most important difference between houses made of wood (does not apply to frame-panel houses) is the ability to shrink as a result of drying of the wall material (logs, timber). And this point is decisive in installing plastic windows in a wooden house, because if you install a window, as usual, in a bare opening, it will inevitably be crushed and deformed by the shrinkage process.
There is an opinion that the first two are the most active period of wood drying. But that's not true. After the construction of the house, the shrinkage of the walls continues for decades. But that is not all. Wood not only gives off moisture, but also absorbs it. Therefore, rigid fastening when installing windows in a wooden house is impossible in principle!
- Shrinkage in a log house is about 10 - 15 mm per log D = 250-300 mm
- Shrinkage in a house made of timber is about 7 - 10 mm per beam with a section of 150x150 mm
- Glued laminated timber - unknown.
There are other ways to calculate the shrinkage height of log houses as a percentage: approximately 10-15% of the original height. But in fact, the shrinkage of houses made of timber and logs depends on many factors:
- on the material (log, rounded log, timber, laminated timber);
- on the time of material procurement (winter procurement or summer);
- depending on the time of day (morning, evening) Yes-Yes!!! Don't be surprised - we investigated this too!
- from where the forest grew (swamp, field); on the degree of resinity and density of the tree;
- on the size of the material - both its length and thickness;
- from the moisture content of the material;
- on the size of the building; on construction technology (dowel, type of felling, etc.);
- from the material of inter-crown insulation; from the type of wood;
- depending on the time of year when construction is carried out.
The most severe shrinkage occurs in log houses made of ordinary logs, followed by rounded logs, profiled beams, timber, and laminated veneer lumber. Even if the house is more than a dozen years old, it is still necessary when installing windows in a wooden house to take into account the vertical movements of the walls as a result of an increase and or decrease in humidity and air temperature at different times of the year.
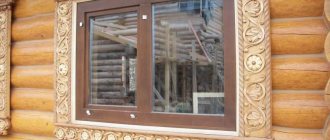
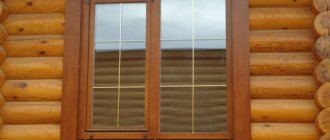
How the pigtail works
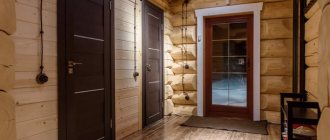
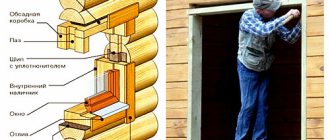
As can be seen from the photo, the casing is an ordinary window box made of four, sometimes three (sides and top) thick boards, installed inside the opening.
The meaning of this design is that it is independent of the vertical movements of the wall and moves freely in the opening, since it is not attached to the logs (beams) with nails, screws, or other fasteners, but is held in place by grooves in the side posts mounted on the spikes at the ends of the logs. Even foam is not used to seal the gaps around the window frame - only tow, jute (flax batting) and other soft insulation.
Shrinkage gap
Please note: a large gap is specially left above the jamb, the size of which is designed for the maximum possible amount of shrinkage of the logs (beams). During the first years after the construction of the house, this compensation gap will gradually decrease to a minimum, but the upper log (timber) of the opening, if calculated correctly, will not press down or deform the frame. Thus, the shrinkage of the house will not in any way affect the size and shape of the window frame, and, accordingly, will not damage the plastic window located inside it.
Shrinkage gap size
If you decide to install windows in an old wooden house that has long gone through the process of shrinkage, then, when disassembling the window blocks, you will probably notice: they are made according to the same principle as the casing design described here, i.e. are not nailed to the logs of the opening, but are fixed in it using a simple “mortise and tenon” system on the sides.
This suggests that the technology of installing windows and doors in a wooden house in frames was invented a very long time ago, and is used successfully to this day. We will not invent anything new and will follow the same path.
Filing the casing
The frame for plastic windows can be of various shapes: rectangular, triangular, polygonal in the form of a trapezoid with beveled corners, balcony blocks, entrance blocks, octagon and even circle.
In each case there are features of filing the casing corners. It is the correct filing of the corner joints of the casing structure that ensures the rigidity and tightness of window openings.
Filing the corners of the frame is a labor-intensive process that requires accuracy in the dimensions of the tenons and grooves, and an even plane of contact of the risers and window sills. Maybe someone read on the Internet about a unique old Russian method.
This method is not unique, but it is the only correct one. This is done by everyone who knows how to make a joint and who cares about customer reviews. And this is the best advertising.
There are several ways to install the pigtail (more details at the link):
- T-shaped frame - a groove is made at the ends of the opening logs, and a T-shaped profile is placed into it;
- U-shaped - a tenon is cut out at the ends of the opening logs, and a groove is made in the side casing posts).
We do both options, since they provide maximum strength and stability of the opening, because the frame not only protects the window from shrinkage of the walls, but also ensures the stability of the wall at the place where the opening is cut.
Briefly, the sequence of our actions will be as follows: we cut out an opening in the wall, the dimensions of which are slightly larger than the dimensions of the inserted plastic window;
We form a groove for the T-shaped pigtail;
<
We form a spike for a U-shaped pigtail;
We make the parts of the pigtail;
We install the window frame in the finished opening;
We install a window in a wooden house into a frame, aligning it flush along the front edge (we fasten it with self-tapping screws of such length that they do not pierce through the frame and do not go into the logs);
We blow foam into the gap between the frame of the plastic window and the frame, not forgetting about the installation of waterproofing (outside) and vapor barrier (inside - suitable for a rough frame under the cladding, for finishing it is not required since the window rests on the quarter) of the foam seam;
we install external platbands (we attach them to the casing);
we carry out the interior finishing of the window (window sill, slopes - not required for finishing the frame, since it is the slopes and window sill).
We use foam only inside the pigtail. We insulate the gaps around it with traditional flax fiber or jute fabric.
Over the next 5 years (if the house is newly built), we will have to periodically remove the trim and gradually reduce the amount of insulation put in there. If this is not done, the upper parts may bend.
Even after the house has completely settled, the gaps around the casing should under no circumstances be sealed with foam.
Preparing the opening for installing a window in a wooden house
Before cutting, we mark the window opening using a level, because the plastic window will be installed strictly level in all planes, therefore the frame must also be installed in the opening as accurately as possible according to the level initially.
The lower crown in the opening needs to be sawed through so that a flat horizontal platform is obtained.
We determine the dimensions of the opening based on the size of the plastic window, the thickness of the casing bars and the size of the required gaps.
We perform all calculations visually. Here is an example of a diagram for calculating the size of the opening for a rough T-shaped frame:
Accordingly, we take a beam with a cross-section of 100x150 mm and cut out a T-shaped profile.
Here is a diagram for calculating the details of a p-type finishing socket:
For a U-shaped window frame, we cut out a U-shaped profile from solid timber.
The size of the shrinkage gap (H shrinkage) is not easy to determine, since the amount of shrinkage of the house, as mentioned above, depends on many factors. If we, for example, roughly calculate, taking everything to the maximum, then for a window with a standard height of 1400 mm (plus the thickness of the casing crossbars, plus installation gaps ~ 245 mm) with 15 percent shrinkage, the top gap will be 24.5 cm - a huge hole , the height of which will most likely end up being too large.
To simplify the task and avoid mistakes, you should not rack your brains over GOSTs that regulate the shrinkage values of building materials of various wood species, comparing this with local climatic conditions, etc. You can do it simpler, namely:
• if you are building a new house, then start installing windows in it no earlier than a year after the construction of the log house in order to wait out the period of the most active shrinkage. Then, when manufacturing and installing the frame, the size of the shrinkage gap (H shrinkage) can be safely made 60-50 mm for a log house, 50-40 mm for a timber house and 40 mm for a house made of laminated veneer lumber;
• if your house has stood for more than five years, then the shrinkage gap (H shrinkage) can be made minimal - 40 millimeters, just to compensate for possible seasonal changes in the geometric dimensions of the opening;
So, we calculated the size of the opening, marked it and cut it out. Now you need to cut out a tenon at the ends of the logs (beams) on the sides of the opening. The tenon is also marked using a level in the center of the log (beam).
We make the tenon size 60 mm - width and 40 mm height.
We cover the sides and bottom of the opening with linen or jute using a stapler.
Making a pigtail
First, you need to decide on the width of the frame bars: it should either be equal to the thickness of the wall, or be a little larger, so that later, when installing external trims, they (the trims) fit tightly and unhindered on the frame, and not on the wall. There is another option in a log house - a groove around the opening along the width of the groove.
Secondly, to make a pigtail you need to take well-dried material, otherwise the assembled structure itself will soon deform as it dries.
First we cut out the bottom part (window sill), making it 10 cm longer than the width of the opening. At the ends of the window sill we cut a groove for a tenon 65 mm wide and 40 mm deep.
We also make small 20 mm recesses at the ends of both window sills for joining the crossbars with the side posts - the so-called locks.
We make the side posts 70 mm higher than the height of the plastic window frame. On the reverse sides of the racks, using a circular saw, we cut out a groove for a tenon 60 mm wide and 40 mm deep. We immediately make a lock in the side posts for the upper part.
Lastly, we make the top part of the pigtail. Based on the dimensions obtained between the two installed side parts.
Rough casing
For a house built from unplaned timber, it is better to order a rough frame made from solid wood. It will reliably strengthen the walls of the house and protect the windows from the negative consequences of the shrinkage process.
Subsequently, the rough frame is covered with internal and external finishing.
You should not pay special attention to the appearance of such a pigtail, but the installation must be carried out according to all the rules.
In log houses, when installing this type of window frame, it is necessary to use a window sill board with a thickness of at least 65 mm.
In houses built from timber, the window sill board may not be used; in this case, the riser frames are cut into the underlying timber.
Installation of the pigtail
We begin installing the frame into the opening from the bottom crossbar (window sill). Then the top is inserted into the opening, under which we place the side posts one by one, placing them with grooves on the tenons.
We fasten the elements of the frame together with self-tapping screws and, if desired (not obligatory), coat the joints with sealant. We caulk the gaps around the casing with ordinary tow, but without much fanaticism, so that the parts do not bend.
We close the upper shrinkage gap with soft insulation such as Rocwool or holofiber. This operation is best done after installing windows and external trim. More details in the article “here”
>
Now you can begin installing the window.
Order casing inexpensively
The price of a joint is not small, but there is always a way to save. The casing installation season is spring and autumn. In winter, when it’s cold and no one really wants to build, the manufacturer may offer you a discount.
For this period of the year it is better to leave internal openings and interior doors. It is better to order a window frame in the summer at the height of the holiday season. During this period, not like in winter, but there is a shortage of orders from manufacturers and you can also place an order at a discount
Source: nareevo.ru/pages/okosyachka-dlya-derevyannogo-doma
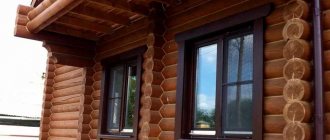
Installing a window in a wooden house
We install a wooden or plastic window, aligning it with the front edge of the frame. There is no need to place a window inside a third of the wall thickness, as is done in a panel or brick house, due to the lower thermal conductivity coefficient of wood (smaller freezing depth).
Moreover, given the small thickness of the walls of a wooden house, by deepening the window into the opening, we will be forced to trim the already narrow window sill. And the ledge that is formed as a result on the outside of the opening will have to be additionally closed and sealed. And as measurements taken with a thermal imager show, the main conductor of cold is the profile itself. For more details, see the photo report based on photographs from a thermal imager here.
Rough frame for cladding
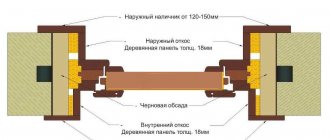
If you have calculated the dimensions of the opening and the frame as described above, then the installation gaps around the window frame when installing in a wooden house should be 15 mm on the sides, 15 mm on the top and 15 mm on the bottom (we do not make the bottom gap larger, because the stand profile makes it possible later place a plastic window sill under the frame, the thickness of which is 30 mm).
It is more convenient to attach the frame to the frame with the help of self-tapping screws of such a size that they fit into the body of the frame, but do not penetrate the wall. We drill holes in the frame with a drill with a diameter of 5-6 mm. Using self-tapping screws longer than the thickness of the frame is dangerous because they will pass through the frame and screw into the logs (timber), which is unacceptable.
Provided that all preparatory work has been done using a level, the window frame should fit exactly along the frame, i.e. the front edge of the frame should be parallel to the plane of the window, without noticeable distortions.
Waterproofing a window from the outside
Before foaming the gap between the window and the frame, we need to decide what material we will use to waterproof the installation seam on the street side. As you know, the two main enemies of foam are sunlight and water. If we can simply cover the installation seam with platbands or flashings from the sun's rays, then with waterproofing the situation is more complicated, because it must meet two basic conditions: not let water in and at the same time not prevent moisture vapor from escaping from the inside to the outside. Well, and, of course, waterproofing must be resistant to prolonged weathering.
All these conditions are met by materials such as PSUL, waterproofing vapor-permeable tape and special sealant “STIZ-A”. Sealant "STIZ-A" - a one-component, vapor-permeable acrylic sealant of white color for sealing the outer layer - is characterized by good adhesion to the main building materials: plastic, concrete, polymer concrete, foam concrete, plaster, brick and wood, among others.
It is also resistant to UV radiation, precipitation, temperature deformation and can be applied even at temperatures as low as -20 degrees. The only disadvantage of this material is that it is difficult to find in small containers, and buying a whole bucket makes sense when you are installing a lot of windows. If you choose “STIZ-A” as external waterproofing, then the procedure will be as follows: first we foam the window, then, after complete drying, we cut off the foam sticking out from the outside and after that, using a spatula, apply sealant to the cut.
Waterproofing vapor-permeable tape (self-adhesive butyl rubber tape consisting of a vapor diffusion membrane with an adhesive layer of sealant on one or both sides) is sold in rolls of different widths. In our case, a tape with a width of 70 mm is suitable. When using this tape as waterproofing, ensure it is oriented correctly when gluing.
You can determine this by blowing into it from one side and the other (don’t forget to remove the paper first). Since there is a membrane inside the tape, air passage is only possible in one direction. The side from which it is impossible to “blow through” the tape is the outer (street) side.
The sequence of actions (first the tape, then the foam or first the foam, then the tape) does not matter much, but you need to take into account that the foam, expanding when drying, not only stretches the tape with a bubble (it will interfere later when installing platbands), but in general it can tear it away from the window or frame.
Therefore, if you first stick the tape, then screw the platbands or hard strips on top of it immediately, and only then foam it. Or foam it first, wait for the foam to dry, cut off the excess and stick the tape on the same day so as not to expose the foam cut to prolonged weathering.
PSUL is a pre-compressed self-expanding sealing tape (similar to foam rubber), impregnated with a special composition, thanks to which it is waterproofing and vapor-permeable. Supplied compressed, rolled into rollers.
If you choose PSUL tape, then buy one that expands more than 30 mm. The PSUL will have to be glued not to the outer side of the frame profile, but to the end next to the front edge. This should be done after fixing the frame in the opening, but before foaming. Of course, it is more convenient to cover the frame with PSUL before installation, when it lies on the floor, but then the installation will have to be done at an accelerated pace, because after a few minutes the tape will expand and interfere with work.
The installation seam should be foamed only after the PSUL has completely expanded and closed the installation gap. But here the same problem is quite possible as with the waterproofing tape: the foam expanding as it dries can squeeze the PSUL out. This can be avoided by pressing the PSUL on the street side with platbands or flashings.
Internal vapor barrier of windows
On the inside, the foam should also not remain open to prevent moisture from entering it from the air in the room. To install an internal vapor barrier, you can use vapor barrier tape, which has already been discussed in the main section of this site, or use acrylic sealant SAZILAST-11 (“STIZ-B”).
The vapor barrier tape is glued to the end of the frame with a thin adhesive strip before foaming. Immediately after foaming, the protective paper is removed from the wide adhesive strip, and the tape is glued to the pigtail. Before the foam under the tape hardens, it is advisable to immediately install the window sill and screw the starting profile to the edges of the frame, otherwise later the tape “bloated” with foam will interfere with this.
Sazilast is applied to the hardened foam, or more precisely, to its cut. In this case, it is no longer necessary to rush to install the window sills and the starting profile, as when using tape. Nothing will prevent you from doing this later, when it is convenient.
Interior decoration
The interior decoration of a window in a wooden house (window sills, slopes) is not much different from the decoration in a panel or brick house. It’s even a little simpler here: you don’t need to drill holes to install the slopes - we fasten everything with self-tapping screws into the wood (into the frame).
There is also no need to additionally insulate the slopes from the inside with foam plastic or other material. To be on the safe side, before installing the slopes, it is enough to foam the inner surface of the casing with a narrow strip next to the installation seam. This will be enough, because wood does not freeze as deeply as concrete or brick.
How to make slopes has already been described on the pages of this site. I want to propose a slightly different method of finishing a window in a wooden house, or rather, refuse to install a plastic window sill and any panels, and instead use the window frame itself. This method is not innovative; a lot has already been said about it on the Internet. I want to share my experience and tell you how we do it.
Like a window sill and slopes
This method of installing a window in a wooden house allows you to save on slopes and window sills, gain time and achieve, in my opinion, a greater aesthetic effect, but for this you will need a good woodworking machine to evenly cut out the so-called reverse quarter on the casing elements, which will be install a plastic window.
What a reverse quarter is can be easily understood from the figure. This is the recess into which the window frame will be installed on the street side. The depth of the quarter is 20 mm. The width is made exactly corresponding to the thickness of the frame, for example: a 5-chamber VEKA has a profile thickness of 70 mm, therefore the width of the reverse quarter should be 70 mm.
It is important to accurately calculate the dimensions of the frame and the window, carefully assemble the frame and install the frame in the opening exactly at the level - the internal clearance should have the shape of a regular rectangle, and all edges of the outer edge should be located in the same plane without distortion. In order not to make a mistake in the dimensions, it is better to first make and install the window frame, and only then accurately measure and order the plastic window locally.
Interior decoration
The interior decoration of a window in a wooden house (window sills, slopes) is not much different from the decoration in a panel or brick house.
It’s even a little simpler here: you don’t need to drill holes to install the slopes - we fasten everything with self-tapping screws into the wood (into the frame).
There is also no need to additionally insulate the slopes from the inside with foam plastic or other material. To be on the safe side, before installing the slopes, it is enough to foam the inner surface of the casing with a narrow strip next to the installation seam. This will be enough, because wood does not freeze as deeply as concrete or brick.
How to make slopes has already been described on the pages of this site. I want to propose a slightly different method of finishing a window in a wooden house, or rather, refuse to install a plastic window sill and any panels, and instead use the window frame itself.
This method is not innovative; a lot has already been said about it on the Internet. I want to share my experience and tell you how we do it.