You can increase the window opening both in length and width. You can also combine two adjacent windows by eliminating the partition between them. This will allow you to install one panoramic window, which will let in much more light into the house.
A house with large windows is the dream of many. The size of window openings in existing old-type buildings is often too small. On the other hand, the modern market offers a wide range of panoramic designs, which become a great temptation for the homeowner. However, it is worth considering that people's expectations may not always be realized in this particular project. The WINDOWS MEDIA portal will tell you how to enlarge the windows in your house. One way to modernize an old house is to replace the windows facing the garden with larger structures. How large they can be depends both on the planned repair and on the capabilities of the profile systems. Dreams of large windows occupying almost the entire wall of a building cannot always be realized. This should be kept in mind by investors and architects who realize the needs of clients in the renovation process. Windows have a limited size, exceeding which can pose a danger to the structure of the building and its occupants.
Installing plastic windows in an old wooden house yourself
Installation of plastic windows in an old wooden house can be carried out according to standard instructions for such work.
However, old houses have one feature that can be considered a big advantage over newly built houses - the old house no longer shrinks. In this case, there is no need for large gaps that are left for shrinkage of new houses. Sequence of work:
- Preparatory stage - dismantling the old window, adjusting the size of the opening for the new window;
- Manufacturing of casing
- Window installation
Preparatory work
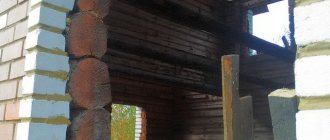
If the house is old, then most likely the old windows were made of wood. Such windows are dismantled using a crowbar. If necessary, the old window is sawn. The doorway is completely cleared and inspected to determine the condition of the logs.
Important!
If the house is old, then when windows were first installed, most likely, the window opening was not treated with antiseptic impregnations, which protect the wood from rot and bugs.
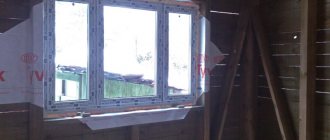
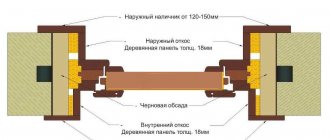
The old casing in the doorway is usually not suitable for a new window - it is either damaged or does not fit the size of the new window of the desired size - about 2 cm are left between the window frame and the casing on each side. If you use old casing, the window may turn out to be too small. Therefore, the old opening is expanded taking into account the size of the new plastic window.
New opening dimensions:
- Width - 220 mm is added to the width of the plastic window, which takes into account the thickness of the new casing beams (2 * 100 mm), the gaps between the frame and casing are 20 mm on each side, 15 mm on each side for jute insulation. The allowance is reduced by 50 mm due to the insertion of the tenons of the side openings of the window into the casing beams;
- Height - 245 mm is added to the height of the window for installation gaps under the frame and above the window frame, the thickness of the casing beams is taken into account. For an old house, they do not make a gap for shrinkage above the top beam of the casing.
Attention!
If there are even slight doubts about the possibility of shrinkage of the house, then it is better to leave a small gap of about 45 mm above the upper beam of casing to compensate for possible shrinkage.
Adjusting the size of the old opening
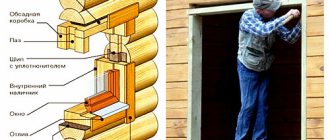
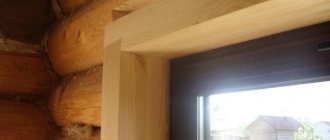
Manufacturing of casing
The casing must be installed even if the house no longer shrinks at all. The casing is needed to fix the linear dimensions of the opening.
Attention!
For casing, use only well-dried wood that will not shrink.
Tenons are cut out at the end of the logs on the side parts of the window opening, and recesses are cut out in the side beams of the casing, the size of which exactly matches the size of the tenon.
After trying on the beams, the opening is treated with an antiseptic impregnation and before laying the casing beams, a jute seal is secured with a stapler.
Laying jute seal
The casing beam is laid on the lower part of the opening with a sealant, then on the upper part of the opening. The side casing bars are installed last.
Before installing the side bars, sealant is applied to the joint. All gaps that were left above and below the casing are sealed with tow.
Window installation
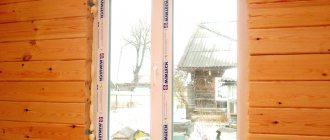
Before installation, the window frame is aligned along the front edge of the casing and fastened to the casing with self-tapping screws so as not to go through it completely and not go deeper into the frame. According to the instructions for installing plastic windows, a gap should be left under the frame, which is then filled with foam.
Installation of a window with a gap under the frame
After the polyurethane foam has hardened, the excess is cut off with a knife, waterproofing work is carried out, and trim is installed.
Purpose of casing and its types
The tree reacts to drying unevenly. The linear dimensions change most of all across the direction of the fibers, while the longitudinal dimensions remain almost unchanged. When a wooden house made of logs or beams shrinks, the height of the wall and, accordingly, the height of the openings (windows, doors) decreases. To prevent the window from “shrinking” and its movable sashes from jamming, install a rough wooden frame - casing.
It compensates for the effect of shrinkage due to the following factors:
- sliding method of vertical fastening to the wall in the opening;
- the gap between the top board of the rough frame and the top rim of the opening itself;
- using exclusively dry wood for staking, which has already passed the drying stage.
There are different types of sockets, differing in the way they create a sliding fastening. Although the basic principle of fixing the casing frame in the opening is the same - it is a “tenon and groove” type connection.
The following options can be distinguished:
- Grooves are cut at the ends of the side walls of the opening.
The casing frame is made in advance from ordinary planed boards. Embedded bars are prepared for it, the cross-section of which should be less than the width and depth of the groove.
The bars are placed in grooves so that they slide freely in them. The casing frame is attached to the bars.
The advantage of this method is its ease of manufacture. Disadvantages are the gap between the embedded bars and the casing, as well as the risk that the screws may come out from the side of the block and jam it in the groove of the opening. - Grooves are cut in the side walls of the opening. For the side posts of the casing frame, a profiled block with a “T-shaped” section is used.
The frame is assembled on site (in the opening itself), placing the pins of the side posts into the grooves of the opening.
The advantage is the absence of gaps in the casing frame. The disadvantage is the complexity of assembly. - Spikes are cut into the side walls of the opening.
Grooves are made in the side posts of the casing frame. The casing is assembled on site.
The advantages and disadvantages are the same as in the second option.
The nuances of expanding windows
Depending on the design idea, the expansion can be vertical or horizontal. Both options require a professional approach and consultation with design organizations. Do not carry out repair work yourself unless you have the appropriate qualifications.
Vertical expansion - combining rooms or a room with a balcony. The window opening is enlarged due to the complete demolition of the wall or part of the wall with a window sill. In this case, the heating battery is installed in a new location and there are certain rules:
- You cannot move the radiator to a balcony or loggia. The only option is to place the battery on the opposite wall, inside the room.
- After redevelopment, the balcony area of the apartment will still be considered non-residential and will be listed as non-residential premises in all documents.
Please note that in most multi-storey buildings, the wall between the room and the balcony holds the balcony slab and its demolition can cause extensive damage to the building, and casualties are not excluded.
Avoid the collapse of walls and ceilings! Experts insist: you can remove the window and door frames, but you don’t need to touch the partition itself. From the window sill you can organize either a table or a bar counter.
Horizontal expansion of a window opening is an increase in the window structure only in width. Whether it is possible to increase the window opening in an apartment in a similar way should be decided by specialists, since reinforcing elements for the facade may be needed. Entrust the calculation of parameters to trusted builders to avoid any cracks, chips and collapses.
Complexity and pitfalls
Wood is a living material that constantly breathes. After installation on the foundation, the log house must stand from several months to several years before it is subjected to subsequent finishing. Shrinkage can reach 15% of the height of the frame.
Even after shrinkage, in a house that has already been completed, the wood will still continue to breathe. Wood absorbs moisture and releases it depending on the state of the environment and air humidity. The permissible values for changing parameters are 1 centimeter per 1 meter of wall height, that is, a one-story log house will move by 2-2.5 cm, a house or bathhouse with two floors will be up to 5 cm.
When a house breathes, the geometry of the object may be disrupted. The weakest points are window and door openings, since the size of the metal door leaf, window frame and glass does not change. During construction, shrinkage and operation, it is important to ensure that these elements have a rigid and unchanging shape.
Do-it-yourself window replacement
If the house is no longer new and it’s time to change the windows, everything needs to start with careful measurements in several places: few window openings have ideal geometry and the same dimensions. It doesn’t matter what the walls are made of, they “floated” at least a little, and after them the openings changed.
The first step is to dismantle the old window. Everything needs to be deleted
Dismantling and assessing the condition of the opening
After removing the old frames, it is necessary to remove the plaster and polyurethane foam. Either the wall should be exposed, or wooden planks should appear - mortgages, to which it is more convenient to attach the frame.
Mortgages are not a mandatory element of window design, but they are easier to work with. So, if there are wooden planks, we evaluate how damaged they are. If the wood is not rotten or splintered, this is a good sign. Let's check further: take the awl and drive it in about a third of the length. If it doesn’t go in even with a swing, or it’s hard to pull it out - only with pliers or by pushing and pulling hard, then the wood is suitable for further use.
If everything is wrong, you will have to change the mortgages. You remove the unusable ones, install new ones in their place, secure them with nails, self-tapping screws, dowels - depending on the material of the walls, and lay them with mortar (hence the name - mortgages). One point: the bars must be soaked with antibacterial compounds or hot drying oil.
Repair of window sashes and fittings
Next, you should carefully inspect all the sashes removed from the frame. If possible, it is better to remove them so that they do not interfere with you during grinding work.
Also pay attention to the condition of the fittings. As a rule, it is better to replace it with newer, anti-corrosion fittings from old and unsightly ones. This way you will get rid of creaks, cracks, and your windows will simply look neater, they will be easier to clean, and they will illuminate the rooms brighter.
Old putty on windows should also be removed (as a rule, it is petrified and no longer performs its function). In recent years, special acrylic or glass silicone has been used to thoroughly seal the joints between the glass and the window frame. And only then putty is applied, which holds the glass in the frame.
The advantage of acrylic is that it can be painted in the desired color. It is also recommended to consider additional window trim with decorative wooden slats, which will hide the seams and add charm to your windows. Once the acrylic is dry, you can begin painting the windows, first protecting the seals and other elements with masking tape.
Technological stages of casing installation
For successful installation of the pigtail, compliance with the technology will be a prerequisite:
- an opening is cut in the wall, which is located at a height of 80 cm from the floor;
- a groove or ridge is cut out - this depends on the type of casing chosen;
- all wooden elements are impregnated with an antiseptic solution;
- insulate the opening around the perimeter using thermal insulation materials.
The casing is installed with mandatory compliance with the technology
To order the manufacture of plastic frames, measurements must be taken after preparing the opening and installing the casing . This avoids incorrect sizes.
Sealing an opening in a new building
Sometimes the question arises, how to seal a window in a wooden house if it has just been built? The reasons may be different: the owners decided to make changes to the project or purchased the structure at a low price and want to modify the design themselves. Unlike an old building, in this case shrinkage has to be taken into account.
The new log house must “sit down”, so its height will decrease. Rigid fastening of any structures to walls is impossible. When shrinking, this can lead to cracks in the logs and other deformations.
The simplest solution to the problem in this case will be the frame method described above. The unnecessary window is removed, but there is no need to disassemble the frame. The frame is installed not in the opening itself, but in the frame of the frame, fastened to the wall using a tongue-and-groove system, and the nails for fastening the frame should not go into the wall.
After this, a lining or block house is attached to the frame in the same way, covering the hole. The internal space and all cracks are filled with insulation, then the cold will not penetrate through the opening. You can install false window shutters on the outside; the inside of the wall is sheathed with clapboard, plasterboard or other materials.
The increase in window openings is not limitless
When planning to increase window openings, it is necessary to follow certain principles. Oversizing your windows over time can lead to unsightly bulges as well as problems associated with their use.
The segmentation of large glazing is determined by its design or fittings that support the opening and closing of the windows. A smaller number of elements in a window allows for a larger glazing surface. This helps improve visual contact with the surrounding landscape and reduces the cost of this window.
The structural elements of the window (frames) with fittings to support the movement of the sashes are the most expensive part of the window. If it is important to combine the interior with the garden without optical barriers, then it is better to choose windows with large sashes without structural divisions.
A large window without imposts may be blank. This ensures unobstructed visual contact with the garden area. Exit to the outside and ventilation of the room is possible thanks to the side opening terrace doors. A comfortable temperature in the vicinity of solid panoramic glazing can be provided by a duct heater or a heating double-glazed window. Restrictions on the permissible window size are aimed primarily at ensuring the durability of the structure and user comfort. Thus, before increasing the window opening, it is worth considering that the manufacturer will not always be able to satisfy the customer’s requirements. He must strictly adhere to his system catalog and can only implement large glazing designs within the permissible limits.
When to cut openings?
There are only three options:
Cut a blank frame, cut out openings after shrinkage;
Cut the frame taking them into account, carry out casing after shrinkage;
Cut the log house taking into account the openings and carry out the casing immediately.
Each method has its pros and cons.
Solid log house without windows and doors
One of the most controversial options, as it has a number of pros and cons that balance each other.
The log house is made in the form of a blind box. It will perfectly hold the geometry and shrink evenly along the entire height of the wall. When designing openings, you can achieve maximum accuracy, since they are cut out only after the object has settled on the foundation. Holes for future windows and doors are marked in place, for a specific structure.
The disadvantages include greater consumption of material, which leads to higher prices already at the stage of purchasing logs. The lack of standard window and door openings forces us to resolve the issue of organizing the ventilation of the facility. Without passages, air exchange in the interior of the log house becomes difficult. The log house simply will not dry, and fungus may form because of this.
The craftsmen who cut the log house will not be able to immediately install structures for filling the openings, which means that they will have to return to this work after a while and overpay the team for visiting the site.
A blind log house is an additional complication in the felling process. Once a certain height of the wall is reached, getting inside the object becomes problematic. It is necessary to organize technological passages or come up with additional auxiliary structures.
This method for log and inset structures would be the best case scenario. But for the customer and the builder it is extremely costly and difficult to implement. Maintenance of the log house during shrinkage turns into a separate quest.
Log house with openings, but without casing
One of the most common solutions due to the price-quality ratio.
Window and door openings are immediately included in the project and implemented at the time of cutting the log house. The log is calculated and purchased taking them into account, which reduces the cost.
It is impossible to leave the opening completely without casing during shrinkage. Therefore, after designing the future locations of windows and doors, rough casing is done. A groove is cut into the vertical ends of the opening into which a guide block is inserted. The casing box is attached to this block.
Rough casing is necessary to maintain the geometry of the opening during shrinkage. The guide bar prevents and/or minimizes the horizontal movement of logs and does not interfere with the shrinkage of the log house, that is, the vertical movement of logs. During operation, the jamb prevents direct pressure from the logs on the window or door structure and is responsible for maintaining rigidity in the horizontal plane.
Even the installed rough frame does not always allow maintaining the ideal geometry of the opening, so during shrinkage these places are reinforced with installation logs. This procedure is almost mandatory for doorways and large windows.
Remaking door and window openings in a log house
Question:
Hello. Is it possible to order an individual consultation on a log house from you? Is this possible based on detailed photos? Cost of consultation? We bought a plot with a log house already installed, at the moment we have questions, since we want a different arrangement of door and window openings than the previous owner planned. There are no openings yet. Thank you.
Nikita Smetanin, Chelyabinsk.
Answer:
Hello Nikita from Chelyabinsk!
There are situations in life when, after the construction of a log house and preliminary outlines of the location of door and window openings, it becomes necessary to change the layout of the premises.
What sometimes happens when the owner of a log house changes (sale to new owners, transfer to relatives, etc.) And the new owners, and sometimes even the oldest owner, have changed the plans for the arrangement of the premises and the previous layout does not fit into the previous plans for the placement of windows and doors.
It becomes more difficult when the openings have already been cut, but they need to be moved, with partial or complete sealing of the previous ones. Because then the structural strength of the log house walls can be significantly compromised.
In each such specific case, a decision is made on the location.
And one more feature. When assembling log houses using the correct construction technologies, the crowns (it makes no difference whether the frame is made of logs or beams) must have dowels along their length, which prevent them from moving to the sides (external or internal), and also thoroughly strengthen the walls.
In 1998, we had to assemble a huge log house with a huge attic above it. The total area was over one and a half hundred square meters. Regular timber with a section of 150*150 mm. The difficulty was that one team began to assemble it, which then, due to disagreements with the tight-fisted owner, parted with it. By what principle the dowels were located in the walls of the log house was completely unclear. There were no marks on the walls indicating their presence, and the owner did not know about them either.
Therefore, when they began to cut out window and door openings in the walls of the log house, they repeatedly fell directly on these dowels.
And this is not good, but there was nowhere to go. Then I had to play around with everything by installing a casing frame and reinforced platbands made of thick edged boards. Which were attached to most of the crowns of the log house.
That is, immediately after cutting out each opening, you should install both the frame and platbands (the latter can be temporary, which are then replaced with permanent ones).
The main rule in this case is that the openings should be no closer than a meter to the corners of the log house, otherwise there may be problems with its strength. It is better to place the openings closer to the middle of the walls.
In addition, it is optimal when there is no more than one door or window opening in the wall, although this does not always work out.
Under the openings (especially doorways) there should be a crown of solid logs or beams, without any cuts. Sampling of sections of wood under such openings is allowed extremely rarely and no more than 1/3 of the cross-sectional area of the element. That is, for example, if the diameter of the bottom log is 30 centimeters, you can remove no more than 10 centimeters from above. Otherwise, the structural strength of the lower casing will be significantly compromised, which can lead to deformation and even fracture of the log (timber).
On top of the openings there should also be solid logs (beams) of the frame. Because the elements of the roof rafter system rest on them.
Regarding consultations, it is better to naturally invite a construction specialist to the work site. It is not always possible to clearly present a detailed picture from photographs.
However, you can send photos. I will help as much as I can. Regarding the payment (and its amount) for consultations, I am not indulged in this, so it is at your discretion.
In any case - good luck!
Construction in Moscow and Moscow region
We work with a guarantee! Wide range of construction services. Foundation, walls, ceilings, roofing, turnkey! +7 (905) 797-20-34
luxurykomfort.ru
Other questions on the topic of metal and interior doors and windows:
- Doors
- Window
Doors
- DIY wooden doors
- Steel door
- Flood doors
- Insulating the front door
- Decorate doors instead of a cross oven
- How to cut large arches in a log house
- Remaking door and window openings in a log house
- How to beautifully seal shrinkage window openings in a log house
- New doorway in an old log house
- What to make roller shutters for the door on the porch
- Painting an MDF door
- Height difference between extension window openings
- Door in the end wall of a log house
- Installing a door in an opening made of gypsum blocks
- Installing an iron door in a wooden house
- Widening a doorway in a log house
- Casing for a door in a 90 mm timber wall
- Openings in a house made of chopped logs
- Is it necessary to make a pigtail?
- Replacing a door deck in a log house
- Which internal doors are better for a timber house?
- Double door instead of a vestibule in the house
- Wooden entrance door sticking
- Installation of doors and windows in a finished log frame
- Arch in the fifth wall of the log house
- Make a joint in a built timber house
- Installing a door in a plaster wall
- Installation of doors in an opening made of tongue-and-groove gypsum boards
- Internal slopes of entrance doors
- Move a doorway in a log wall
- How to move a doorway in an adobe house
- How to paint a bathroom door
- How to cover MDF overlays of a metal door
- Repairing a wooden door after a flood
- Wooden entrance doors get wet and freezing
- Repair of interior wooden door
- Installing a metal entrance door to a breathing house
- Installing a metal door in an old timber frame
- Entrance door in a log house
- Installation of a metal door in a log house
- How to cover an MDF front door
- How to make a door for a country house
- Wooden doors have dried out
- How to fix a warped door frame
- How to strengthen doorways in an adobe house
- How to make cabinet doors from clapboard
- Moving an interior door in a frame-and-fill house
- Mounting beam in window and door openings
- Wooden door repair
- Wooden entrance panel doors
- Installing a metal entrance door in a log house
- Window and door openings in a timber house
- How to process wooden interior doors
- Repairing an old wooden door
- How to make an entrance door?
Window
- Wooden windows
- Do-it-yourself wooden trims
- Installing a window in a slag concrete wall
- Is casing necessary for small log windows?
- How to seal the gaps between the frame and the window frame
- Vapor barrier for window slopes made of sandwich panels
- Panoramic windows in a timber house
- Restoration of wooden platbands
- Plastic balcony window in a timber house
- Lintels over window blocks
- Insert windows and doors until the log frame shrinks from the cylinder
- Installation of stained glass windows in a timber frame
- Leaking through the top window casing
- Plastic windows in a tourist house
- Reducing the window opening in a timber house
- Natural humidity beam for window frames
- Installation of plastic windows in a slag-cast house
- Installation of windows in profiled timber 200 by 150
- Wooden windows and doors in a frame house
- Installation of plastic windows in an adobe house
- Replacing wooden windows with plastic ones in an old frame
- Finishing window openings with siding
- How to make windows in a brick basement
- Installation of plastic windows in a panel house
- Window installation in Kolomna
- Installation of doors and windows in a finished log frame
- Condensation on plastic windows
- Make a joint in a built timber house
- Where to buy a square bead
- Dampness after installing plastic windows
- How to remove an old bead on silicone
- The timber under the plastic window is rotting
- Window opening in a log house - how to seal it
- Attaching a hanging flower box to a window
- Installation of a roof window under bitumen shingles
- Replacing windows on the veranda of an old house
- Blowing through plastic windows
- Make one window out of two in an infill house
- Glazing beads for wooden windows
- Distance from the corner of the frame to the windows or doors
- Installation of an attic roof and windows in a log house
- Slopes for plastic windows in a gas block wall
- Platbands with protruding piping
- Make a window in the wall from timber
- Plastic windows in a log house
- Slopes for plastic windows
- Stages of painting a wooden window
- Prices for installing plastic windows
Doors, windows
Construction in Moscow and Moscow region
We work with a guarantee! Wide range of construction services. Foundation, walls, ceilings, roofing, turnkey! +7 (905) 797-20-34
luxurykomfort.ru
Other questions on the topic of log houses:
- All about log houses
- Replacing logs in log houses
- About caulking log houses
Replacing logs in log houses
- Cost of replacing the top rims of a log house
- Replacing a cut-off wall with foam blocks
- Replace half a wall in a log house
- Replacing a rotten wall of a timber house
- Replacement of lower crowns and cracks in logs
- Replacing the lower logs of an already sheathed house
- Rotten places in logs
- Vertical log house made of round timber
- What to do with rotten logs from a log house
- Rotten crowns in the middle of the wall
- Replacing a log frame with a brick or block
- Replacing the lower crowns of a log house
- Replacing rotten crowns with bricks
- How to strengthen a corner in a log house
- When you need a fifth wall in a log house
- Vibrations in the log house
- Remove the three lower crowns of a log house
- Replacing a wall in a log house
- Replacing the lower crown with brick or foam blocks
- Joining logs of different diameters
- Replace the corner of a log frame with sleepers
- Replacing the lower crowns of a log house with a concrete wall
- Rotten log in a log house
- Restoration and cladding of a timber frame
- Reconstruction of an old log house
- Replacing a rotten corner of a house
- Repair of rotten beams in a log house
- Replacing the lower crowns of a log house with blocks
- Replacing rotten logs of a log house
- Replacement of the lower crown of the house
- Replacement of a main wall made of timber
- Transfer of logs in height in a log house
- Alignment and replacement of the lower crown of the log house
- Replacing rotten logs under the window with blocks
- 2 corners rotted at the level of the log house windows
- Cost of work to replace the top rims of a log house
- The log house is rotting next to the vent
- The wall near the log house in the five-wall building has rotted
- Repair of old logs
- Replacing a log house wall with a foam block
- Replacing the lower crown in a wooden house
- Replacing logs in a log house
- Replacing logs eaten by insects
- Replacing the lower crown of a timber frame
- Replacing the lower crowns in the house
- Replacing the top rotted crown of a log house
- Replacement of the lower crowns of the bath
About caulking log houses
- Caulking log corners
- Rules for caulking a log house
- Caulking of an old log house
- Cold corners in a log house
- Caulking and insulation of a log house
- Caulking a log bathhouse over old moss
- How to caulk a log house covered with clapboard
- Should tow for a log house smell?
- How to fix a chopped pediment
- Re-caulking of a log house
- Caulking and log processing
- Re-caulking the bathhouse with moss
- Calculation of the amount of jute for caulking a log house
- Caulking of a log house lined with bricks
- Caulking tight logs
- Dismantling inter-crown insulation
- Log caulking
- Log house for three years in the open air without a roof
- Re-caulking of a log house
- The basics of caulking a log house
- Caulking and sanding of a log house
- Caulk of a log house from the inside
- Do-it-yourself log caulk
- Caulking of a log house made of rounded logs
- Sanding timber
All about log houses
- Log house made of logs or timber?
- Estimate for finishing the log house
- Is it possible to sand a raw round log?
- Strengthen the corner of the log frame from the gun carriage
- The wall of the log house is collapsing
- Forced shrinkage of the log house
- How to fix a crooked timber frame
- The lower crowns of the log house are getting wet
- Correction of a 9-year-old log house
- Rot between the crowns of a bathhouse log
- The frame sank and the window jammed
- Led walls made of profiled timber
- The crown of the log house was turned out
- The dovetail insert moves apart
- Construction of a log house in the South of Russia
- Painting the outside of the log house
- Is casing necessary for small log windows?
- What to do to prevent the log house from twisting during shrinkage
- The quality of the log after 5 years of settling
- Protection of the sauna frame
- Rebuilding an old log house
- Strengthening the fifth wall of the log house
- Bathhouse gables made of rounded logs
- The top crown of the frame was torn out
- How to cut large arches in a log house
- Remaking door and window openings in a log house
- The partition made of logs was torn out
- Repair of an old log house
- Finishing the log bathhouse immediately after installation
- Which interventional insulation to choose
- Lining crowns made of logs with natural stone
- How to beautifully seal shrinkage window openings in a log house
- Tiles and laminate for log floors
- Ceramic tile floors in a log house
- Strengthening the log house
- Align the crown for installation of ceilings
- How to coat a log house after sanding
- Editing the geometry of a log house
- How to install profiled timber in a log house
- Installation of crossbars in a timber house
- New doorway in an old log house
- Reconstruction of a log house
- The bottom beam on the plinth gets wet from the inside
- Treatment of the log house before cladding the outside
- The walls of the log house got wet through and through
- The first crown of a log house made of oak
- Insulation of the stone base of a log bathhouse
- Overcut in the house
- Basement and blind area for an old shrunken log house
- Uneven shrinkage of the frame
- Repair of an old 2-story log house
- What kind of foundation for a 6 by 8 log house?
- How long does it take for a log house to shrink on a pile foundation?
- Increase the height of the log house without removing the roof
- Wind protection between the foundation and the log house
- Problems when lifting an old log house
- Insulation of a log house with sawdust and lime
- How to lay a log house from timber of poor geometry
- Pouring a concrete floor in a log house
- Interfloor ceiling in a log house
- Waterproofing the log house from the foundation
- Renovation of an old log house
- Repair of an old brick-lined log house
- How to strengthen a log house
- When to put a roof on a freshly assembled timber frame
- When to cover a log house with natural humidity
- Support under the log and shrinkage of the log house
- Beetles in logs
- Door in the end wall of a log house
- A team for the construction of a log bathhouse
- The cut of the log on the outriggers of the log house darkens
- Rot on the lower crown of a log house
- Vertical log house
- Which finishing plaster for clay to choose
- Mushrooms on a log house
- Log house without frame and floor beams on slab
- Dry rot of the lower crown of a timber house
- The upper corner of the frame has been removed
- Demolition of a log house wall
- Displacement of profiled timber in a log house
- How to build up log extensions of a log house for a veranda
- The log house was mowed down
- Installing a shrinkage compensator in a finished log house
- Twisted the logs of the log house before assembly
- Log house with nails instead of dowels
- How to protect a log house without a roof from rain
- A set of works on the external finishing of a log house made from central fiber boards
- Repair of a log house after a fire
- Is it possible to put a roof on a log house for the next year?
- Warm joint with sealant for log house
- Insulation and cladding of a log house made of corrugated timber
- Insulation of a log house from the inside
- Concrete floors in a log house
- Shrinkage of log walls old and new
- The procedure for finishing a log house
- How to preserve timber from spring to winter
- What comes first: flooring or door casing
- Dismantling half of an old log house
- Types of beam connections
- Sealing the joint between the roof and the frame from OCB
- Cleaning a log house from old paint
- Connection of two log houses
- Support column in a log house on stilts
- The difference in the shrinkage of a log house between winter and summer felling
- Dismantling and moving a house made of profiled timber
- Supporting floor beams in a log house
- Preparing a log house for winter
- Guarantees when cutting a log house on a plot
- Chop into a bowl or warm corner
- How to lower the ceiling in a log house
- The timber turned blue in the rain
- Preservation of the log house in a non-temporary gathering place
- Consultations on a timber house
- Sheathing of a house made of cylinders without insulation
- Scheme of a log house with outlets and a ridge roof
- How to lay a carriage while lying down
- Reinforced concrete slab on a log frame
- How to assemble a log house from twisted timber
- Repair of a cut in a log house
- Installation of a log house on a columnar foundation
- The chopped gables of the log house are shaking
- Fastening beams in a log house
- The top beam in the log house was driven into the screw
- How to cover a timber façade
- Waterproofing the frame of an old house from the foundation
- A log house without nails is being pulled apart
- Sheathing a log house
- Cutting the lower crown in the log house
- Settlement of a log house made of used timber
- The log house rotted in the castles
- The corners of the log house are rotting
- How to strengthen a log house
- Work plan for interior finishing of the log house
- Log processing procedure
- How to lay a log house in the rain
- Cut the lower crowns of the log house
- Sheathing a log house immediately after construction
- Heating and windows in a new log house
- Processing the crown of an already built house
- Painting a timber house
- Blind area and shrinkage of the log house
- How to enlarge a house made of timber
- Connecting a timber house with a brick extension
- Finishing a timber frame with jute rope
- Diameter of a log for a permanent home
- Treating the log house with an antiseptic during assembly
- Reconstruction of a wooden house
- Connecting timber in cuttings
- Protection of the ends of the timber at the corners of the log house
- How to connect two log houses together
- Cutting a balcony doorway in a log house
- When to casing a newly assembled log house
- Insulation of gables made of lining
- Gaps between the logs of the log house pediment
- How to preserve logs before cutting a log house
- Raise the frame to increase the ceiling height
- Methods for joining timber in the walls of a log house
- Raise a log house to increase the underground floor
- Cladding a log house with clapboard before shrinking in winter
- When to remove the compensating jacks of a log house
- Log house for three years in the open air without a roof
- How to make a cut in a log house
- Make a house from an old bathhouse (timber)
- Moving the log house to another location
- Log house hanging on dowels
- The fifth wall in a log house made of smaller timber
- Should I paint the backing board in a log house?
- Remove mats to increase log ceilings
- The log house does not match the foundation
- Ceiling mats in the log house
- Construction from fire monitors
- How to remove bark from an already assembled aspen log house
- Transporting an old log house
- Connecting internal timber walls with external ones
- How to repair cracks in a log
- Gap between log and foundation
- Alignment of the first crown of the log house
- Stages of arrangement of the assembled log house
- Treatment of the log house after installation in the summer
- Processing the ends of the frame from the outside
- The log house floated - the walls moved
- An old wooden house sank
- Leveling the crowns when assembling a log house
- How to close the opening between the log house and the foundation
- How to straighten a log house
- Sheathe a log house with protrusions with corrugated sheets
- How to process the ends of a log house
- Collecting the first crowns of a timber frame
- Riser frame
- Preservation of the log house during assembly in rainy times
- Forgot to waterproof the log house from the foundation
- Installation of log shrinkage compensators
- Interventional gaps in a house made of profiled timber
- Gaps between logs in a house
- Communications and finishing in a timber house
- Precision when cutting log houses
- Which log house will be warmer?
- Log house made of timber 200 by 120
- Old log house - reconstruction or demolition
- Partitions in a log house
- Internal partition in a log house
- Beginning of finishing of shrunken timber frame
- Double timber construction technology
- Processing the log house from the outside
- Log shrinkage process
- The walls of the log house collapse during shrinkage
- Insulation of a log house from the inside
- How to build a house from sleepers
- The logs were kicked out of the log house
- Supports (pillars) instead of crosscuts in a 9x10 house
- Do-it-yourself timber log house without experience
- Preservation of a house made of rounded logs for the winter
- Embed additional beams into the frame
- Backing crown - installation tricks
- Log house on brick walls
- Sequence of work in the log house
- How to make a load-bearing partition in a log house
- The log house got wet during assembly
- How to seal cracks in a log house
- Align the vertical wall of a log house
- Vents in timber on foundation
- Timber 200 by 200 construction nuances
- The log house turned blue, what should I do?
- How to seal cracks in cutouts from the outside
- You can live on the second floor of a log house for shrinkage
- Replace rotten logs with mortar
- A non-load-bearing log has shrunk
- Replacing logs with boards in a house project
- Vertical supports in a log house for shrinkage
- Does a large log house need recutting?
- Metal tiles on a non-shrunken log house
- Permissible gaps between timber crowns
- Gaps in log beams
- Replacing parts of rotten logs in a log house
- The logs of the log house are shaking
- The log house was poorly assembled
- The gap between the log log and the foundation
- Protect an unfinished log house for the winter
- How to save a log house without a roof
- Log finishing service
- Assembling a profiled log house in the rain
- Gaps when fastening profiled timber
- Sealing cracks in a bathhouse
- Processing timber with a blowtorch
- Butt beam - is it reliable?
- The wall of the log house is littered
- How to align protruding ends in a built timber house
- Transferring beams in a log house in height
- The corners of the log house disappear from the timber during assembly
- The log house is wet, what should I do?
- Does a log house need a fifth wall?
- How to assemble a log house 10 by 11
- Restoring a log house after a fire
- Processing of a log house made of rounded logs
- Extension of a log house when replacing the roof
- Sand under the crowns for insulation
- Methods for lifting a bath to replace the crowns
- Impregnation of the log house inside and out
- The façade of the log house leaned
- Log shrinkage - problems
- Treatment of timber against bugs
- The smell in the house is from sleepers
- How to preserve the light color of a fresh log house
- Estimate for a house made of timber 7 to 9
- Treatment of exposed ceiling beams
- Strengthening the corner of a log house
- What is the dowel pitch?
- Protection of the lower crown of the log house
- How to check the diagonals of a log house
- Which timber to choose, square or rectangular?
- Spruce and pine log house
- Sequence of work when finishing a timber house
- Insulate an aspen log house from the outside
- How to install a casing on a log house
- What to put between the crowns
- Should I trim the paws of a log house?
- What is the best way to impregnate a log house?
- Window opening in a log house - how to seal it
- Gaps in the assembled frame
- Support pillars in a timber house
- How to move the 5th wall in a log house
- Ants and the lower crown of the house
- Sanding and processing of the log house after installation
- Barked or planed log for log house
- Repairing the corner of a log house of an old wooden house
- Should window openings in a log house be closed when it is in storage?
- Consultation on the size and shape of the log house
- Questions about construction from profiled timber
- Log house and foam block on a single slab
- Preparing an unfinished log house for winter
- Longitudinal cuts in a log house
- Cracks in the ends of logs
- Should I paint a log house with tikuril?
- Strengthening the corners of the log house
- How to secure a cross beam in a log house
- Ventilation gap between insulation and frame
- Moss or tow for building a log house
- Shrinkage of a timber house
- Fifth wall in the log house
- How to raise a 6 by 6 log house
- Distance from the corner of the frame to the windows or doors
- How to cut off the protrusions of the corners of a log house
- Log house without nails
- How to clean a linden bathhouse from darkening
- Impregnation of a log house with fire-bioprotection
- Velo log house
- Questions about cutting a bathhouse after installation
- Painting a log house
- Blackness between the crowns of the log house
- Types of cutting corners of half beams or carriages
- Attaching beam supports to a log wall
- Strengthening logs in a log house 7 meters long
- How to sort through the log gables of a log house
- The beam was squeezed out of the wall
- Is a matitsa needed in a 3 by 3 m bathhouse?
- Priority work after installing the log house
- Entrance door in a log house
- Maintaining the level when assembling the log house
- The corner of the log house and the lower log have rotted
- The sequence of finishing a timber frame
- Insulation of a settled log house
- Restoring a burnt larch frame
- Quality of a 40-year-old oak log
- Permanent roof on a newly assembled log house
- Cracks in logs
- What time of year is it better to cut a log house for a bathhouse?
- What and how to make partitions inside a log house
- Ceiling beams in a timber frame
- Installation of a metal door in a log house
- The crown molding of a log house
- Questions about assembling a log house at home
- Turnkey log house for a season - is it possible?
- Arrangement of the subfloor in a rounded log house
- Common roof for a new log house and its extension
- Ventilation system in the log house underground
- How much does it cost to change the lower crowns of a house?
- Finishing the log house after shrinkage
- Reinforcement as a dowel for a log house
- What to rest the floor joists on in a log house
- Attaching timber to a log frame
- Cover an old house with a new frame
- Extension made of foam blocks to a house made of timber
- Wet lower rims of a new timber frame
- House made of sleepers
- How to cover a log house on screw piles with bricks
- How to strengthen the motherboard in a log house
- Birch log house
- Sauna log - pine or aspen
- The lower crowns of a larch frame as a plinth
- Adjusting anchors for shrinkage of the log house
- How to properly assemble a log house
- Octagonal timber frame
- Is a fifth wall needed in a log house?
- An alternative to dowels when assembling a log house
- Problems after shrinkage of the log house
- What to make partitions from in a log house
- Tongue-and-groove slabs as walls in a log house
- Insulation of the log house inside
- How to strengthen floor joists in a timber frame
- Log houses in Kolomna
- House made of timber or frame house
- Insulation of a log house from the inside
- Work plan after shrinkage of the log house
- Squeezed logs out of the log house
- Where to start after installing a log bathhouse
- Rounded log with Finnish profile
- The timber frame is spreading
- How to align the geometry of a log house
- Large gaps between logs
- Are dowels needed for profiled timber?
- Is it worth overpaying for profiled timber?
- Repairing the corners of a log house
- How to cover an unfinished log house for the winter
- The beam bends out of the log house
- Construction of a log house in the rain
- Processing and insulation of external walls of a log house made of timber
- How far can the outer ends of the logs be trimmed?
- Ceiling beams 7.5 m in a house made of timber
- How to attach a room attached to a house
- Technology for assembling a log house from timber
- Waterproofing log walls outside
- Replacement of the lower crown of an old house
- Interior finishing of the corners of the log house in the paw
- Dry brown rot in log timber
- Shrinkage of timber frame
- Roof on only installed log house
- How to fill the gaps between the log house and the outbuilding
- When to install a log house for a house
- How far can the ends of logs be trimmed?
- When should a log house be treated with impregnation?
- Cutting the end corners of the log house
- Leveling timber in a log house
- Protection of the log frame from the outside
- Replacing log walls with stone
- How to seal the gaps between the foundation and the log house
- How to cover a timber house
- How and with what to seal the gap between the foundation and the log house
- Bark on logs - to remove or not?
- Sandwich panel or log house?
- Preservation of log wood
- How to change the lower crown
- Settlement of a log house made of laminated veneer lumber
- Log house repair
- What kind of foundation is needed for a log house made of 9 by 12 m timber?
- How much timber is needed for a log house 9 by 12 meters
- Foundation for a log house with chopped gables
- When to put a roof on a log house
- How to seal cracks in a timber frame
- Log house on the spring
- Preparing a log house for winter
- Oak backing for the lower crown of the log house
- Log house repair
- Photo of a chopped log house
Construction in Moscow and Moscow region
We work with a guarantee! Wide range of construction services. Foundation, walls, ceilings, roofing, turnkey! +7 (905) 797-20-34
luxurykomfort.ru
Construction in Moscow and Moscow region
We work with a guarantee! Wide range of construction services. Foundation, walls, ceilings, roofing, turnkey! +7 (905) 797-20-34
luxurykomfort.ru
Construction in Moscow and Moscow region
We work with a guarantee! Wide range of construction services. Foundation, walls, ceilings, roofing, turnkey! +7 (905) 797-20-34
luxurykomfort.ru
Log houses and their maintenance
All questions to Semenych about construction
Semenych (author of materials)
Our site is regularly updated with interesting and unique materials and articles on the topics of lumber, building materials and works, the author's opinion and knowledge of a real coven with more than 15 years of experience are provided. There is a section - funny stories of shabashniks. If you would like to receive information about this, subscribe to our website's newsletter. We guarantee that your address will not be shared with third parties.
Apartment renovation in Moscow and Moscow region
We work with a guarantee!
Wide range of repair work. Professional craftsmen.
+7 (905) 797-20-34
luxurycomfort.ru
| Country house | Bath |
| For the dacha | Tool |
| Materials | Tales |
| Foundation | Log houses |
| Roofs | Insulation |
| Walls | Siding |
| Floors | Cellars |
| Attics | Doors windows |
| Stairs | Extensions |
| Wells | Toilets |
| Balconies | Loggias |
| Condensate | Flooding |
| Fences | Kennels |
| Sidewalk | Birdhouse |
| Adobe | Carts |
| Garages | Barn |
| Greenhouses | Bath |
| Swing | Brazier |
| Shower | Horizontal bar |