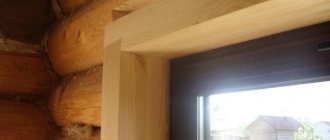
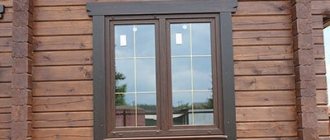
In the modern world, a person can choose the most comfortable place to live. Increasingly, the choice falls in favor of not only apartments, but also cozy country houses, where you can take a break from the bustle of the city and enjoy nature in comfort. Windows in a wooden house require a special approach to finishing, so you need to know how to make slopes for windows in a wooden house.
Installing PVC windows based on your own preferences and the size of the room is not everything. For maximum comfort and visual appeal, it is necessary to correctly select and install slopes and casing. Decorating windows in a wooden house in a certain style will highlight the design of the room inside the house and its facade.
Finishing window slopes in wooden houses
Korovin Sergey Dmitrievich
Master of Architecture, graduated from Samara State University of Architecture and Civil Engineering. 11 years of experience in design and construction.
In the modern world, a person can choose the most comfortable place to live. Increasingly, the choice falls in favor of not only apartments, but also cozy country houses, where you can take a break from the bustle of the city and enjoy nature in comfort. Windows in a wooden house require a special approach to finishing, so you need to know how to make slopes for windows in a wooden house.
Installing PVC windows based on your own preferences and the size of the room is not everything. For maximum comfort and visual appeal, it is necessary to correctly select and install slopes and casing. Decorating windows in a wooden house in a certain style will highlight the design of the room inside the house and its facade.
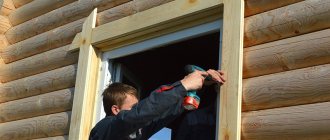
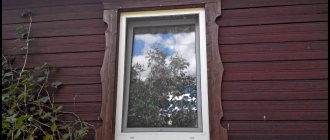
Installation of PVC panels in a blockhouse cottage
External window decoration made in a frame cottage with plastic looks respectable. It is easier to do than in a brick building. Initially the bevels are even and smooth
Window holes are carefully cut out. If the structure is made of rounded logs, then the process of installing PVC may be a little more complicated due to the uneven, protruding surface of the walls
How to make slopes on plastic windows from the inside in a blockhouse cottage:
- Fastening a special strip on a modular system. PVC panels will be installed in it. The walls of frame buildings are not thick, and the paneling will also not be wide. You can save on finishing and trim the bevels with one thick strip that will cover the entire edging.
- Plastic panels are mounted using self-tapping screws. They are screwed from below and from above with a screwdriver to hide them under the internal corners.
- Plastic windows in a wooden house are also finished at the top of the opening. When using several thin strips, they are attached using a groove and tenon system.
- The joints are filled with sealant. The slopes in a log house must be sealed; the timber absorbs moisture and gradually deforms.
After the finishing of the window slopes inside is completely completed, you need to move on to the plastic corners. They are secured using liquid nails and assembly glue. Internal parts can only be fixed in this way; elastic foam is suitable for external corners (to protect against insects, dust and moisture).
Photo report No. 2: using starting profiles
Despite the new approach, all work begins with the preparatory stage, which also includes cutting the polyurethane foam, as well as removing everything that does not adhere well to the slopes. It is permissible to coat the surface of the slopes with a special deep-penetrating primer to improve adhesion.
Preparing the window opening
Along the perimeter of the slopes, in the immediate vicinity of the frame, a wooden strip is attached, on one side of which an uneven angle is formed, equal to the angle of divergence of the slopes. This can be done using a regular plane or a circular saw, if you have one.
We make a slope on one of the faces of the block
The wooden block is secured with dowels and long self-tapping screws. If the structural elements are made of wood, then dowels will not be needed.
Screwing the block
Then the starting profile is installed on a wooden rail and secured in any available way. The fastest fastening method is to use a stapler. As an option, you can use PSh self-tapping screws with flat, wide heads.
We attach the starting profile
Naturally, it is better to take a high-quality profile, although it may be more expensive. Each window will require about 4 meters of profile, although it all depends on the size of the window - perhaps no more than 3 meters will be required. Despite the fact that it is advisable to press the profile as tightly as possible to the window frame, you cannot do without a small gap. The thing is that the angle formed by the slope is indirect.
Joining the profile is a responsible task, although any gaps can be carefully sealed with white acrylic sealant (matching the color of the profiles).
Installation of plastic slopes according to this principle, as in the first case, begins from the upper slope. It is better to opt for durable plastic panels, although they are somewhat more expensive, but they can easily withstand some effort.
We insert a plastic panel into the profile
As a rule, panels are selected whose width is greater than the width of the slopes; otherwise, additional slats will have to be installed, and the appearance will not be very attractive due to the presence of joints.
If the panel is longer than the width of the slope, then it is installed in its place and the cutting line is marked with a felt-tip pen. Having cut off the panel, it is installed in its place.
As in the first option, the space between the slope and the plastic panel is filled with polyurethane foam. The process starts from the top corner downwards. You should ensure that there is little foam, but there are as few gaps as possible. To prevent the plastic panel from moving, it is attached to the wall using masking tape.
After the foam has completely hardened, the tape is removed and all that remains is to get rid of the unattractive end part of the slopes. You can take a completely different path by abandoning “wet” work using putty. To do this, take a white plastic corner and attach it with liquid nails. After applying liquid nails, the corners are set in place and secured with masking tape until the glue dries completely.
Installed corners along the perimeter of the slope
About a day later, the masking tape is removed and the windows take on the following appearance.
This is what a window with installed plastic slopes looks like
If any gaps catch your eye, they are sealed using white acrylic sealant.
How to choose the right finishing element
The functions of a window sill are known, but not everyone knows why slopes on windows in a wooden house are needed. Slopes in a wooden house not only add completeness to the interior, but also provide a kind of protection for the materials used to install the plastic window:
- protect window frames and openings from water ingress;
- help cover the mounting foam, prolonging its service life for as long as possible;
- visually improve the appearance of the window.
Slopes prevent moisture from entering the window opening and frame.
Based on the type of window that will be installed (metal-plastic or wood), it is necessary to consider various methods for creating window slopes. There is a huge range of products on sale that will not only effectively protect materials, but also decorate the facade and the inside of the room. Materials for installing slopes must have several basic characteristics: moisture resistance, strength, practicality, long service life, ease of installation and dismantling. To install the slopes, you can hire specialists or make and install slopes on a wooden house with your own hands.
In a log house or timber structure, a plastic slope, as well as cladding inside and outside with wooden panels, will look harmonious. The most popular options for a log house:
- plastic;
- lining made of natural panels;
- tree.
The most practical material for constructing slopes is plastic.
Despite the use of a wide variety of finishing options, when choosing plastic windows in a wooden house, it is best to create the finishing of the façade window opening using practical materials that do not absorb atmospheric moisture. In the best case, PVC window slopes are recommended to be installed from plastic. In a house made of timber, you can make slopes inside yourself and choose the material based on your own taste.
About fixed windows
Windows are ready-made for installation in homes. Making a good and beautiful window is not an easy task even for an experienced carpenter. But sometimes - in an attic, in a barn, a garage or in a country house - you need to make a small blind window. You can make such a window yourself by making a frame from beams and slats.
What should be the profile of the window frame can be seen in the figure
Note the highlighted protrusions at the bottom that are the lightest. These are teardroppers
Their purpose is to prevent water from flowing into the frame. They must be made on the lower cross member of the frame, but in no case should they be done on the top: there they will turn into moisture traps. But they are useless on the sides.
***
So, now you know how to install a wooden window in any window opening of any building. As you can see, the work itself is not complicated or difficult, but it requires preliminary consideration of many different factors, and when performing it, intelligence and accuracy.
External window trim with siding
Vinyl siding is ideal for finishing exterior windows. It is presented in the form of hollow plastic panels that are attached to each other using special locking systems. The material allows you to quickly create an aesthetic coating that has a certain level of thermal insulation and soundproofing.
The slats do not require additional finishing or complex maintenance. As additional insulation, it is recommended to fill the space between the siding and the wall with mineral wool or foam, and decorate the joints with decorative corners.
Advantages of vinyl siding:
- DIY installation is possible;
- slopes are easily cleaned of dust and dirt;
- no fungal growths appear on the plastic;
- many color options;
- will last a long time if handled carefully.
Disadvantages of finishing slopes with siding:
- color change may occur with intense exposure to ultraviolet radiation;
- insufficient shock resistance.
Insulation
An important part of the repair work associated with the installation of slopes is the insulation of the window frame. Of course, you can do without this, but in winter it will be much colder in an uninsulated room
The following are considered as insulation:
- Styrofoam;
- penoplex;
- mineral wool.
Styrofoam
Budget insulation, which is in great demand among consumers. It is easy to work with, it costs a penny, and in terms of thermal insulation it is not much different from other competitors.
Penoplex
An expensive analogue of polystyrene foam, which differs from its “younger brother” in energy-saving properties. Among other advantages of the material, the following are noted:
- more dense structure;
- less tendency to absorb moisture.
Mineral wool
It is used in the case of insulation of frame structures, as it is extremely convenient to install
When purchasing material for insulation, pay attention to moisture resistance. Brands that tend to absorb excess liquid are not suitable for insulation.
Interior window decoration
Depending on the interior design used in the timber house, the choice of material for slopes and casing indoors will be determined.
The interior decoration of windows should be combined with the design of the room in which it is located. Source layout-lidea.ru
In interior decoration, the choice of materials is more diverse, since it is not exposed to the aggressive influence of the external environment.
Finishing options may include wooden lining and cladding, which is a classic in wooden architecture.
Not inferior in beauty and functionality to MDF panels, which are easy to install and have a wide selection of colors and textures.
A popular solution for finishing slopes are plastic panels. They are low maintenance, easy to install, and last a long time. They have a large selection of colors.
Internal finishing of slopes and casing not only gives a finished look to the window, but also protects the fastening elements and polyurethane foam from destruction when exposed to sunlight and changes in humidity. Any type of finish can cope with these functional tasks. The use of one or another option depends on the taste preferences of the customer and his financial capabilities.
Finishing windows inside a house made of timber is detailed in this video:
Let's sum it up
To correctly assemble the slope yourself, you should follow the same rules as when assembling the casing: there should be no fixed connections between the panel (or slats) of the slope and the frame.
carries out work on the processing and installation of building structures in wooden log houses, including the manufacture and installation of casings, external and internal slopes. You can clarify the details of cooperation and calculate the cost of work via e-mail or by phone numbers published in the “Contacts” section.
Calculate the cost of painting and insulating your home right now
Select types of work:
Select materials:
Types of wooden slopes and their properties
The slope is part of the window opening both inside and outside the window structure. They are made from different wood species, as well as from cork oak bark, and their function is mainly to mask traces of installation of window frames, such as polyurethane foam and unsightly joints. High-quality and correctly selected, they can become a worthy interior decoration and a beautiful frame for windows.
Wooden slopes give the window nobility.
In addition to the decorative function, slopes for window openings function as a kind of window insulation, since they cover joints and cracks. So, let's look at the main functions that wooden window slopes carry:
- Provide protection against freezing. Wooden slopes can save you from poor-quality thermal insulation when installing windows, since they cover the gap formed between the frame and the window opening. At the same time, slopes significantly improve the thermal insulation of the room. Also, wooden slopes prevent the appearance of condensation on the window frame, because it is condensation that contributes to the formation of mold and rot.
- Protect from wind and drafts. Polyurethane foam used to seal seams when installing windows loses its properties when exposed to ultraviolet radiation and water, which is why it quickly collapses. By installing slopes, you can prevent the destruction of the polyurethane foam, which, in turn, will eliminate the appearance of drafts.
- They have high decorative properties. In addition to masking polyurethane foam, chips and joints, wooden slopes look very impressive in the interior and give the window frame completeness.
During the manufacture of wooden slopes, special glued boards are used, which are treated with special compounds to prevent exposure to the environment. To make slopes, it is recommended to use the same type of wood that was used to make window frames - in this case, both the color and texture of the window block will completely match, and wooden windows with slopes will look seamless.
Different types of wood, such as larch and pine, have different textures, and even if the same varnish is used to finish the window and slopes, the original color will still differ.
As a rule, wooden slopes are not installed on the same day as windows in a wooden house; this is done so that the installation foam has time to dry and become durable. At a minimum, 11-12 hours should pass between installing windows and wooden slopes. But it is not recommended to delay the installation of slopes, because environmental influences gradually destroy the polyurethane foam.
Varieties
Plastered
Plaster is a traditional material for finishing a window opening. In its original version, the method was used to save money and in conditions of shortage of finishing materials. The process consists of leveling part of the wall using a primer, applying plasters and then painting the slopes. Thus, the slopes could become a full-fledged continuation of the walls, but at the same time they did not have a tight connection with the window frame. Because of this, after some time, cracks formed, and the thermal insulation was practically zero. The windows needed to be insulated from the outside, and not always using aesthetic methods - cotton wool, moss and even plasticine. At the moment, the technology for applying plaster mortar has changed a lot, and now this type of slopes is considered the best and most stylish option.
Drywall slopes
This method is quite economical, and also modern for cladding a window opening. Drywall retains heat perfectly, is inexpensive in itself, and its texture will be an excellent basis for applying any type of decor. Pieces of drywall are often left over after a modern renovation of a room has been carried out, and to save money they can be used as materials for slopes. Among the disadvantages, it is worth noting that this type of finish is unstable to dampness (if you use the usual option), and also has a tendency to deform at the junction of the wall and window.
Plastic slopes
This type of cladding is the most popular today. The plastic used for slopes can have different textures and modifications, and can also be used as decoration, or stylized to resemble any other material. Plastic panels are practical and durable, easy to install. Using thin sheets, you can hide all the ugly “insides” of the window opening - insulation, foam and missing pieces of the wall.
In addition, plastic can be easily washed using household products that are found in any home, and the material is not afraid of moisture and prevents drafts. Among the disadvantages, it is worth highlighting that it is expensive and also fragile at low temperatures in an unheated room. In the construction materials market, plastic panels are presented in variety and different shades. It will not be difficult for you to choose any shade of beige, white, milky color to match the frame, as well as any other pattern or color to match the wall, wallpaper or accent in home design.
Wooden slopes
What is even better for finishing the slopes of plastic windows inside? It is not for nothing that wood is considered an elite type for slopes, but also has a high cost and requires high-quality care. As a rule, wood panels are left in their original natural color, and then simply coated with a varnish. It makes sense to install wooden slopes as a continuation of a frame made of wood material, which in themselves will be indicators of respectability, or as a continuation of a brightly accented log wall. For example, this is an excellent option if the interior is made in a chalet, country or rustic style.
The main advantage of wood is its environmental friendliness, beautiful appearance, which is often called “warm,” and durability. Among the disadvantages, it is worth noting the high cost, as well as the requirement to follow special rules for caring for wood.
Cork slopes
Cork as a facing material has a number of advantages in the form of a high level of thermal and noise insulation, and it is also available in various natural shades and is very pleasant to the touch. But the high price of cork panels in combination with not very good durability, simple appearance and difficulty in maintenance is a huge disadvantage. Due to such circumstances, cork slopes are not so popular and therefore are extremely rare. But they can be taken as a pencil to develop various style directions indoors.
Platbands
Platbands can serve as interior decoration for window slopes. They may be based on different materials, but these products perform the same role - they protect the seam and give it an aesthetic appearance.
Types of platbands
The side walls near the window should look attractive. To do this, you can use different platbands, which differ in shape, texture, and base material. The simplest and cheapest are flat products. They look inexpensive, but are quite functional. Another type of finishing is profiled products that have a convex surface. The decorative function is enhanced here, but such platbands are somewhat more expensive.
If you feel that you may have difficulties installing slopes, you can easily install shaped products with complex terrain with your own hands. Such cladding can imitate natural materials, such as wood. If you do not want to finish the slopes with plasterboard, you can choose carved platbands, which are more expensive than others, but can have individual dimensions and are made to order.
Materials for production
In order to finish the slopes of the windows of a wooden house, you can use platbands made of different materials, for example:
- plastic;
- wood;
- metal;
- MDF.
When choosing a tree, you must be prepared for the fact that you will have to take care of the products all the time. Every few years the material requires blocking or painting. Only then will the products not dry out and retain their original appearance. The advantage of such products is that they can be different, are environmentally friendly and look quite presentable. But the most logical way to finish the slopes of plastic windows is with PVC. All maintenance will be reduced to wiping the surfaces from dirt; no other manipulations will be required. Plastic platbands are resistant to external factors, do not fade and tolerate freezing and thawing well. The advantage of this material is its low cost, but the decorative function here is not performed very successfully.
The inside of the slopes can be finished with MDF. Externally, this material will not withstand exposure to moisture and sun. The surface of the products is covered with a laminated film, so the base can imitate different materials, for example, stone or wood. If you don't want to use plastic, but don't have enough money for wood, MDF is just for you. This is a budget option and a compromise of two solutions.
Finishing windows with metal slopes is done quite often. This cladding does not look very presentable, but it will last much longer than wooden products. The metal can be periodically renewed and also coated with compounds that will protect it from corrosion and external negative factors. When choosing window trim with metal slopes, you prefer a budget option that will last for decades. This window design is suitable for houses in a modern style.
Fastening
When finishing windows with metal slopes, you will need to prepare the surface by removing all excess from it, including polyurethane foam. The seams are filled with silicone sealant, only after which can we proceed to installation work.
The next step is to measure. If you make the slopes yourself, you can cut them from a metal sheet. Next, the installation of ebb tides should be carried out, the horizontalness is checked by the building level. The joint between the frame and the wall should be supplemented with thermal insulation tape to protect against moisture and noise. In those places where the slopes will come into contact with the frame, sealant is applied. The side elements are installed first, while maintaining an outward slope.
But when renovating an apartment, you can finish the window slopes with wood. The material can be lining. At the first stage, you need to prepare slats according to the size of the opening. These elements will be necessary to create the sheathing. They are installed around the perimeter on dowel-nails. When finishing windows with clapboard, the frame is positioned perpendicular to the cladding. The frame can be insulated with foam plastic or mineral wool.
Finishing window slopes with laminate is carried out according to the same principle, which cannot be said about stone. Masonry begins from the bottom of the slope. As soon as these elements are strengthened, you can proceed to the next row so that it does not slide down. Corners are formed by trimming the end elements at an angle of 45˚. Before finishing the window slopes with decorative stone, the surface must be leveled and coated with a primer. The preparatory stage can be carried out using drywall, which will act as a leveling layer.
Why are slopes needed?
The basic technology for installing PVC windows assumes that they are not installed close to the casing, but with the creation of a small installation gap. After centering the window, the gap is filled with polyurethane foam, and waterproofing and slopes are installed to isolate it from the external and internal influences of the atmosphere.
In general, two goals should be highlighted that are achieved by installing slopes:
- decorative concealment of construction irregularities and communications;
- additional thermal insulation of the window.
The listed goals can be achieved both simultaneously and separately.
Plastic window in finishing casing
For stone houses, the specified installation scheme is unchanged, but in wooden houses, solutions are possible when installing slopes is not necessary. A typical example of this approach is when plastic windows are installed in a finished frame with a reverse quarter, in which the casing frame, window sill and slopes are integral elements of one wooden structure.
In modern construction practice, it is customary to use a universal option, when the slope is not only a decorative panel, but also additional protection for the window from freezing.
It is traditionally believed that the slope is an element of interior decoration. Indeed, if the window is installed in compliance with all the rules for installing waterproofing, then the internal slopes will completely eliminate heat loss through the installation gap.
However, in cases where the window has a deep seat in the reverse quarter, it is not possible to close the installation gap using the platband alone, and in such cases it is necessary to install an external slope.
At first glance, the slope is just a panel covering the construction cavity of the window. But from a technical point of view, this is far from such a simple design, consisting of several elements:
- decorative protective panel;
- internal filler, which plays the role of thermal and sound protection;
- devices for fastening the outer edge of the slope;
- decorative corners for external finishing of joint areas.
Slope design in section
Both polyurethane foam and mineral wool can be used as an insulating filler.
In the example given, the filler serves as the basis for the decorative panel, but it must be taken into account that for some models of slopes it is necessary to install a more complex supporting structure.
Separately, we note that if the window opening is wide enough, then the window sill area can be used as an additional useful area, and elements of household infrastructure (sockets, network communicators, etc.) are introduced into the decorative panels.
Necessary tools, materials
To carry out the installation yourself, you need to have a set of necessary tools on hand:
- To prepare the holes you will need a drill and a set of drills.
- To secure the sheathing to the walls, you will need dowel plugs. A hammer drill is required for their installation.
- The work will be carried out with lumber, which means that the workpieces will have to be sawed with a hand-held electric saw.
- For marking - tape measure, square, simple pencil, laser level.
- To attach the timber to the screws, you need a screwdriver.
To fix the frame, prepare self-tapping screws for screwing into wood, dowel plugs that will fix it in masonry, timber, profile, polyurethane foam, liquid nails.
Internal slopes made of plaster for a plastic window - step-by-step instructions
When decorating plastic windows indoors, owners of houses and apartments have a desire not to resort to plastic or metal products - these stand out too much inside the room and are more suitable for the outside. In this situation, the slopes are made of plaster - it can later be painted either in a neutral white color or to match the design of the living room or kitchen.
Step 1: Protect glass and frames from plaster by temporarily covering them with plastic film. It is also advisable to use masking tape in some places - this way you will free yourself from the need to subsequently clean the window from any pieces of plaster that have fallen.
The window is sealed with film
Step 2. Using a pencil, take initial measurements of how the plaster will be applied. The mixture should partially cover the plastic window frame itself - this will minimize any possibility of a draft. In this case, plaster slopes are also made at dawn - the surfaces are located at an angle, expanding from the window into the room. This ensures better illumination of the room.
Performing initial measurements
Step 3. Complete the marks using a laser level or its regular bubble equivalent. In this case, it is necessary to indicate several points for screwing in the screws and drill holes there - the fasteners will become a kind of substrate for the beacons installed in the middle of the opening planes.
Drilling holes
Prices for popular hammer drill models
Hammers
Screwed screw
Step 4. Treat the surfaces of the window opening with primer, preferably in two layers. It will ensure better “adhesion” of the plaster to the main wall.
The surfaces of the opening are treated with a primer
Step 5. Prepare the beacons for insertion into the opening. In this case, purchased factory-made products are used, which are quite cheap, but at the same time very convenient to use. Trim them to the appropriate height or width of the window opening.
Preparing beacons
Step 6. Prepare a sufficiently dense and good solution for attaching beacons to the surfaces of the window opening. Apply several “cakes” of the mixture onto each of them with a spatula. Then mount the beacon using the heads of the screws that were screwed in earlier as a backing - the metal product will not pass beyond them. Lightly drown the beacon in the solution.
The screw head acts as a backing
Step 7. Using the same principle, install the beacon on the top of the window opening.
Installation of the upper beacon
Step 8. Install “formwork” around the perimeter of the window opening, along which the edges of the surface with the “dawn” will be aligned. In this case, the master applied the old rule for these purposes, fixing it with screws and dowels.
"Formwork" from the old rule
Step 9. Prepare the plaster mixture to form the slopes. Mix all its components in a bucket using a mixer or drill with a special attachment.
Preparation of plaster mixture
Step 10. Perform an initial sketch of plaster on the surface of the window opening, but without much leveling - just form the required amount of sweep on the top and side parts.
Initial sketch of plaster
Step 11. Take a wide spatula and, leaning it against the plaster, the beacon on one side and the rule on the other, level the mixture and make it smooth. Repeat this operation on the other sides of the window opening.
Leveling the plaster mixture
Step 12. Work out small details and defects using narrow spatulas. After this, you can leave the plaster to dry. Then remove the protective plastic film from the window. The final touch is painting the new plaster slope in the desired color.
Using a narrow spatula
Manufacturing technology
Tools and materials
To install panels with our own hands, we need to use a whole arsenal of tools.
I usually prepare the following set for work:
Polyurethane foam is used for sealing
hammer drill with concrete drill;
- screwdriver;
- jigsaw;
- awl for MDF (hacksaw, disc or reciprocating);
- a breadboard knife with a long, strong blade;
- hammer;
- foam glue gun;
- level;
- roulette;
- pencil or marker.
I make the slopes themselves from MDF panels 10 mm thick.
In addition to decorative materials, I use:
For work we take fairly thin panels
- wooden slats for the frame;
- antiseptic primer;
- repair composition for concrete or brick;
- decorative corner overlays;
- platbands;
- "liquid Nails";
- self-expanding polyurethane foam.
Along with the installation of slopes, the installation of platbands is also carried out
Preparing the opening for installation
MDF slopes can be mounted both on the opening itself and on a frame made of wooden beams. The first technique is used relatively rarely: for its successful implementation it is necessary that the edges of the doorway be sufficiently smooth.
Measuring the opening
That is why I almost always mount panels of decorative material on a frame made of beams rigidly fixed to a solid foundation.
The work is carried out according to the following scheme:
- Using a hammer drill with a chisel attachment, I knock off pieces of old plaster from the slopes that remain on the surface after replacing the doors.
- I clean the walls of the opening from dust and debris, and then check for the presence of gaps and cracks in the load-bearing surface.
The lower part of the slope, ready for cladding
- If defects are found that reduce the strength of the base, I repair them using a cement-based or epoxy-based composition.
- To avoid the appearance of fungus or colonies of pathogenic bacteria, I treat all surfaces that will be hidden under the cladding with an antiseptic primer.
- Next, I install a frame made of wooden beams, also impregnated with an antiseptic, on the inner surfaces of the opening. I level the beams and fix them to the wall with express-installation dowels with plastic sleeves. To prevent the parts from moving, I hammer wooden wedges into the gaps between the frame and the opening.
Metal profile frame option
- Slopes for entrance doors and windows can be additionally insulated. To do this, I either put thermal insulation material in the cells of the frame (foam plastic is enough, but if finances allow, feel free to take mineral wool), or I blow out the space between the beams with self-expanding foam.
Installation of slopes
Now all we have to do is make the slope strips themselves and install them on the prepared frame.
I act like this:
- I cut out three blanks from an MDF sheet: two for the vertical parts and one for the horizontal.
- I apply the blanks to the opening and mark on them the lines along which the trimming will be carried out.
Part fitting
- I trim the parts strictly to the size of the door or window opening.
- I apply “liquid nails” to the underside of each panel, and then glue the MDF to the frame.
- I carefully align the panels, ensuring that the gaps between them are minimal.
Scheme for installing additional panels on foam
- Additionally, I strengthen the fastening with self-tapping screws, tightening them at the top and bottom. I hide the screw heads in pre-drilled secret holes, covering them with decorative caps to match the panel.
- I fill the gaps between the parts with either tinted wood putty or (if they are not wider than 1 mm) with transparent sealant. In the second case, I make sure that the sealant does not remain on the front surface of the slopes.
- I complete the finishing of the opening by attaching platbands to the ends of the slope strips and to the walls located next to them.
At the final stage we attach the platbands
This is interesting: The plastic door does not press well - we outline it in detail
How to do it yourself?
Material selection
Tip When choosing a material, attention should be paid to products that contrast with the overall decoration of the room and the texture of the window frame. Common materials are larch, oak and pine.
Main criteria:
- Species should be chosen similar to those used for wall cladding or window installation, since combining different wood textures has a negative impact on the aesthetics and functionality of the structure.
- Coniferous wood gives products increased strength, wear resistance, and resistance to atmospheric or mechanical stress.
- Choose products made from seasoned wood with a smooth grain and no visible nicks or irregularities.
- For fragmented wood finishing, larch products that are resistant to microbial and destructive processes are suitable. The material is available and its price is reasonable.
- Choose products with a thickness of 12 to 15 cm, taking preliminary measurements of the window opening.
Manufacturing of panels
To process wood you will need a jointer, a circular saw, and a planer.
- Level the surface of the board on both sides using a jointer, getting rid of any unevenness or roughness.
- Place the board on the thicknesser with the wrong side out and process until the required thickness is obtained.
- Wane the rib with a circular saw until a 90-degree angle is formed. If the board is edged, then use a jointer, pressing the plane against the guide.
- Set the circular saw guide to the width of the future slope, cut the board.
- Make transverse cuts to form an inclined angle of repose, round the longitudinal edge on a jointer to join the board to the window sill.
Important Do not level the board on both sides with a thicknesser, as after removal the wood will return to its original shape and bends. The jointing machine provides systematic processing of planes, making them symmetrical.
Installation of window sills and slopes
After completing all work with the installation of plastic double-glazed windows, you can begin installing the window sill and technical slopes. You should start with the window sill, which should be covered with a protective film
It is important to remember that this window element is attached using an adhesive binder and not mechanical couplings. Its dimensions are slightly larger than the window itself, since it is mounted directly in the walls
In particular, the width should be 5-7 cm longer than the window. Care should also be taken to ensure the proper distance to the heating battery.
Scheme for installing a window sill on a plastic window
The following materials can be used for the window sill:
- PVC window sills. The fairly light, but at the same time durable multi-chamber structure is covered with a special PVC film. Often, owners prefer the traditional white color, but modern products can imitate the surface of any other material;
- Window sills made of wood. There are certain requirements for the operation of these products, since natural wood is sensitive to changes in moisture in the atmosphere. The advantages of the material include the ability to give any aesthetic shape. At the same time, it must be covered with a protective layer;
- Window sills made of stone. They are used quite rarely, since the high cost and heavy construction are not originally intended for plastic windows. However, in pursuit of a beautiful design, many agree to such an original window sill.
The first stage of installation can be considered adjusting the size of the window sill so that its location is optimal and the edges do not hang over the slopes. The location of the window element can be either strictly perpendicular or with a slight slope to ensure drainage. After joining the window sill in the wall recesses, the voids are filled with polyurethane foam. After all installation work is completed, it is time to finish the internal surfaces. And only after all these procedures the protective film is removed and the fastening of the slopes begins.
Attention! It is much easier to install a window sill in a frame-type house than in a building made of natural wood. Possible deformations will be minimal.
Window slope in horizontal section: diagram of its components. An important point is also the vapor barrier layer inside and outside the opening
The installation of the double-glazed window itself involves fastening in the form of anchor plates
An important point is also the vapor barrier layer inside and outside the opening. The installation of the double-glazed window itself involves fastening in the form of anchor plates.