Almost any country house, or just a country house, is complete without a cellar. Very often it is installed in the basement, and low built-in windows (at ground level) are used to provide it with natural light. And in city buildings with a basement, such windows are not uncommon. As a rule, a special light or protective pit is installed near the basement window. This design allows you to protect windows from dirt and moisture, and also allows you to make the most of daylight hours. Manufacturing standards and sizes of pits may vary, depending on the type of building and the size of the basement windows.
Let's take a closer look at their purpose, types and main stages of their installation.
Purpose of pits
The main purpose of pits installed in the basement is to collect and remove water.
These structures are able to protect structures from the destructive effects of groundwater, storm water and melt water.
Water in the basement or cellar may appear in the following cases:
- when there is a sharp increase in groundwater due to large amounts of precipitation, intense snow melting, or artificial damming of aquifers during new construction;
- the appearance of through cracks and destruction of waterproofing in the structure of foundations or basement walls as a result of design errors, incorrect calculations of loads, or violation of technology during the construction stage;
- failure of drainage systems due to clogging or failure of automatic drainage pumps.
In flooded basements, pits can serve as an indicator of rising groundwater. A pump with float control installed in the pit will turn on when the water rises to a certain level.
Installation diagram of a pump with a float.
Drainage pit: main aspects of the device
Monolithic well
In traditional Russian baths, a container for draining and collecting water from the bath was placed directly under the floor of the bath, where it entered through specially left cracks in the floor.
This feature of the structure of the bathhouse floors makes it easier to collect water. All this is wonderful and traditional, but the smell of standing water in the steam room is unpleasant.
Bathroom floor installation
It is better to arrange a regular drain with access to the sewer pipe.
Due to the constant presence of smell, baths were considered buildings in which it was impossible to live or spend time for a long time.
Nowadays, a bathhouse can be considered as temporary housing while the main house is being built, like a guest house.
And it is not necessary to create excessive dampness out of love for traditions.
Sewerage is a necessary element even in the smallest and simplest bathhouse. It can save the land from sewage pollution and protect your bathhouse from the influence of moisture. And, of course, there should be no doubt that large baths with a shower and toilet especially need sewage.
Types and designs of pits
Drainage pits are installed outside the building, near the windows of the basement or ground floors, or inside basements.
The size of the pits depends on the specific conditions and the amount of water penetrating into the basement.
Light pits
To provide natural lighting to the basement floors and to collect and remove water from the walls, windows are constructed below ground level. Such structures can be used to supply technological equipment, fire hoses, and large items to the basement.
The shape of the pits can be rectangular, semicircular or trapezoidal.
Work on the arrangement of light pits is carried out in the following order:
- A pit is being developed, which should be 1.5-2 times wider than the window. The depth of the pit should be at least 50 cm below the window.
- The bottom of the pit is filled with crushed stone, and a perforated pipe is laid on the crushed stone bed to drain water into a well or storm drain.
- The formwork of the pit walls is installed from boards or plywood, reinforcement is carried out and concrete is poured into the structure.
- After removing the formwork, the base is filled with concrete with a slope towards the drain. The walls of the pit are waterproofed with bitumen mastic 2 times.
The devices are equipped with durable grilles designed to withstand loads from moving people or cars. Grilles of pits located near windows can serve as protection against unauthorized entry into buildings.
Modern manufacturers produce ready-made structures for installing light pits made of plastic or fiberglass.
The products are equipped with the following elements: siphons, valves, baskets for collecting leaves and debris.
Light pit.
Drainage pits
To collect and pump out water entering the basement from one point, pits are installed towards which the floor slope is directed.
The pits are made of monolithic reinforced concrete in the shape of a rectangular container, with a wall thickness of 120-150 mm.
The size of the structure depends on the area of the room.
The work is performed in the following order:
- a hole is dug for a pit in the center of the basement;
- a recess is made in the bottom part for installing a stainless steel container where the suction pipe of the drainage pump will be located;
- the reinforcement frame is mounted and the formwork of the pit walls made of boards or plywood is installed;
- Concrete B 15 is poured into the formwork and cured until the design strength is reached.
- After removing the formwork, the bottom of the pit is concreted.
The walls of the pit can also be laid out from solid clay bricks, followed by plastering and waterproofing.
The basement floor screed is poured with a slope towards the storage tank.
To create a pit in the basement with your own hands, you can use factory-made containers with a body made of composite materials, stainless or galvanized steel.
An electric pump is installed to remove water from the pit.
Formation of walls
At this stage, you should create formwork from boards, which will allow you to fill the walls. Their thickness should be 15 cm or more. The pit can be level with the ground, then it will receive wastewater. You can make a threshold, the dimensions of which can be equal to the limit from 15 to 20 cm.
For such structures, reinforcement is almost not used, since the dimensions are quite small and will not involve large loads. However, it is necessary to ensure connection with the outer wall of the building by driving in long nails halfway. When setting up a pit in the basement, you must insulate the lower part of the wall, which will reduce heat loss near the window. Additionally, a layer of waterproofing film should be laid. It is discharged into the drain.
When is drainage necessary?
To prevent seasonal or emergency flooding of basements, it is necessary to equip a drainage system.
Excess moisture can lead to premature destruction of foundations, floors and walls, and the formation of fungus and mold.
Drainage must be arranged in the following cases:
- high level of groundwater or its seasonal rise;
- location of the site on slopes along which streams of melt or rainwater flow;
- periodic flooding of the area;
- the site falls into a river flood zone;
- in the presence of clay or loamy soils;
- being near ponds, lakes, rivers.
The need for drainage is determined during a geological survey of the site at the design stage of buildings and structures.
It is much easier and cheaper to equip a drainage system and build pits than to deal with excess moisture and the consequences of flooding during the operation of buildings.
Drainage system for draining water from the basement.
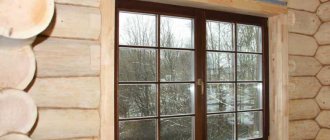
Features of basement windows
Owners of country houses often do not pay special attention to such a design as basement windows. They are not made at all, they are nailed down or covered with finishing materials.
But in order to determine whether such devices are needed in the house, you should get acquainted with the advantages of correctly made elements:
- The main one is the organization of natural lighting in the basement.
- Just two or three small windows in sunny weather are enough to illuminate the basement and eliminate the need to use electric light bulbs.
- A room with natural light is more comfortable.
- One cannot ignore the decorative properties of window openings.
When designing and operating basement windows, it is necessary to take into account various factors that directly affect their service life. The main feature of the basement is that the windows are located quite low near the ground, which exposes them to withstand serious external influences, such as high humidity.
In this case, you should not use wood for their manufacture. It is not suitable for a basement room due to numerous disadvantages: from drying out in hot and warm weather to excessive moisture on rainy days.
Advice: For the basement it is worth using modern structures that are treated with special compounds and designed for the above loads.
The size of basement windows is significantly smaller than other window structures in the house. In addition, in the places where they are installed, the walls are thick, which entails the entry of light from such windows at an acute angle.
When using basement windows you should:
- If the view from the basement window does not seem entirely clear or the lighting in the basement has deteriorated, then you definitely need to wipe and clean the glass. Pollution can absorb up to 60% of the sun's rays.
- It is worth considering that white profile and slope structures will reflect more light.
- The presence of a window in the basement for smoke removal will help relieve its owner from the presence of excess gas in the room, or ventilate it after the ignition of some elements or even a fire. Their arrangement must be provided for at the design stage of a private house.
The video will show you how to make smoke exhaust windows in the basement and how to install them correctly.
So:
- It is necessary to provide for the construction of pits, or special niches, which allow increasing the surface of the windows by one and a half to two times.
- For greater safety of the contents of the room, it is worth installing bars on the basement windows.
- Additionally, it is recommended to make a small canopy over the window, which will protect the niches from debris and precipitation.
- The canopy can be made of polycarbonate, which perfectly retains rainfall, and can be easily cleaned if necessary. An example of such an element is shown in the photo.
Plastic canopy over a basement window
Material for making windows
Such structures are made of the same material as the rest of the windows in the house.
Types of drainage
Drains can be installed inside and outside buildings.
The choice of drainage systems depends on the type of soil, terrain and depth of underground water.
The need to install drainage systems, their layout, and depth are determined by the project, since errors in calculations can lead to stagnation of water in the pipes and ineffectiveness of their operation.
There are several types of drainage systems:
Wall drainage
It is installed outside the building, along its perimeter. The wall drainage circuit is installed after the foundation or basement walls have been erected and waterproofed.
Stages of installation of wall drains:
- At the level of the base of the foundation, a trench is dug around the perimeter of the building.
- The bottom of the trench is covered with geotextile, which protects the pipe from small particles of sand or soil.
- To collect water from the wall drainage, a hole is dug in the lowest place of the site to install a storage tank. You can use sealed plastic containers or concrete rings as a storage well.
- We dig a trench from the wall circuit drain to the storage tank and connect the drainage pipes to the well. In this case, a slope of at least two centimeters per meter of the trench towards the storage tank should be maintained so that the water flows through the pipe by gravity.
- Crushed stone or gravel is poured over the geotextile in a layer of at least 100 mm and a perforated pipe is laid with a slope towards the drain.
- The pipe is covered with crushed stone, covered with geotextiles and covered with sand or natural soil.
Drainage pipes should be laid below the ground freezing level
The soil is backfilled to the design level with layer-by-layer compaction. A concrete blind area is installed around the perimeter of the building.
Scheme of wall drainage device.
Wall drainage cannot be installed to drain water from old buildings, due to the possibility of destruction or subsidence of dilapidated foundations.
Internal drainage
In private houses, internal drainage is often installed.
This method will help if the house is located on a landscaped area where blind areas are poured, paths and platforms are paved, plants and lawns are planted.
This is the most affordable method that allows water to be drained from the basement without disturbing the landscape of the site.
Internal drainage of large basements is carried out as follows:
- soil is removed from the basement to the base of the foundation;
- the walls are dried and treated with bitumen, liquid rubber or other waterproofing materials;
- the basement floor is covered with a sand-gravel mixture and perforated drainage pipes are laid, wrapped in geotextile with a slope towards the pit;
- To collect water in the basement, a factory-made pit is installed from reinforced composite or galvanized steel, or made from solid ceramic bricks or monolithic reinforced concrete.
- The pipes are covered with sand or crushed stone on top, and a concrete screed is installed with a slope towards the pit.
Water from the drainage pipes flows into a pit, from where it is removed using a pump.
Surface drainage
The system for collecting and draining rain and melt water from buildings in areas with deep aquifers can be superficial.
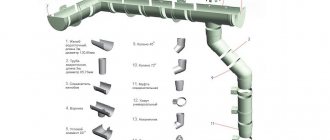
Surface drainage consists of drainage gutters with gratings, drainage pipes, inspection and drainage wells.
Water from the foundations is drained through gutters into storage tanks, drainage wells or centralized storm sewers.
Surface drainage of the site.
Semi-open and partially buried basements
When the groundwater level is high, it is advisable to build semi-open or partially buried basements.
The mark of the bottom of the pit should be at least 30-40 cm above the water surface.
Drainage is installed around the perimeter of the pit. To do this, a trench about 40 cm deep is dug below the base of the basement.
When water enters the trench, it is pumped out.
Sand is poured into the trench in a layer of 10-15 cm, then geotextiles are placed and crushed stone is filled.
A perforated pipe is laid on the prepared cushion with a slope towards the outlet pipe. The top of the trench is filled with crushed stone and sand.
It is better to make the foundation for a building in an area with high groundwater levels slab, made of monolithic reinforced concrete.
Work on constructing a semi-buried basement is carried out in the following order:
- Construction of a monolithic foundation slab, including:
- backfilling a cushion of sand and crushed stone with a layer of 30 cm;
- device for concrete preparation from concrete B 7.5;
- waterproofing device for the base of the slab;
- installation of foundation formwork around the perimeter of the building;
- installation of reinforcement cages;
- concreting the foundation slab with concrete B 15.
- Pouring walls made of monolithic reinforced concrete includes:
- installation of reinforcement frame;
- installation of wall formwork;
- pouring concrete into formwork with layer-by-layer compaction using vibratory rammers.
- After the concrete walls have reached the design strength, the formwork is removed.
- Waterproofing basement walls.
- Internal and external walls are coated with hot bitumen twice, 2 layers of roofing felt or other rolled material are glued.
The thickness of the basement walls must be at least 40 cm. It may vary depending on the number of floors of the building and the characteristics of the soil.
In the corner of the basement you should build a pit and make floors sloping towards the storage tank.
An important step in the construction of a basement is its insulation. High-quality basement insulation can ensure stable indoor temperatures all year round.
Construction of a partially buried basement.
The most effective material for insulating a basement, both inside and outside, is extruded polystyrene foam. The porous material is an excellent heat insulator. It is not afraid of moisture and can withstand high soil pressure without deforming.
Insulation boards are glued to the wall using bitumen mastic or any bitumen-based adhesive.
After completion of waterproofing and insulation, the basement walls are backfilled with sand and soil, with layer-by-layer compaction.
To protect the basement walls from rain and melt water, a blind area of concrete or asphalt, 70-100 cm wide, is installed around the perimeter of the building. The slope of the blind area from the walls of the house should be 5-10%.
If there are windows in a semi-buried basement, light pits are installed.
For reference
Today you can find ready-made pits on sale. Their cost is acceptable, and their design allows minimizing work, reducing it to preparing a pit. Such devices require a detailed study of the installation instructions, since individual models have their own technical requirements and features.
A pit is a structure in which, when pouring it, a small amount of liquid glass should be added to the concrete, which will protect the material from moisture. The system can be supplemented with a small curb, which will provide additional protection from rain and will not allow moisture to enter the pit.
The bottom of the structure must have a certain slope, which should be directed into the drain. It should be covered with a pit grate, which will eliminate the possibility of clogging. If you plan to make the structure yourself, then after the concrete has hardened, it should be treated with antibacterial impregnation. This will reduce the risk of developing mold and mildew.
Basement entrance device
The main task when constructing an entrance to the basement from the street is to protect it from precipitation.
The entrance to the basement from the house can be of almost any configuration, depending on the size of the basement, the availability of free space and the purpose of the premises.
The entrance from the street is usually located near the entrance to the house. The flight of stairs to go down to the basement should be convenient and located along the wall of the building.
Entrance to the basement.
The staircase is made of reinforced concrete.
To finish the steps, it is better to use porcelain stoneware tiles. It is non-slip, durable and affordable.
To protect against flooding, the following measures should be taken:
- installation of a drainage pit at the lowest point of entry into the basement;
- the doorway must have a threshold of at least 150 mm to prevent water from flowing into the basement;
- installation of a canopy or canopy along the entire length of the stairs.
Whatever option you choose to go down to the basement, the stairs should be comfortable, reliable and safe.
Final works
This stage is quite important; the safety of people in the house sometimes depends on it. This is explained by the fact that the pit is at ground level and a small threshold is not able to protect against an accidental fall. Therefore, special structures are formed that have a specific purpose.
Experts recommend making metal gratings from galvanized iron or stainless steel that can support the weight of a person. Sometimes they also endure the weight of the car. Many people make designer products by chrome plating or bluing. As a result, they manage to obtain a pit design that becomes a real work of art and a decoration of the facade.
Over the pit you can create canopies that will protect the space from rainwater. Such designs reduce the degree of sun penetration into the room. If you choose ready-made products, then this issue will already be resolved. Therefore, the buyer should choose only the option he likes. The pit's protective fence should be firmly fixed to the walls and house. Such designs prevent falls, and their appearance usually comes second.
Drainage well
Drainage pipes carry water away from buildings and into storm drains. If it is not possible to connect to a centralized storm drain, a drainage well is installed on the site.
You can make a storage tank yourself from concrete or PVC rings, barrels and other available containers, or buy ready-made products from composite materials.
To install a drainage well, a deep hole is dug down to the sand layer. Drainage made of crushed stone, gravel or broken brick is poured into the bottom of the hole.
Well rings are installed.
Diagram of a drainage well.
Sealed containers need to be pumped out as they fill.
To ensure that the water in the well does not exceed the level of the drainage pipes, automatic pumps are installed.
Final finishing of the structure
In order for the pit to not only effectively perform its functions, but also decorate the house, it is necessary to competently and thoughtfully select materials for its decoration. Usually the walls of the well are lined with decorative tiles, artificial or natural wild stone. You can also simply paint the walls or lay down lining made of plastic.
To protect the pit, you can make a canopy or lattice fencing.
But it is better not to use wood, as it will quickly become unusable. In addition, the tree can become a breeding ground for mold and pests that can threaten your basement supplies. When choosing a material, keep in mind that the lighter the walls of the pit, the more effectively the sun's rays will be reflected from them. And accordingly, the cellar will be lighter.
Remember that the pit must be reliably protected, even if the walls of the well protrude above the ground. Such protective elements can be canopies or lattice fencing, which with their appearance support the overall architectural design of the house. In this case, the well will not only reliably protect the basement, but will also serve as a decoration for the base. In addition, such gratings will prevent animals from entering the cellar.
When choosing a fence, make sure that the frames can be opened or easily removed. Because from time to time the well has to be cleaned of accumulated debris or snow.
How to waterproof a basement
One of the main tasks when building a house is to protect structures from groundwater, melt and storm water.
Waterproofing the foundation and basement walls from the outside is carried out with bitumen mastic in two times.
For additional and more reliable protection against flooding, you can install a waterproofing membrane.
Waterproofing of internal structures is carried out using various materials and technologies:
- built-up or adhesive insulation with bitumen-based roll materials: TechnoNIKOL, Bikrost, Gidroizol, roofing felt;
- PVC or EPDM membranes;
- penetrating impregnations based on a cement-sand mixture with chemically active additives, organic resins or aqueous solutions of liquid glass with calcium chloride;
- coating insulation with bitumen mastics, liquid rubber or deep penetration compounds such as Ceresit, Aquatron, Penetron.
Pasted waterproofing of basement walls.
Waterproofing basement structures will not solve the problem of flooding unless the cause of water entering the room is eliminated.