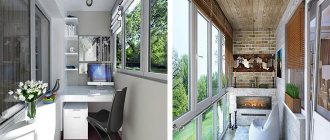
Country houses are built for permanent residence and temporary summer vacation. The words associated with such a house are: coziness, relaxation and comfort. Therefore, in addition to functionality and reliability, the design of the house must meet aesthetic requirements. A balcony in a wooden house dilutes the severity of clear architectural lines and adds uniqueness to the facade. Houses with a balcony can resemble old noble mansions in a rustic style and look quite modern. But the main condition for installing any balcony is to ensure safety for residents.
What should a balcony be like and where should it be located?
To add a wooden balcony to an existing house structure with your own hands, you will need to carry out calculations. The part protruding beyond the facade line must withstand its own weight and additional load (the weight of residents and furniture). Therefore, planning the installation of a balcony in a house should be done at the time of designing the building. This way you can avoid unnecessary costs and immediately provide reliable support elements.
A balcony in a wooden house is installed in two versions:
- with canopy;
- open type.
To protect against precipitation, a balcony is usually made with a canopy. A protruding part of a common roof or an individual structure can be considered as a canopy.
Open structures are often used as a decorative element of the facade. They are not used as a place for permanent stay and tea drinking.
Before you make a balcony in a wooden house, you need to understand what is the purpose of its use. If you plan to spend time in company and have tea parties on it, you will need a large area and, accordingly, a powerful base. It is better to install such structures on support pillars with a projection above the entrance area or veranda. As a canopy for large bases, it is better to use a roof extension, for which the rafter structure is calculated in advance.
If the balcony is intended to make the facade of the house unique as a decorative element, it is attached to an already erected wall. In this case, a cantilever frame with a stop is taken as the basis.
The location depends on the purpose of the structure and the overall design of the house.
Small balconies with a narrow entrance door and a width of no more than 1.5 m are well suited for sleeping areas. Such structures are not intended for long stays. Their goal is to create additional comfort inside the room and decorate the facade. In addition, it is so nice to go out on a summer morning to a sun-drenched open area and stretch after a light sleep.
Large platforms, more than 2 m wide, are mounted on racks. They are placed above the terrace, forming a protective canopy over the open area at the entrance to the house. To enter the site, double hinged doors are used, which will allow you to take out the dining table and chairs. For wide buildings, it is recommended to provide a row of wooden windows to the balcony along the entire length of the facade.
Preparing for work
Preparatory work, first of all, includes the creation of a project with calculations . If you correctly calculate the loads on the supporting structures, then the balcony is not in danger of collapsing.
The success of construction largely depends on the quality of the project. When preparing it, first of all, the location of the structure is determined . The classic option is the location above the entrance to the house. In this case, the porch columns will support the balcony base.
Experts recommend that at the stage of preparation for construction, it is simplified to calculate the load, taking into account the strength coefficient and weight of the following components :
- balcony designs;
- installed furniture;
- people going out onto the balcony.
There are other requirements for choosing the right extension design :
- for safety there must be a fence at least 105 cm high;
- the base of the balcony is mounted with a slope of up to two degrees, so that during precipitation the water flows out;
- The location of the balcony must correspond to its purpose. For decoration it is placed on the facade of the building, and for relaxation in quiet places;
- Additional equipment for the canopy will well protect the balcony from precipitation and extend its service life.
Construction of a cantilever balcony
Initially, the materials specified in the project are purchased and the tool is prepared. In addition, the project must include drawings with the dimensions of the parts. This will save materials and also simplify assembly.
Important! If an extension is being made to a house under construction, then the protruding floor beams are a good basis for the construction of a wooden balcony. In a built house, the best option would be to support it on pillars.
Before starting work, you must make sure that the location of the balcony door will not affect the strength of the load-bearing wall.
In a cantilever balcony, one of the options is used for mounting the base:
- pinching in the wall. Disadvantage: the width of the base is limited to one meter;
- support on cantilever beams. The dimensions of the base increase to one and a half meters.
Construction work is being carried out in stages:
- Markings according to the project are made on the wall;
- For the balcony beams, a wooden beam measuring 200 x 100 mm is prepared. It is pre-treated with antiseptic solutions;
- Holes are cut in the wall with a depth of at least 250 mm and a pitch of up to 1 meter. The ends of the beams, wrapped with waterproofing, are embedded in them;
- the ends of the beams are connected by a transverse beam, which is then used to secure the fence;
- to increase the load-bearing capacity of the balcony, wooden brackets are installed, which rest against the wall at an angle of 45 degrees. The brackets at the bottom of the beams are attached to the cross beam;
- sheathing for flooring from boards is laid on the cantilever beams; arrangement is being made.
Important! Be sure to treat the wooden surface with protective compounds!
Construction of an attached balcony
As in the previous version, work begins with the purchase of materials and preparation of tools. Unlike console structures, such structures are more complex to install and require more financial costs.
Stages of construction of an attached base:
- according to the project, markings are applied on the wall and in the places where the pillars are installed;
- for supports, pillars with a diameter of more than 140 mm are selected. They are treated with an antiseptic. The lower part of the pillars to the depth of installation in the ground is covered with bitumen;
- holes are dug or drilled. A sand cushion is placed at their bottom;
- the pillars are filled with concrete. For a closed balcony, the height of the pillars should be higher than the height of the ceiling;
- a wall support is attached under the door strictly horizontally along the entire length of the future balcony;
- at the level of the wall support, the pillars are tied with crossbars;
- the pillars are connected to the wall support with lathing, which is necessary for installing wooden flooring; arrangement is being made.
How to make a frame for a future balcony
When assembling a frame for a wooden structure, edged lumber from softwood is used. Before starting work, a sketch of the future structure is made, measurements are taken and the amount of material is calculated.
There are three options for a balcony frame:
- Based on protruding floor beams.
- On pillars.
- On the slopes.
In the first case, during the construction of a house, the interfloor floor beams are moved to the outer wall. It is permissible to extend timber with a cross-section of 150x100 no more than 2 meters. To ensure high strength of the outrigger beams, they are reinforced with 100x150 timber along the width of the balcony. This beam is placed under the beams and secured to the wall using 150-200 mm nails. The preparation of the frame based on protruding beams is completed by installing a 5 cm thick bonding board on the ends.
When the frame is placed on poles, a 100x150 beam is attached to the wall as a second support point. The mounting height of the timber should take into account the inclination of the future floor covering from the wall outward by at least 2 degrees. The pillars are connected to each other with 100x100 timber. Between the support beams, logs from 100X50 boards are laid, with a pitch of no more than 0.4 m.
The construction of the frame on slopes resembles the first option. The main support will be a 150x100 beam attached to the wall. The slopes are assembled in the form of right triangles from 100x50 boards and secured under the support beam. The ends of the slopes are connected with 100x50 boards, forming a closed loop. The frame is ready, then the floor joists are installed.
For all types of frames, the rule applies: the level of the future floor should be slightly lower than the level of the floor inside the room. In this case, precipitation will not be able to enter the room, but will flow down the floor covering to the outside.
When assembling the frame of the structure, you need to carefully finish the lower part of the site, since it is visible from below. Upon completion of the preparation of the frame, the balcony is finished with imitation timber or clapboard.
Arranging a roof balcony
Such designs come in 3 varieties:
- Pedimental. This type can be protruding or recessed, in the form of a small terrace.
- Roofing.
- Windows-balconies.
All these types differ in properties and installation methods.
Mansard roof with balcony Source e-dach.com.ua
Creating a pediment structure has the following nuances:
- One of the fronts should be arranged lower, based on the planned width of the structure. A hanging rafter system is used for roof cladding.
- The slab between the lower floor and the future balcony is lined with insulation and waterproofing.
- After which the partition is installed. The material used for such an element can vary quite a bit.
- The wall that separates the balcony should not be too thick.
Window-balcony Source deko.access.ly
Window-balcony also has its own design features. These include:
- This type consists of an upper and lower sash. The lower part will serve as a railing, and the upper part will serve as a canopy.
- Hinges will allow you to fix the lower sash in the selected position or move it carefully.
- When open, this design creates handrails.
How to make struts and columns for a balcony
Struts to strengthen the supporting structure of the balcony can be installed in two ways.
- Making a right triangle from a 100x50 or 100x70 mm board with a side equal to the width of the balcony. The triangle made is placed under the support beam and secured to the wall with nails or self-tapping screws. The free ends of the triangles are connected with a 100x50 mm board to form a closed frame.
- Single struts. Made from 100x100 timber. The ends of the timber are cut at an angle of 45 degrees. One end of the beam is attached to the wall of the house using nails and metal corners. The second end is attached to the outrigger beam from below. Thus, a rigid frame structure supported by the wall is obtained.
To get a more rigid and durable support for the balcony, the struts can be made from a metal corner with a shelf of at least 70 mm and a wall thickness of 4 mm
Columns are considered the most reliable support when assembling a balcony frame. Vertical posts allow you to extend the balcony by more than 2 m and extend along the entire length of the facade.
To install columns under a balcony, you need to perform the following steps:
- installation points are marked on the ground and wall of the house (if the columns will be duplicated on the facade);
- prepare pillars of the required size, taking into account immersion in the ground to the freezing depth. It is also necessary to take into account the height of the pole when installing a canopy over the balcony. The part of the post that will be in the ground is impregnated with antiseptic and bitumen mastic;
- prepare holes for pillars;
- a sand cushion 50 mm thick is poured onto the bottom of the hole and compacted;
- the pillars are put in place. Verticality is checked by plumb and level. To hold the pillars in the desired position, slopes are installed;
- the pillars in the holes are filled with cement-sand mortar;
- They tie the pillars, connecting them to each other and to the support on the wall.
To hem the base from below, imitation timber or lining is used.
The nuances and dangers of installing wooden frames
When making boxes and window frames yourself, it is necessary to impregnate the wood with antiseptics. On the outside, all surfaces are varnished with acrylic varnishes with water-repellent properties. The inside of the box and binding can be varnished with oil-based furniture varnish and polished.
Countersunk holes are drilled for through bolt anchors. This method allows you to disguise a metal bolt with a wood plug, which is not visible when the sash is open. At the same time, the metal fastening is additionally protected from rust. Do not use wedges or bars filled with mounting foam to strengthen the frame structure. They are not strong enough to withstand strong gusts of wind.
If you plan to install a balcony extension, it is better to make its frame from a metal channel, the parts are fastened by welding or bolted connections.
Installation operations at height are dangerous. When working with the upper fastenings of wooden glazing of balconies and loggias, it is recommended to use stable, wide scaffolding. The normal methods of insurance when mounting at height would be a mounting belt or a chest strap with a three-meter end of a strong rope. The rope is secured to the metal parts of the fence or tied to the door of the balcony block. It is not recommended to install the structure alone; it is better to work with two or three people.
What to make a durable balcony floor from
Floor boards for the balcony are chosen carefully, as they are subject to the main load and exposure to precipitation.
Logs are laid on the timber base in increments of 0.4 m, waterproofing is carried out, and only after the base has been protected, boards are laid.
To prevent water from stagnating on the balcony, the flooring is made with a slope of two degrees from the wall. The boards are not fitted tightly to each other, leaving a gap of 2 to 5 mm.
It is best to use larch or pine boards with a thickness of 40 mm for flooring. If funds allow, purchase a special decking board with a corrugated surface.
Methods of adding to an already constructed building
In the case where the presence of a balcony room was included in the design of the building, and at its base there are overlapping beams or a slab, the goal of the master is to enclose a certain space. In this case, there are no problems with arranging the frame on the balcony. But what to do when the need arises to attach a balcony room to a finished building?
Read more in the article “How to make a balcony with your own hands in an apartment.”
If it is made of high-strength materials, for example, brick or concrete, you can organize a suspended structure on brackets. The load in this case will fall on the walls. For dwellings made of building materials that are not durable (for example, slag and aerated concrete), a configuration based on one or two pairs of pillars is suitable.
It is also suitable for brick or concrete walls that have corrosion damage.
Waterproofing a wooden balcony
To organize reliable waterproofing, it is necessary to prepare a continuous subfloor. When installing the flooring, you need to ensure an inclination from the wall outward of at least 2 degrees. This slope will prevent water from stagnating in the place where the frame is attached to the facade of the house.
After assembling the flooring, they begin to waterproof the floor.
The following materials are used to protect the base:
- liquid rubber;
- rolled deposited materials;
- membrane materials.
To spray liquid rubber over the surface of a subfloor, you will need special equipment. Therefore, to insulate a balcony in a house with your own hands using liquid rubber, you will have to rent it. Before applying liquid waterproofing, you need to fill all cracks and joints of the boards with mastic. Preliminary putty will allow you to perform waterproofing more reliably and save material.
The roll material is laid using mastic or a burner is used to fuse the sheets directly onto the wooden surface. Using a torch to waterproof a wooden base carries a risk of fire. These works are entrusted to trained builders.
When laying roll material on mastic, first apply a liquid layer to the subfloor. Then sheets of roofing felt are laid with an overlap of 50-100 mm, which are also coated with mastic for adhesion.
The junction points of the frame to the wall of the house also require additional protection. Usually, the painting method of waterproofing is used to treat joints. To do this, the surface is treated with paints and varnishes with rubber additives.
Required materials and tools
Installation of lathing does not require expensive equipment or any high qualifications in the field of construction. In most cases you will need the following:
- Tape measure, pencil (marker);
- When working with wood, you need a tool for end cutting (hacksaw, jigsaw or power saw);
- Hammer drill, screwdriver, electric drill (as a last resort, you can get by with one impact drill with a set of necessary drills and bits);
- Metal scissors or a grinder for cutting galvanized profiles (if the sheathing is made of it);
- Fasteners (dowels, screws, anchors);
- Installation of insulation and waterproofing elements will require polyurethane foam and a stapler with staples.
- For wooden sheathing: timber 40x40 and lath 20x40;
- For metal: rack profile and guide;
- Insulation (mineral wool, expanded polystyrene);
- Waterproofing (vapor barrier).
How to make a fence for a wooden balcony
Balcony fencing protects residents from falling and has a special aesthetic value. Beautiful fencing in wooden houses attracts attention, so this design element is treated with special attention.
The height of the fence should not be less than 120 cm, the distance between balusters should not be more than 100 mm. The design load on the railing is at least 100 kg/m.
To assemble the fence, prepare the required number of balusters with spikes at the ends, railings and bars for fixing the balusters at the bottom. At the corners and in places where it abuts the wall, the fence is attached to support posts with a section of 60x60.
To install balusters, bars with grooves are laid around the perimeter of the structure. The baluster is fixed with the lower tenon in the groove of the base. The upper tenon is fixed with railings in which grooves are provided. All structural elements are secured together with self-tapping screws; if necessary, metal corners are used.
Wooden railings have a limited lifespan. Even with high-quality treatment with antiseptics and paints, they rarely last more than 25 years. Balconies with forged metal fencing are considered more durable.
Arrangement of the balcony base
These works require special care , since the reliability, attractiveness and longevity of the balcony structure largely depend on them.
Connecting the balcony frame to the wall
As a rule, the frame of a wooden balcony is made of wooden elements .
Firstly, wood has high thermal insulation qualities, and secondly, it goes well with various architectural styles.
Typically, the balcony frame is connected to the wall using bars fixed vertically to the wall at the ends of the balcony base. The height of the bars determines the size of the fence. The wall is most often covered with clapboard.
The lining made of pine and larch looks good and is durable . If the balcony frame is large, then round profile boards are installed (block house). This wall has a distinct log look.
Floor installation
The floor is mounted on the prepared sheathing . Forty-millimeter planed boards are chosen as the material. To prevent water from accumulating, they are laid with a gap of up to 2 mm.
For flooring on the balcony, terrace boards have proven themselves . They are durable, but at the same time easy to process. The corrugated surface of the boards is suitable for open balconies.
Fencing installation
A good fence not only has an attractive appearance that matches the architectural style of the building, but is also durable and reliable. Turned or carved balusters give a wooden balcony an attractive look.
Railings are made from different materials:
- Forged railings turn the balcony into a work of art. The number of possible ornament options is practically unlimited. Such fencing combines elegance with high strength.
- Wooden railings provide high safety and reliability. They are easy to manufacture and install. However, such railings have a short service life due to rotting under the influence of moisture.
There are certain rules that fencing for wooden balconies must comply with :
- the height of the railing is not less than 1.0 m;
- the distance between balusters is no more than 0.1 m;
- permissible horizontal load on the railing is not less than 100 kg/m;
- There should be no nicks or roughness on the surface of the railing.
Note! When choosing railings, you must first of all be guided by the safety of using the balcony.
Creating a canopy
Not every wooden balcony requires a canopy . It is equipped to create comfort and protect the balcony from the destructive effects of natural conditions.
It is easy to construct a canopy as an extension of the roof slope. In this case, it is enough to have longer rafters.
The simplest design is tying the top of the pillars to support the balcony base. After this, a sheathing is made on which the roofing covering is laid.
There are polycarbonate canopies mounted on the wall. Light materials that can withstand snow and wind loads are suitable for the canopy.
Processing of wooden elements
A mandatory requirement for all wooden balconies is protection from insects and weather conditions.
Protection will be effective if it is carried out comprehensively:
- applying primers;
- impregnation with antiseptics;
- coating with fade-resistant varnish.
Special requirements for processing cladding material on open balconies without canopies . Therefore, before installation work begins, the reverse side of the floorboards is coated with VISASOL antiseptic primer. It contains substances that prevent the formation of mold.
For wooden railings, an elastic, hard and weather-resistant varnish is selected . The best option is alkyd-urethane varnish. It is not afraid of mechanical influences, temperature fluctuations, or direct sunlight.
Note! Wooden fences must be treated with primer, impregnation and varnish from the same manufacturer. Only then will full compatibility of all coatings be guaranteed.
The outside of a wooden balcony must be coated with paint that matches the color of the house facade.
How to make a canopy for a wooden balcony
The canopy allows you to more effectively protect the wooden elements of the structure from the effects of precipitation. In the photo of wooden balconies in houses you can see various options.
There are two types of awnings for balconies:
- A canopy as a continuation of the common roof.
- Individual canopy over the structure.
The best option for protecting a balcony from precipitation is considered to be a canopy, as an extension of the roof. This method is planned in advance and is not suitable for attached structures.
To assemble an individual canopy, you will need to build a frame supported by a wall or an extension of the support posts. The frame is assembled from edged boards with a cross-section of 50 mm; a board 2.5 cm thick is used for lathing.
To ensure that the canopy over the structure does not fall out of the overall design, the same material is used for the covering as for the general roof.
To facilitate the construction of the canopy, polycarbonate sheets can be used. Polycarbonate is available in various colors, so choosing the right material for the overall design of the house will not be difficult.
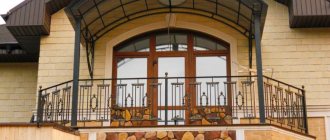
Design and forms
The open balcony structure of a semicircular shape will attract attention with its magnificent design. A fence and canopy with artistic forging will add even more elegance to the structure and turn the balcony into a bright area for relaxation.
The bay window is practically no different from the glazed loggia, but inside it represents a continuation of the interior of the room. A bay window can have many sides separated by windows.
The photo shows the design of a bay window balcony decorated with flowers.
As a decoration, it is appropriate to place boxes with large plants on the balcony, hang pots with flowers, and decorate the fence on the outside with hanging or climbing greenery.
How to choose a protective coating for balcony structures
The balcony of a wooden house is constantly exposed to aggressive weather conditions. Rain falls on the uncovered area, snow and fallen leaves accumulate on it. All this contributes to the rapid destruction of wood, even in houses made of laminated veneer lumber. The weakening of wood at joints is especially dangerous.
To extend the life of the balcony in the house, all wooden structural elements are treated with special compounds.
To strengthen wood, antiseptic impregnations, insect repellents, primers for painting and paints and varnishes are used.
Materials are treated with protective solutions at each stage of construction:
- when constructing the frame, beams and lintels are coated with an antiseptic and primed;
- the base of the floor is treated with an antiseptic and then protected with rolled waterproofing;
- the flooring is treated with a primer and painted with enamel for exterior use or varnish;
- The fence is primed and painted.
To protect floor boards, antiseptic primer VISASOL is recommended. It penetrates deeply into the wood structure and protects the surface from the appearance of fungus.
For the finishing coat, durable enamels for exterior use or alkyd-urethane varnishes are used. They retain their original color for a long time without fading in the sun, and they resist shock loads and temperature changes well.
To obtain the best result, impregnations, antiseptics and paints from the same manufacturer are used to treat the balcony space. They complement each other's positive qualities.
It must be remembered that repairs on the balcony are only cosmetic. To replace the supporting structures, you will need to completely dismantle the structure and build a new one. Therefore, you cannot skimp on quality protection.
A balcony in a private house is a good way to make your home more elegant, romantic and easy to use. Whether it's spring, summer, fall or winter, we all enjoy enjoying the outdoors. There are several different types, each suited to a specific style of architecture. It is very important to correctly combine the internal ergonomics and external stylistic unity of the facade of the house.
This is an important area in an apartment or house. It connects the interior of the house with the outside world. We usually use it for:
- Enjoying breakfast or reading
- Supervising children playing in the yard
- This room controls the penetration of heat and air into the room
- Increasing the area of the room
- We raise the price of real estate
- We arrange a storage place
Step-by-step instructions for installing wooden frames
Specialized companies usually accept orders for the production of expensive frames with three-chamber double-glazed windows along with installation. It is unrealistic to make such a design at home. Therefore, it is rational to consider the installation of simple glazing of balconies with wooden frames.
In terms of installation methods, installing sash with single or double glass differs little, but will save household financial resources (up to 20 - 30 percent of the cost of the window unit).
Tools and preparatory work
For installation operations you will need a small set of tools:
- plumbing tools (hammer, screwdriver, wrenches or socket bits);
- measuring instruments (tape measure, metal ruler, construction square, level, plumb line, laser plane builder);
- rubber mallet;
- carpentry tools (for finishing, sanding, varnishing, polishing windows);
- power tools (wrench, air chisel, screwdriver, electric drill, grinder);
- mounting guns for foam, driving dowels.
Kinds
A house project may involve very different design and construction solutions. The choice depends on the facade architecture and the purposes that they must fulfill. The article lists the most popular balconies in a private house - photos and detailed explanations.
Open
There are several benefits to having an outdoor balcony. One of the biggest is the ability to increase living space connected to the outside world. Another benefit is that an open plan above a home's porch provides more privacy than a porch or deck on the first floor. This is a good place to grow plants, as there is a lot of sun and oxygen at altitude.
It is convenient for those who want to enjoy the view without visual obstacles. Many people like to dine on their loggias. If there is enough free space, the open type will provide a good grilling area. There are many things you can add there - flower pots, flags, hanging toys, other accessories. This will enhance the personality of your property. There are many architectural designs that you can use to plan the layout of your outdoor space.
The balcony project in a confined space looks compressed and suffocating. There is little space for lighting and fresh air. It will save a huge amount of your time that you spend walking. This will ultimately benefit your health. You can get vitamin D, which is important for your productivity. There are always railings there to make outdoor recreation safer.
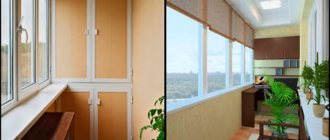
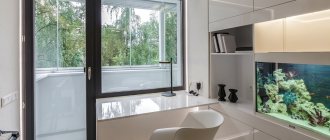
Closed
A closed balcony will create additional space for placing new furniture in the living room. This insulated space is suitable for storing items that should not be exposed to the elements. When you plan to enclose a loggia, you may gain additional storage space or additional usable area. However, an enclosed type will also destroy the space for comfort, as it pushes you away from the outside world of the street.
A home that has a high-quality enclosed loggia will bring you profits compared to a property without one. This is because the gallery property will look more aesthetically pleasing. Buyers always want a balcony with a stylish design that will provide them with more space. This type is safer than the open version. The height of the railing is not standard in relation to human height, so it becomes risky and unsafe to use. While the panel glass walls of a closed balcony will completely protect you and your child from falling. However, the closed type has a number of significant disadvantages:
- When you close the balcony, you have less space in the room for ventilation
- A covered balcony can prevent direct sunlight from entering the cottage. This may not be pleasant, especially during the winter season. A covered balcony is only necessary when you receive excess sunlight in your home.
- A house design with a beautiful balcony connects the homeowner with the outside world. The closed type blocks the view from the house. If your house has a park or/any open green area in front, then this balcony cover idea will disappoint you.
Frame lathing on the ceiling
DIY glazing frame
The elements are attached in the same way, but technologically it is more difficult to do. Planks are also attached along the perimeter of the ceiling. Their direction can be chosen arbitrarily; this will not significantly affect anything, but will help save money for the purchase of material.
Securing the screws in advance on the floor is mandatory; a screw that comes off can not only damage the eye, but also break our leg if we fall!
Also, if the insulation of the sheathing is not strong enough, you can fix the frame to a concrete base, this is essential for this surface, but it will be difficult to do this on the ceiling. To do this you will need a drill and an anchor.
One hole is drilled first from the edge of the block, then at the base - through the hole in it, the anchor is hammered in, and it is already held securely. After which the remaining holes are drilled at a distance of 30-40 cm. This design can reliably support even the heaviest existing slabs, for example, plasterboard.
Concrete
The advantages of concrete balconies - their durability, fire resistance and appearance - make them an attractive addition to any private cottage. Many people take advantage of the flexibility and durability of these balconies and often decorate them with carpets, tiles, furniture, and plants.
However, all external concrete balconies are susceptible to deterioration, although this may not be obvious to the owner. Cracks, peeling of concrete, corrosion of reinforcement are signs of deformation. Small cracks in a concrete surface may look harmless, but the gaps provide a place for moisture to enter.
Throughout its life, a concrete floor is subject to numerous freeze-thaw cycles that affect both the surface of the concrete and the potential structure. Scaling (also known as spalling) is localized spalling of surface mortar caused primarily by hydraulic pressure from freeze-thaw cycles affecting the concrete at the surface. As a rule, it begins with localized small cracks, which can later merge and expand. Remember that concrete balconies can be severely damaged by frost. Regular frozen water expands by about 8%, but water with salts can expand up to 16%.
conclusions
Is it possible to build a balcony yourself? Definitely yes, if you follow all the recommendations and use high-quality materials. The right location, well-chosen design and beautiful finishing will make the balcony the highlight of the exterior of the country house. So, a few general conclusions:
- the balcony should overlook the garden or courtyard; if it faces the street, it is unlikely to be used often;
- if several people will be relaxing on the balcony at once, its dimensions must be calculated in advance;
- often the balcony is located above the entrance doors;
- the maximum width of a cantilever balcony is 1.2 m, anything larger requires additional supports;
- a corner balcony structure can combine several rooms. It rests simultaneously on two walls and one column;
- the floor level of the balcony should be at least 15 cm below the floor level of the room, which will prevent rain or melt water from entering the interior;
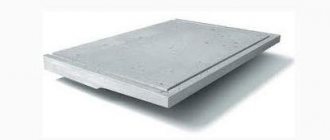
- a prerequisite is waterproofing the concrete surface of the reinforced concrete slab. Otherwise, when wet, the concrete will begin to crumble, and water will seep inside, causing corrosion of the reinforcement;
- the slab must have a special groove - a teardrop - which does not allow moisture to pass to the facade wall;
- a balcony slab is always a separate slab that does not have direct contact with the interfloor slab. You cannot use the main slab, pushing it outwards, to build a balcony, which can cause its destruction, as well as the appearance of cold bridges;
- It is imperative to ensure that water is removed from the floor. For this, drainage is used if a continuous fence is installed, and the floor itself is made with a slope of 2% in the direction from the facade wall to the drainage. Residual water, even with high-quality waterproofing, can eventually penetrate into the thickness of the slab and damage the reinforcement;
- Balcony fencing is not only a beautiful decorative element, but also a structure responsible for safety. That is why it must be durable, not subject to external influences in the form of solar heat, precipitation, wind and mechanical stress;
- any balcony must have a canopy. It not only protects from the sun, but also partially protects from snow and rain. Thanks to it, even in cloudy weather you don’t have to close the balcony doors - water won’t get into the room anyway.
The balcony installation video will be a useful additional instruction.
Bay windows
They are multi-section windows that typically extend outward from the exterior wall of the home. Although they can be used and are commonly found in all styles of home, they are most often found in Victorian or other traditionally decorated homes. Bay windows are popular for many reasons, but mainly because their large size and unique shape have the ability to fill a room with natural light and create a slight expansion of space.
Bay windows are usually three-sided, consisting of three or more windows. One window is parallel to the wall of the house, while the other two face outwards towards the interior wall, forming a trapezoidal shape. Typically, bay windows will add length and width of two to three meters, but this depends on the size of the structure installed.
Bay windows are very popular due to their aesthetic appeal. For this reason, adding a bay window to your home tends to be a very good investment if you ever sell your home in the future. Buyers often pay extra for improved natural light, and panoramic windows only increase this amount. In addition to providing better lighting, bay windows will help improve air flow in your home. They also add extra storage and furniture space, making them a popular choice for small bedrooms, living rooms or reading areas.
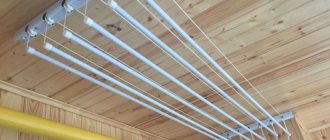
Ceiling installation: dryer installation
To lay the ceiling sheathing you will need a 20x40 mm cross-section batten installed at intervals of 40 cm.
However, if you plan to mount a dryer to the ceiling, the structure must be more rigid since the loads on such devices are quite large. It is considered optimal to use a beam with a cross-section of 40x60, fixed on a concrete base with anchors, at least every 80 cm (the smaller side is in contact with the rough ceiling).
Installation includes the following steps:
- For a four-meter loggia you will need 3 beams 4000x70x40 mm (or the same footage assembled from short pieces).
- Holes for anchors with a diameter of 10 mm are drilled in the block.
- When applying the blanks to the place of future fastening, it is necessary to mark the ceiling, and then drill holes in the concrete (also 10 mm in diameter) with a depth of 60 mm using a hammer drill.
- Next, using anchors 120 mm long, the prepared bars should be secured to the rough ceiling.
To ensure the ceiling is level, do not forget to align the bars with each other!
If there are significant unevenness of the concrete surface, they must be compensated with spacers (plastic, thin dry lath, MDF, fiberboard) of appropriate thickness.
If you are planning a small and lightweight dryer made of reinforced plastic, you can make bookmarks from the same bars.
We apply the dryer to the ceiling using markings
We fasten the block with three dowel nails
We measure the distance to the next bookmark
The process will become much more complicated if the floor is the last and there is no floor slab on top. In such situations, a so-called semi-loft or canopy is built, which usually requires a team of qualified builders. A rectangular structure is assembled from hardwood timber (oak, ash, birch, beech) or a thick-walled metal profile. The small leg of this design is rigidly fixed on the main wall of the building, the large leg will be the base of the ceiling, and the hypotenuse will be the slope (roof) of the canopy.
For plastic panels and drywall, a metal profile is perfect:
Wood
Classic wooden balconies often become central gathering places in residential buildings; it is important to make them durable and attractive to the eye. Choosing the best type of wood used for construction matters for long-term use and ease of maintenance. A wooden balcony is a very good choice.
The best wood is the one that can withstand the most stress. Pressure-treated wood, with an expected quality guarantee of around 15 years, is used in the vast majority of outdoor balconies, with "green" pine being the predominant variety. Usually the material is treated with an insecticidal preservative. Wooden buildings require additional treatment with repellent every two years. Redwood and cedar woods are naturally rot and insect resistant. When used, expect them to be good for about 20 years.
Design placement options
Usually the balcony is located on the central part of the house and shares a roof with it. This location option is best suited for low-rise buildings. This placement allows you to best arrange a recreation area, protected from bad weather and scorching sun rays. A fairly spacious space allows you to install folding or plastic furniture here: tables, chairs.
located under the roof of the building looks unusual and attractive Such a room can be successfully used to organize a flower corner.
Other details of balconies
It can be very difficult to find a table that requires a lot of space. If you don't have a regular set up, you can try this great folding table that conveniently attaches to your railing. When you're not using it, it folds down to maximize space.
Having a barbecue in your apartment is a huge advantage. There are small grills that you can attach to the railings. They are compact and convenient.
Plants add variety to the furniture in the cottage, add color accents, provide privacy and, if necessary, hide unsightly railings and walls.
Parapets
With railings that suit your home and surroundings, you can easily transform a boring cottage balcony house design into a modern and comfortable place to relax.
Wooden railings in private houses
Standard wood railings are the most commonly used railings. And there's a good reason for this. Wooden railings are an inexpensive option, they are comfortable and modern and give a wonderful view from the balcony in a country house. After some time, wooden railings need to be updated or changed. Often a wooden balcony in a country house is made with your own hands, which takes little time and helps make the house more individual.
Parapets made of polycarbonate and PVC in private houses
A polycarbonate canopy for a balcony in a private house is a popular alternative to wood. White has become a popular and classic color for such parapets. Available designs are the same as wood railings, but vinyl railings do not warp and do not require repainting or sealing.
Glazed parapets in the house
There's nothing better than clear glass railings. There are a variety of options available on the market, including solid panels or railings made of tempered glass or acrylic. Glass railings are quite expensive, but they are the best choice for cottages located on the seashore or near a lake.
Concrete parapets
Concrete railings are a durable and inexpensive option. You can use them in city buildings. Although there are not many designs available, these railings are durable and maintenance-free when compared to wood, glass or metal railings. If you want easy maintenance and durable parapets, choose this option.
Aluminum parapets
Aluminum railings are another option available in the market. Durable and lightweight aluminum is a suitable solution for many cottages with a balcony. This type is available in a variety of colors and styles, and you can definitely find a type that perfectly follows the design of your home.
Basic methods of building a balcony
For buildings built from logs or timber, the technology for constructing a balcony is similar. The only difference is the method of support. Supports can be made:
- beam-cantilever method;
- beam-supported.
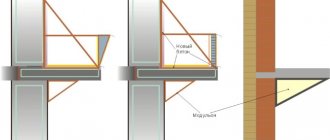
Diagram of types of balconies according to the method of construction in a private house.
In the first option, cantilever beams (logs) or simply extensions are located on the lower rims of the logs and are elements of the continuation of internal or external load-bearing walls. Among other things, such beams additionally decorate the facade of the house.
The cantilever method involves another option, in which the supports for the balcony are elongated beams of the interfloor floor, protruding to the required length beyond the facade. But many experts believe that this method does not comply with building codes and requirements, since moisture may enter the support beams, which will eventually lead to rotting of the wooden elements.
With the beam-support method of construction, the balcony is located above the veranda or terrace and serves as a roof for them. This option is much more often used in the construction of country wooden cottages.
The internal balcony is built mainly according to the French type, when it is arranged as a full-height window frame. That is, this is a small fenced area located immediately outside the door.
Let's take a closer look at each method.
Console method
When using beam-cantilever technology, it is necessary, when preparing the project, to determine the location and height of the loggia in order to release beams in this place during construction. For greater reliability, the other end of the beam should be attached to the main wall of the house. The fastening must be rigid.
Construction of a balcony in a private house on consoles.
The beams are usually released at 1.5-2 m. The beams themselves can be made of rounded logs or profiled timber
It is important that the outlet beams form a monolithic structure with the wall. If the width of the balcony is greater, then additional support pillars are erected
At the same time, a special screw mechanism is placed in the pillars to reduce the height of the supporting element by the size of the building's settlement.
To further strengthen the console, wooden or metal slopes are installed. The latter, made using forging, can serve as an additional element of facade decor. To strengthen the fastening of beams resting on the walls, battens are used.
The consoles, which are the basis of the design of a classic rectangular loggia, are connected by one beam, then a rough flooring is made and a finishing floor is laid on top of it. The outer floor beams are securely attached to the horizontal frame posts of the wall, and the rest are attached to the battens.
The canopy over the loggia is made separately, or is a continuation of the roof of the cottage.
If the balcony is purely decorative and has a width of no more than 1 m, then in this case you can use wooden trusses as a support. They are attached to the wall with special brackets. But there is a significant drawback. Over time, the fastening loses its appearance under the influence of precipitation and dirty rust stains appear in the fastening areas.
Construction of a balcony on racks
Owners of country cottages most often prefer to build balconies on racks that rest on the base of the veranda or terrace. In this case, the base of the balcony serves as a roof for them.
This method is used when the balcony is large, or it is not possible to use a ceiling under the base of the loggia. Of course, this option will require more significant costs, but the size of the balcony and, accordingly, the terrace under it can be any. You can place a parking lot under the balcony.
Attaching a balcony to a private house using the beam-support method.
Support posts with this method can be wooden, metal or brick. They are usually located along the outer edge or on both sides of the loggia. The inner part of the racks rests on a beam, which is rigidly attached to the wall.
Support posts are installed in accordance with the following technologies:
- The logs are taken slightly smaller than required. Initially, bars are placed under them, and after the house shrinks, they are removed, thus leveling the loggia. But, nevertheless, there should be an outward slope of about 2% so that the water does not stagnate, but flows freely.
- The racks are installed on jacks and then tightened as necessary.
- The beams or logs are set strictly according to size, and when the building shrinks, they are simply sawed down.