A loggia or balcony is usually not used as additional living space. After all, almost forty percent of the warm air in the room comes out of the windows. Double-glazed windows, very high in terms of price and quality, installed on the balcony doors also do not help: they cannot replace the thickness of the walls, which is at least sixty centimeters. There is only one way to save it - to insulate the loggia at the same time as completing all its external decoration. Modern technologies provide the opportunity to choose the appropriate type of finishing structures.
Each type differs from the other in properties and external parameters, so everyone can choose which one they want. The article reveals the main topics, including the principle of fastening, properties and care of the skin in various views. Most of all attention is paid to studying the features of finishing with profiled sheets. What is corrugated sheeting, how to install it correctly, what tools and equipment are needed, how to ensure safety during work? The answers to all questions asked will be indicated in this article.
Initial steps for covering balconies with corrugated sheets yourself: installing the frame, fastening the sheathing
This process requires maximum caution due to the lack of a protective barrier in the form of asbestos boards. The whole work is not very complicated and consists only of connecting wooden blocks with a metal frame.
Sheathing a balcony from the outside is dangerous work. For safety, observing safety precautions, it is necessary to use a drill and a metal drill to form holes in the iron frame at a distance of no less than 100 and no more than 120 centimeters from each other. The diameter of each should be three and a half millimeters. It is best to do this not alone, but with an assistant, because you will need to drill in awkward positions, which adds danger. Starting the cladding from the third floor, it is advisable to have a safety belt.
The next step is fastening the pre-prepared mounting rails using holes and screws made with a drill. The frame racks, made of wood, should have a width of 4 centimeters and a thickness of 2 centimeters. They are attached with a screwdriver.
Wooden slats cover each metal rod located on the frame, both vertically and horizontally. They must be the same length from one corner of the balcony structure to the other.
The slats that are missing in length in the frame are supplemented with pieces, attaching them with screws. The result is one horizontal, straight line.
Tools required for installation
Finishing a balcony with a metal profile can be done with your own hands. If the loggia is not on the first floor, then you cannot do without a climbing rope and an assistant who can hold the installer. The following tools are needed:
- Wooden slats 20x45 mm;
- Self-tapping screws;
- Corners;
- Screwdriver;
- Roulette;
- Bulgarian;
- Hacksaw for metal;
- Hand jigsaw.
In most cases, cutting a metal profile is carried out using a hacksaw; it can be used to make a neat cut without nicks. It is convenient to use a jigsaw to cut a metal profile whose corrugation thickness exceeds 25 mm.
How to fix a profiled sheet on a balcony?
Covering the balcony with corrugated sheeting allows you to protect the structures and give them a decorative appearance. Profiled sheets make the product more impressive. Typically, manufacturers of this material offer it in a variety of shades that are in harmony with the color of the façade of the building.
The first stage of covering a balcony with corrugated sheets is to choose the method of fastening it. Corrugated sheeting, as a rule, has a width of 1100 to 1200 millimeters. Such parameters make it possible to secure it horizontally and vertically. Vertical fastening consists of using appropriate strips to ensure that all sheets are correctly installed together. This is necessary to give a neat look.
You can also use silicone sealant to seal the structure and create a tight seal at the joints of the product.
When installing corrugated sheeting, it is necessary to leave a gap between it and the wall, as well as at the corners of the balcony, after each sheet. The size of this gap is from 5 to 10 millimeters, where the corresponding corner profile is mounted. It performs the function of creating structure decor and reliable sealing of areas where corrugated sheets and building structures are connected to each other.
How to cover the ceiling
On a glazed balcony, the ceiling is often sheathed either with the same material as the walls, or with plastic panels. You can make a ceiling from plasterboard.
If we are talking about an unglazed balcony or loggia, then the ceiling is usually sheathed with siding. It is inexpensive, washes well, is easy to install and at the same time holds up well.
See the photo below for several ideas for finishing unglazed balconies.
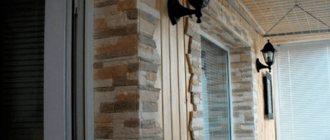
How to sheathe without glazing: a combination of a plastered painted surface and decorative stone
Porcelain tiles on the floor
Finishing, covering a balcony or loggia with corrugated sheets or corrugated sheets with your own hands: step-by-step instructions
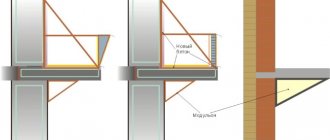
At the initial stage, the balcony sheathing is made, onto which metal sheets are installed. It is usually treated with an antiseptic. An anti-corrosion liquid is applied to the metal sheathing.
This frame is connected directly to the metal structures of the loggia, without any additional effort. The only thing is that the metal elements are first cleaned, primed and lubricated with an anti-corrosion agent.
The frame is assembled from wooden or metal slats. The method when metal is used is quite complex; wooden parts are much easier to install.
The outer frame can be sheathed using two methods:
- Straight or classic. In this case, the profiles are installed parallel to the walls of the balcony. The advantage is that they are easy to fill with insulation, onto which the sheathing can be easily applied. Mineral wool is very often used as insulation;
- Using oblique stems. With this option, the location of the profiles will be in front and on the sides of the balcony. Making a frame using this method is much more difficult than the previous one, but as a result, the room in the loggia is significantly increased and the dimensions of the window sill are expanded.
The main rule is to always treat all slats with antiseptics, regardless of whether they are wooden or metal. This is necessary to prevent rotting of the sheathing, which is especially true in regions where there is a mainly humid climate.
Before attaching a wooden beam to a metal fence, you will need to make holes using a special drill. Fastening is carried out with screws, along with screws of standard sizes. As a result, the length of the slats is the same as the length of the loggia itself.
You will need bars measuring forty by twenty millimeters. The frame needs to be connected at the corners, which is considered a difficult task. The frame elements must be connected so that there are no discrepancies at the corners. Often, this is not so easy to achieve, so the blocks are fastened at the corners with appropriate screws.
At the next stage, they begin finishing the loggia with professional sheets. How to install profiled sheets is indicated below.
Sheathing an outside balcony or loggia using profiled sheets is not at all difficult, even without the help of specialists.
The main rule is to do everything sequentially, according to step-by-step instructions.
In detail, with a description of each stage, it looks like this:
- Carry out dismantling work yourself to remove the old finish.
- Clean and dry the surface thoroughly.
- Next, a sheathing or frame is formed. For independent work this is not at all difficult. You need to put aside all fears, because any mistake can be corrected. The work of specialists will not be cheap at all: at least 15 thousand rubles for a standard loggia, up to 5 square meters in size. For those who do not want to give money to specialized companies, you can make the finishing yourself. But it is better to do this with an assistant, for safety reasons.
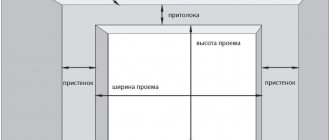
The slats are fixed into the drilled holes in the balcony railing. The holes are made of light metal, the diameter of which is three and a half millimeters. They must be drilled in two rows, in places of the supporting slab, at a distance of up to 1.2 meters from each other. The lowest rail should be attached, leaving the opportunity to reach this part in the future, if necessary, using a screwdriver, for secure fastening.
During the installation process, if the balcony is located above the first floor, at least two people and at least one safety rope will be required. Fastening of corrugated sheets is carried out only with insurance, because the dimensions of the sheathing are quite extensive. The length of the profiled sheet is one meter and 20 centimeters; it completely covers the frame. The width of the element can be from 5 to 15 centimeters, depending on the overlap of the sheet on the sheathing.
Installation is carried out using self-tapping screws with caps of a certain color; they generally match the shades of the sheathing itself, but for an unusual design you can use contrasting colors. Also, the self-tapping screws should have special rubber washers, which provide additional waterproofing of the joint areas. They should be screwed into all two rows of recesses made on the inside of the bend.
The structure and part of the wall must be separated from each other by a gap equal to half a centimeter, where the internal corners are attached. A corner that is not completely adjacent to the wall requires additional reinforcement or sealing, which can be made with self-tapping screws. The thickness of the metal sheet is quite thin, so screwing in the screws should be done extremely carefully to prevent damage. Installation of external corners is carried out similarly to internal ones.
A question of cost
At the moment, the cost of 1 m² of the thinnest 0.4 mm profiled sheet starts at about 150 rubles. A more or less durable product, that is, with a thickness of 0.7 mm, will already cost about 250 rubles.
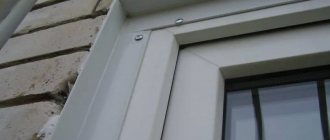
Attaching the outer corner.
If you like a “smart” polymer coating, then be prepared for the price to increase by about a third. Here, a sheet with a thickness of 0.4 mm will cost no less than 200 rubles, and the price for a thick profiled sheet starts from 300 rubles per 1 m².
Corrugated sheeting is approximately in the same price niche as corrugated sheets. As for metal tiles, they can be 20% or 120% more expensive than corrugated sheets. In this case, everything depends on the ambitions and appetites of the producers.
As for hiring a team, classically it has always been assumed that the labor of a hired worker costs the same as the material. But this principle is not always respected. The appetites of the craftsmen mainly depend on the region.
The difference between a self-tapping screw for wood and for metal.
More precisely, at first they may agree with you and tell you the approximate cost of the material. But then it turns out that you will need to pay extra for cleaning and preparing the balcony, garbage removal and other things that you did not think about, but the deposit has already been received, and you will still have to pay for the work. So when you draw up a contract, take these nuances into account.
So in Moscow and St. Petersburg, the cost of 1 m² of cladding based on galvanized profiles reaches 1,200 rubles. And in the vastness of our great homeland, the average price fluctuates around 500 - 700 rubles per 1 m².
As an example, I have compiled a small table for you with average prices for one of the popular brands.
| Marking | Sheet thickness | Weight of 1 linear meter of sheet | Cost of 1m/p including VAT |
| S10-1100 | 0.4 mm | 4.4 kg | 220 RUR |
| 0.5 mm | 5.4 kg | 248 RUR | |
| 0.7 mm | 7.4 kg | RUR 343 |
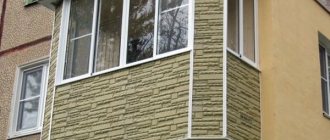
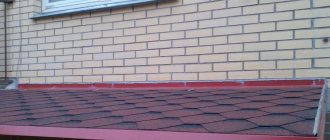
Original design of a balcony covered with corrugated sheets.
Specifics of do-it-yourself installation of external materials for cladding the outside of a balcony
Currently, balconies are sheathed with the following materials:
- siding - panels. Covering a balcony with siding from the outside can last up to fifty years. The panels are laid horizontally;
- plastic lining. Its service life is shorter than that of siding panels, so such cladding cannot be called profitable (for more details, see the article “cladding a balcony with clapboard“);
- corrugated sheeting;
- steel sheets coated with an anti-corrosion galvanized layer. There are also proposals with a polymer coating made of plastisol or polyester, which increase decorativeness and preserve the appearance of the material for a long time.
The advantages of this material are as follows:
- resistance to external temperature influences;
- excellent flexibility to cover areas with curved lines;
- wide range of color options.
Plastic linings are mounted vertically.
Finishing from profiled sheets is widely used, because their composition has a number of features:
- high service life;
- ease;
- simple installation;
- resistance to external conditions of the surrounding atmosphere;
- no risk of fire;
- variety of color options.
Siding - an option for covering loggias and balconies
Siding is the material from which the external covering of structures and structures is made.
Features of siding include such parameters as:
- a varied palette of shades;
- long service life;
- resistance to shocks, as well as temperature changes, but not more than 60 degrees.
Siding is ideal for humid climates, as it has a coating that cannot cause the formation of fungus and mold. Caring for such a finish is not at all difficult; it is enough to remove dirt from its smooth surface with a damp cloth. You can also use detergent if necessary.
Siding is not susceptible to swelling or peeling. This facing material is distinguished by elasticity, elasticity, high strength, shockproof ability, and is not subject to mechanical stress. The siding surface is usually scratch-free and has the ability to effectively remove moisture and condensation, removing sediment and excess water from the walls.
Installing siding on a balcony railing does not cause much difficulty, giving you the opportunity not to seek help from specialists. To do this, you will need to stock up on strips and fasteners.
There are two ways to attach siding:
- Vertical installation of panels.
- Horizontal - in the form of a “ship plank” and “herringbone”.
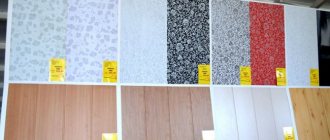
Plastic lining as a finishing material
Plastic lining is often used as a finishing material.
It is known for such advantages as:
- efficiency;
- durability: service life of 15 years and above;
- moisture resistance;
- resistance to mechanical loads and atmospheric influences;
- high sound insulation and thermal insulation;
- attractive price;
- multifunctionality.
This is a highly heat-resistant material with good insulating properties. The outer shell of the lining does not lose its qualities for fifteen years in very or moderately cold climates. In this case, the air temperature should not be higher than fifty degrees, or minus fifty.
The above advantages of this finish are the main criteria for excellent cladding of balconies and loggias, both from the inside and from the outside.
Plastic lining is assembled in an easy and quick way; there is practically no dust, dirt and other residues left on it, which are always noticeable when a routine repair is completed.
Thanks to its design, which consists of stiffening ribs, the lining has quite durable properties. It is fastened to wooden or metal battens, as well as to appropriate plastic guides.
Installation is carried out using self-tapping screws that have flat heads. They also use a stapler and clips for plastic guides. The corners of the joints of each panel are closed using an internal as well as an external corner.
The fastening of the sheathing is connected to the walls of the loggia, at a distance of 40 to 50 centimeters from each other. The width of the logs - slats made of edged boards - must be no less than forty and no more than fifty millimeters.
They are mounted perpendicular to the lining. For vertical placement of planks, which is most common, the sheathing must be installed horizontally. However, there is also the installation of plastic lining with vertical fastening of the sheathing.
Installation of metal profile
To cover the outside of balconies, the metal profile is laid horizontally. There should not be any difficulties with the height of the product - it should be such that during the installation process the metal profile can cover the outer side of the loggia as accurately as possible.
Since during the installation of the sheathing the height of the metal vertical rods of the frame was already measured, 10-15 cm should be added to it and the sheet should be trimmed. In all cases, the length of the balcony is greater than the width of the metal profile sheet. Based on this, two sections of sheathing are made, which will in total cover the outer space of the frame.
The overlap should be 10-12 cm. The function of fastening elements is performed by self-tapping screws equipped with sealing washers. The screw head is selected based on the color of the sheet. The sheathing is fastened from corner to corner.
It is recommended to tighten the screws using a screwdriver so that the sheet is subsequently tightly pressed to the frame. You shouldn’t over-tighten it either, since the sheathing may move a little under the influence of outside temperature. To avoid such deformations, there is no need to tighten the screws all the way; it is best to leave 1-2 mm free.
The fastening line should be lined up evenly, this will improve the aesthetic appearance of the facade. Self-tapping screws are screwed only into the area where the wave of the sheet goes deep inside. The screw fastening step should be 30-50 cm. The finishing of the balcony should look symmetrical, and therefore corner profiles should be used to decorate the corners.
If they are not there, then you can simply bend the metal profile around the corner and secure it with screws; the same actions are carried out at the junction of the sheets with the wall. To insulate the resulting skin, mineral wool is placed underneath it, and a layer of vapor barrier film is secured on top to protect it from moisture.
Why should you choose corrugated sheets?
Corrugated sheeting has a slightly higher cost than other materials, but differs from them in the following advantages:
- reliability;
- long service life;
- resistance to external wind influences and direct sunlight, without losing color qualities;
- ease and simplicity of fastening, as well as transportation;
- impeccable fire safety;
- the presence of plastic finishing materials that do not cause unpleasant odors.
To the listed advantages of this type of finishing, you can also add its absolute tightness. The production of corrugated sheets is carried out in the form of sheets, the length of which is sometimes 12 meters.
Therefore, when performing the outer cladding of the loggia, you will not have to deal with discrepancies in certain places. This eliminates the risk of water getting inside the structure, and the additional heat created by the insulating structures is not lost.
Finishing from corrugated sheets is much easier due to their light weight. People often ask what color metal profile to cover the loggia parapet with. For example, covering a loggia with corrugated board in a color reminiscent of wood will create the impression of the natural origin of the material.
During the installation of finishing elements, insulation of the balcony is carried out in parallel. Due to their high strength, profiled sheets provide reliable thermal insulation, and their surface provides the necessary ventilation. These features allow the use of thermal insulation materials containing basalt or mineral fibers. The listed insulation materials are highly sensitive to moisture, which can harm their thermal insulation properties.
Here are some recommendations on how to use profiled sheets for finishing loggias or balconies:
- On the top floors, along with the cladding, it is possible to install a roof over the balcony. For the roof, the same material is used, in which stiffening ribs are present in greater quantities than for finishing balcony railings;
- To prevent strong noise in rainy weather, it is recommended to install corrugated sheeting on the insulation. But it is impossible to completely eliminate the sound of rain due to the properties of the material. Read more in the article “soundproofing a balcony roof.”
However, when a reliable sealing of the loggia is created, the penetration of noise into the apartment will be very weak. This disadvantage is covered by its low cost. In addition, using a profiled sheet, it becomes possible to design the exterior of the balcony according to your preferences. For example, an interesting option is when the cladding is installed, which consists of pieces of corrugated board of various shades in one balcony structure.
About the painting process
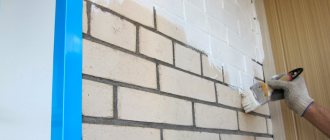
You need to understand that the process of painting a brick wall is not so simple. This is due to the fact that such surfaces are difficult to process. Regardless of the choice of paint, you need to additionally treat the wall surface with a sealant. Applying a sealant is necessary to prevent the paint from coming into contact with dust.
If you want to leave the color of the brick in its natural form, then you need to use special sealants designed to care for brick surfaces.
It is best to paint brick with a brush, this way you can process the seams more efficiently and efficiently. Paint for brick walls, due to its special texture, is able to hide imperfections well - stains, streaks or boundaries between salts will not be noticeable on the surface. But you shouldn't abuse this. It is better to apply the paint immediately and carefully.
Article on the topic: Design and decoration of walls on the balcony: possible options and non-standard solutions
All areas adjacent to the surface to be painted, as well as all borders, should be covered with masking tape. Place paper or film under the wall to be treated. This is done so as not to waste time scrubbing the paint off the floor.
Paint is applied to a brick wall in several layers - most often it is two layers. In this case, the second layer is applied only after the first one has completely dried. This process can take from 7 to 9 days.
In most cases, paint and varnish coatings are applied to already prepared walls, but there are many different situations when you can save on preparatory operations:
- The painting process begins from the corners, where stripes are drawn out with a brush - each width is 2-3 cm.
- The entire surface is painted with a roller or other convenient method. If a mechanical method is chosen for work, then it is necessary to use a compressor that can create a pressure of about 2-3 atm.
- The paint is also applied in two layers - after 10-20 minutes. Brick does not always absorb paint evenly.
- To make the layers of applied coating dry and harden faster, it is recommended to use hardeners. These are inexpensive but very effective means for drying any surface.
The resulting coating will be as reliable as possible; it can be washed with ordinary water and non-aggressive detergents. Acrylic and latex based paints are odorless and will withstand any repair. If a small area of the surface is damaged, it can be repainted - there is no need to paint the entire wall. Over time, the color of this area will merge with the color of the rest of the wall.
On video: how to paint brickwork.
Metal finish
Sheathing a balcony with painted corrugated sheeting is as easy as vinyl siding. It’s even easier, especially if you have an assistant. The frame for this type of siding is made according to exactly the same principle as in the case of vinyl siding. The strength of the new base can be achieved using wire or special galvanized clamps that secure wooden blocks.
Installation work when sheathing a parapet with sheeting begins with the installation of the sheets themselves. To do this, use roofing screws that have the same color as the material itself. The correct installation is checked by a building level, which is applied to the upper edge of the metal sheet. Screw the screws through the wave. This is enough to obtain a strong connection.
When all the sheets are fixed in place, additional decorative elements are attached. This is precisely what distinguishes the process of covering a balcony with vinyl panels and corrugated sheets.
Previous entry A high-quality aluminum window profile will help you glaze any space
Next entry Adjusting handles and hinges on a plastic window
Conditions for effective external insulation
Before you insulate your balcony from the outside, you need to take three important steps:
- strengthen the parapet;
- replace double-glazed windows;
- coordinate the work.
A parapet is a fence made of wood, metal or plastic. In older houses, it is not designed to support the weight of new double-glazed windows and insulation. Without preliminary strengthening it will collapse. Metal reinforcement is used, brick inside the balcony or complete replacement of the parapet with brickwork.
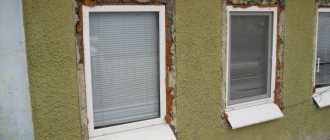
Replacing double-glazed windows before insulating the balcony from the outside will help reduce heat loss. The reason cold air enters the house is cracks. Wooden frames especially often suffer from this, but plastic frames are not without a similar drawback.
Structures on the external wall of a building change its appearance, affect technical characteristics, and may cause inconvenience to neighbors. Therefore, such work requires approval. If there are no documents, regulatory authorities may require the insulation to be dismantled.
External insulation of a balcony requires preparation - only then will it be effective and legal. Incorrect preliminary work will negate all efforts at thermal insulation.
Advantages and disadvantages of external insulation
The benefits of insulating a balcony are immediately noticeable: an increase in temperature in the room next to the loggia and the ability to use additional living space. If you organize heating (electric or oil heater), you can get a full-fledged small room.
Benefits of the external method:
- the balcony area remains the same;
- less risk of condensation;
- more effective thermal insulation.
Disadvantages - external insulation is labor-intensive; it must be installed by specialists on all floors above the first. Necessary approval.
Whether or not to insulate a balcony is up to the owner to decide according to his own taste. But when choosing a method of work, external factors should be taken into account.
Work begins with dismantling
Before covering the balcony with siding from the outside, you need to remove all interfering elements. Any materials located on the parapet, as well as objects that could interfere with work, must be dismantled. As a result, there should be nothing left on the balcony except a metal frame, which is a fence.
Next, you should carefully inspect the concrete slab and parapet. If cracks, shedding or rust are noticed, they must be eliminated so as not to weaken the future structure in the future. The old metal parapet needs to be strengthened. A galvanized strip is perfect for this; it can be used to strengthen the connection between the concrete slab and the old fence.
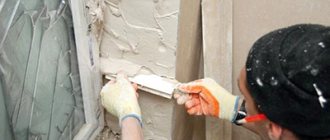
Afterwards you will need to coat the metal with a primer, having previously cleared it of any existing paint. Concrete should also be covered with an anti-corrosion compound to prevent any destructive processes. Once these steps are completed, you can move on to the next stage of work.