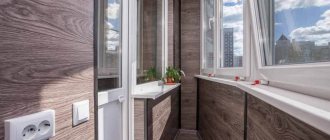
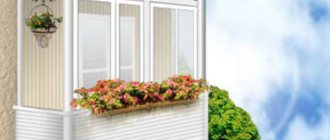
MDF panels perform not only a decorative role in a room. With their help, you can visually expand the space and create additional storage space. In Soviet-era apartments, this function becomes indispensable, especially on the loggia, which the owners were accustomed to using as a storage room. Plates of this material cover not only the walls, but also the ceiling. Finishing balconies with MDF panels has become popular relatively recently; the method is considered safe and environmentally friendly. This ensures thermal insulation of the entire room, maintaining a comfortable climate for people and plants.
What are MDF panels
The abbreviation is translated from English as fibreboard material. Used for finishing walls and ceilings of various types. Including for balconies and loggias. Decorative coating for vertical surfaces is similar to plastic panels. But they are made from natural wood raw materials. Their colors match the natural shades of wood, are pleasant to the touch, and have a rounded, smooth surface.
Made from wood processing waste. In fact, this is the twin brother of Soviet chipboard, but created using new technology. The composition does not contain dangerous resins or phenol. The presence of paraffin and lignin is allowed.
The basis of the composition is wood dust, which is obtained from sawdust. After grinding, it is dried and fired in ovens. When heated, lignin is released and processed into powder. Afterwards, the raw materials are pressed, panels are formed, and cut. Cover with melanin film with a natural wood pattern.
The structure is pliable, with properties similar to cardboard or plywood. Easy to cut, has excellent thermal conductivity. Can be painted any color.
Varieties
Production is carried out using the same technology; they differ only in external finishing:
- Veneered . The top layer is wood veneer. During production, several types of wood are used simultaneously. Externally, such MDF panels look natural and imitate natural wood. The cost of these products is the highest among those presented.
- Laminated . The most popular option, covered with melanin film. MDF panels for balconies are usually selected from this type of product. A lot of color options and images have been developed that are applied to the film. The top of the veneer is covered with a laminated film to create the effect of exclusivity and respectability.
- Painted . The outer coating of such slabs is paint. The color can be any, imitation wood is not used.
Preference in the choice is made based on the characteristics of the room where the finishing is done. Panels with lamination protect from moisture, while expensive ones with veneer protect from scratches.
Design solutions
The external attractiveness of the finish is ensured in various ways. The photos of the designs show some interior design options. The following characteristic design solutions can be distinguished:
- A combination of different stripe arrangements. Even modest white panels with a harmonious combination of vertical and horizontal slats, emphasized by PVC profiles, create an original interior.
- Color scheme in the form of a general background. Warm colors create coziness. Pastel colors add a special touch, contributing to a pleasant rest. The photo shows an example of design in pink.
- Colour contrast. Modern design styles widely use a combination of black and white, red and white and other opposing shades.
- Striped wall. Colored stripes can visually change a space: a combination of light and dark stripes in a vertical direction increases the height of the room.
- Drawing. Plastic panels are available with bright patterns and ornaments. Their different locations allow you to create a colorful interior.
- Imitation. This method is widely used when decorating a balcony. Popular materials include precious wood, natural stone, marble, granite, and paper. You can imitate ceramic tile cladding.
Plastic panels allow the designer's imagination to unfold. There are many design options. Which one to choose depends on the preferences of the master and the overall design style of the apartment.
Is it worth using MDF panels for cladding a balcony?
For this area of the house, materials that are highly wear-resistant, can easily withstand low and high temperatures, are stable, and are not heavy in weight are suitable. Finishing a balcony with MDF panels is one of the most popular design options. Consumers like the material for its performance properties, variety of colors, and ease of installation.
The cost, compared to similar types of finishes, is usually lower. There are a number of special advantages:
- externally look presentable;
- resistance to temperature changes in the environment;
- They are easy to care for, moisture resistant, and can withstand cleaning with detergents;
- variety of design options.
The material can be treated with any detergent, it is unpretentious. Warning: Aggressive chemical compounds should be avoided to avoid damaging the laminating film and the entire board behind it.
On the balcony, MDF plates perform a soundproofing function. Installation can be done with your own hands; it does not require special skills or the use of special equipment.
Finishing material options
Wooden lining
It is better to use coniferous wood for cladding balconies. This type of lining is most resistant to changes in temperature and moisture.
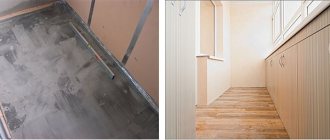
Floor and wall cladding with wooden clapboard.
To ensure that the elements do not lose their visual appeal, timely protection against darkening during operation is necessary. You should also avoid damaging the surface.
The use of lining provides an effective finish and comfort in the room.
Finishing the surface of the walls with clapboard, linoleum was chosen as the floor covering.
PVC panels
Cladding with PVC panels is an economical finishing option. The elements can be easily installed on a wooden frame using self-tapping screws. If the walls are fairly even, there is no need to create lathing; in this case, special glue is used for fastening.
Covering with PVC panels.
Mandatory operating conditions: the indoor temperature must be + 5 degrees and above.
In order to preserve the appearance of the panels from fading in the sun, it is necessary to decorate the windows with curtains or blinds.
Drywall sheets
Using drywall, you can create curved shapes due to its good flexibility. The surface is painted, decorated with decorative plaster, wallpaper or artificial stone.
The base is drywall, the top layer is wallpaper.
A combination of decorative plaster and wallpaper with a bamboo texture.
Artificial stone and plaster.
The final finishing layer is wallpaper.
The main disadvantage is poor moisture resistance. It is better to use a moisture-resistant version of drywall (GKLV).
This method does not require large time and financial costs.
Cork
Decorating the loggia with sheets of cork.
The raw material for the manufacture of panels is cork oak. Sheets of pressed cork are produced in a small thickness. The flexibility of the material makes it easy to form and install elements yourself.
Cork material can be installed not only in an insulated room, but also on a cold loggia without double-glazed windows.
The sheets are resistant to sun exposure and do not absorb moisture or odors. The main disadvantage is the cost - from 400 rubles. per sq. m.
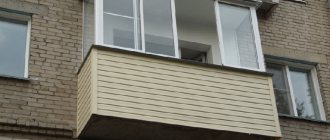
Siding
Siding in a completed project.
Vinyl siding is used for interior wall surfaces. The cost of the material is low - from 180 rubles. and more (per sq. m).
Main characteristics:
- Harmless to humans;
- High level of resistance to cold temperatures and fire;
- Light weight.
It is better to purchase white panels. This color is not subject to change over time; sun stains will not be visible on the surface.
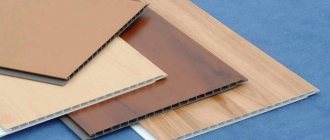
MDF panels
There is a large selection of shades and textures of MDF panels on the construction market.
For production, compressed wood is used, which is pre-dried. The material is laminated on top. MDF surfaces can be colored (film) or replicate the texture of wood (veneer).
MDF panels imitating the texture of natural wood.
Pros: affordable price and possibility of self-installation. The downside is poor resistance to moisture and low temperatures.
Block house
The material is made of metal, wood or vinyl. The shape of the elements is a rounded log. The imitation of a log house in the decoration of the loggia looks impressive and rich. The use of a block house is not appropriate in small rooms, since the area will become even smaller due to the thickness of the material (3.6 cm).
Block house in the interior of the premises.
It is better to choose a vinyl block house. This will reduce the load on the floor and walls.
Lining made of plastic
This is the most economical way of cladding a loggia. Cost of 1 sq. m starts from 130 rubles. Feature of the material: practical, has good sound insulation and high thermal conductivity; elements can be installed even if the room is not insulated.
Plastic lining.
The operation of plastic lining is permissible both in cold conditions and at high temperatures.
Stone
Imitation of natural stone in the design of a balcony.
Artificial stone in the balcony space looks reliable and presentable. Manufacturers indicate a service life of 15 years or more. The stone surface can be used in different temperature conditions. The finish is not afraid of moisture and prevents the occurrence and spread of fire.
Disadvantage: the cost varies in the range of 400-2000 rubles (price per package).
How to take measurements correctly
Correct calculation of the square meters that will be required to finish the balcony will save you from wasting time on remodeling and re-searching for suitable material.
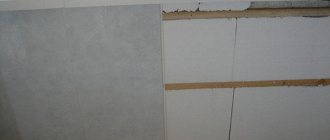
MDF boards look like boards in appearance. They come in different widths and heights. For balconies and loggias, moisture-resistant varieties are used. The thickness of the product must exceed 6 mm. The plates are fixed using a tongue-and-groove method. The calculation of the amount of material is based on the area of the walls and ceilings where the installation will take place. Another 10-15% is added to the required number of square meters for adjustment.
Plastic corners connect the joints and form corners. They are purchased according to the footage of the balcony in accordance with the length of the joints. The insulation is calculated based on the square footage of the area that needs to be protected, taking into account the presence of beams.
For the sheathing you will need longitudinal wooden beams. Suitable size 20*40 mm. Variety - metal profile. They are measured in linear meters and will be fixed in increments of 40 cm over the entire finishing area.
Exterior finishing: functionality and design
When planning a major overhaul or complete reconstruction, take into account the design features of the façade of the house and the methods of glazing in neighboring apartments. If all floors sparkle with white vinyl siding, it is hardly appropriate to decorate the outside of the balcony with wooden paneling with openwork carvings. Or sheets of corrugated sheets painted poisonous green. Particular care is required when interfering with the appearance of a historical building - against the backdrop of luxurious balustrades and stucco cornices, cheap plastic will look ridiculous and tasteless.
The atmosphere inside the room, especially temperature and humidity, depends on the cladding method. A thin layer of plastic will only protect from precipitation, and then only for a short period. Decorating the outside of the balcony with expensive materials, additional insulation and waterproofing guarantee a comfortable temperature and optimal humidity for a long time.
Balcony insulation with penoplex
What you need for DIY installation
No complex installation equipment is required.
You will need to use:
- screwdriver;
- hammer drill;
- screwdrivers;
- jigsaw or saw;
- for metal - with a grinder;
- building level;
- furniture stapler;
- polyurethane foam;
- self-tapping screws;
- staples, glue, clamps.
Also stock up on a simple pencil, ruler, and tape measure. For safety reasons, wear safety glasses and gloves.
Preliminary work
The first thing you should pay attention to is the walls. There is no need to level them, but preparation will be required. External premises have direct contact with the street. The walls should be free of cracks, gaps, and places where moisture can accumulate. Their presence can lead to the formation of mold and subsequent dismantling of the entire structure.
Preparing the walls
Pre-cleaning of the previous finish is carried out. Unstable areas and cracks are covered with a layer of protective material (concrete, plaster). For treatment against parasites, an antifungal composition is used. The top of the walls are covered with primer.
Preparing the premises
Before purchasing MDF wall panels for finishing a loggia, it is necessary to carry out preparatory work, which includes complete sealing and waterproofing of the loggia. Sometimes work is also carried out to ensure increased fire resistance. In this case, this is not necessary: the chances that the balcony will rot from high humidity are hundreds of times higher than the probability of a fire on the balcony of an apartment building.
Preparing the loggia for finishing with MDF involves the following work:
Today, the woodworking industry produces many color variations of MDF.
- all large holes, cracks and cracks are sealed (to seal the loggia, it is better to buy polyurethane foam);
- if fungus or mold often appeared on the loggia before, then before installing the wall panels, you should treat the walls with a special disinfectant liquid; if you don’t want to spend money on it, you can buy cheap and effective copper sulfate;
- the solution is always applied with the most ordinary spray (spray) - you can buy a window cleaner, which is usually sold with it;
- the amount of solution must be exactly such that it flows directly from the walls, filling all the holes and cracks;
- the waterproofing layer must be continuous, and not installed only in those places that require insulation from moisture;
- The easiest way for waterproofing is to buy any mixture based on polyurethane - for loggias and balconies this is the best option.
The simplest, cheapest and most effective way to prevent fungus and mold from appearing on the walls is to treat them with a solution of copper sulfate.
Installation of sheathing
The presence of a holding frame is an optional condition for cladding a balcony. It is possible to install the material with glue directly on the wall. In this case, experts recommend installing the sheathing only on the outer surface that is in contact with the street. It has direct contact with the street and needs insulation.
Grilles allow you to fill the space with insulation, which will maintain a pleasant indoor climate. Another advantage of having insulation is that the cladding will retain its original appearance longer at room temperature on the balcony.
Why wooden sheathing is preferable to metal sheathing:
- easier to install;
- according to its characteristics, it has the same moisture absorption system as cladding panels, the possibility of warping of materials is significantly reduced;
- it weighs less, which is especially important when installing external structures (balconies).
The location of the sheathing bars directly depends on the design of the cladding. They can be positioned horizontally, vertically or diagonally, as the owners of the room decide. According to the rules for installing the structure, the lathing is installed perpendicular to the direction of the MDF panels, in particular:
- horizontally if the panels are vertical;
- vertically if the slabs are horizontal;
- diagonally - not important.
horizontal direction of siding - vertical sheathing
Lathing installation steps:
- Measure equal sections on the wall in increments of 40-60 cm. Make marks using a marker and ruler horizontally and vertically.
- Install hangers according to the marks. They will help smooth out the unevenness of the wall if necessary, and even out the sheathing bars.
- Attach the beams and check that they are installed evenly. If necessary, adjust the tabs.
- Securely fasten the sheathing.
- Treat the timber with an antiseptic.
- Cut pieces of insulation according to the size of the logs and insulate the walls.
After this, you can begin installation.
Advantages and disadvantages of various solutions
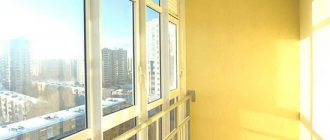
When choosing materials, be guided by their performance properties, appearance, price, and ease of installation. Performance properties are especially important for finishing a window-door unit on an open or glazed, but not insulated, balcony.
Using plaster
Plastering walls in window openings is a traditional solution that is rapidly losing its popularity. The reasons lie in the shortcomings of the material.
- Applying the solution requires careful leveling of the working surface.
- The finished coating does not provide additional heat and sound insulation of the room.
- The work process is labor-intensive and “dirty”.
- In order for the slopes to look organically in the interior of the balcony and harmonize with the finished coating of the walls, they will have to be painted.
As for the advantages of this solution, there are not many of them:
- Firstly, this is the same possibility of painting the final coating. Yes, this process requires additional costs and effort, but it allows you to keep your openings clean and looking fresh for many years.
- Secondly, the variety of decorative compositions. The presence of fractions of different sizes in them will make the working surface textured and original.
- Thirdly, the affordable price for finishing materials.
Plastered window opening ready for painting
If the balcony is not glazed or is not well insulated, opt for facade plaster. It is more resistant to temperature changes, moisture and UV rays than analogues for interior work.
Choose plaster if you want to save money, plan to thoroughly improve your balcony, or want to decorate the walls with the same material. Then the time and dirt spent will fit into the overall scope of work. Otherwise, consider other options.
You can protect yourself from splashes of solution using gloves and a work suit
Drywall for balcony block slopes
Drywall is a popular solution for decorating window and door openings. This is due to a number of reasons:
- simplicity, “cleanliness” of installation;
- low cost of material;
- the ability to complete all work in one day;
- good thermal insulation properties;
- no need to level the coating;
- a variety of options for additional finishing of gypsum boards - painting, finishing with artificial stone, etc.
The disadvantages of plasterboard sheets include:
- Low strength characteristics.
- Susceptibility to negative effects of moisture. Already at an air humidity of 75% it swells and becomes deformed.
- Loss of performance properties due to regular exposure to direct sunlight.
Taking into account how drywall reacts to external influences, it is not recommended to use it on an open and insufficiently insulated balcony.
Plastic for decorating slopes on the balcony
PVC slopes are an ideal option if you have plastic windows and a balcony door made of the same material. They seem to continue the frame structure, which looks natural and attractive. Moreover, you can cover the entire balcony with plastic.
Covering the opening and walls in the same style
Advantages:
- Speed, ease of installation.
- Minimal amount of dirt during installation.
- Plastic panels are produced in various colors. This allows you to match them to the interior as accurately as possible.
- There is no need to use additional finishing material to create a fine finish. Plastic panels are aesthetically pleasing in themselves.
- They are resistant to moisture, UV rays, and temperature changes, so they can be installed on any balcony.
- Easy to care for.
- Durability.
Slopes are made from ordinary plastic panels, under which a layer of insulation is laid, or from sandwich panels. The latter are characterized by increased rigidity and are a three-layer structure: two layers are rigid PVC plates, the third is insulation laid between them. Finishing with such panels is the most expensive.
Installation of MDF panels
Installation of decorative finishing is the main stage of cladding. There are several options for attaching material to the sheathing:
- glue-based, suitable for thin slabs for placement on small balconies; large areas require a different level of reliability;
- on staples or screws, suitable for warm rooms where the material is protected from temperature changes and will not change its physical properties;
- on clamps (special devices that connect the sheathing and the panel), the optimal method for external rooms.
Step-by-step instructions for installing slabs:
- Cut the material according to the height of the walls. Take into account the 3-5 mm that must be left for installing the corners. Create the necessary openings for electrical outlets.
- It is recommended to start installation from a window. The first panel is installed from top to bottom.
- The next one is mounted in the grooves of the previous one. On the reverse side it clings to the sheathing with clamps.
- At the corners, in order for the material to fit evenly, you will need to trim them. To maintain uniform placement, the corners on which the eye falls when entering the balcony are connected first and as smoothly as possible, invisible to the eye.
If there is a window sill or projections, the panels are cut according to their size.
Slopes
The horizontal slopes are added first, followed by the vertical ones:
- Measure the required length under the windows, above them, near the door.
- Cut the panel pieces according to the measurements.
- Installation is carried out on foam.
- Press them against the wall and leave to dry.
- After fixing the polyurethane foam, eliminate excess material;
- Secure with self-tapping screws. Leave some space for the final corners.
Finish line
The last stage helps to hide the imperfections of the cladding. The design of corners and joints gives the work a finished look:
- Start with the floor, attach the baseboard.
- Cut the corners for the joints according to their length. To ensure that the junctions of horizontal and vertical corners are even and aesthetically pleasing, they should be cut at an angle of 45 degrees. Then they will come together without layering.
- To fix the joints: coat the inside with glue, bend it at an angle inward, and press it firmly against the wall. Then spread the side wings and press tightly too.
- Treat small discrepancies between the window frame and panels with silicone sealant. Remove excess.
Installation is easy to do with your own hands, without involving workers and spending extra money. If necessary, dismantling is also easy.
Glue mount
Applying glue to MDF panels
Don't have time or opportunity to create lathing? There is another way to attach finishing slabs - using glue, or rather liquid nails. The method is quite effective and easy. It's done like this:
- Prepare the loggia by clearing the walls of wallpaper and plaster. A hammer can help in this matter - lightly tapping the walls will speed up the crumbling of the old coating.
- Treat the surface of the walls with a solution of cement-sand mixture. Pay special attention to areas with flaws.
- Wait a few days until the walls are completely dry.
- Cover the surface of the walls with wallpaper glue (primer). Use a roller.
- When it dries, start filling the walls.
- Place MDF boards according to the “from the corner” principle. Treat the slabs with construction glue, press them against the wall, remove excess glue with a knife.
- Continue working the same way.