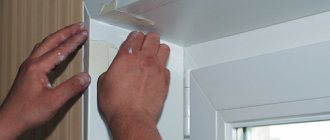
Exterior works
To more reliably protect the room from heat loss, it is necessary to insulate the window slopes from the outside as well.
The best material for these purposes is penoplex. You will also need a special sealant for exterior use. In a private house, you can do the work yourself, but in a multi-story house it is better to use the services of professionals. The technological sequence of operations is as follows:
- Clean the surfaces of external slopes from dust, dirt, paint residues, finishing and building materials.
- Level with cement mortar and allow the layer to dry.
- Cut the insulation into pieces of the required size.
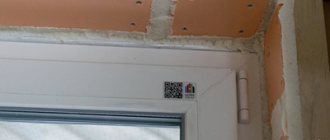
- Coat the sheets with glue and install them on the slopes. Additionally secure in several places with dowels.
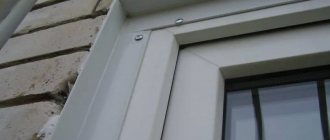
- Mount the corners. Do not neglect this stage. As a result, you will receive not only insulated, but also smooth slopes.
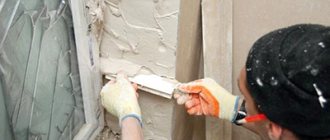
- Treat the front surface of the penoplex with special glue and secure the reinforcing mesh.
- Level with putty.
- After drying, apply water-based paint or other finishing materials.
The issue of slope insulation should not be ignored. The microclimate in the house and the size of the electricity bills depend on how well and timely this is done. Moreover, the whole process can be carried out independently.
Expert recommendations
The insulation procedure is characterized by its peculiarities. Knowing the subtleties, you can avoid many problems. To ensure the highest quality work, adhere to the following rules:
- If there is no insulation of the required size, you can use separate pieces. They are placed tightly to each other.
- Ideal adhesion can be achieved through a combination of glue and reinforcing mesh.
- Preparatory work includes getting rid of cracks and defects. If the hole is larger than 3 mm, sealant must be used.
- Of all insulation materials, extruded polystyrene foam has the maximum thermal insulation function. This will be a plus when performing outdoor work.
- You need to choose thermal insulation based on the dimensions of the gaps. If the free space exceeds 4 cm, use polystyrene foam or polystyrene foam. If the gap is 2-3 cm - fiberglass, less than 2 cm - polyurethane foam, mineral wool.
You cannot take foam with a density of less than 30 kg/cubic meter. m. If you prefer mineral wool, the density should exceed 75 kg/cu.m. m. Otherwise, the insulation will not withstand the load and will quickly become unusable.
How to make external slopes for polystyrene windows step by step diagram
Step 1: Preparing the adhesive
Before proceeding with installation, you need to prepare a suitable adhesive solution in advance. According to experts, Ceresit adhesive brand st-85 is most suitable. The adhesive composition is mixed very thoroughly so that there are no lumps left in the mixture. Stir until the mixture thickens: the glue should not flow down the spatula. Don't forget to prime the area around the window where the slopes will be installed.
Step 2: Installation of slopes
After this, we rub glue into the wall - this method will ensure the highest quality adhesion between the surface of the walls and the foam. Next, having already made a foam blank, we apply glue to the products, and for convenience it is best to use a notched trowel. They begin gluing work from the bottom of the product, while also checking that the products are glued correctly. To do this, use a building level. It is advisable to properly glue the joints of our slope strips. Having finished pasting around the entire perimeter, you need to coat the existing seams with glue once again.
Don't forget to apply glue to the area where the window sill will be installed. After this, we proceed to the installation of the side slopes in contact with the window frame. When carrying out work, you should not skimp on glue; otherwise, voids may form between the frame and the slopes. Excess composition is carefully removed with a damp sponge. We coat all the joints between the material again - this completes the work on installing the slopes.
Step 3: Finishing the Material
While the adhesive dries, we finish the foam to give it a good appearance. In this case, we once again treat the slopes with an adhesive solution and install the fiberglass mesh
Don't forget the importance of covering the outer and inner corners with perforated corners. After the surface is completely dry, the foam is covered with facade paint in several layers
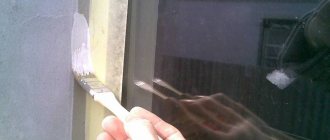
To prevent the composition from getting on the glass (which will be very difficult to clean), cover the perimeter of the glass unit with a wide piece of construction tape. But for the finishing (finishing) finishing, rely on your tastes, since modern manufacturers will be able to offer you a wide selection of products. So, you can purchase a color that will change the color of the slopes; acrylic paint with small particles will also work - this will create an unusual effect.
Properties and advantages of using polystyrene foam
Polystyrene foam is a universal material that is used in various cases. It has the following distinctive properties:
- Light weight. This makes it possible to carry out work without using additional forces, and also eliminates the need for auxiliary strengthening of surfaces.
- No harm to human health.
- Moisture resistance. The product does not absorb water and does not rot.
- Ease of preparation and installation.
- Low cost.
- Durability. The service life is calculated in tens of years.
- Additional insulation of slopes.
- Drill with mixer attachment.
- Construction knife.
- Level.
- Container for solution.
- Set of spatulas.
- Sandpaper.
- The slopes are covered with a layer of primer. This is necessary for good adhesion of the applied solution.
- The prepared putty mixture is applied in an even layer to the treated area.
- The first vertical element is coated. It is applied to the surface and pressed well. Next, a horizontal strip and the remaining vertical fragment are laid.
- If required, spacers are installed to help secure the glued sections.
- It takes 5-8 hours to dry completely, but it is better to leave the work for a day.
- Putty is applied to the surface. It is necessary to obtain a thin and uniform layer.
- Perforated modules are installed at the corners. They are completely covered with putty.
- Dried slopes are treated with sandpaper. Next, several layers of paint are applied.
- If the foam plastic will be laid not only along the perimeter of the slopes, but also on the front part of the window, then it is necessary to use a mesh to reinforce the joints.
- All joints are pre-treated with sealant to prevent the possibility of water penetration.
- First, we visually assess the condition of the slopes and the possible thickness. In the photo you can see that the left and upper slopes will be thicker than the right. That is why we decided to purchase polystyrene foam of different thicknesses, so that the leveling would be gradual, in several layers:
- As mentioned above, do not try to apply too thick and continuous a layer of the mixture. Expanded polystyrene is more resistant to fracture, but even 5 cm of foam can break into pieces when you try to lift it.
- It is recommended to remove the protective film from the window or door, as well as from the windowsill, only after all work has been completed. In addition to installing the foam plastic, you also have to putty and paint, so the film will protect the surface of the plastic from scratches.
- In our case, the upper and left slope had to be made in two layers of foam due to large differences. For example, the upper part of the left slope should be 8 centimeters, and the lower part – as much as 11 centimeters. We alternated pieces of 2 and 3 cm foam plastic in order to eliminate such a large difference with their help, as well as with the help of the mixture seam. The photo shows how the unevenness is eliminated with each new layer:
- When trying it on “dry”, pay attention to how much and in what place you need to apply the mixture. Otherwise, it will be difficult to align the workpiece during installation.
- There are usually large indentations in the area of the plastic frame. We advise you to first seal them with the mixture and only then glue the foam. The photo shows that this is exactly what we did:
- Minor differences vertically or horizontally are acceptable. Finishing will eliminate all unevenness. Plus, don’t forget that the foam itself is quite soft. If you press the level a little harder, the air bubble will show unevenness, but in fact you simply did not calculate the pressing force.
- If the walls are uneven, then cutting a piece of foam so that it fits exactly with the outer corner is difficult. As you can see from the photo, we made allowances so that later we could cut off the excess strictly flush with the wall:
Why is it worth doing insulation?
First of all, it is worth noting that insulation is an essential part of a high-quality installation of a window system, which subsequently will not only last longer, but will be distinguished by high functionality. The main reasons requiring insulation:
- The window frame does not fit tightly to the surface of the slopes, leaving corresponding seams, which are often filled with polyurethane foam for sealing. This material shows excellent thermal insulation properties, but often reacts to moisture and temperature changes, undergoing destruction and loss of basic functions.
- Window frames without additional finishing are poorly protected from the influence of external factors. If insulation is not carried out, the joints will be susceptible to water ingress, which, under the influence of low temperatures, leads to the destruction of the fastenings and subsidence of the window.
- After the structure shrinks, free spaces form between the window frame and openings, which lead to freezing and cold air inside the room.
- Insulated windows are not characterized by the accumulation of condensation from the inside, leading to the formation of fungus or mold.
Insulating the slopes protects the window opening from freezing and condensation.
In addition to functionality, insulating the slopes of the windows will give the structure a stylish appearance that will harmoniously blend with the interior of the room.
How to make a “warm” window installation yourself
The technology of insulating slopes with extruded polystyrene foam is excellent for an ordinary country house. But, installing windows in energy-efficient homes requires a more advanced option. The thermal characteristics of the wall-window assembly can be improved by using the so-called system. "warm" installation.
This could be EPPS, PIR board, foam glass. The technology for “warm” installation of a window with facing brickwork is as follows, you need:
- Insulate the upper, right and left slopes with EPS.
- The base under the window is also insulated with EPS. But first, in the thermal insulation, you need to make a rigid support under the frame (under plastic support pads/wedges) to transfer the load to the wall, which will be discussed below.
- Additionally protect the mounting foam - from the inside with a vapor barrier, and from the outside with a vapor-permeable moisture-UV and windproof sealing material .
Now let's take a closer look at the lower heat-insulating part made of EPS. The nuance is this: the window must rest and transfer the load from its weight to a reliable, rigid base. When installing a window on aerated concrete, brick, concrete or a wooden lintel in the frame, no problems arise.
The window is mounted like this: under each vertical element of the frame, support blocks/wedges made of durable plastic are placed, and not, as some “masters” do, wooden chips or scraps from boards that come to hand are placed.
But extruded polystyrene foam, although a relatively strong material (it is laid under the foundation, for example, USHP), does not withstand local crushing well. Those. point load from the support block.
To install a window using the “warm” installation technology you need:
- Pre-drill holes with a diameter of about 25 mm in the EPS, which is placed under the window.
- Insert pieces of thick-walled polypropylene water pipes into extruded polystyrene foam.
- Fill the inserts with polyurethane foam.
The height of the inserts in the EPS is selected according to the thickness of the thermal insulation. The installation locations for the inserts are where the support wedges are placed. Next, the window is mounted as usual and secured to the wall with mounting/anchor plates.
We insulate the inside
Having decided how to insulate the slopes, we move on to practice. Sometimes it happens that when a plastic window is installed, despite good treatment with foam, the glass gets wet and there is a strong blow from the slopes. This is often the result of careless installation, as a result of which the structure will have to be put in order yourself.
- Remove any remaining foam.
- Treat the surface with a primer with an antibacterial effect to prevent the appearance of mold in the future.
- We plaster the window area, achieving a flat surface onto which foam plastic can then be easily glued.
- We thoroughly clean the plastered areas, apply primer and begin laying insulation.
- In the case of polystyrene foam, the surface must be scratched with an emery sheet to reduce the smoothness. After which the material can be safely glued to the slopes. When cutting out the required pieces of foam, measure out slightly larger sizes, which can always be trimmed instead of gluing the missing pieces.
Before gluing the foam, it is recommended to scratch its surface
. Let the structure dry and putty the corner. After laying the foam, we proceed to the finishing coating, chosen to our own taste. This can be plasterboard covering or decorative plastering.
Having figured out in practice how to insulate the slopes of plastic windows inside, we move on to external work.
Materials used
The range of materials used to insulate slopes on your own is quite diverse. Each of them has its own advantages and differs in installation and operation features:
- Mineral wool (not to be confused with glass wool - this material is highly undesirable to use for interior work). The main advantages are excellent heat and sound insulation properties. Disadvantage: high moisture absorption. If you notice that the windows are “sweating”, then it is better to abandon this type of insulation, as over time this can lead to the formation of mold and fungi.
The easiest way to insulate using mineral wool
Styrofoam. The material is inexpensive and easy to work with, which is why it is popular in various types of work.
Penoplex. It has improved performance characteristics compared to polystyrene foam, but it is also more expensive.
Sandwich panels. Modern and most convenient type of material. Already includes thermal insulation and protective layers. It harmoniously complements plastic windows and usually fits into any room design. Cons: relatively expensive.
The choice of the preferred material is made based on climatic conditions, the general condition of the walls of the house, the material capabilities of the owner, and the skill level of workers.
Select the required thickness of insulation.
Difficulties and errors
Some difficulties and errors may arise during operation :
- If polystyrene foam or polystyrene foam is used for insulation, when cutting into pieces, it is recommended to leave a small margin, since those pieces that were cut flush may turn out to be smaller than needed (after which you can simply throw them away).
- When insulating, it is necessary to carry out work in such a way as not to disturb the ventilation in the room, as this will lead to stagnation of air, the formation of dampness, and subsequently the appearance of mold and mildew.
- If you use unsuitable or low-quality insulating material, there is a possibility of not only worsening the microclimate in the room, but also damaging the fastenings of the window frame.
- Sealing joints is important when insulating with any material, since if it is not done, cold bridges or blow-out spots will appear, and in the worst case, the insulation will be exposed to the external environment, which will quickly deteriorate.
Material selection
The modern building materials market is distinguished by a wealth of choice. Despite the wide variety of products presented, the most popular are polystyrene foam, polystyrene foam and mineral wool. Simply covering existing cracks has little effect, since the polyurethane foam is subject to destruction over time, and the plaster cracks and crumbles. Insulating slopes only from the inside will not bring the desired results, since soon the cold will again make its way into your home. There is only one way out - using high-quality thermal insulation materials for installation on the outside of the building.
Most experts recommend insulating windows with polystyrene foam.
Why is this particular building material recommended, which is not cheap compared to others? It is important not to confuse expanded polystyrene with polystyrene foam, because they differ in a number of significant properties:
- water absorption. The value for polystyrene foam is 10 times less. What does this mean in practice? If you place two slabs in water for 30 days, one will absorb 0.4% of its volume, the other 4.0%. As you know, under the influence of moisture, materials are destroyed, their weight increases, which means the load on the fastening elements increases. A wet surface releases heat faster, so the value of the water absorption parameter should be as low as possible;
- thermal conductivity. This is the most important parameter that determines the effectiveness of using insulation. Expanded polystyrene has lower heat loss compared to polystyrene foam by 27–46%. In combination with low density and light weight, the thermal conductivity value of 0.028 W/(m.K) makes it an ideal insulation material;
- tensile strength. Everyone wants the money invested in slope insulation to fully justify itself, and for the finished structure to last as long as possible. That is why, of the two insulation materials, you should choose expanded polystyrene, which is 5–7 times more reliable. This applies to both tensile strength and compression. The service life of both insulation materials differs by 2–5 times.
Expanded polystyrene is completely environmentally friendly. Its use will not have a negative impact either on the person who lays the insulation or on the environment during operation, despite temperature changes and humidity. The advantages of expanded polystyrene over conventional polystyrene foam are obvious. As for mineral wool, it has a much lower cost, and it may seem that using such insulation is more profitable. In fact, high thermal insulation characteristics are characteristic only of mineral wool boards, the price of which is higher than expanded polystyrene.
Pros of foam finishing
Insulating window slopes with foam plastic has a large number of advantages:
- Ease of work. Even a novice master can handle installing polystyrene foam sheets. The main thing is to follow the installation instructions. The low weight of the foam elements makes it easy to install them at heights without outside help. This parameter also makes it easy to fix – there is no need to think through a complex fastener system.
- Oxidation resistance. Polystyrene foam does not rust. It is resistant to various household chemicals.
- High thermal insulation characteristics. Polystyrene foam has a closed cell structure and is capable of high-quality retention of heat inside the building.
- Aesthetics. The panels are characterized by their stable geometry. They look neat and go well with other materials.
- Minimal moisture absorption. The plates will not accumulate moisture and will not become a breeding ground for microbes and bacteria.
- Safety. High-quality foam does not emit harmful substances during operation.
- Long service life. When installed correctly, foam elements will last a long time. They will retain their original characteristics and attractive appearance throughout the entire period of operation.
- Affordable price. Polystyrene foam is cheaper than other finishing materials.
How to make window slopes from polystyrene foam - step-by-step diagram
Step 1: Preparing the surface for work
Before proceeding directly with installation, you need to clear the area under the slopes from dust and dirt, and also cover all the cracks with either cement or putty. The surface is primed for evenness, and while the composition dries, it will be time to prepare the parts.
Step 2: Installation of slopes
After cutting and preparing the slopes, we apply an adhesive mixture to their inner surface, after which we apply the material to the installation site. When pressing parts, it is worth using a building level for reliability in order to be able to check the evenness of the work. Despite the high quality of modern glue, for reliability you can secure the slopes with dowels by drilling several holes along the edges of the foam. By the way, experts do not recommend making holes for nails until the glue has dried. If you make the slightest mistake when carrying out work, this can lead to the set level of the foam moving. It is better to drill holes either in advance or two to three hours after finishing the work.
Step 3: Finishing the material
The surface of the material is puttied, all joints and cracks are properly sealed, providing good insulation and protection from drafts. The entire surface of the products is covered with starting putty, and a reinforced mesh is installed on top: carefully press it into the mixture with a spatula. To prevent the corners from collapsing during work, glue perforated corners to them. As soon as this layer has dried, the material is once again covered with finishing putty, after which the foam is painted or the slopes are plastered.
Instructions for finishing sandwich panels
There are many ways to install slopes using sandwich panels. The simplest one is to install panels in the window opening using “liquid nails.”
A more labor-intensive method, but high-quality slopes are obtained when installing panels on the sheathing.
- The sheathing is installed in the window opening using 20x40 mm slats.
- The upper part of the slope is cut to size and placed close to the window frame. After this, the opening is filled with insulation, and the panel is attached to the sheathing.
- The side parts are attached in a similar way.
- A platband is attached to the sides of the window opening.
- The installation is completed by sealing all joints with liquid plastic.
Stages of the installation process and their characteristics
Having decided on the key characteristics and advantages of the insulation, it is necessary to follow the installation technology
It is important to know how to insulate windows with polystyrene foam in such a way as to create excellent conditions for tightness and long-term operation. To do this, it is worth doing the work step by step, giving each stage great importance:
cut out strips of polystyrene foam to the required length and width. As a rule, a sufficient size is 5–8 cm. The thickness of the insulation should be at least 5 cm, otherwise the effect will be barely noticeable; We clean the external window openings. Expanded polystyrene adheres well to brick, so it is advisable to clean the surface of foreign building materials, especially if they adhere weakly
It is important to fill existing cracks with cement mortar and treat areas where mold or mildew has formed. The façade can be further strengthened by using a deep penetration primer; install polystyrene foam slopes
Special glue or dowels can be used as a fixer. The combined use of fasteners ensures greater durability of the structure. It is important to know that for better drying of the glue, a temperature of at least +5 degrees is required - keep this in mind when planning insulation. When using polystyrene foam, it is recommended to play it safe and install both types of fasteners to significantly increase durability; We blow out the cracks that have arisen with polyurethane foam, after which has dried, you can begin to apply the plaster. The process is mandatory, since even a material that is relatively inert to the influence of the external environment is subject to aging under the influence of environmental factors. It is important to use a reinforcement mesh during the installation process - it will provide additional protection for the surface. Plaster will give the product greater strength and provide it with a long period of operation. After plastering, the surface is painted.
How to insulate window slopes with polystyrene foam in order to extend the period during which the material will remain airtight? It is important not to rush in the process of installing slopes - in order for the insulation to stick better, it is necessary to allow both the glue and the mounting foam to dry well. In general, we can say that having an understanding of how to insulate slopes with polystyrene foam, even a non-specialist can cope with the task
Do you have the skills to work with the necessary building materials? Can you carry out each stage of the work carefully and accurately? The procedure does not require the use of special equipment, so feel free to start insulating window slopes.
List of required materials and tools
And so, in order to finish the external or internal slope, you will need the following devices:
- Construction mixer for mixing the solution.
- Drill.
- Putty knife.
- Level.
- Knife (painting knife).
- Brush.
Necessary tools for installing slopes
To seal slopes, the following materials will be useful:
- Assembly adhesive.
- Foam sheets.
- Special dowels for fixing material (parachutes).
- Fiberglass mesh.
- Primer mixture.
- Perforated corner (for decorating corners).
Now you can start insulating and decorating window slopes.
Insulation of slopes inside with foam plastic or penoplex
Sheets of foam plastic or penoplex are the most common types of materials for insulating slopes. Work using them is carried out after installation of the double-glazed window in the following sequence:
- Slopes and areas between the frame and the wall, filled with polyurethane foam, must be plastered with cement mortar.
- After drying, treat the surface with an antibacterial compound.
- Cut the insulation to the required size. It is better to cut a larger piece - the excess can be easily trimmed after installation.
- Sand the surface with sandpaper. Coat with special glue for foam plastic. If you use foam, don't apply a lot of adhesive coating. This type of insulation expands when heated - in hot summer times, a thick layer of adhesive may crack and the coating will lose its thermal insulation properties. Apply the prepared insulation to the slope, partially covering the window frame.
- After the insulation has been glued, we fix it with plastic umbrellas.
- The next step will be mesh reinforcement.
- Then, we place the perforated corner on the putty and align it directly to the level.
- Apply a decorative coating to the front part of the insulation in accordance with the repair concept. This can be drywall followed by painting, plastic panels, colored plaster.
The advantages of polystyrene foam when designing slopes
A window slope is a specialized system that can close the opening that forms between the window frame and the facade. It is customary to make slopes after replacing the window unit. As we have already said, the purpose of installing slopes is moisture and heat insulation. Few specialists, after installing a new window unit, suggest immediately making slopes. But, due to such negligence, the polyurethane foam (the material on which the window unit is supported) quickly dries out, gaps form, etc.
Window slopes made of foam plastic
Previously, to seal slopes, craftsmen used various construction solutions, such as plaster, but such finishing material was not particularly reliable. Also, many people prefer plastic panels, but this material is absolutely not suitable for such work, because atmospheric influences can deform it. Today, slopes made of plastic, foam and metal, which have the following advantages, are becoming increasingly popular:
- They last a long time in use.
- Resistant to rust.
- Not deformed.
- Excellent retention of heat in the house.
- Easy to install.
- They have an attractive appearance.
How to insulate plastic windows for the winter
The material is selected depending on the area that needs to be insulated.
| Insulation | Mode of application |
| Polyurethane foam | The voids between the window opening and the frame (installation seam) are filled around the entire perimeter |
| Mineral wool (for interior work) | Insulation of window sills and internal slopes with a mounting seam width of 30 mm or more |
| Foam plastic, polystyrene foam | Insulation of external and internal slopes with a mounting seam width of less than 30 mm |
| Dry building mixtures (plaster, putty for exterior work) | Insulation of slopes, protection of insulation from the influence of the external environment outside |
| Silicone sealant | Sealing gaps between plastic window elements |
| Construction tape | Glued on top of the sealant or instead of it |
| Energy saving film | Adheres to the inner surface of the glass unit |
| Rubber compressor | Replacing dry or damaged seals on the sash and frame |
To protect insulation from mechanical damage and as decorative coverings for slopes indoors, plastic panels and plasterboard are mainly used. The latter requires additional puttying and painting.
What are the features of polystyrene foam?
Advantages of polystyrene foam as a window slope Foam
plastic is a very common building material, which is increasingly used to insulate walls and even ceilings. Its main advantages are:
- affordability;
- environmental friendliness;
- resistance to the influence of external stimuli.
The table below shows the characteristics of the foam.
| Material Feature: | Index: |
| Water absorption in 30 days: | 4% |
| Water absorption per day: | 2% |
| Thermal conductivity: | 0.036-0.05 W/(m*S) |
| Tensile strength: | 0.07-0.2 MPa |
| Density: | 15-35 kg/m3 |
| Operating temperature range: | +50-70оС |
Slopes on windows made of polystyrene foam allow you not only to insulate your home, but also to make metal-plastic windows more attractive. Such material does not rust during operation and does not deform.
Important! According to the DIY installation technology, insulating slopes with polystyrene foam is very similar to installing drywall. But, if drywall is used exclusively as an internal finishing building material, then polystyrene foam can be safely used outside. You can make slopes from foam plastic inside the apartment, as well as slopes from foam plastic from the outside, as soon as the mounting foam, which is used to fill the voids after installing the window block, has dried.
When making window slopes with your own hands from foam plastic, please note that you need to fix the canvas along the entire perimeter of the window, also under the window sill. The main condition during finishing is to apply putty in more than one layer. Do not use an excessive amount of adhesive solution, because as a result of exposure to high temperatures, the foam will expand, after which cracks will appear. Due to such troubles, the structure will lose not only its thermal insulation properties, but also its attractiveness.
DIY polystyrene slopes (video)
Technology of work on the internal slope
To begin with, prepare the slopes yourself. They need to be cleared of debris and the cracks covered with cement mortar. Next, apply the primer with a brush to the entire surface. While the primed surface dries, we prepare the blanks (cut them to size).
Then, an adhesive solution is applied to the surface of the foam plastic with a notched trowel, and the workpiece is pressed against the slope. You can immediately pick up a building level, checking how level the installation is, because if the surface is uneven, this will significantly complicate the installation of windows. For a clearer installation, we recommend fixing the foam plastic to dowels at several points, then the plate will definitely not move away from the slope.
Next, all the foam plates are installed, with careful joining. If possible, you can additionally putty the joints to ensure that there are no gaps.
Now we apply the starting putty to the surface, attach the reinforced mesh, and apply the finishing layer of putty on top. So the internal slopes made of polystyrene foam are ready. What about the outside ones? Let's take a look now!
Instructions for installing slopes indoors
Well, now we come directly to the solution to the question “How to make slopes on polystyrene foam windows?” Before starting installation, you need to prepare the place for subsequent work, namely, clean the surfaces from dust, plaster all damaged areas using a plaster solution. Then, if the surface is not smooth enough, it needs to be primed and then given time to dry.
Applying adhesive solution to foam plastic
When the foam is cut and the slopes are prepared, you can begin. An adhesive mass is applied to the inner surface of the foam and a fragment of material is fixed in the required area. Try to press the foam sheet against the surface as hard as possible, and check your actions with a building level to be sure that the glued fragment is even.
Despite the fact that today there are a lot of different adhesives on the construction market (and the prices for them are also very different), which are considered very reliable, do not be lazy to secure the slopes with dowels, but after the glue has dried.
Window slopes reinforced with dowels
After this, the foam plastic is puttied, and all gaps and irregularities are carefully covered so that there is not the slightest loophole for moisture and winds. Then the entire surface is treated with starting putty, reinforcement is applied, which is pressed into the solution that has not yet dried. To avoid damage to the corners, install a perforated corner on them. After the solution has dried, another layer of finishing putty is applied, then the slope can be painted or plastered.
Internal and external insulation of slopes
To ensure that the installed plastic window serves you for many years and meets all requirements, many experts strongly recommend insulating the slopes both indoors and outdoors.
After you have a new plastic window installed, you should not immediately start finishing the wall; you should initially take care of insulating the slopes and install thermal liners in the gap between the window and the wall.
When choosing a material for internal insulation of slopes, do not forget that the quality of insulation of the window opening depends on how tightly the heat insulator comes into contact with the surface.
When using the soft insulation materials discussed above, the gap between the window and the wall should be completely closed; hard materials should be laid end-to-end on top of the thermal liner.
Insulation of slopes with foam plastic
Foam insulation of window slopes is widespread due to the low price of the material (lower than other insulation materials) and dense composition.
But at the same time, in order to organize high-quality insulation of slopes using polystyrene foam, it is necessary to level the base on which installation will be carried out. It is better to carry out this work immediately after installing a new window. In this case, all slopes should be plastered with a special solution and create a flat plane at a certain angle.
Before gluing, sand the foam with sandpaper.
After the surface has been prepared for the installation of polystyrene foam, it should be treated with special antifungal compounds to create a protective barrier against mold growth between the surface and the foam plastic.
To ensure better adhesion of the material to the surface, the side of the foam on which the adhesive composition will be applied should be treated with sandpaper, giving the surface of the foam roughness.
It is customary to use the following materials for decorating polystyrene foam:
- decorative plaster;
- moisture-resistant drywall;
- decorative plastic panels.
The main parameter for choosing a material is the comparison of the product with the interior decor of the room. For more information about the stages of work, watch this video:
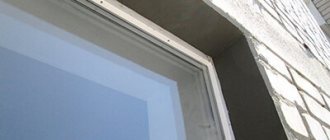
External insulation
As mentioned above, it is better to carry out insulation for slopes outside and inside. To level the insulated outer surface, a cement mortar or a special mixture is used; further work is not recommended until it has completely dried.
For exterior work, it is recommended to use penoplex (expanded polystyrene), since the density of this material is greater than that of foam plastic. Installation of penoplex is carried out using an adhesive solution, as well as the additional use of 2-5 dowels, depending on the size of the slope.
After the adhesive has hardened, another layer is applied to the surface, into which a reinforcing plaster plastic mesh is pressed. When the top layer of coating has hardened, you can begin decorating. For more information about insulating slopes, watch this video:
Summing up the written material, we can say with confidence that every owner can do the work of insulating slopes. There is no need to doubt the significance of this process, “the result will speak for itself,” and you can decorate the appearance of insulated surfaces with any of the above options.
Sometimes owners of windows made of metal-plastic profiles are faced with the situation that in winter cold air enters the room through the window opening (drafts, “drafts”). To decide how to insulate plastic windows, you need to find places and identify the reasons for the violation of thermal insulation.
Window and door frames made of foam plastic, technology and aesthetics.
See our decor options in the “Exterior Window Decoration” section of the catalog.
Decorating the outside of windows with foam moldings is a technically simple and universal solution for walls of any type. It has significantly more advantages than disadvantages. The disadvantages, first of all, include some fragility of foam stucco, which is fully compensated by its high maintainability. Any classic finishing option can be made from foam plastic.
BUY a set of polystyrene foam for the window.
The box is erected, the roof is covered, it seems that it is ready and the bulk of the work has been completed.
However, finishing both inside and outside takes even more effort and time than construction and installation work (CEM). Project "Julia" - without exterior decoration.
The foam details and faux stone have completely transformed this cottage.
Windows are one of the most visible and significant elements in the architecture of a building, both from a functional and aesthetic point of view.
The design of a window opening from the outside raises many questions, which this article will help solve. Let's start with the constructive points:
There are 2 types of window openings:
- With a quarter.
- Straight.
BUY foam plastic trim for windows.
Expanded polystyrene parts are installed differently in openings of different designs. This must be taken into account when purchasing or ordering stucco molding. With a straight opening, slopes must be installed on the outside, and if there is a quarter, the quarter itself is already a window slope. Foam profiles are well suited for constructing slopes, but warm plaster can also be used.
If the window opening does not have a quarter, then the ideal finishing option is a slope + foam casing.
3 options for composite window framing with foam or concrete profiles.
Buy a foam casing combined with a slope.
The solution to the purely technical question: “What material should the architectural elements be made from?” will determine what appearance the building will acquire in the end.
Windows made of architectural concrete, casing and slope form a single whole. The L-shaped casing can also be made of polystyrene foam.
Buy foam plastic window frames in the online store from the manufacturer.
In the manufacture of window treatments, we previously used various materials, concrete, foam plastic, a composite of concrete and polystyrene.
Now we produce a variety of foam decor as an alternative to expensive products.
An example of the use of slopes and platbands of our production. BUY A FOAM COVER IN MOSCOW.
Ease of manufacture, ease of installation, excellent properties after plastering and painting, allowing stucco foam to decorate the facade for many years, as well as excellent price-quality ratio. Do not forget that polystyrene foam is an excellent insulation material.
Therefore, we can say that exterior window decoration with foam plastic is a good choice if you have a limited budget.
It is easy to make a rectangular platband with your own hands. It will look something like the images below.
Rectangular platband can also be purchased in our online store at the most attractive price. But this is the simplest and least visually attractive way to decorate window openings from the outside. You can often see cottages with rectangular frames around the windows. Of course, such a slope and a foam plastic casing will serve to insulate the opening, but it is unlikely to greatly decorate it. Of course, beauty, as always, requires sacrifice and a figured frame will most likely cost more, but even here you can find good options in terms of price-quality ratio.
An important question when carrying out facade work in general and window finishing in particular is at what stage the façade stucco molding is installed. How to correctly install embossed finishing details if the facade is already tiled, plastered and painted, or made of facing bricks. Facade profiles made of foam plastic are lightweight, so there is no need to leave mortgages under them, and there is also no need to do additional insulation, foam plastic is an insulation in itself.
External foam products with the “Wet facade” finishing method are installed on a rough screed over the insulation before the walls are finished plastered.
Buy foam plastic window frames in the online store from the manufacturer.
When the outer walls are already lined, the façade polystyrene parts are mounted directly on the cladding material. One clarification: if the cladding has a pronounced relief, for example, torn stone, then most likely the seat will have to be leveled under the stucco molding.
Insulation with sandwich panels
One of the simplest and fastest ways to insulate window structures using sandwich panels.
In addition to the main material, to complete the work you will need a U-shaped profile, mineral wool, an F-shaped profile, and self-tapping screws.
Work process:
- secure the U-shaped profile around the perimeter of the window structure using self-tapping screws;
- prepare appropriately sized slopes from the specified building material;
- insert the panels into the mounted profile;
- the gap between the sandwich material and the wall can be sealed with mineral wool or another similar heat insulator;
- “transform” the outer side of the slopes with a finishing F-shaped profile.
Why is it necessary to finish window slopes from the outside?
So, finishing the slopes of windows from the outside is necessary not only for the reason of adding aesthetics to the facade. Much more serious goals are being pursued that directly affect the comfort of living in the house.
When installing new window frames into openings during construction, or when replacing them during reconstruction or repairs, they are never mounted flush against the wall structure. It is mandatory to leave certain gaps on all sides, which are necessary to compensate for possible “movements”, for example, during shrinkage of the building or even during seismic tremors. Otherwise, even a small change in the geometry of the walls, including a temporary one, can skew the windows, completely deform them, squeeze out the glass, etc.
Naturally, such gaps become loopholes for the cold. For a long time, during construction, they were filled with natural insulation materials - tow, felt, wool, etc. But if you leave these insulating padding layers without the necessary protection, they will not last long. They quickly begin to age, are taken away by birds for nests, under the influence of precipitation and simply atmospheric humidity, they get wet, losing their qualities, and begin to rot and rot.
Over time, such natural insulation materials were replaced by industrially produced materials, such as mineral wool. It may not be so attractive to birds and does not rot, but exposure to water in combination with exposure to frost leads to matting, increased fragility of the fibers and a sharp loss of insulating qualities.
Filling deformation gaps around the perimeter of the window frame with foam
Recently, polyurethane foam has been used to seal and insulate such expansion gaps. This is an excellent material that does the job perfectly. But it cannot boast of exemplary durability if it is not protected. Consolidated exposure to ultraviolet rays, humidity, wind and temperature changes can very quickly “age” hardened polyurethane foam - the foam begins to crumble, and such sealing will be of little use.
Therefore, insulated seams between the wall and the frame must be covered with a material more resistant to natural influences. This, by the way, will further increase the thermal insulation qualities of this area. And since it is human nature to be drawn to beauty and neatness, they also try to give such decoration the most attractive appearance. That is, the work is planned and carried out with unconditional consideration of the decorative qualities of the created façade appearance.
How to determine where it's blowing from
Possible places for cold air to enter are:
- Connection of the window block to the wall panel along the entire perimeter (ceiling part, slopes, window sill);
- Seal between the sashes and the window frame;
- Fittings (worn or loose hinges, handle);
- Plastic bead securing the double-glazed window to the profile.
The main reasons for the formation of cracks in these places are:
- Violation of the rules for installing plastic windows;
- Warping of the window frame due to natural shrinkage of a new building or wooden house;
- The use of low-quality materials by the manufacturer in the manufacture of PVC profiles and by installers when installing windows in order to save money;
- Drying and cracking of the rubber seal;
- Wear of window fittings, leading to weakening of the clamping force;
- Failure to comply with the rules for operating windows (regular wet cleaning and treating the rubber seal with glycerin, cleaning and lubricating the clamping mechanism and hinges).
To determine the location of the blowing, it is enough to run the back of your hand along the listed elements. In a place where thermal insulation is damaged, a flow of cold air rushes into the room. For greater effectiveness, the palm can be wet.
If in doubt, you can use a lit match, lighter, or candle. They are carried out at a safe distance from the profile (2–3 cm) along the entire perimeter of the window. Deflection of the flame to the side indicates the presence of a draft from the gap.
You can determine where the air is blowing using a burning match.
The tightness of the seal can be checked using a sheet of writing paper. It is placed between the open sash and the frame. The sash is closed by turning the handle all the way. If the paper can be pulled out, it means that the seal does not fit tightly and there is a gap.
Detected places of cold penetration and cracks are marked on the drawing or with a pencil on the window profile
During insulation work, these areas should be given special attention.
It is recommended to call a specialist if:
- The warranty period has not expired;
- External insulation is required on high floors;
- The cause of the gap is a manufacturing defect;
- Replacement of worn elements of the clamping mechanism is required;
- The work must be completed efficiently and in a short time.
In other cases, it is more economical and expedient to do the insulation of plastic windows yourself.
Rules and safety precautions
When insulating external slopes, you should adhere to the following rules :
If insulation of windows on the second or higher floor is required, it is recommended to involve specialists in high-rise work, since there is a high probability of doing the insulation incorrectly due to limited mobility.
Also, working at height can cause physical injury or property damage, and in the worst case scenario, you can die if you fall from a window.- When working with insulation based on mineral wool, as well as when drilling walls, you need to wear protective equipment for the eyes, hands and respiratory tract, since the dust suspension can lead to negative effects on the body.
- During work, care should be taken not to damage the window frame, insulating layer or fastenings. You also need to make sure that the insulation layer does not extend beyond the window boundary too much, as this will shift the dew point or cause deformation of the PVC layer.
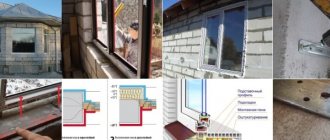
Why insulate slopes and options for materials used
The most common reason for insulating slopes is replacing outdated wooden windows with plastic ones, but this process does not always lead to the desired result, and dismantling work may not be carried out properly, which will lead to greater damage to the window opening.
A guaranteed increase in thermal insulation properties, regulated by manufacturing plants, is possible if certain requirements are met, one of which is the installation of insulated slopes.
The reason for the need for this insulation or insulation is that if this process is not performed, the direct barrier between a warm or cold space will be the window itself.
When installing a window, quite often there are invisible gaps through which warm air quickly leaves the room, and the new design has nothing to do with heat loss.
In order to reduce such heat losses and move the barrier (neutral) zone slightly towards the apartment (this process will eradicate the cause of mold on the slopes near the windows), the slopes are insulated.
You can see a visual view of the insulated “pie” in the diagram below.
Materials for slope insulation
Before insulating the slopes, it is worth deciding on the insulation option. Today there is a large selection of materials with which you can qualitatively insulate a slope, make it airtight and reliable. Such materials may include:
- mineral wool;
- glass wool;
- Styrofoam;
- expanded polystyrene;
- polyurethane foam;
- basalt wool;
- roll-type foil fiberglass;
- sandwich panels.
The choice of suitable material is made depending on what raw material the wall is made of and how the interior decoration of the rooms where the windows are installed is done.
The thickness of the insulation must correspond to the dimensions of the window
Insulating openings with soft materials is an effective method, but the parameters of the slopes and openings do not always allow resorting to this insulation option.
Since mineral, basalt and fiberglass wool are at least 5 cm thick, even when compressed they may not fit the dimensions.
In addition, these types of insulation require external cladding with a separate material, in particular, plastic panels or plasterboard.
Insulation of slopes can be done using foil fiberglass. This material may cause some difficulties during installation work, but it completely blocks the circulation of moisture and air between the room and the outside, while creating complete thermal insulation.
One of the most popular methods of insulating slopes are options using polystyrene foam and expanded polystyrene. These materials are dense and are perfectly placed using adhesive solutions on any surface.
Expanded polystyrene is well suited for insulating slopes
To give a decorative appearance to slopes insulated with penoplex or polystyrene foam, the surface should be plastered and painted.
Sandwich panels are also considered a modern, but expensive option for finishing and insulating slopes. They can be installed using liquid nails adhesive. The material is very reliable and does not require additional cladding.
Design of window frames, examples of solutions for window and door openings.
Pilasters for windows instead of platbands are one of the ways to decorate windows from the outside in an unusual way. If pilasters are used as a platband, a sandstone is placed in the upper part of the window, which can be made from a cornice profile.
Read more about the rules for window design, stucco options, and combinations of various elements of stucco parts on windows in the new article.
The moldings that are presented in our online store are much simpler than the magnificent frames that you saw above, but the price of a simple profile is much more affordable. Foam facade products are a simple and inexpensive way to decorate your home, however, you can custom repeat any of the frames you like.
Preparatory process and cutting of finishing material
Before insulating slopes with polystyrene foam, you need to correctly cut the sheets. The size of the slope is closely related to the dimensions of the window, so you need to understand that they will have to be “planted” as deep as possible.
After cutting the parts, they are connected to each other with glue, which is applied to the seams. Then the glued product is left for a short time. Next, the prepared fragments are connected, pressing firmly, and left for 60 minutes to dry completely.
Fiberglass reinforcement
To achieve maximum strength, fiberglass reinforcement can be done. To do this, fiberglass is cut into strips, the width of which corresponds to the width of the slope. Fix the tapes with a stapler and then secure them with glue. When the glue dries, it is customary to putty the reinforcement, as shown in the photo above.
Preparing slopes - correct cutting of products
To make an external slope from foam plastic, it is necessary, first of all, to competently cut the products. The dimensions of the material will directly depend on the parameters of the windows. Here you should not forget that the slopes need to be seated to the maximum depth. Having cut out the layers of foam plastic, we begin to connect the already prepared parts together using glue: with a brush we apply the solution to the seams of the material and leave it there for about 10–15 minutes. Next, we connect the products, squeeze hard so that the glue takes hold and leave for one and a half to two hours until completely dry.
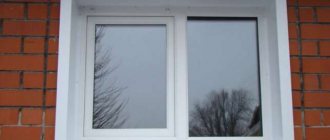
High-quality insulation of slopes of plastic windows is the key to maintaining heat in the apartment
Preservation of heat is one of the key conditions for comfortable living in an apartment during the cold period. Most often, an effective way to protect your home is to replace an old window with a modern metal-plastic one.
But choosing a high-quality design from a 5-6-chamber profile and a double-glazed window is not enough; the window itself, of course, will not let the cold into the apartment, but the places where it adjoins the opening, if they are not properly insulated, may well cause penetration cold air into the room. occurrence of dampness and mold.
Therefore, insulating the slopes of plastic windows is a task of paramount importance. The opening is insulated from the outside and inside of the window, using various types of materials