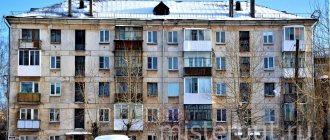
When buying an apartment, it is not always possible to choose which floor it will be located on. Indeed, in this case, you need to take into account a lot of nuances and the number of floors is not the most important thing. Therefore, it often happens that you are satisfied with everything, but the apartment is on the first floor. Well, you have to take it, even knowing that there will be problems due to the cold basement.
And sometimes an apartment is inherited from relatives. And here there is no choice at all. Of course, you can always sell the apartment and buy another option. But not everyone is ready to take such drastic measures - especially if the area is normal and the renovations in the house are new.
What to do? In fact, dampness in apartments on the ground floor is not a death sentence. Yes, it’s unpleasant, yes, it can cause various problems, but all this can be solved. It is much easier to carry out certain additional work than to sell an apartment, look for a new one and generally deal with such a hassle. In addition, it will be many times faster in terms of time and more profitable financially. Although even if you decide to sell your home, it won’t hurt to solve the problem with a damp basement. At a minimum, in order to increase the value of real estate.
Therefore, in this article we will look at what to do if a damp basement “makes itself felt.” There are different methods used to solve this problem, so let’s look at them in more detail.
We recommend the product Exhaust fan Soler&Palau Silent-100 CZ Design (5210601800) 7 reviews
In stock
Finish: glossy | Diameter, mm: 100 | Air consumption, m³/hour: 85 | Fan noise level, dB: 26.50 |
Contact the house management
The first thing to do is contact the management company. Especially if the basement is problematic (water flows along the walls, there are constant temperature changes and excessive moisture levels). Make statements, complain, ask its employees to restore order and fix leaks. It will also not be superfluous to waterproof the walls so that moisture does not rise through them into the apartment. In short, do everything so that the management company solves this problem.
Often people living on the 1st floor deal with these issues on their own. That is, they collect money and hire specialists to perform specific work. But a damp basement affects all residents of the house. Therefore, you can call your neighbors and contact the management company together. You have every right to do this.
Remember that responsibility for the condition of the basement lies entirely with the management company. In the worst case, if the issue cannot be resolved peacefully, you can always turn to other authorities and even to court.
What materials are needed for construction?
Once permission is received, procurement of materials can begin. Typically the following is required:
- Rolled waterproofing material for insulating floors and walls.
- Components for preparing the cement mortar necessary to form a floor screed.
- Reinforcement network (you can purchase steel bars separately, and then tie them yourself in any suitable way).
- Material for the construction of cellar walls (bricks, blocks, etc.).
- Thermal insulation and finishing materials. They are selected in accordance with the wishes and capabilities of the future owner of the cellar. There is no particular point in buying expensive insulation materials.
- Bars, slats and other wooden elements with which you can make a hatch into the cellar. Also, the hatch is sometimes made of sheet metal.
- Pipes for installing a ventilation system.
The above list is largely standardized, so everyone can supplement it at will and based on the specifics of the work.
It is necessary to monitor the condition of your cellar, periodically renovating it.
Insulate the doors
In many houses, the entrance to the basement is provided directly at the entrance. Because of this, all odors easily penetrate into the apartment. Plus it can also feel chilly.
How to get rid of the smell from the basement on the first floor? Pay close attention to entrance doors. For example, insulate them or install platbands. You can also change the seals and cover the doors with vinyl leather (insulation is pre-placed under it).
An equally effective solution is to install second doors. Ideally, it should turn out like this: first – metal, then – wooden. In this case, you will not be afraid of the smells and cold from the basement.
You can insulate doors yourself (if you know how) or entrust this work to professionals. In any case, the result will be instant and you will notice it immediately.
Uninvited guests and protection from them
Product odors in the basement can attract uninvited guests such as mice, rats and insects. The appearance of such living creatures can cause significant damage to the farm's reserves.
The first thing you need to do to protect yourself from pests is to carefully check the integrity of the inner surface of the basement. The holes and cracks that appear are sealed with cement mortar and crushed glass. Rodents don't like this very much.
Then the ventilation hole must be covered with a fine mesh. Mousetraps are placed on the floor of the cellar and poison is laid out for rodents. All this will help keep food supplies safe and sound.
3. Install equipment to combat the smell of dampness
There is often a damp smell coming from the basement. This is common. How to get rid of dampness in an apartment on the first floor? This is where efficient ventilation equipment comes in handy.
First, check the operation of the ventilation duct, see if there is draft in it. Most likely not, since the effectiveness of natural ventilation leaves much to be desired. In this case, it is necessary to purchase ventilation equipment. Which one depends on the available budget.
The most affordable solution is an exhaust fan, a large range of which is presented in the Vencon online store. It is a compact device that is mounted in the wall and solves the problem of ineffective natural ventilation. That is, it removes room air. At a minimum, such a fan should be installed in the bathroom and toilet.
A kitchen hood would be a good idea in the kitchen. It works in much the same way as an exhaust fan, only it more effectively removes steam, fumes, smoke and all sorts of odors that appear during the cooking process. After all, it was developed for these tasks.
We recommend the product
Kitchen hood Elica Elibloc LUX/GR A/60 4 reviews
In stock
Height, mm: 252 | Width, mm: 524 | Depth, mm: 289 | Hood installation: in a kitchen cabinet | Noise level (max), dB: 70 | Hood operating mode: air exhaust | Kitchen hood type: built-in | Productivity, m³/hour: 1200 | Capacity in withdrawal mode, m³/hour: 690 |
To create an effective ventilation system, you will need a complete supply and exhaust unit. From its name it is already clear that it will extract indoor air and supply fresh air from the street. That is, to ensure complete air exchange, which is what is required in this case.
A household recuperator is ideal for apartments. It also belongs to the supply and exhaust models, but has more compact dimensions. It is hidden in the wall, having drilled a hole in advance using the diamond drilling method, so that one side faces the street and the other goes into the room. Due to this, the recuperator can operate 24 hours a day, 7 days a week, and at any time of the year. And you don’t even have to open the windows for this, because it already has access to street air.
Of course, the recuperator can adjust the air flow temperature if necessary. For example, in summer - cool it, and in winter - heat it to the optimal temperature. However, sometimes you still need to open the windows: it’s not difficult, and you always need fresh air in the room.
We recommend the product
Recuperator Prana 150 Eco Life 4 reviews
In stock
Heat recovery efficiency,%: 95 | Heat exchanger material: copper | Installation of external grille: from indoors | Wall module diameter, mm: 150 | Filter class: G2 | Wall thickness from, mm: 450 | Area, m²: 11-20, 21-35, 36-60, up to 10 |
How to make a cellar or mini-cellar on the balcony in an apartment with your own hands
On a closed balcony you can build a container cellar from plywood or wooden lining. First, the location for the future storage is determined. It’s convenient to make it in a corner, blocking off part of the space.
At its core, a balcony cellar is a wooden box, the thermal insulation of which is made like a thermos
Process:
- To keep the temperature inside the storage facility at a certain level, two wooden boxes are knocked together - a large one and a smaller one. The space between it is laid out with a layer of insulation.
- The frame of the structure is made of boards 50 mm thick. The sheathing is made of 10 mm plywood.
- The inside of the frame is covered with polystyrene foam or foil-clad polyethylene, folded in several layers.
The foil material holds a certain temperature level inside the cellar well.
The parameters of the inner box should be 2-3 cm less than the outer frame: the air gap serves as additional insulation.
Ventilation holes are made in the walls of the internal storage.
A hinged wooden lid is attached to the rear partition of the storage facility.
The balcony chest is designed for storing root vegetables; the temperature inside the storage is kept within 3-7 ᵒC
Insulate the walls of the apartment
If possible, be sure to order external wall insulation. This service is inexpensive, and for apartments located on the ground floor, it is performed easier and faster (craftsmen use scaffolding, not cables).
If it is prohibited to change the facade of an apartment building, then you will have to insulate the walls from the inside. Yes, the area of all rooms will decrease, but this is not as critical as constant dampness on the first floor. The main thing is not to make a mistake with the thickness of the insulation (it should be chosen based on the design of the external wall and the climate in your region).
Legal aspect
Unfortunately, building codes and laws do not regulate such construction. If you wish, you can prove that this is allowed by referring to some documents, and you can also easily prohibit it, because other regulations do not allow this. Therefore, the best option would be to coordinate this issue with the board of the house or with the head of the housing and communal services department. If your construction does not interfere with the laid communications, does not protrude beyond the walls of the house (this happens when half of the basement is underground, and the rest is in a built-up niche under the balcony), then you should not be refused.
Do major floor work
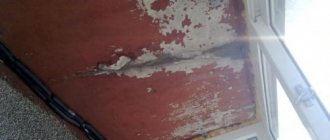
The cold floor on the first floor is perhaps the main problem. Although far from the only one. The basement is located below you and, accordingly, all dampness and moisture “come” from below, through the floor. Therefore, he needs to pay close attention.
Most likely, you will have to carry out major work: completely dismantle the floor, insulate it and seal it so that dampness and cold do not get to you. There are plenty of ways to make a floor above a basement.
At a minimum, the first floor of the apartment must be waterproofed. You can roll out a vapor barrier film over the floor slabs. And between the lags - lay mineral wool (or its equivalent). Then roll out the vapor barrier film again, connecting it to the top layer. Boards and chipboards are installed on top. Then laminate or other flooring of your choice is laid.
There is another solution. So, you can lay another floor covering on the old boards. In this way, it will be possible to close the cracks under the baseboards and at the same time make the floor thicker and insulate it. But you also need to make sure that the logs have not rotted due to dampness. If everything is in order, you can leave it as is. If not, then you will have to disassemble everything and carry out major work.
How to make a cellar on a heated balcony
A chest for storing vegetables is made based on the parameters of the balcony. The best option is when the length, width and height are approximately 1.1 m. If the dimensions of the loggia allow, you can increase the parameters of the product.
The chest is placed at the end of the balcony. The floor and walls of the room are first insulated with polystyrene foam or polystyrene foam.
Only the front side of the storage is covered with plywood or wood.
The front surface is attached to the walls of the balcony with metal corners. The back panel and sides are the walls of the balcony, insulated with foam plastic.
The inside of the cellar is lined with chipboard sheets.
The lid is attached to the top. Its inner part is also lined with foam plastic.
All cracks: internal and external should be treated with sealant.
How to make heating:
- Take two sewer pipes with a diameter of 50 mm, two rectangular elbows, and a plug for the end of the pipe.
- The length of the first pipe should be ¾ of the length of the bottom of the cellar, the second - ½ of the outer width of the cellar.
- Holes are drilled in three rows in the first pipe.
Each top hole should be perpendicular to the previous row - The pipe is laid at the bottom of the cellar, holes up, and secured with metal brackets.
- Using a crown, a round hole is cut out in the cellar wall; its diameter should be equal to the circumference of the pipe.
It is important to make an even cut so that there is no gap between the hole and the pipe - The pipe is taken out, the second elbow is put on and turned with the hole up.
- An electric hair dryer is inserted into the bell of the knee and turned on. A few minutes are enough to heat the cellar in severe frosts.
To avoid connecting the hair dryer manually, you need to purchase a temperature sensor. The hair dryer is connected to the device. The thermostat is installed in the middle of the inner wall of the cellar. The device and its wire are protected from accidental damage, for example, by a thick film.
The temperature sensor itself regulates the frequency at which the heater turns on
Install a heated floor system
In recent years, tiles have been installed on the floors in the kitchen and bathroom. This is understandable, because it is considered a reliable floor covering with a long service life. So: if the apartment is on the ground floor, then you can additionally use a heated floor system. The basement is not heated. And with such a system, you will definitely be sure that even in the winter season the floor in the kitchen and bathroom will always be warm.
True, this solution is not suitable for everyone, but only for those who are doing repairs. Or plans to start it in the near future.
We recommend the product
Electric underfloor heating Ensto ThinMat EFHTM160.3
In stock
Specific power, W/m²: 160 | Power, W: 480 | Mat width, m: 0.5 | Mat length, m: 6 | Heating area of the heating mat, m²: 3 | Cable type: two-core | Purpose: under tiles | Installation: screed |
Space under the first floor loggia
dygilev
New member
Good afternoon. I searched for a long time, but could not find the answer to a simple question: Who owns the space under the first floor loggia?
The situation is this: - There is an apartment five-story panel building.
— Under the loggias of the first floors there are spaces/niches
that are surrounded on three sides by walls/panels of the house, and on one side they face the street.
— The house is managed by an HOA.
Many people have these same spaces
under the loggias of the first floors they are sealed tightly with bricks (most likely there are cellars there), a couple of these
spaces/niches
have not yet been sealed.
The questions are: 1) Who owns these very spaces under the loggias of the first floors? 2) Is it possible to arrange similar cellars under loggias? 3) Who can occupy these spaces - only the residents under whose loggias these spaces are located or any other resident of this house? 4) How can this space be occupied? 5) Can a resident of this house, when moving to another apartment (purchase/sale), who previously used this space/niche
(covered with metal sheets from the street, with a door) sell this
space/niche
? 6) What should the residents of the first floor apartment under the loggia which has this type of “mini garage/shed” do (this space was occupied by a tenant from the 2nd floor) if there is constant noise (when opening/closing this mini garage) and all sorts of things are stored there “ junk"?
I ask you to answer these questions and, if possible, indicate the codes/laws/articles on the basis of which you will give your answer.
Yuri Nikolaevich
Lawyer
1) Who owns these very spaces under the loggias of the first floors? - To an indefinite (both in quantity and quality) group of people and the state, with a ratio absolutely unknown to anyone.
(Many people think that there is certainty... and they declare about some group of “house owners”, but no one ever knows anything about this group..)
2) Is it possible to arrange similar cellars under the loggias?
- No.
(and under no circumstances.). 3) Who can occupy these spaces - only the residents under whose loggias these spaces are located or any other resident of this house?
- any plot is COMMON property: therefore no one, separate and specific, can.
4) How can this space be occupied?
- The first condition should be to obtain permission from ALL OWNERS - but due to the uncertainty of this concept - the condition is impossible to fulfill,
5) Can the tenant of this house, when moving to another apartment (purchase / sale), who previously used this space / niche (sealed with metal sheets with streets, with a door) sell this space/niche to the buyer (new tenant)?
— Just like the hole from the steering wheel..
6) What should the residents of the first floor apartment under the loggia which has this type of “mini garage/shed” do (this space was occupied by a tenant from the 2nd floor) if there is constant noise (when opening/closing this mini garage) and all kinds of “junk” are stored there?
— Throw the junk in the nearest trash heap (or a neighboring one)
Most of the answers are contained in the Civil and Housing Codes. But these issues (the special regime for common property in apartment buildings) are revealed crookedly and obliquely. Therefore, disputes have been going on for many years, but things are still there.
There is a burden of maintenance, but no "right of ownership"
"on common property (only fiction).
Source
Use electric heaters
Electric heaters will also help you combat dampness. Many Ukrainians already buy them for various reasons - for example, to save on heating costs or to create a more comfortable microclimate if the temperature in the rooms is too low. You can use electric heaters for all tasks at the same time. Including to combat dampness.
Alternatively, you can replace the heating batteries by purchasing new ones - with an increased number of sections. But such a solution will cost an order of magnitude more, plus there will be additional installation costs. If your budget allows, you can replace the batteries, but if not, then an electric heater will suffice.
Choose the appropriate option
To prevent vegetables from drying out and rotting, the proper microclimate must be maintained in the vegetable storehouse. This is why you need a balcony cellar. Essentially, this is a thermally insulated container that provides ventilation and heating.
Seeing the difficulties that city residents who are deprived of full-fledged cellars have to face, the domestic industry met them halfway and mastered the serial production of products designed for storing a small supply of vegetables. All of them are divided into two groups:
Thermal cabinet "Cellar"
Inside such a cabinet, vegetables and fruits will feel quite comfortable even in forty-degree frost. Thanks to the built-in electric heating elements in the cellar on the balcony, the temperature is maintained from +2 to +10 degrees, and user participation is not required for this at all - the vegetable cabinet is equipped with a thermostat. Ventilation is provided to maintain humidity at an acceptable level. The body of the heating cabinet is made of ordinary steel, the drawers in which vegetables are stored are made of galvanized or stainless steel. Thanks to the powder paint coating and well-developed design, the cellar will not only cope with its main function perfectly, but will also serve as a real decoration for the balcony.
The capacity of such a cabinet can reach 300 liters. In this case, its dimensions will be 85x50x120 cm (WxDxH).
Flexible thermal container
This option is suitable for those who do not want to drag a heavy iron box up to their floor, as well as for those whose balcony is not large in size. A flexible thermal container called “Balcony Cellar” is just a large bag, its weight does not exceed 5 kg and can be used even in the most cramped conditions.
The walls of the thermal container are sewn from two layers of dense fabric with water-repellent impregnation; padding polyester is used as insulation. The optimal temperature is maintained using a wire electric heater. In such a shelter, the vegetable brethren are not afraid of either frost or heat: the maximum permissible ambient temperature for a thermal container is -40 and +50 degrees.
More interesting ways to store vegetables on the balcony and loggia are described in this article. It also provides tips for preparing potatoes for winter storage.
What are the problems of apartments above a cold, damp basement and their solution?
When buying an apartment, it is not always possible to choose which floor it will be located on. Indeed, in this case, you need to take into account a lot of nuances and the number of floors is not the most important thing. Therefore, it often happens that you are satisfied with everything, but the apartment is on the first floor. Well, you have to take it, even knowing that there will be problems due to the cold basement.
Installation of PVC windows- Covering the drain hole with your own hands
- How to lay flexible tiles on the roof?
And sometimes an apartment is inherited from relatives. And here there is no choice at all. Of course, you can always sell the apartment and buy another option. But not everyone is ready to take such drastic measures - especially if the area is normal and the renovations in the house are new.
What to do? In fact, dampness in apartments on the ground floor is not a death sentence. Yes, it’s unpleasant, yes, it can cause various problems, but all this can be solved. It is much easier to carry out certain additional work than to sell an apartment, look for a new one and generally deal with such a hassle. In addition, it will be many times faster in terms of time and more profitable financially. Although even if you decide to sell your home, it won’t hurt to solve the problem with a damp basement. At a minimum, in order to increase the value of real estate.
Therefore, in this article we will look at what to do if a damp basement “makes itself felt.” There are different methods used to solve this problem, so let’s look at them in more detail.
Problems of an apartment above a cold, damp basement and their solution
Unfortunately, we do not always have the opportunity to choose a house or apartment on our own. If you have a property located on the ground floor, and the basement underneath is damp and unheated, problems are likely to arise. How can you solve them without changing your place of residence?
Of course, the owners of a problematic apartment on the ground floor often want to simply get rid of it, sell it and buy something more comfortable. But sometimes it is not advisable to make such drastic changes; you don’t want to change the area, for example, and the price may be too low. Before deciding to sell your property, we advise you to take measures to solve problems with dampness and cold. In any case, in the future, the measures taken will increase the value of real estate, that is, they will pay off.
So, if under your apartment there is an unheated basement with damp walls and moisture, you need to take the following actions:
1. Contact the management company or the building management. Especially if communications are leaking in the basement or water is flowing along the walls due to high humidity and temperature changes. Urgently complain, write statements so that the management company takes the necessary measures. Demand that the basement walls be waterproofed, leaks fixed, and order restored. Waterproofing the basement from the inside will prevent moisture from rising along the walls into the apartment. In general, this is a problem for the entire house, so you can safely involve your neighbors and demand that the utility companies correct the situation. Sometimes desperate residents of the first floors begin to deal with the problem basement on their own and raise money for its improvement. But this is a common building, so the responsibility lies entirely with the management company. As a last resort, you have the opportunity to complain to higher local authorities or file a lawsuit.
2. If the entrance to the basement is in the entrance, all the “aromas” of dampness and cold can penetrate into the apartment through the front door. Pay special attention to it, insulate it, install trims, replace seals, get rid of all the cracks, cover the door with vinyl leatherette, under which you should put soft insulation. The best option is if there are two entrance doors - wooden inside and metal outside. You can insulate the front door with your own hands, and the result will immediately affect the condition of the apartment.
3. Effective ventilation will help combat the smell of dampness. Modern windows with ventilator valves allow you to get fresh air even when the window is closed. A recuperator, an exhaust fan in the bathroom and toilet, and an extractor hood in the kitchen will help. Check how the ventilation duct in the apartment works, whether there is draft in it. In any case, do not forget to periodically open the windows, even if it is cold outside - fresh air is more important.
4. Experts consider the option of insulating apartment walls on the street side to be much more effective. Be sure to find out if you have such an opportunity, because sometimes making changes to the appearance of the facade of an apartment building is simply prohibited. If local authorities have banned insulating an apartment from the outside, then you will have to do it from the inside, reducing the area of the premises. It is important to choose the optimal thickness of insulation; be guided by the design of the outer wall and your climatic conditions.
5. The floor will require special attention. We are sorry, but most likely you will have to completely disassemble it, insulate and seal it in such a way that cold air and dampness from the basement do not enter the apartment. It is necessary to roll out a vapor barrier film over the floor slabs (https://www.rmnt.ru/story/isolation/kak-uteplit-dom-pravilno.560882/), it is placed on the walls above the finished floor level. Insulation, such as mineral wool, is placed between the joists. Then again a vapor barrier film, which is connected to the top layer in order to close the insulation as securely as possible. On top are boards, chipboard, and then the finishing floor covering, for example, laminate or linoleum. As an option - a screed on the floor slabs, a layer of mortar on which the new floor will be laid. Sometimes owners of apartments on the first floors lay an additional layer of flooring on old boards, trying to close the gaps under the baseboards and make the floor thicker and warmer. But usually such measures are not enough. It is important to make sure that the joists and the base of the floor are in good condition and have not rotted due to dampness from the basement. Therefore, despite the loss of time and money, it is better to disassemble the floor.
6. In the kitchen and bathroom on the first floor, warm floor tiles would definitely be a good idea, as a reliable and durable floor covering. In this case, you definitely won’t have to worry that these rooms will be cold in winter due to the unheated basement.
7. You can also additionally install electric heaters, replace heating batteries, increasing the number of sections.
You shouldn’t be so upset that you got an apartment on the first floor and a basement below. The first floor has its advantages, for example, independence from the elevator and a lot of shade in the summer. And with the help of modern materials, you can insulate the apartment so that there will be no difference with other floors, despite the problems with the basement.
Step-by-step guide to making the inside of a vault
- Mark the measurements of the width and length of the future container on the furniture board and cut it.
- Assemble a box of the desired size and shape from the cut out parts - this is the outer box of the vegetable storage.
- Cut and assemble the second box from moisture-resistant material - the inner body of the cellar.
- Attach a sheet of fiberboard or plywood, as well as boards treated with machine oil, to the bottom of the container using self-tapping screws.
- Cover the inside of the outer box with insulation.
- Cut a lid for the container that extends one and a half centimeters beyond the outer edges of the thermal box.
- Attach the lid using furniture hinges.
- Drill holes in the walls and bottom of the container for air circulation.
Exterior decoration
The final stage of creating a cellar for the balcony is covering the lid of the container, which will later serve as a seat. To do this, make a cut out of the desired material. Its size should be slightly larger than the area of the lid (taking into account the folds and tension). Cover the lid of the thermal box with a ball of foam rubber of the appropriate size, and attach the “lining” material on top. Fasten fabric, leather or leatherette using a stapler or small nails.
How to create a basement
The standard design of an apartment building provides owners of apartments located on the first floors with the opportunity to construct basements with above-ground parts in niches under the loggias. If you decide to take advantage of this opportunity that fate itself provides you, the planned work will need to be carried out, sequentially moving from one stage indicated below to another:
- Having decided on the depth, they dig out the basement. Its walls are cemented and wait for them to dry.
- The above-ground walls of the under-balcony niche are laid. They can be built, for example, from cinder blocks. Although any material that can hold heat well will do.
- Carry out thorough thermal and waterproofing of the basement. Internal thermal and waterproofing of basement walls is necessary to increase the durability of the created room, as well as to ensure the safety of everything that will be in it.
- The inside of the resulting room is lined with plastic or plastered and whitewashed.