The houses were built in the 50s of the last century. Balconies need additional strengthening and are designed for light loads. For these reasons, it is important to think about what the exterior and interior decoration will be made of.
There are different options for glazing a balcony in a Khrushchev-era building. Each of the projects is quite feasible to implement. To do this, it is useful to know the features of installation of structures. For residents of small apartments, it is quite possible to turn a small balcony into an extension of the room and increase the area of the apartment.
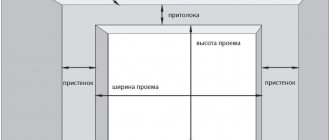
Typical sizes of balconies
Just a few years ago, the first glazed balconies were a rarity. Now, this technology is used everywhere, regardless of whether it is a new building or a Khrushchev-era building. With new buildings the situation is simpler, but the age of Khrushchev-era buildings, worn-out materials and dilapidated structures significantly complicate this process. The size of the balconies limits the glazing options.
No matter what your home layout is, the standard height from the bottom slab to the top is 2.6-2.65 m.
And the typical dimensions of a balcony look like this:
- width - 0.65-0.8 m;
- length - 2.8-3.1 m;
- parapet height - 1.0 m.
Strengthening the slab
During the construction of Khrushchev houses, low-quality concrete is often used. Over time, such material begins to deform and crumble. Therefore, the balcony slab needs to be reinforced before subsequent glazing. In this case, the order of work is as follows:
- screw several (at least 6) anchor bolts into the wall along the length of the balcony above the slab;
- weld a steel frame to them, performing a supporting load-bearing function;
- make a new slab by filling the frame with concrete mortar.
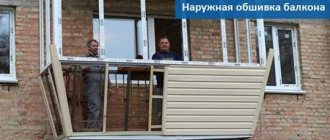
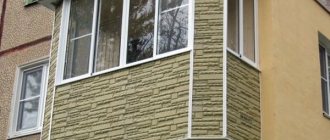
Cladding the external wall of the balcony
You can finish the external wall of the balcony in various ways. The most popular materials are:
- Siding is divided into steel, wood, aluminum and vinyl. The latter option is most often used for cladding the walls of Khrushchev’s balconies due to its light weight, combined with excellent performance properties.
- Lining is a budget material that contains wood. However, it has a short shelf life and will require replacement after a couple of years.
To sheathe the outer wall of a balcony with clapboard or siding, it is necessary to install a sheathing made of wooden blocks or a metal profile. The latter option is preferable due to its immunity to fungus and mold. Then the facing panels are attached to the sheathing with self-tapping screws.
Design Features
Glazing balconies in Khrushchev is not the easiest task. Loggias in new buildings are more suitable for these purposes, however, it is possible. In addition, you will have to take into account several more factors:
- the condition of the slab - the concrete that was used several decades ago was not of good quality, so now the floor slabs look deplorable. They may be cracked or partially crumbled, so it is not recommended to do such work with your own hands without preliminary repair work;
- the condition of the railings - they cannot be used as supports for the frame. Their age also needs to be taken into account and you cannot do without additional work to strengthen them or completely replace them;
- size - this factor may push you to a completely unexpected solution, such as glazing a balcony with a remote. This option can be used if the technical and operational characteristics of the house comply;
- floor - any balcony must have a roof, so if there is no roof, you will have to do this too.
Construction of balconies in Khrushchev buildings
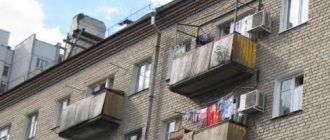
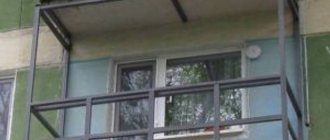
Since in Soviet times all residential buildings were built using the same technologies, under the same “comb”, the balconies of the “Khrushchev” buildings are of the same type - cantilever. The balcony slab is partially built into the wall and recedes from the general vertical plane of the building by several tens of centimeters.
A metal fence about 80 centimeters high is installed along the perimeter of the balcony slab. As a rule, the fence is not capable of bearing any additional load and cannot be part of the future glazed frame. When installing glazing, the old railings must be dismantled, making a parapet from a different, more reliable material. This will be discussed in more detail below.
Often, Khrushchev-era balcony slabs are in a pre-emergency condition - exposed reinforcement, cracks throughout the entire area, chips on the edges of the slab . This is due, firstly, to the fact that the structure was open to any external atmospheric influence during the entire period of operation.
Secondly, as already mentioned, during construction there were no such high quality standards and constant checks by technical control, so the quality of the concrete from which the balcony slab was cast left much to be desired. In this regard, before starting work on glazing the Khrushchev balcony, it is necessary to strengthen and restore the structure - a separate chapter will be dedicated to describe this process.
Warm and cold glazing
Do-it-yourself glazing can be done using two technologies. There are two methods for this:
- warm method (or glazing with frames made of plastic or wood);
- cold method (aluminum profiles).
To decide which glazing method you want to use, warm or cold glazing, you need to know the maximum load on the slab. According to SNiP data, per 1 sq. m there should be no more than 100 kg of weight, but it is not recommended to exceed 65 kg. A big advantage in this matter would be supporting or replacing the old fence with aluminum. But this will not completely solve the problems.
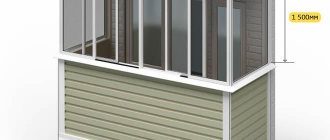
Warm glazing of balconies in Khrushchev allows you to expand the usable space of the apartment. There you can equip a work area or use this area as a winter garden. When performing such work, you must accurately calculate the weight of the future structure, taking into account the additional weight of finishing materials and insulation. Therefore, it is recommended to entrust this work to specialists to avoid troubles in the future. For such work, you can use frames made of wood or plastic. Options for warm glazing can be seen in the photo.
Cold glazing of balconies in Khrushchev is made with an aluminum profile. The load is small, but it is very difficult to insulate such a structure. If you do not plan to do this, then this option will be the most suitable. You can see what cold glazing looks like in the photo.
Warm
Cold
Dismantling the parapet and frame
If the roof is located on racks, then first you will need to remove all the interior decoration (tiles, wallpaper, paint, plaster, etc.), and then you can take on the roof, then the frame, and at the last stage the racks.
For dismantling you will need a nail puller, a pry bar and a grinder. It is very advisable to act with two or three people, otherwise the heavy frame can easily fly down. And this is dangerous, because people and animals can walk below. So it is highly not recommended to do such work alone.
Selection of material and features of working with it
Until recently, used frames or other available materials were used as glazing materials. You can glaze a balcony in a Khrushchev-era building with your own hands using more modern materials. In the photos presented you can see several options.
Plastic
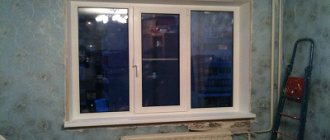
Installing plastic windows has many advantages:
- high quality and durability;
- long service life;
- easy care;
- affordable price.
But the weight of the structure is very large, so much so that old balconies are unlikely to withstand the weight of such windows. A parapet cannot be built either; this will reduce the already small area.
Tree
Installing wooden windows is quite a popular and favorite way to glaze balconies. This is largely due to the advantages of the material itself:
- environmental friendliness;
- excellent external data;
- wood fits well into any interior;
- compatibility with modern fittings;
- hygroscopicity;
- good soundproofing qualities;
- light weight;
- Easy installation that you can do yourself.
By treating wood with special antifungal compounds, you increase its service life to 50 years. The light weight of wooden windows is ideal for glazing balconies in Khrushchev-era buildings. When choosing wooden windows, it is recommended to choose pine needles, ash or oak.
The disadvantages of wooden windows include:
- mandatory painting;
- drying out and, as a result, poor closure.
Aluminum
The best option for glazing is an aluminum profile. Its main advantages include:
- high strength;
- light weight;
- fire resistance;
- affordability.
Modern designs have additional inserts made of insulation or plastic, and although they slightly increase the overall weight, the thermal insulation qualities become more noticeable.
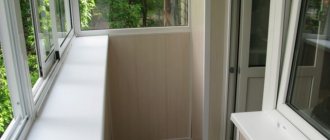
Interior decoration of the balcony
A typical Khrushchev panel or brick does not have the best layout. The balcony in such a house is L-shaped or U-shaped. Such a room requires a major overhaul, including high-quality glazing and interior decoration.
Insulation of the ceiling, floor and walls is carried out with mineral wool and polystyrene foam, or a more expensive option is chosen in the form of heated floors.
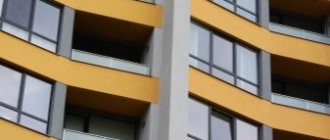
After restoring the loggia and securing the attic of the balcony, we proceed to the external cladding of the facade. The most suitable, simple and practical solution is vinyl siding.
Wall decoration
The most popular types of finishing are wood panels, plasterboard sheets, PVC plastic panels, cork, wallpaper and siding. For brick walls, painting is suitable, which gives the atmosphere a special flavor and at the same time does not hide the useful area of the balcony in the Khrushchev-era building.
In the interior of the loggia, pink, yellow, light green, blue, beige or light metallic shades will look advantageous.
Balcony floor
Before finishing work begins, special attention is paid to the condition of the floor, its deterioration, age and degree of wear of the balcony slab, taking into account the expected weight load.
The main requirements for flooring are strength, durability and ease of maintenance.
As a modern decor, materials from environmentally friendly wood are used, an analogue in the form of laminate is chosen or linoleum is laid. A warm and pleasant wooden or cork floor will fill the atmosphere of the loggia with naturalness and naturalness. For a balcony in Khrushchev, located on the sunny side, you can use ceramic tiles or soft carpet.
Ceiling on the balcony of Khrushchev
An excellent material for designing a ceiling plan on a balcony in a Khrushchev-era building is plasterboard or low-temperature stretch fabric. Thanks to this finishing, it is possible to create a perfectly smooth top, hiding all defects and irregularities. A suspended or tensioned structure with built-in spotlights will look impressive even in the design of a small loggia.
Lighting
Under no circumstances use heavy and lush chandeliers on the balcony that fill the worst part of the ceiling area. For a small room they are inappropriate and only cause a feeling of tightness and discomfort. It is better to choose spot lighting or decorative lighting using LED strips. Also, lamps for street lighting would be appropriate in the design of the balcony.
Balcony lighting depends only on your imagination. Here are some examples:
- for a high ceiling you should choose mini-chandeliers and lanterns;
- balconies with low ceilings will be decorated with several bright lighting fixtures;
- lovers of antiques should opt for a floor lamp;
- young people will definitely like the spots - metal strips with a couple of lamps, hung in different parts of the balcony.
If we are talking about an open balcony, then the choice of lighting fixtures is small, since it must be a sealed model.
Frame and frameless glazing
Do-it-yourself glazing can be done in other ways, for example, using the frame and frameless methods. Frameless glazing is more preferable for such balconies, since the structure is very light, which means the load will be minimal.
In appearance this design looks like this:
- guide profiles are installed on the upper and lower parts of the balcony;
- special glasses equipped with rollers are inserted into them;
- the opening or closing of such windows occurs like an accordion.
If there is such a need, then the glass can be moved to one side, thereby freeing up part of the balcony opening. You can see what frameless glazing looks like in the photo. The disadvantage of this method is the presence of a flat surface. This is the main drawback, since it will not be possible to install a guide profile on uneven surfaces.
The second option, which you can do yourself, is frame glazing; it does not have this drawback. It can be used even in cases where the balcony opening is far from ideal. Installing frames is faster than using the frameless method, and no special knowledge is required. Frame glazing is shown in the photo.
Frameless
Frame
Glazing methods
The standard glazing design involves a tightly sewn lower part - a parapet, and windows on top. Sometimes they make full glazing from floor to ceiling - this is the so-called French balcony.
Frame
The usual and most common method. Suitable for do-it-yourself installation, as it does not require special skills or experience. Frames are first installed on the supporting surfaces, into which the window sashes are then inserted.
Frameless
It is carried out on the principle of sliding doors. The windows move along guides on rollers from a closed position to an open position. For normal operation of the system, a perfectly flat horizontal surface is required both at the bottom and at the top. This design has minimal weight and is very convenient for a narrow balcony.
Calculation and measurements
Even the simplest rectangular balcony design is not dimensional accurate. No one is immune from errors. For example, in panel houses these errors can reach 10 cm, which can significantly affect the installed frame. There is such a pattern: the larger the size of the balcony, the greater the error will be. Therefore, experts advise not to use standard measurements, but to take them yourself. To do this, you will need to measure the width and height of the balcony in several places and find the smallest values.
In order to measure the height of future glazing correctly, you must follow some rules:
- the distance to be measured starts from the edge of the parapet and ends with the roof of the balcony;
- the measuring tape should be positioned strictly vertically;
- if you have a wide balcony, then height measurements should be taken every linear meter;
The length of the future glazing is calculated based on measurements from one edge of the parapet to the other. This line must be strictly horizontal. Having calculated the minimum distance, subtract 6 cm from it if plastic windows are installed, and 4 cm if aluminum windows are to be installed. The resulting gap is sealed with polyurethane foam.
Measuring a balcony for glazing
Basic standard dimensions of a balcony
Preparation for glazing
What balconies are called Khrushchev balconies and their varieties
Khrushchev's balconies are small in size and, unlike modern buildings, protrude slightly forward. The average size of a balcony space is 3 meters by 0.8 meters.
The following types are distinguished:
- L-shaped. A special feature of this type is the presence of a common adjacent wall with a neighboring building. During installation, 2 walls need to be glazed.
- U-shaped. This type has 3 walls that need to be glazed. This design is considered free-standing.
Khrushchev's five-story buildings have an inconvenient layout. Unlike modern buildings, such apartments require a special approach during planning.
Decorating a balcony is difficult, since the area is small and you need to carefully calculate all the nuances of the work.
Improving the strength of slabs before glazing
As mentioned above, glazing a balcony on a poor foundation is strictly prohibited. If the slab contains chips and large cracks, then you cannot do without repairs and strengthening. If you think that such measures are unnecessary, then think about the additional load that will occur when installing the frame; sooner or later the entire structure may collapse, which will lead to serious problems.
The most common ways to strengthen the foundation are:
- laying reinforcing mesh;
- cement strainer;
- internal sealing of seams.
Installation of reinforcement mesh
Installation of reinforcing mesh is necessary when the base slab is seriously damaged. In this case, its load-bearing functions will be weakened. To make such a mesh, you need to prepare steel wire with a cross-section of 5 mm. Before laying it, clean the base thoroughly. It is better to assemble the net itself outside the balcony, it will be more convenient. When laying, pay attention to the resulting gaps; they are needed for the concrete to flow under the rod. Concrete is poured based on the diameter of the reinforcement. Its amount should completely cover it.
If the base is so damaged that you are afraid to stand on it, then do not take risks and invite specialists to do such work. The price for such work will be set based on the complexity of the work.
Reinforcement and beacon system
Screed with cement
If small cracks are observed on the balcony slab, then instead of laying reinforcement, you can try a cement screed. The plan for performing such work looks like this:
- the surface of the balcony slab is thoroughly cleaned and leveled using cement mortar;
- a new layer of mortar is laid on top with a mandatory slope of one and a half degrees;
- the surface is ironed using dry cement;
- level the screed using a trowel;
- In this position, the balcony slab is allowed to dry for several days.
Cement screed Installation of metal fences
Frame installation
Interior finishing and seam sealing
Interior finishing is intended to create a more aesthetic appearance of all surfaces. You can also protect yourself from negative climatic conditions in this way.
Internal sealing is carried out in several stages:
- Sealing seams and cracks - When installing windows, you will likely develop small cracks or seams that need to be sealed to achieve maximum protection. For these works, any heat-insulating sealants are used, for example, polyurethane foam;
- insulation of internal surfaces - for such work it is recommended to use roofing felt or other insulating materials. They are laid overlapping, and they themselves are tightly glued to the base. In addition, you can use compounds such as foamed polyethylene, polystyrene foam or any sealant. Polyurethane sealant is also excellent for sealing cracks;
- internal insulation with insulation - this insulation involves covering the floor, ceiling and walls with thermal insulation materials. More often, foam sheets are used for such work. Since such material is characterized by great fragility, a sharp knife is used to cut the required sections;
- vapor barrier - such work is performed with special materials that are covered with foil. Installation of such sheets is carried out end-to-end, and the joints are sealed with special tape;
- finishing work - this work means finishing the walls and ceiling to give it the desired style. After this, they begin to design the floors, the entire area is covered with mortar and any floor covering is laid.
How to glaze a balcony yourself. Step-by-step instruction
- Preparing the base of a concrete slab to enhance its strength - cleaning the surface from dust and debris.
- Construction of a reinforcement frame and a layer of cement screed. This was discussed in detail above in a separate chapter.
- Balcony fencing assessment. As a rule, in “Khrushchev” buildings it is performed in the form of metal spans along the perimeter of the slab. In this case, the metal fence must be removed - it is not capable of bearing additional load, and along the perimeter of the slab on three sides, a masonry of foam blocks must be made, raising it to a height of about 70 cm. Brick masonry is unacceptable, as it increases the load on the balcony too much.
- On the foam concrete parapet, it is necessary to mark the places where the window frames will be attached to the fence. It is better to do this “in place”, applying the frame to the fence and marking the points at which the fixation will be carried out.
- On the marking line it is worth drilling several holes for dowels in increments of 25-35 cm.
- is attached to the outer wall of the apartment, the parapet and the higher balcony slab, which serves as the ceiling, using anchor plates.
- On the outside of the glazing structure, it is necessary to install a window sill and secure the facing corners.
- After the frame is installed , we fill it with double-glazed windows and sashes.
- All gaps that arise during the work (between the parapet and the frame, the frame and the ceiling, etc.) must be filled with polyurethane foam to ensure better sealing, heat and sound insulation.
- At the owner's request, it is possible to install a window sill in the resulting enclosed space. This will create an additional feeling of a full-fledged room.
Features of glazing a balcony on the top floor
Glazing the top floor is associated with many difficulties. Among the main difficulties is the lack of a roof. To equip a balcony with a roof, you need to decide on its design. The best options for balconies would be to equip them with a roof using one of the proposed options:
- the dependent design will look perfect with aluminum frames. It is easy to install and its weight is small, its affordable price makes this option the most popular, but it requires obligatory covering with galvanized corrugated sheet, this must be taken into account;
- An independent roof structure is installed using brackets on the top of the house. The covering is attached there. To cover such a canopy, you can use any roofing material.
Pay special attention to the installation of drainage systems, canopies and window sills.
Glazing with extension
The width of balconies in Khrushchev buildings is small. If you make insulation, even two people will hardly be able to pass each other in a narrow space. There is a natural desire to increase the habitable space using the “removal of the balcony” method.
Usually the front part of the glazing is extended beyond the balcony slab, but sometimes the expansion is made along the entire perimeter. The parapet has an inclined plane and consists of triangular brackets united by longitudinal connections. In this way it is possible to add from 30 to 50 cm to the width of the balcony.
Installation of the glazing frame outside the slab is carried out in the following sequence:
- Completely remove the old balcony railing.
- Install the side structures and secure them to the threaded rods through the through holes in the wall.
- Connect the outer brackets with longitudinal braces from angle steel.
- Install the intermediate front brackets.
- Secure the reinforcing diagonal brace in the frontal plane of the parapet.
- Install the frames on the parapet.
- Do the exterior cladding.
- Place the window sill on the top of the brackets.
- Fix the thermal insulation material on the inner surface of the parapet, fill all the cracks with polyurethane foam.
- Install window sashes.
- Cover the walls, parapet, ceiling, and floor surfaces.
Is it possible to expand the balcony
A small loggia or balcony space can be expanded. To do this, you should follow a step-by-step algorithm of actions:
- Dismantle the old fencing.
- Install a new fence, which will be made of durable, lightweight material, while protruding slightly beyond the boundaries of the slab. In order to make the structure safe, it is important to install additional supporting elements.
- The glazing frames are mounted on the edge of the slab. In order to make the use of such a metal frame safe, it is recommended to install a window sill.
- The frame is insulated and additionally secured to the walls using anchors.
- The structure is glassed.
It is necessary to expand the balcony only after additional strengthening of the structure
To ensure that the repair is durable and safe not only for those living in the apartment, but also for other residents, all installation instructions are followed. However, it is important to carry out calculations and only after that carry out construction work.
Khrushchev buildings are distinguished by their small size. It is especially difficult for large families to live in such premises, so the balcony is often used as an extension of the room. Using step-by-step tips, you can choose an interesting design for your loggia. However, it is important to remember that in old buildings the load-bearing structures may not withstand heavy loads. Therefore, before starting repairs, it is important to consult with specialists.
Material requirements
We have sorted out the glazing, now it is necessary to select other materials that would most fully meet the requirements for the repair of such a specific balcony as the Khrushchev one. After all, this is an open-type structure, so its enclosing elements, namely the parapet, should be protected with stronger and denser materials. But again, do not forget that we are limited by the load on the balcony slab; this structure does not allow the use of elements and structures of large weight. Therefore, in this case, the products used must be light and at the same time durable, especially for wall materials.
What can the market offer us to solve these conditions? Foam blocks fully meet this criterion - they have excellent thermal insulation properties, which solves the problem of thermal insulation of a balcony. The blocks are installed with a special glue, thanks to which there are no seams between the blocks and, thus, a reliable barrier to cold outside air is created. Also in favor of foam blocks for the “Khrushchev” balcony is the ability to select blocks according to the dimensions you need and, thus, you can adjust the thickness of the walls being built.
It is very important to correctly seal joints and gaps in all elements and structures. Particular care should be taken to blow out the critical joints of the ceiling, parapet and walls with glazing elements with foam.
Balcony insulation
First of all, the balcony must be insulated from the outside. This work should be done immediately after finishing the glazing. In order for the insulation to be high-quality and reliable, a working frame must be made of wooden slats or a metal profile for the insulating materials. The frame is mounted on the surface of the parapet in such a way that it can simultaneously take on the cladding materials of the outer and inner parts of the fence. The insulation itself - it can be polystyrene foam, mineral wool or another (as a rule, mineral wool is used) - which you choose, is placed in the space between the slats or frame profiles. The thermal insulation product should be as thick as possible, and if possible, it would be very good to use two or three layers of insulation. Now comes the turn of finishing materials.
Mineral wool is also suitable for insulating other wall surfaces and ceilings, although there are many other materials of this class with decent thermal insulation characteristics:
- polystyrene foam (with a wide range of densities and thicknesses);
- foamed polystyrene;
- penofol (new generation material);
- fiberglass.
This is not a complete list of thermal insulation materials with which you can perform high-quality insulation of a “Khrushchev” balcony.