Rational use of additional square footage of the balcony space can be ensured not only by modern repairs and insulation. An important part of the furnishings will be suitable furniture, in particular storage systems, for example, a shelving unit. This is practical and very stylish, because you can make a shelving unit for a loggia or balcony yourself, adapting it to the decor and size of the room.
Types of shelving for balconies
Racks are usually presented as open shelves of a kind of mini-cabinet. In fact, this is a correct definition, but this does not mean that throughout its existence this piece of furniture has not undergone some modifications.
What types of racks are used:
- With open shelves.
- With hinged doors.
- With a sliding door.
- Corner models.
The choice of a suitable option must be coordinated with the possibilities of its placement. It is also important to immediately determine the areas of use of such structures, the maximum load and operating conditions.
Manufacturing
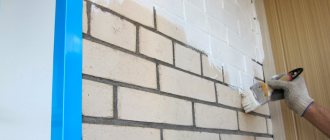
When making a rack, the base of which is on the floor on the balcony, the supporting surface must be leveled.
Debris must be removed from the work site. For beauty, you can sew up the back and side walls with laminated plywood.
Wooden rack
To make a simple wooden rack for a balcony with your own hands, you will need the following tool:
- Hacksaw. An electric jigsaw or grinder will make the work easier.
- Screwdrivers (screwdriver).
- Electric drill.
- Measuring tools – ruler, tape measure, building level.
- Consumables and hardware - screws, dowels, metal clamps (corners), nails.
- Wooden blanks.
Creating a wooden shelving for a balcony begins with the installation of vertical posts. The support bars are connected by a board, the length of which is equal to the intended width of the shelves. The first board is attached at the level of the upper cuts of the support bars. The blanks are knitted with one screw.
The resulting letter “P” is installed on a flat surface. The level checks the horizontal position of the jumper.
After making sure that the elements are strictly perpendicular to each other, we fix the position with two additional screws. In the same way (control by building level) we install the required number of jumpers. The step size should correspond to the size of the items that will be stored on the shelf.
The finished element resembles a wooden ladder. Let's make another similar copy.
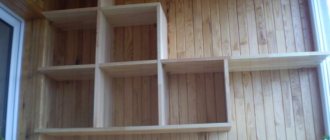
We connect the vertical posts with boards. Their side surface should not extend beyond the plane limited by the sides of the wooden blocks. Compliance with this requirement will allow, if desired, to improve the design. For example, sew up the sides with decorative material, or hang the doors on the facade of the rack.
Some of the bars will be in contact with the wall. We attach metal corners to their ends.
We install the finished product in the desired location. We mark the points where the holes in the corners face the wall. We take away the rack and drill a hole for a dowel-nail or dowel.
This measure will prevent tip-overs and make the storage area for household items safe.
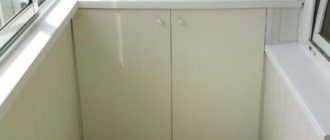
In order to hide the contents of the shelves, doors are often hung on the structure. Carrying out this work (manufacturing and subsequent fitting) is one of the most complex elements in furniture manufacturing.
Using blinds is a great alternative.
They cover shelves on glazed balconies and loggias. You can install blinds - roller shutters. But it’s even easier and cheaper to use ordinary aluminum blinds. You only need two screws to secure them to the top wooden header. A variety of colors makes it possible to choose the desired background.
In the case of using similar products on the balcony frame, a harmonious ensemble of elements complementing each other is created.
Metal rack
The main requirement when working with iron is compliance with personal safety measures. For work you will need safety glasses, a respirator and headphones.
Metal parts are cleaned of rust. A mechanical method (brush, sandpaper) and a chemical method (rust converter) are used.
For the manufacture of racks, a rectangular profile with a wall thickness of at least 2 mm is used. The task is simplified when using a perforated mounting profile.
The basis for placing shelves can be a profile and a corner.
The product is installed by bolting or electric welding. A design in which the parts are welded together looks more aesthetically pleasing. There are no protruding elements.
Depending on the connection method, the sequence of painting the rack depends. When used to connect bolts, paint is applied to the parts; when using electric welding, paint is applied to the finished product.
Installation of the metal structure begins with the side walls. Jumpers are attached to the posts. If a corner is used, the internal corner is directed towards the inside of the structure.
It is necessary to weld something like a ladder. A plumber's angle is used to control the position of the jumpers.
Two finished parts are connected to each other by long jumpers - the base for the shelves. If the material for the shelves will be thin boards or plywood, an additional stiffening rib is welded at an equal distance from the side edges.
Advantages of shelving on the balcony
You can equip the free space of the balcony in different ways. Even though its use is no longer considered solely as a storage space, a balcony shelving unit is essential. Such furniture will not only fit organically due to its small size, but will also become a practical addition to the decor, because there are many ways to use such shelves.
Advantages and application of balcony rack:
- Small dimensions allow you to squeeze the rack even into limited space. Due to the open shelves, such furniture does not visually overload the room.
- Corner shelving is usually less practical and is suitable for very small spaces. As an option, you can use corner shelves.
- Along with open shelving, you can also use mini-cabinets with doors. To do this, there must be free space on the balcony to allow easy access to the shelves.
- Original countertops - shelving is often used in limited space. You can install a tabletop on top of them and use them as a dining group or parapet.
Balcony racks are used to store various items that do not have a place in the apartment. Most often these are tools, canned goods, fishing and other special equipment that is used infrequently.
Varieties
When choosing a cabinet, take into account its purpose, the presence of niches and glazing on the balcony, the width of the loggia. The specified criteria will allow you to make a rack of the required size, characterized by maximum functionality.
Depending on the design features, several models are distinguished:
- Built-in. Rack equipped with hanging shelves. It is mainly installed on those balconies where there are niches. The model allows you to make the most efficient use of the available space. The width of the rack will be limited by the size of the niche.
- Angular. The corner cabinet is attached to the wall on both sides. Brackets are used as mounting elements. The advantage of the model is its spaciousness and compactness. The model will take up less space and will not block the passage.
- Open. A shelving unit without doors is installed against the wall and can be of any height and width. The model is well suited for storing seedlings, since this way the plants will have enough sunlight. If you make it in the form of hanging shelves, there will be space below for storing large items. In particular, a bicycle can fit under the cabinet.
- Closed. Model with doors. In such a rack they store items that need to be kept in a dark place, as well as things that the owner of the balcony wants to hide from prying eyes. The doors can be located along the entire height of the cabinet or cover only a few shelves. When choosing such furniture, it is important to leave free space for unhindered opening of the rack.
Requirements for shelving on the balcony
The specific conditions of the balcony space impose strict requirements on its organization. Most finishing materials and pieces of furniture will not fit here. Even on a glazed and insulated balcony, it is possible that precipitation, as well as more dust and dirt, can get inside. That is why balcony furniture must meet the following requirements.
What should a balcony rack be like:
- Practical and roomy enough, does not take up much free space.
- Durable, all fastenings must be designed for the total weight of the stored items.
- Aesthetically attractive and also fits into the overall interior of the room.
- Moisture-resistant, because on the balcony there is still a risk of moisture getting inside. Often this is not only precipitation, but also accidentally spilled water after watering plants.
- Easy to clean, as dust will accumulate on the shelves.
- Resistance to temperature changes, especially in uninsulated rooms.
- The most commonly used materials are wood and metal, and both options have advantages and disadvantages.
When decorating, you should choose the lightest colors possible so as not to overload the space with a dark accent. It is also necessary to consider the location of lighting sources and the direction of the light flux from the windows so that the rack does not interfere with the illumination of the room.
Ideas for original designs
It is not necessary to follow the instructions when remodeling the interior space of a balcony or loggia. It will be much easier to turn on your imagination at full capacity in order to “bring to mind” one of the original ideas for arranging the interior space of premises.
For example, a used wooden container for vegetables or fruits can find a second life in the form of an original shelf. We simply connect several boxes together in random order, and then attach the resulting structure to the side wall. Such designs fit organically into the interior of the balcony.
A broken staircase is another idea for creating an original balcony structure. We take an undamaged section, file the posts at a certain angle, and then install the resulting structure near the load-bearing wall. The rungs of the stairs are a good place to store books or place pots of house flowers.
By the way, another original shelf for flowers can be made in just a couple of hours. To do this we need four square planks and a coil of rope. In the center of each plank we cut out a large hole for the pot, and four more small holes for the rope need to be drilled in each corner.
We connect all four storage stands with a rope and fix them at the same distance from each other with regular knots. The shelf is ready - all that remains is to hang it from the mount installed on the ceiling.
https://youtube.com/watch?v=etDbFsrltK4
These examples once again prove that people can make their lives a little better without much expense. Want to see this for yourself? Try to start by arranging your balcony or loggia.
How to make wooden shelving
With minimal woodworking skills and the availability of tools, building a balcony rack is not difficult. To do this, it is necessary to design in advance the dimensions and configuration of the future cabinet, as well as cut and prepare wooden elements. After this, you can safely proceed directly to assembling all the parts.
Preparing wood for installation
The easiest way to make a rack on a balcony or loggia with your own hands is from wood. For this purpose, chipboard, which is sensitive to moisture and temperature changes, is not used. It is easier and more reliable to use a laminated board, or pre-treated boards and beams.
The finished drawing is adjusted to size
Stages of preparatory work:
- According to the dimensions of the future rack, cut the materials.
- Clean the cut areas, remove burrs and polish the surfaces.
- Treat all exposed parts with a deep penetration antiseptic solution.
- Paint the wooden parts of the structure.
Where to begin
Before you start building a rack with your own hands, you need to carefully calculate everything, choose the right place and material. The shelving structure should be strong and the shelves should be wide and spacious to provide ample storage space. The cabinet must be stable; it is important to correctly calculate the load and, if it wobbles slightly, additionally secure it to the wall.
In no case should the rack block the natural light entering through the window, and its dimensions should correspond to the area of the balcony in order to leave enough space for movement. Fire safety rules should be observed, and if there are heaters on the balcony, then the wooden shelving should be placed away from it.
Before you start building a wooden shelving unit, you need to properly treat the wood so that it is not exposed to moisture or dryness. You also need to sand the wood very well and make sure it is dry before use. If you use unfinished material, the quality of the shelf fastenings may suffer and then you will have to start the work all over again.
Door arrangement
Closed shelving models have many advantages over open ones. At the same time, the organization of such storage systems requires more space for maneuvers, as well as the construction of beautiful and practical doors.
Three assembly options are usually considered:
- Conventional hinged doors, fastened using furniture hinges and opened using pre-installed handles.
- Sliding doors based on the principle of wardrobe doors - compartments. The most popular and practical option for modern balcony design. At the same time, a lot of space is saved, and the rack itself looks stylish and attractive.
- Combined designs, when open shelves alternate with doors. Most often, the lower and upper compartments are closed, and an open space is left in the middle for unhindered access to the items located there.
The option of opening doors using closers is not considered in our article, because this is quite expensive and impractical for infrequently used furniture groups.
shelves on the window for dishes and assorted displays:
This idea, as a rule, appeals to those who are fascinated by 2 solutions: (1) open shelves + (2) tableware in plain sight. If you have blind windows in your kitchen, feel free to implement this non-standard move. Here are 12 options for similar decor in real American homes:
displays for beautiful things: If you don’t want to limit yourself to just dishes or just plants, create an interesting composition on shelves suspended from a blind window. Check out some ideas for inspiration:
several windows in one line: If there are several windows “in a row” on one wall, try installing long shelves or combining several into a single structure. For example, like in these photos:
Racks for flowers and growing seedlings
Balcony shelving is often used for flower gardens and even mini-vegetable gardens. Despite the limited space, the practicality of this option is very high. The main conditions are maximum illumination and resistance to moisture. To do this, you can place rows of shelves along the parapet, as well as make the end parts of the balcony.
It is preferable to use painted wood or moisture-resistant boards, as well as plastic shelves that can withstand sufficient weight.
Material selection
The base material affects the quality, appearance and durability of the structure. Racks are made from the following raw materials.
- Made of wood. This environmentally resistant material does not emit foreign substances into the atmosphere. Also, thanks to their external aesthetic properties, wooden shelving will fit into any interior. Treatment of raw materials with antibacterial agents will help increase the wear resistance of a wooden structure. You can also varnish the finished structure.
- Made from metal profile. Racks made from metal profiles can support weights from 60 to 120 kg. Also, this design will last a very long time. To prevent the metal from rusting, it is treated with an anti-corrosion coating or galvanized. In addition, the price of the material is significantly lower than other options.
- Made from compressed wood. This material is used to make rack shelves. Such raw materials are cheap and easy to work with. Chipboard is suitable only for glazed balconies and loggias due to its instability to humidity and temperature changes.
- Made of plastic. This material is highly resistant to environmental influences. However, a plastic rack will not withstand heavy loads.
- From glass. Manufacturing glass shelving is quite expensive. But this solution gives the furniture a modern look. The material used is impact-resistant glass.
Photo ideas for design and placement of shelving
It’s easy to make a balcony rack with your own hands from available materials, for example, an old wardrobe or other furniture. After appropriate processing and reliable fastening of the elements to each other, such a design will withstand all the hardships of “street” use and become a practical element in the interior. The main points of using racks, as well as the stages of self-assembly, are discussed in the information provided.
DIY hanging shelf-shelf
A charming hanging shelf for the kitchen with your own hands will allow you to rationally use the space. It will look great in a colonial living room, a nautical-style children's room or a Mediterranean-style bathroom. Anyone can handle this kind of work, since you can make a shelf with your own hands in just a few simple steps.
how to make a shelf with your own hands. Master Class
Wood blanks are aligned both in shape and size.
Mark the locations for the holes and make them with a drill with a feather drill. To avoid problems in the future, the diameter of the drill is chosen larger than the diameter of the rope by which the bookcase will be suspended.
It is easier to mark using a template in the form of a 4x4 square cut out of paper. The template needs to be placed on the corner of the board and marked at the point of intersection of the diagonals of the square.
Paint the boards.
There are many options on how to make a shelf more interesting. You just need to show a little imagination, for example, paint it only from the ends.
Now the structure can be assembled. The rope is folded in half and, retreating approximately 30 cm, a knot is tied on each half. The ends are pulled through the holes on one side of the board and secured with another knot. The board thus becomes motionlessly fixed between two nodes. The process is repeated with each shelf, positioned in the required increments.
Do the same with the other side. The main thing is that the nodes on both sides are located at the same distance from each other.
The remaining free ends of the ropes are cut and unraveled to form tassels.
All that remains is to hang the finished bookcase on the wall.
This DIY shelf has several advantages:
- the design will be exclusive, you won’t find one like it anywhere else;
- You won’t have to spoil the wall with too many holes for hooks to hang so many shelves.
Preservation storage conditions
First, a little theory. The fact is that storing different types of preserves requires special preparation and storage conditions. Taking into account the fact that all recipe recommendations are followed during cooking, and the dishes (glass or metal jars) are sterilized and tightly closed, the following temperature requirements are imposed on canned food:
- fish – from 0°С to +15°С;
- meat – from 0°С to +20°С;
- mushroom – from 0°С to +15°С;
- vegetables (fermented and salted) – from 0°C to +25°C;
- fruits and berries – from 0°С to +25°С.
Temperature indicators for pickles and starters stored in barrels, others - from -1°C to +4°C. Therefore, on an insulated balcony it is recommended to keep only products in glass and metal containers specifically designed for preservation. The humidity in the room should not exceed 75%, and regular ventilation is also a mandatory requirement (which is easy to do on the balcony).
Homemade twists are the best snack for the New Year's table
In addition to temperature restrictions, storage periods must also be observed. For example, it is better to sell home-cooked meat and fish within the next year, while pickled gherkins or salted saffron milk caps will easily survive 3 years.
Seaming machine - an easy to use tool
Although new-fangled packaging for long-term storage of various products appears on the market every now and then, the best tableware remains glass jars and bottles made from a special type of glass that is resistant to high temperatures. The standard volume of cans is from 0.35 l to 1.2 l, but 2- and 3-liter containers are often used for pickling cucumbers or sealing semi-finished vegetable products. Products are sealed with tin lids using a seaming machine.
Household balcony heating cabinet
If the air temperature on the balcony still occasionally drops below 0°C and conditions do not allow storing glass jars on cabinet shelves, use a ready-made model - a factory-made thermal cabinet (thermal container, balcony cellar). It is an improved model of a village chest - a large box with compartments, which our ancestors installed in the entryway for storing preparations, cereals and vegetables.
Metal stationary thermal container
A modern storage facility is a large metal box (200-300 l) with a lid and power supply, well-insulated walls and a thermostat that allows you to control optimal temperature parameters - from +3°C to +10°C. Wires for heating are built into the walls of the container. Power consumption during operation is 170-240 W. The main advantage of the cellar is the ability to store preserved food even at forty-degree frosts.
The cost of the simplest models is from 5,000 rubles, more equipped modifications – up to 30,000 rubles.
For tools
There are many designs of racks for storing a variety of tools. There are classic and original options. You can make them yourself.
Necessary equipment and materials:
- plywood, beams, slats, boards;
- self-tapping screws, nails, screws;
- hammer, screwdriver;
- jigsaw, saw.
To assemble the easiest option it is enough:
- Prepare two narrow boards (up to 10 cm wide) for verticals and several for shelves.
- Grooves for various tools are cut in the horizontals. Select holes for screwdrivers and hammers.
- The shelves are nailed to the racks.
If the wall is easy to drill, then this option is also possible.
Here the tiers of shelving are screwed directly to the wall. To do this, holes are drilled in it into which dowels are recessed. Corners are screwed to the shelves, with which they are attached to the wall.
The final stage is finishing. This operation can be carried out in different ways. For example, paint the rack, sand it, and then cover it with drying oil or varnish, cover it with paper or other suitable material.
Preparation
Before installing storage systems, the pantry must be repaired: clean the space, carry out dry and wet cleaning, remove old wallpaper and flooring. If necessary, the walls of the storage room or attic are leveled and also put in order: painted or pasted over.
It is recommended to use a primer that contains antifungal impregnations.
Laminate, parquet or linoleum is laid on the floor. It is also worth equipping the pantry with ventilation and lighting, which will greatly facilitate the use of the room.
What material can be used?
One of the most affordable and durable materials for creating shelves in a pantry is wood. Boards made of natural wood (pine, larch), as well as chipboard, are fixed with metal fasteners. The heavier the items that will be stored in the pantry, the thicker the boards should be. For conservation, large equipment, construction tools and other heavy things, it is worth providing an additional stiffener.
If you make shelves in the pantry with your own hands, you can use what you have at hand - wooden pallets, old unnecessary furniture, plastic fruit boxes. Plywood is considered a budget option, but thin sheets are not suitable for heavy objects. Lightweight but durable plastic is suitable for storing books, clothes and bulk products. It is easy to care for, and the material is not afraid of moisture.
Metal racks are considered the most durable and do not require additional reinforcement. Modern products have a collapsible design, they are easy to rearrange and transport, and the material can easily withstand temperature changes
The photo shows shelving, drawers and wall shelves for a spacious pantry.
What is the best way to arrange shelves in a pantry?
The placement of shelves is primarily affected by the size of the utility room.
- A small pantry (about 2 meters) allows you to install shelves in only one row - linearly, along one wall. Sometimes structures are made rounded - this shape allows you to gain a few centimeters and use three walls.
- The angular arrangement in the form of the letter “L” is considered much more practical, but the storage area should exceed 2 meters. For maneuvers you need to leave a small passage, especially if the room is elongated and narrow.
- In a large utility room, it is optimal to place shelves in the shape of the letter “U”. In this case, it is necessary to calculate the depth of the structures so that there is room in the middle for movement.
The photo shows a pantry in which the shelves are functionally arranged in the shape of the letter “P”.
Deciding on the sizes
The most popular and practical form of shelves is straight. The length of the shelf is usually equal to the length of the wall. If the distance between opposite walls is 2 meters or less, then the shelf does not need additional support. Otherwise, the structure should be strengthened, especially if you plan to store seaming tools and tools.
The thicker the wooden shelf, the more fasteners it requires. Also, its strength is determined by the distance between the support posts: the more massive the structure, the smaller the gaps.
To make using the shelves convenient and safe, the heaviest items must be moved down. The width of the projections should decrease from bottom to top. The standard shelf width for canned food is 30 cm. The height depends on the size of the items.
For tools
There are many designs of racks for storing a variety of tools. There are classic and original options. You can make them yourself.
Necessary equipment and materials:
- plywood, beams, slats, boards;
- self-tapping screws, nails, screws;
- hammer, screwdriver;
- jigsaw, saw.
To assemble the easiest option it is enough:
- Prepare two narrow boards (up to 10 cm wide) for verticals and several for shelves.
- Grooves for various tools are cut in the horizontals. Select holes for screwdrivers and hammers.
- The shelves are nailed to the racks.
If the wall is easy to drill, then this option is also possible.
Here the tiers of shelving are screwed directly to the wall. To do this, holes are drilled in it into which dowels are recessed. Corners are screwed to the shelves, with which they are attached to the wall.
The final stage is finishing. This operation can be carried out in different ways. For example, paint the rack, sand it, and then cover it with drying oil or varnish, cover it with paper or other suitable material.